AWS Greengrass Nucleus Lite が Githubに公開されたので、どんなものか実際に試してみました。
この記事は2024/12/17時点の情報を元にしています。まだ出たばかりということもあり、説明やサンプルに間違っている部分がある可能性もありますので、常に最新のドキュメントも参照してください。
2024/12/18追記:
マネージメントコンソール上でRaspberry Pi用と書かれていますが、アーキテクチャが合えば使うことが可能でしたので、ビルド不要でインストールすることができました。
特徴
- Javaランタイムを必要としない設計で、既存のNucleusと比べて軽量であり、今まで利用できなかったデバイスでも利用が可能になる
- 5MB of RAM space for the nucleus runtime
- 5MB of storage (disk/FLASH)
- IPC(interprocess communicatio)に互換性あり
- まだ利用可能なパブリックコンポーネントは限られている
- 対応しているOSは現状Linuxのみ
今まで使おうと思っていたけど、デバイスの制約により利用できなかったユースケースでも利用可能となるかもしれませんね。
セットアップ (ビルド済みパッケージを利用)
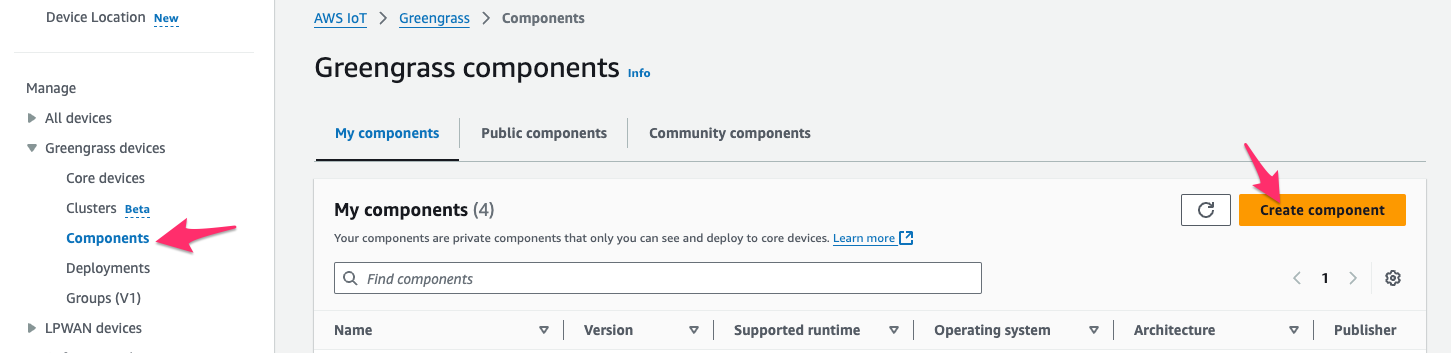
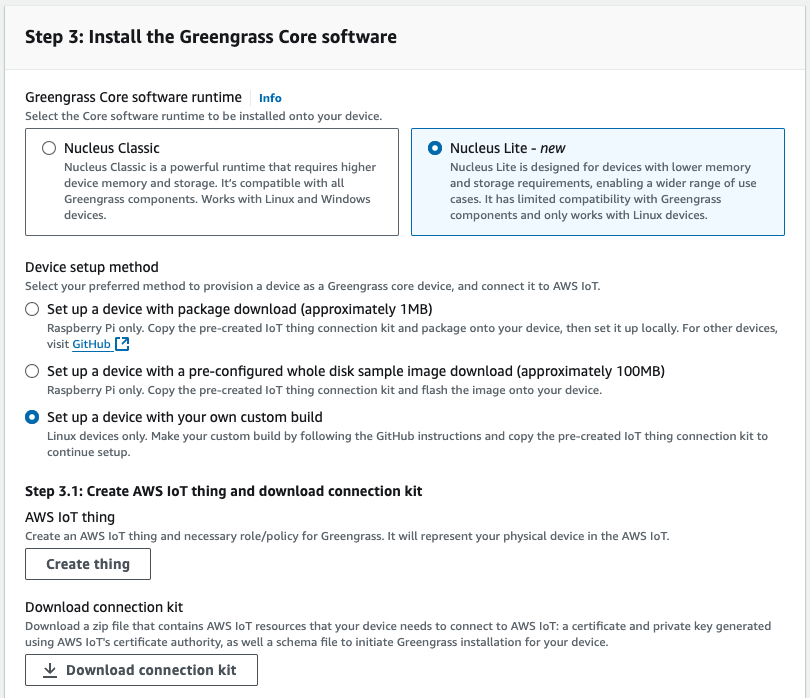
マネコンからGreengrass Coreを追加
Raspberry Pi専用とありますがこれを使います。
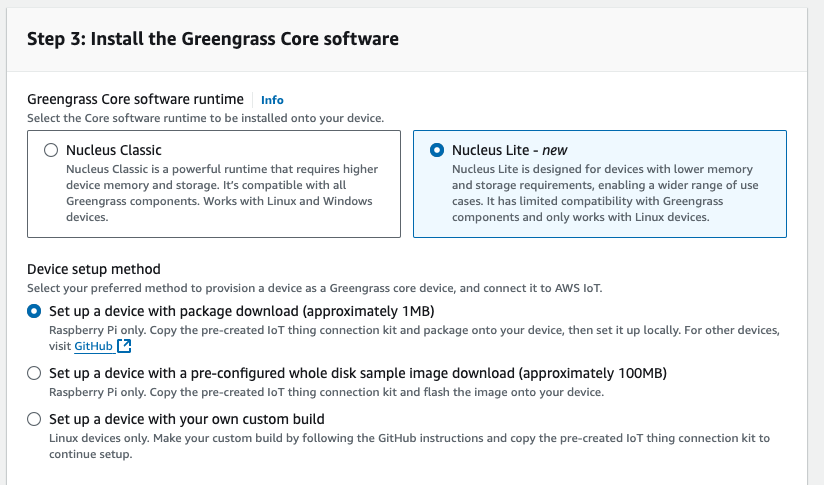
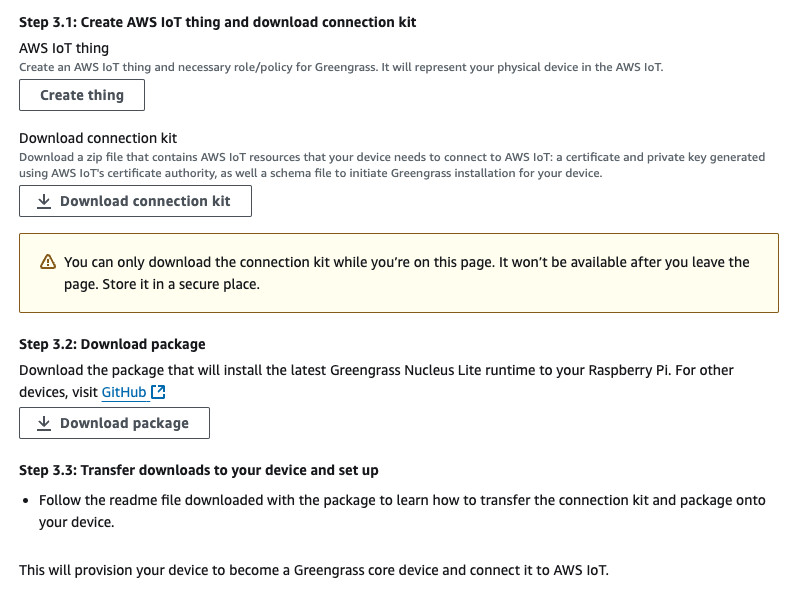
Create thing をクリックしてThingを作成し、Download connection kit、Download packege のボタンをクリックして、必要なファイルをダウンロードします。ダウンロードした2つのファイルを
デバイスにインストール
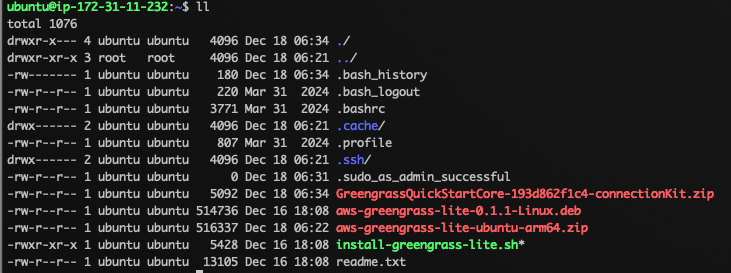
Ubuntu 24.04のEC2インスタンス(t4g.nano)で試しています。
先ほどダウンロードした2つのファイルをEC2にアップロードします。アップロードしたら aws-greengrass-lite-ubuntu-arm64.zip の方だけ展開します。
unzip aws-greengrass-lite-ubuntu-arm64.zip
以下の様に展開したファイルと、connection kitが存在しています。
インストールを実行
sudo ./install-greengrass-lite.sh
Greengrassを起動
sudo systemctl start greengrass-lite.target
ログを確認
sudo journalctl -f

Dec 18 06:51:06 ip-172-31-11-232 iotcored[3720]: D[core_mqtt] core_mqtt.c:1661: Received packet of type 90.
Dec 18 06:51:06 ip-172-31-11-232 iotcored[3720]: D[core_mqtt] core_mqtt_serializer.c:1333: Packet identifier 3.
Dec 18 06:51:06 ip-172-31-11-232 iotcored[3720]: D[core_mqtt] core_mqtt_serializer.c:1273: Topic filter 0 accepted, max QoS 1.
Dec 18 06:51:06 ip-172-31-11-232 iotcored[3720]: D[iotcored] mqtt.c:652: Received suback id 3.
Dec 18 06:51:06 ip-172-31-11-232 iotcored[3720]: D[core_mqtt] core_mqtt_serializer.c:484: Encoded size for length 2 is 1 bytes.
Dec 18 06:51:06 ip-172-31-11-232 iotcored[3720]: D[core_mqtt] core_mqtt.c:1661: Received packet of type b0.
Dec 18 06:51:06 ip-172-31-11-232 iotcored[3720]: D[core_mqtt] core_mqtt_serializer.c:1524: Packet identifier 6.
Dec 18 06:51:06 ip-172-31-11-232 iotcored[3720]: D[iotcored] mqtt.c:659: Received unsuback id 6.
Dec 18 06:51:10 ip-172-31-11-232 sudo[3737]:   ubuntu : TTY=pts/0 ; PWD=/home/ubuntu ; USER=root ; COMMAND=/usr/bin/journalctl -f
Dec 18 06:51:10 ip-172-31-11-232 sudo[3737]: pam_unix(sudo:session): session opened for user root(uid=0) by ubuntu(uid=1000)
Dec 18 06:51:34 ip-172-31-11-232 iotcored[3720]: D[iotcored] mqtt.c:382: Sending pingreq.
Dec 18 06:51:34 ip-172-31-11-232 iotcored[3720]: D[core_mqtt] core_mqtt.c:3238: MQTT PINGREQ packet size is 2.
Dec 18 06:51:34 ip-172-31-11-232 iotcored[3720]: D[core_mqtt] core_mqtt.c:913: sendBuffer: Bytes Sent=2, Bytes Remaining=0
Dec 18 06:51:34 ip-172-31-11-232 iotcored[3720]: D[core_mqtt] core_mqtt.c:3287: Sent 2 bytes of PINGREQ packet.
Dec 18 06:51:34 ip-172-31-11-232 iotcored[3720]: D[core_mqtt] core_mqtt_serializer.c:484: Encoded size for length 0 is 1 bytes.
Dec 18 06:51:34 ip-172-31-11-232 iotcored[3720]: D[core_mqtt] core_mqtt.c:1661: Received packet of type d0.
Dec 18 06:51:34 ip-172-31-11-232 iotcored[3720]: D[iotcored] mqtt.c:666: Received pingresp.
これでインストールが終わりました。
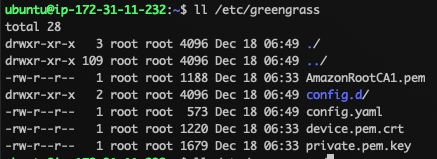
ちなみに、Greengrassのconfigファイルは /etc/greengrass/ にあります。同じディレクトリに証明書などもコピーされてました。
コンポーネントのデプロイ
以下の様なartifact(コンポーネントの実行ファイル)を hello_world.py という名前で作成します。
import sys
import time

message = "Hello, %s!" % sys.argv[1]

# Print the message to stdout, which Greengrass saves in a log file.
while True:
    print(message)
    time.sleep(1)
このファイルをS3にアップロードします。
マネージメントコンソールからコンポーネントの登録を行います。
登録をする際のrecipeは以下の内容で登録します。ArtifactsのURIは自分のS3バケットに修正します。
{
    "RecipeFormatVersion": "2020-01-25",
    "ComponentName": "com.example.HelloLiteWorld",
    "ComponentVersion": "1.0.0",
    "ComponentDescription": "My first AWS IoT Greengrass Lite component.",
    "ComponentPublisher": "MyComponent",
    "ComponentConfiguration": {
      "DefaultConfiguration": {
        "Message": "world"
      }
    },
    "Manifests": [
      {
        "Platform": {
          "os": "linux",
          "runtime": "aws_nucleus_lite"
        },
        "Lifecycle": {
          "run": "python3 -u {artifacts:path}/hello_world.py {configuration:/Message}"
        },
        "Artifacts": [
            {
                "URI": "s3://自分のs3バケット名/hello_world.py"
            }
        ]
      }
    ]
  }
登録されたコンポーネントからDeployを選択し、Create new deployment からデプロイ先のThingGroupを選択して、デプロイを行います。
Thing Groupに対してデプロイを行う必要があるため、事前にThing Groupを作成し、登録したGreengrass Coreを追加しておきます。

デプロイのログがいっぱい出力されますが、以下の様に表示されれば成功です。
Dec 18 07:49:40 ip-172-31-11-232 recipe-runner[4780]: Hello, world!
Dec 18 07:49:41 ip-172-31-11-232 recipe-runner[4780]: Hello, world!
Dec 18 07:49:42 ip-172-31-11-232 recipe-runner[4780]: Hello, world!
Dec 18 07:49:43 ip-172-31-11-232 recipe-runner[4780]: Hello, world!
Dec 18 07:49:44 ip-172-31-11-232 recipe-runner[4780]: Hello, world!
セットアップ (自分でソースコードからビルドする場合)
マネコンからGreengrass Coreを追加
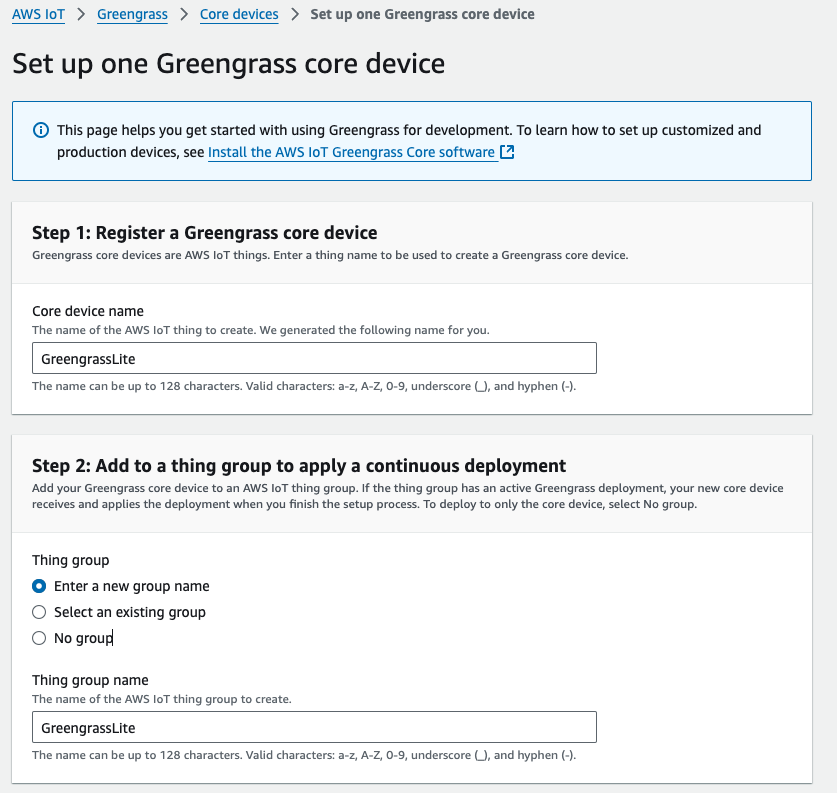
ラズパイ以外はソースコードからビルドする必要があるみたいです。Create thing でThingを作成し、Download connection kit で証明書などをダウンロードします。
ダウンロードキットには以下のファイルが含まれてました
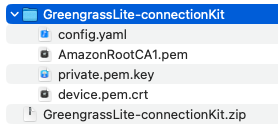
この時点では、マネコン上には作成したGreengrass Coreはありませんでした。
デバイスにインストール
Ubuntu 24.04のEC2インスタンス(t4g.nano)で試しています。
基本的にはGithubの ビルドガイド と セットアップガイド を参考にしています。
ビルドに必要なライブラリのインストール
sudo apt update
sudo apt install -y libssl-dev libcurl4-openssl-dev libsqlite3-dev libyaml-dev   libsystemd-dev liburiparser-dev uuid-dev libevent-dev libzip-dev cgroup-tools
sudo apt install -y build-essential pkg-config cmake git curl unzip
ユーザーの追加
sudo groupadd ggcore
sudo useradd -Ng ggcore ggcore
sudo groupadd gg_component
sudo useradd -Ng gg_component gg_component
証明書、設定ファイルの保存先ディレクトリ作成
sudo mkdir /ggcredentials
sudo chown -R ggcore:ggcore /ggcredentials
sudo mkdir /var/lib/greengrass
sudo chown ggcore:ggcore /var/lib/greengrass
ソースコードのビルド
オプションで指定してログレベルを変えてます -D GGL_LOG_LEVEL=DEBUG
git clone https://github.com/aws-greengrass/aws-greengrass-lite.git
cd aws-greengrass-lite/
cmake -B build -D CMAKE_BUILD_TYPE=MinSizeRel -D GGL_LOG_LEVEL=DEBUG
cmake -B build -D CMAKE_INSTALL_PREFIX=/usr/local
make -C build -j$(nproc)
sudo make -C build install
設定ファイルの作成
cp docs/examples/sample_nucleus_config.yml  ./config.yaml
vim config.yaml
以下の様な中身になっているので、自分の環境に合わせて修正します。 iotCredEndpoint、iotDataEndpoint、thingName、Region は GreengrassLite-connectionKit.zip の中の config.yaml を参考に修正します。privateKeyPath、certificateFilePath、rootCaPathは先の手順で作成したディレクトリ /ggcredentials を指定します。
rootPathは現状 /var/lib/greengrass から変更できない様です。
---
system:
  privateKeyPath: "/var/lib/greengrass/device.key"
  certificateFilePath: "/var/lib/greengrass/device.pem"
  rootCaPath: "/var/lib/greengrass/AmazonRootCA1.pem"
  rootPath: "/var/lib/greengrass"
  thingName: "ExampleGGDevice"
services:
  aws.greengrass.NucleusLite:
    componentType: "NUCLEUS"
    configuration:
      awsRegion: "us-west-2"
      iotCredEndpoint: "<CONFIGURE_THIS>"
      iotDataEndpoint: "<CONFIGURE_THIS>"
      iotRoleAlias: "GreengrassV2TokenExchangeRoleAlias"
      runWithDefault:
        posixUser: "gg_component:gg_component"
      greengrassDataPlanePort: "8443"
      platformOverride: {}
修正後のファイル(東京リージョン)
---
system:
  privateKeyPath: "/ggcredentials/device.key"
  certificateFilePath: "/ggcredentials/device.pem"
  rootCaPath: "/ggcredentials/AmazonRootCA1.pem"
  rootPath: "/var/lib/greengrass"
  thingName: "GreengrassLite"
services:
  aws.greengrass.NucleusLite:
    componentType: "NUCLEUS"
    configuration:
      awsRegion: "ap-northeast-1"
      iotCredEndpoint: "xxxxxxxx.credentials.iot.ap-northeast-1.amazonaws.com"
      iotDataEndpoint: "xxxxxx-ats.iot.ap-northeast-1.amazonaws.com"
      iotRoleAlias: "GreengrassV2TokenExchangeCoreDeviceRoleAlias"
      runWithDefault:
        posixUser: "gg_component:gg_component"
      greengrassDataPlanePort: "8443"
      platformOverride: {}
config.yamlのコピー
sudo mkdir -p /etc/greengrass
sudo chown ggcore:ggcore /etc/greengrass
sudo cp config.yaml /etc/greengrass/
GreengrassLite-connectionKit.zip の中の証明書などをコピー
unzip GreengrassLite-connectionKit.zip

sudo cp device.pem.crt /ggcredentials/device.pem
sudo cp private.pem.key /ggcredentials/device.key
sudo cp AmazonRootCA1.pem /ggcredentials/AmazonRootCA1.pem
Greengrassを実行(aws-greengrass-liteのディレクトリで実行)
sudo ./misc/run_nucleus
ログを確認
Java版と違い、ログは journalctl コマンドを使って確認します。
journalctl -f -t ggdeploymentd

Dec 17 06:31:49 ip-172-31-15-47 ggdeploymentd[10119]: D[core-bus] server.c:340: Listening on socket /run/greengrass/gg_deployment.
Dec 17 06:31:49 ip-172-31-15-47 ggdeploymentd[10119]: D[ggl-socket] socket_server.c:331: Attempting socket activation on gg_deployment
Dec 17 06:31:49 ip-172-31-15-47 ggdeploymentd[10119]: D[ggdeploymentd] deployment_handler.c:3141: Starting deployment processing thread.
Dec 17 06:31:49 ip-172-31-15-47 ggdeploymentd[10119]: D[ggdeploymentd] bootstrap_manager.c:228: Searching config for any in progress deployment.
Dec 17 06:31:49 ip-172-31-15-47 ggdeploymentd[10119]: W[core-bus] client_common.c:141: Server responded with an error.
Dec 17 06:31:49 ip-172-31-15-47 ggdeploymentd[10119]: D[ggdeploymentd] deployment_handler.c:3049: No deployments previously in progress detected.
Dec 17 06:31:49 ip-172-31-15-47 ggdeploymentd[10119]: D[ggl-socket] socket_handle.c:101: Registered fd 6 at index 0, generation 0 with handle 1.
Dec 17 06:31:49 ip-172-31-15-47 ggdeploymentd[10119]: D[ggl-socket] socket_handle.c:101: Registered fd 8 at index 1, generation 0 with handle 2.
Dec 17 06:31:49 ip-172-31-15-47 ggdeploymentd[10119]: D[core-bus] client_subscribe.c:276: Handling incoming subscription response.
Dec 17 06:31:49 ip-172-31-15-47 ggdeploymentd[10119]: D[ggl-socket] socket_handle.c:148: Releasing fd 8 at index 1, generation 0.
Greengrassの起動・停止
Grengrassのプロセスは以下のコマンドで、操作します
# 停止
sudo systemctl stop greengrass-lite.target

# 起動
sudo systemctl start greengrass-lite.target

# 再起動
sudo systemctl restart greengrass-lite.target
サンプルのコンポーネントをローカルデプロイ
mkdir -p ~/greengrassv2lite/{recipes,artifacts}
recipeを作成
Recipeは今までのJava版と少し仕様が異なる様です。詳しくはこちらのドキュメントを。
vim ~/greengrassv2lite/recipes/com.example.HelloLiteWorld-1.0.0.json
中身
{
  "RecipeFormatVersion": "2020-01-25",
  "ComponentName": "com.example.HelloLiteWorld",
  "ComponentVersion": "1.0.0",
  "ComponentDescription": "My first AWS IoT Greengrass Lite component.",
  "ComponentPublisher": "MyComponent",
  "ComponentConfiguration": {
    "DefaultConfiguration": {
      "Message": "world"
    }
  },
  "Manifests": [
    {
      "Platform": {
        "os": "linux",
	    "runtime": "aws_nucleus_lite"
      },
      "Lifecycle": {
        "run": "python3 -u {artifacts:path}/hello_world.py {configuration:/Message}"
      }
    }
  ]
}
Artifactを作成
mkdir -p ~/greengrassv2lite/artifacts/com.example.HelloLiteWorld/1.0.0
vim ~/greengrassv2lite/artifacts/com.example.HelloLiteWorld/1.0.0/hello_world.py
中身
import sys
import time

message = "Hello, %s!" % sys.argv[1]

# Print the message to stdout, which Greengrass saves in a log file.
while True:
    print(message)
    time.sleep(1)
コンポーネントをデプロイ
aws-greengrass-liteのディレクトリで実行
./build/bin/ggl-cli deploy --recipe-dir ~/greengrassv2lite/recipes \
--artifacts-dir ~/greengrassv2lite/artifacts \
--add-component com.example.HelloLiteWorld=1.0.0
ログを確認
journalctl -f
Dec 17 06:34:24 ip-172-31-15-47 recipe-runner[10021]: Hello, world!
Dec 17 06:34:25 ip-172-31-15-47 recipe-runner[10021]: Hello, world!
Dec 17 06:34:26 ip-172-31-15-47 recipe-runner[10021]: Hello, world!
コンポーネントが実行できていますね。
コンポーネントを削除
現状はコマンドでの削除には未対応。
ワークアラウンドで、コンポーネント用のサービスを消す方法があります。以下のコマンドで調べます。
systemctl list-unit-files | grep ggl
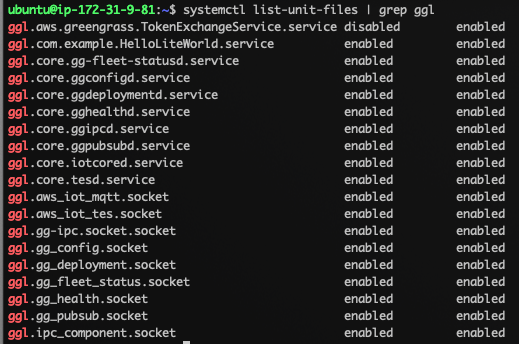
デプロイし他コンポーネントは ggl.com.example.HelloLiteWorld.service とわかりました。このサービスを無効にします。
sudo systemctl stop  ggl.com.example.HelloLiteWorld.service
sudo systemctl disable ggl.com.example.HelloLiteWorld.service
これで削除できました。Greengrassを再起動しても起動されません。
その他メモ
Liteは複数のプロセスを実行しており、各プロセスがそれぞれの機能を持つ
gg_comp+   10019  0.0  0.3   2380  1408 ?        Ss   06:27   0:00 sh
gg_comp+   10021  0.1  1.2  17616  5120 ?        S    06:27   0:01  \_ python3 -u /var/lib/greengrass/packages/artifacts/com.example.HelloLiteWorld/1.0.0//hello_world.py world
ggcore     10106  0.0  0.4   5124  2048 ?        Ss   06:31   0:00 /usr/local/bin/ggconfigd
root       10107  0.0  0.6  14192  2816 ?        Ssl  06:31   0:00 /usr/local/bin/gghealthd
ggcore     10108  0.0  0.4  22540  2048 ?        Ssl  06:31   0:00 /usr/local/bin/ggipcd
ggcore     10110  0.0  0.3   2404  1280 ?        Ss   06:31   0:00 /usr/local/bin/ggpubsubd
ggcore     10111  0.0  0.6 163644  2816 ?        Ssl  06:31   0:00 /usr/local/bin/iotcored
ggcore     10112  0.0  0.3  18868  1408 ?        Ssl  06:31   0:00 /usr/local/bin/gg-fleet-statusd
ggcore     10118  0.0  0.6  29824  2944 ?        Ssl  06:31   0:00 /usr/local/bin/tesd
root       10119  0.0  0.6  47920  2944 ?        Ssl  06:31   0:00 /usr/local/bin/ggdeploymentd
現状の制限