バイクも電子制御が高度化しており、しばらく前からバイクにも診断用にOBD2のコネクタが装備されている車種が増えてきています。(新型は2020年12月から、継続生産車は2022年4月から義務化らしい)
そんなわけで、先日乗り換えたZ900RSにも搭載されており、これを試してみたいなと思いました。
注意:この記事で紹介している内容は、メーカーが保証している作業ではありません。場合によっては故障の原因となります。参考にする場合はすべて自己責任で作業してください。
シートを外すと赤いカプラーがフレームに固定されています。

車のOBD2コネクタとは形状が違い、6ピンのカプラーということもあり、汎用的なOBD2ケーブルは直接繋げられないので、キタコが出している変換コネクタを使います。(ホンダ車用と書かれてますが、Z900RSはこのタイプでした)
OBDのデータを読み出すなら、Pythonなどのライブラリもあるので、簡単に試せるのですが、せっかくなのでコネクテッドバイクとしての構成も考え、AWS IoT FleetWiseを使ってデータの収集をしてみたいと思います。
AWS IoT FleetWiseを実行するデバイスはLinuxベースである必要があるため、家に転がってたRaspberry Pi 3を使うことにしました。OBD2のコネクタからCAN Busに接続できるので、Raspberry Pi用のCAN BUS Hatを使い、OBD2のコネクタに繋いで接続します。
ネットワークも必要なので、これまた家に転がっていたSoracomのSIMとドングルを使って直接通信できるようにしました。
今回使ったのは3G向けのSIMですが、今後停波が予定されているので、この辺のデバイスも新しく揃えないと。。。
最終的にこんな感じのデバイスとなりました。
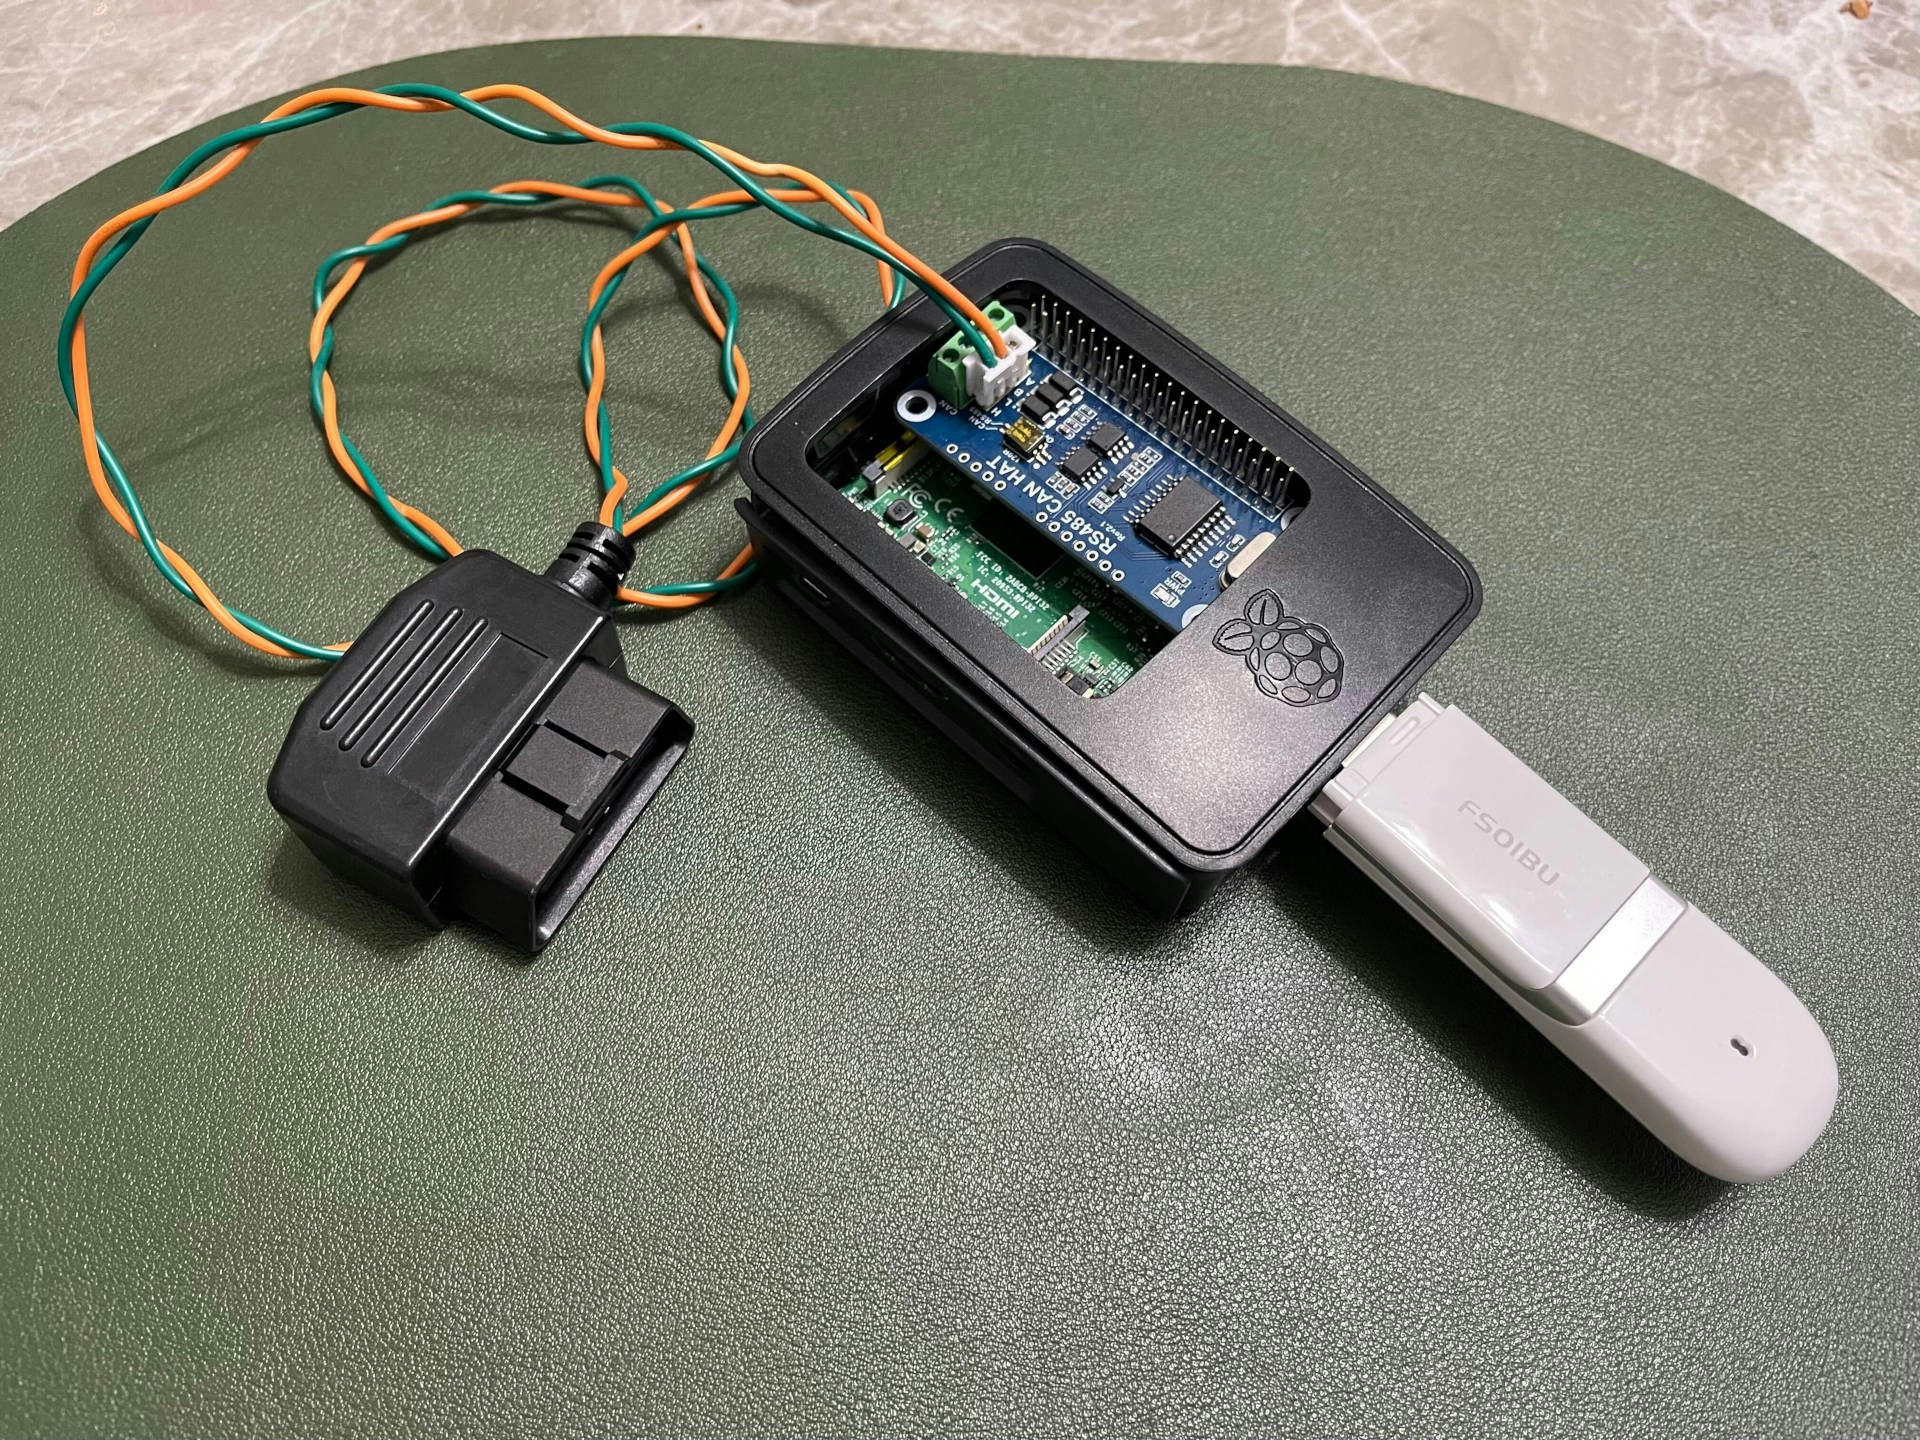
電源はOBD2コネクター経由でも取れるのですが、12vであるため降圧する必要があり、めんどくさかったのでモバイルバッテリーを繋いで試しました。
実際に走行してみて収集できたデータデータをGrafanaで可視化してみるとこのようなグラフが見られました。
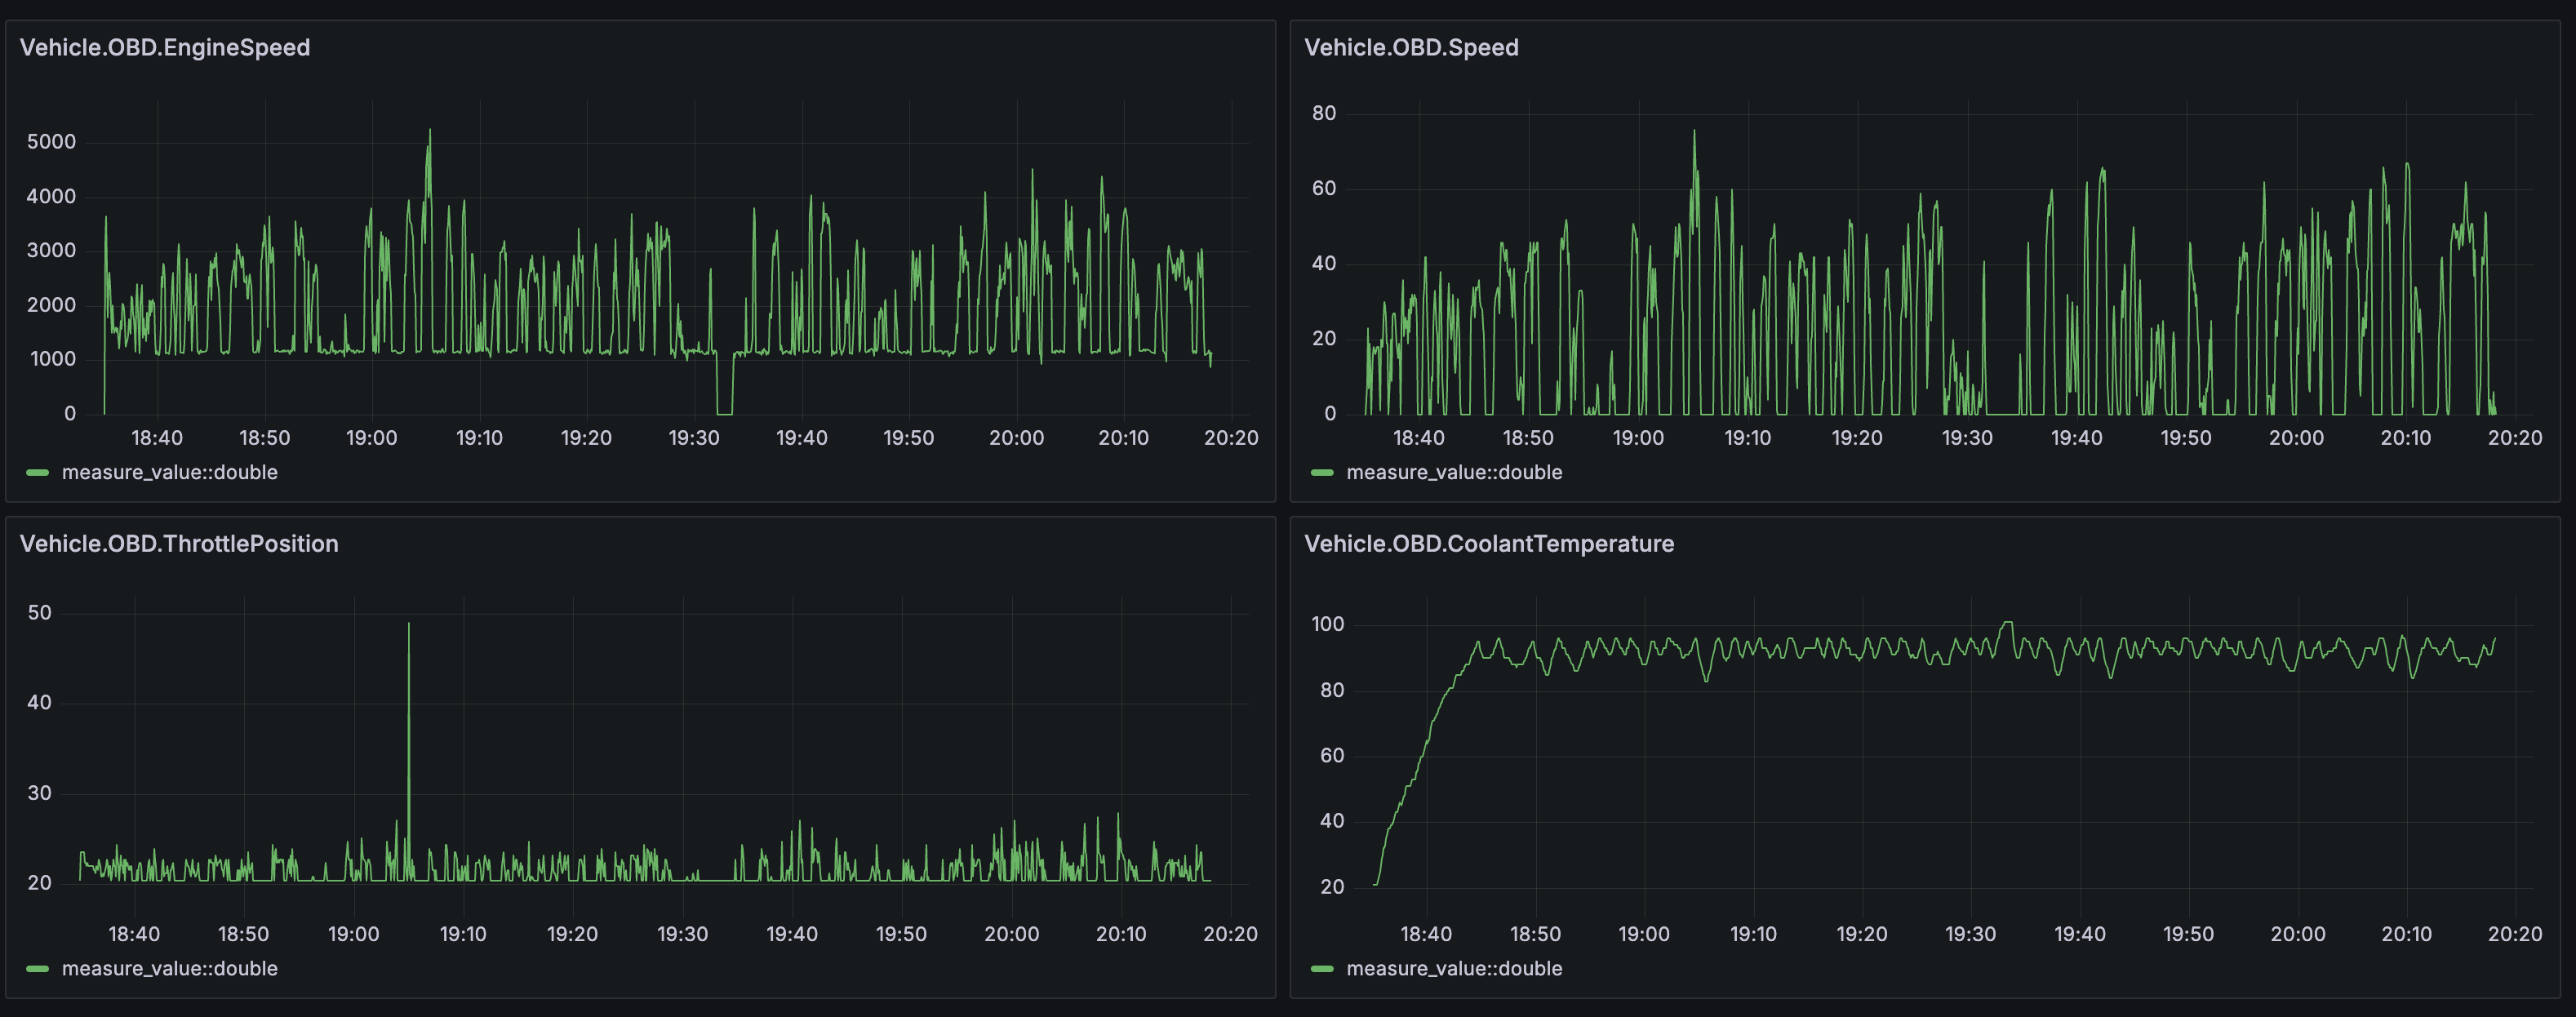
取れるかなと思ったシグナルの内、エンジン回転数、速度、水温、スロットルポジションだけが取れてました。OBDのシグナルのIDは、各社独自の値を使ってたりするので、AWS IoT FleetWiseが用意している標準の設定だと合わないことがあります。メーカーから公開されていれば、その情報をAWS IoT FleetWIseに登録すれば、正しく取れるようになるはず。
実走で発生した通信量はSoracomのコンソールから確認するとこんな感じ。
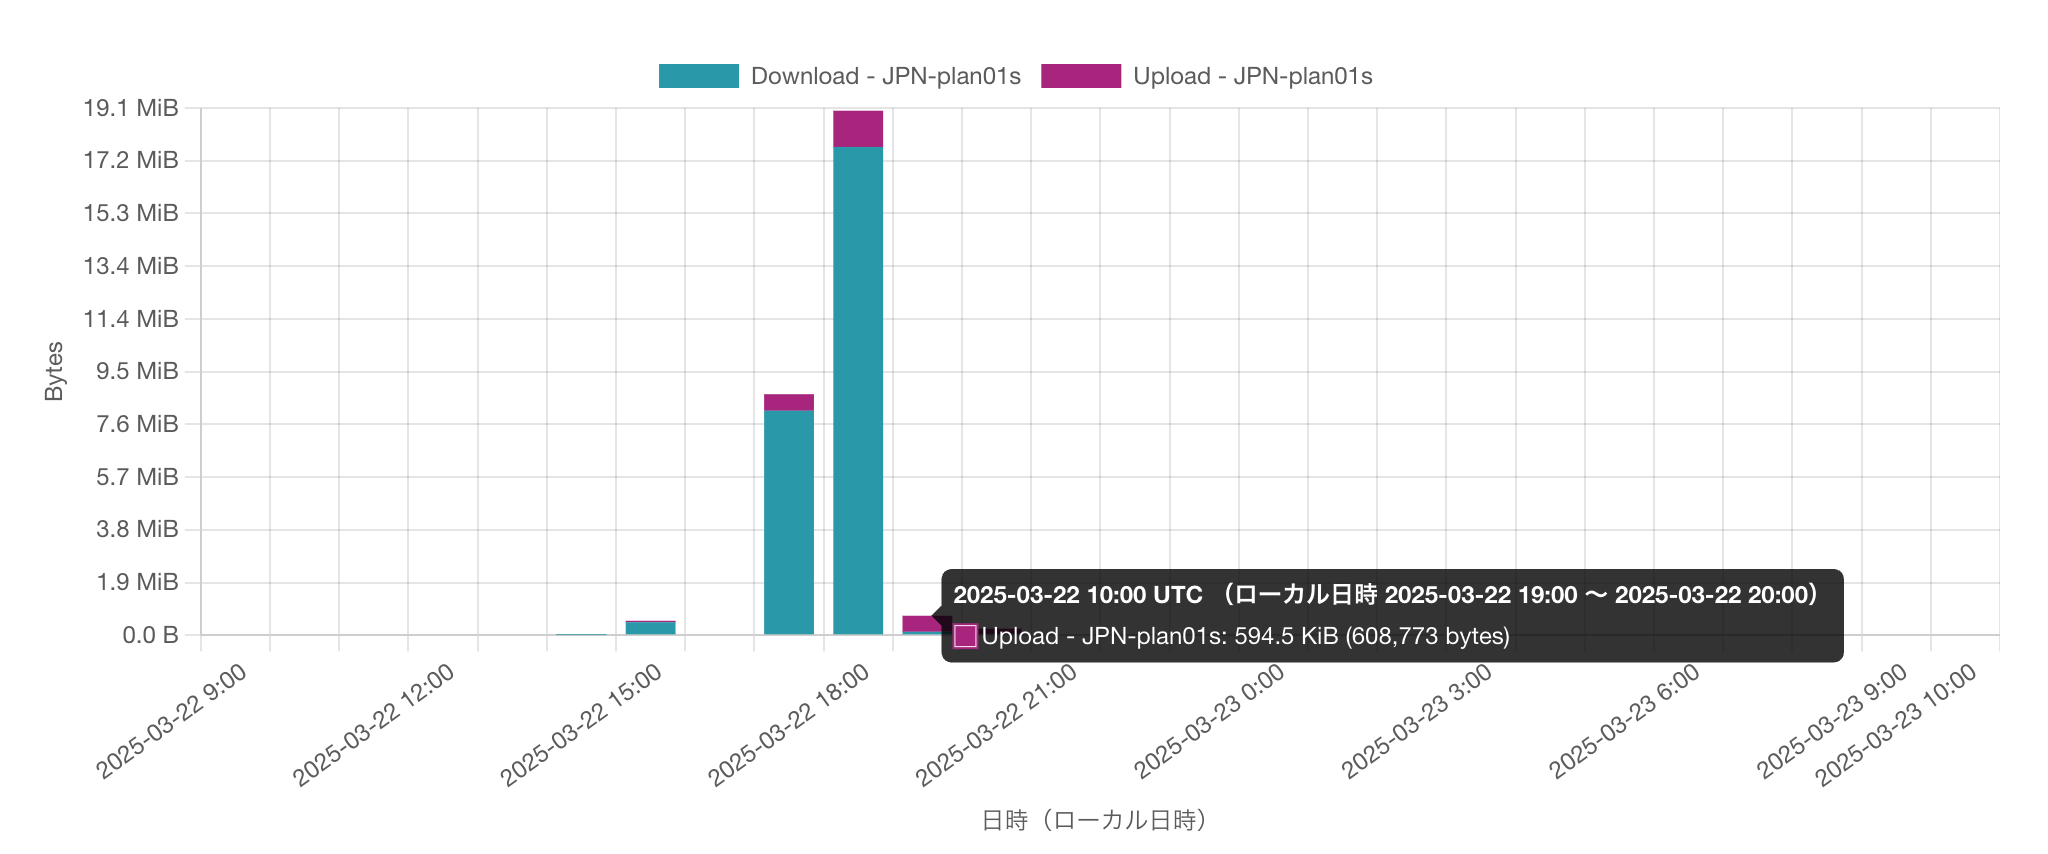
17時〜19時の間はかなり下りの通信が発生していますが、これはリモートからSSHしたくてAWS IoT GreengrassのSecure TunnelingのデプロイとかをSIM通信を有効にした後、実行してしまったから。
AWS IoT FleetWiseの通信部分は、19時の時間だけ見ると、上りで 594 KiB、下りで 129 KiB でした。
今回は、4種類のシグナルを1秒おきに収集したシグナルを10秒間隔で送信するキャンペーンをAWS IoT FleetWiseで設定したので、そこそこ高頻度なデータ収集となってます。
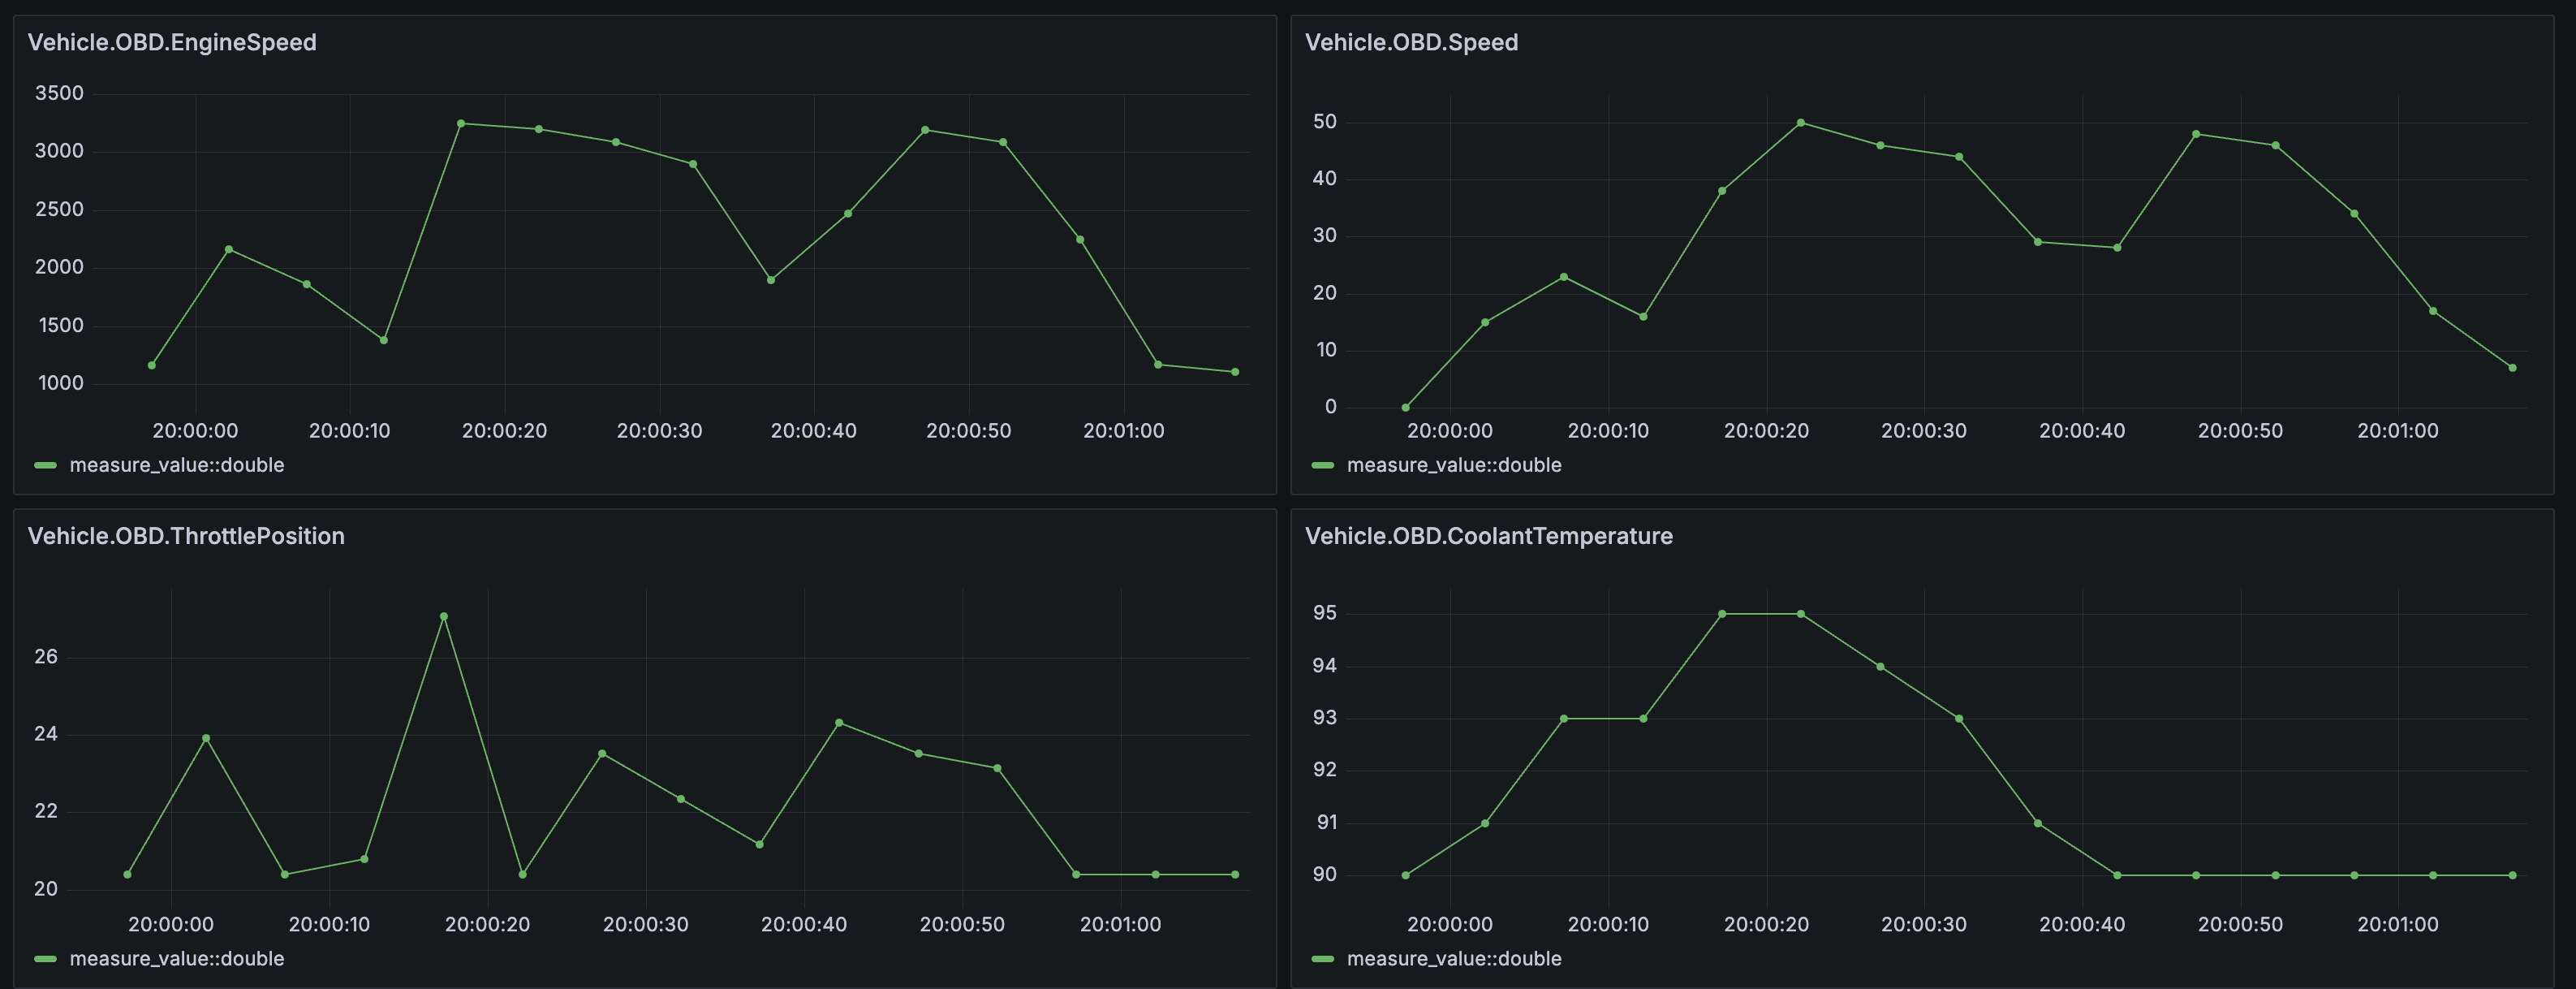
こんな感じで、もっと細かくデータを見ることもできます。
最近はバイクのアクティビティーを記録するアプリもあり、私も使っています。ただ、GPSから想定した速度しか記録できないので、このように直接バイクからデータを取れると、より詳細な情報が見られるようになり、面白そうだなと思いました。
以降では、AWS IoT FleetWiseのセットアップや、キャンペーンの設定を行った際の手順を紹介しています。
AWS IoT FleetWise agentの準備
この手順で用意されているCloudFormationのテンプレートを使ってインスタンスを起動します。
https://github.com/aws/aws-iot-fleetwise-edge/blob/main/docs/rpi-tutorial/raspberry-pi-tutorial.md#step-2-launch-your-development-machine
起動されたインスタンスの情報
uname -a

Linux ip-172-31-35-230 5.15.0-1075-aws #82~20.04.1-Ubuntu SMP Thu Dec 19 05:23:06 UTC 2024 aarch64 aarch64 aarch64 GNU/Linux
ビルド
git clone https://github.com/aws/aws-iot-fleetwise-edge.git ~/aws-iot-fleetwise-edge

cd ~/aws-iot-fleetwise-edge \
&& sudo -H ./tools/install-deps-native.sh

./tools/build-fwe-native.sh
必要な情報をプロビジョニング
実行する前にAWSのクレデンシャルが必要です。REGIONとVEHICLE_NAME 自分の環境に合わせます。
REGION=us-east-1
VEHICLE_NAME=z900rs

mkdir -p ~/aws-iot-fleetwise-deploy \
&& cd ~/aws-iot-fleetwise-deploy \
&& cp -r ~/aws-iot-fleetwise-edge/tools . \
&& mkdir -p build \
&& cp ~/aws-iot-fleetwise-edge/build/aws-iot-fleetwise-edge build \
&& mkdir -p config \
&& cd config \
&& ../tools/provision.sh \
   --region $REGION \
   --vehicle-name $VEHICLE_NAME \
   --certificate-pem-outfile certificate.pem \
   --private-key-outfile private-key.key \
   --endpoint-url-outfile endpoint.txt \
   --vehicle-name-outfile vehicle-name.txt \
&& ../tools/configure-fwe.sh \
   --input-config-file ~/aws-iot-fleetwise-edge/configuration/static-config.json \
   --output-config-file config-0.json \
   --log-color Yes \
   --vehicle-name `cat vehicle-name.txt` \
   --endpoint-url `cat endpoint.txt` \
   --can-bus0 can0 \
&& cd .. \
&& zip -r aws-iot-fleetwise-deploy.zip .
SCPでローカルに ~/aws-iot-fleetwise-deploy/aws-iot-fleetwise-deploy.zip をダウンロードします。
Raspberry Piのセットアップ
使ったのは、Raspberry Pi 3、Ubuntu Server 20.04.5 LTS (64bit)のOS
uname -a
Linux ubuntu 5.4.0-1122-raspi #134-Ubuntu SMP PREEMPT Fri Jan 17 12:48:32 UTC 2025 aarch64 aarch64 aarch64 GNU/Linux
アップデート
sudo apt update \
&& sudo apt upgrade -y \
&& sudo apt install -y unzip
CAN Hatの設定
利用している Can Hatはこちらのものですので、サイトの手順を参考に必要な設定を行います。
sudo vi /boot/config.txt
以下を追記
dtparam=spi=on
dtoverlay=mcp2515-can0,oscillator=12000000,interrupt=25,spimaxfrequency=2000000
sudo reboot で再起動
FleetWise agentをインストール
SCPでダウンロードした aws-iot-fleetwise-deploy.zip をラズパイにSCPでコピーします。
mkdir -p ~/aws-iot-fleetwise-deploy && cd ~/aws-iot-fleetwise-deploy \
&& unzip -o ~/aws-iot-fleetwise-deploy.zip \
&& sudo mkdir -p /etc/aws-iot-fleetwise \
&& sudo cp config/* /etc/aws-iot-fleetwise \
&& sudo ./tools/install-fwe.sh

sudo -H ~/aws-iot-fleetwise-deploy/tools/install-socketcan.sh
CANを有効にするため /usr/local/bin/setup-socketcan.sh へ以下を追記
ip link set up can0 txqueuelen 1000 type can bitrate 500000 restart-ms 100
サービスを再起動
sudo systemctl restart setup-socketcan
sudo systemctl restart fwe@0
FleetWise agentのログを確認
sudo journalctl -fu fwe@0 --output=cat

[Thread: 8288] [2025-03-22T03:46:27.984Z] [WARN ] [AwsBootstrap.cpp:52] [LogStream()]: [FileSystemUtils: Home dir not stored in environment, trying to fetch manually from the OS.]
[Thread: 8288] [2025-03-22T03:46:28.033Z] [INFO ] [IoTFleetWiseEngine.cpp:390] [connect()]: [Maximum AWS SDK Heap Memory Bytes has been configured:10000000]
[Thread: 8288] [2025-03-22T03:46:28.033Z] [INFO ] [IoTFleetWiseEngine.cpp:420] [connect()]: [ConnectionType is iotCore]
[Thread: 8288] [2025-03-22T03:46:28.035Z] [INFO ] [AwsIotConnectivityModule.cpp:184] [createMqttClient()]: [Creating MQTT client]
[Thread: 8289] [2025-03-22T03:46:28.096Z] [INFO ] [AwsIotConnectivityModule.cpp:299] [operator()()]: [Attempting MQTT connection]
[Thread: 8288] [2025-03-22T03:46:28.096Z] [INFO ] [CollectionSchemeManager.cpp:72] [start()]: [Thread started]
[Thread: 8288] [2025-03-22T03:46:28.097Z] [INFO ] [IoTFleetWiseEngine.cpp:1689] [connect()]: [Engine Connected]
[Thread: 8296] [2025-03-22T03:46:28.097Z] [INFO ] [Persistency.cpp:61] [retrieve()]: [Retrieved a CollectionSchemeList of size zero]
[Thread: 8296] [2025-03-22T03:46:28.097Z] [INFO ] [Persistency.cpp:61] [retrieve()]: [Retrieved a DecoderManifest of size zero]
Started successfully
以上で、デバイス側の準備ができました。
クラウドのリソースを作成
クラウドのリソースを作成するので、FleetWise agentをビルドした時に使ったEC2インスタンスから実行します。githubのリポジトリに含まれていたサンプル値をいくつか利用しています。
cd ~/aws-iot-fleetwise-edge/tools/cloud
Timestream DBの作成
aws timestream-write create-database --database-name BikeDatabase
aws timestream-write create-table --database-name BikeDatabase --table-name BikeTable
Signal catalogの作成
SIGNAL_CATALOG_NAME=obd-signals

aws iotfleetwise create-signal-catalog \
--name $SIGNAL_CATALOG_NAME \
--nodes file://vehicle-node.json

aws iotfleetwise update-signal-catalog \
--name $SIGNAL_CATALOG_NAME \
--nodes-to-update file://obd-nodes.json
Model Manifestの作成
SIGNAL_CATALOG_ARN=`aws iotfleetwise get-signal-catalog --name $SIGNAL_CATALOG_NAME --query "arn" --output text`
MODEL_NAME=z900rs-2025
MODEL_MANIFEST=$MODEL_NAME-manifest
このモデルが持つSignalの一覧を作成。(Signal catalogからめぼしいものを指定。が、実際にはこの中から4種類しか取れなかった)
cat << EOF > ./obd-model-nodes.json
[
    "Vehicle.OBD.CoolantTemperature",
    "Vehicle.OBD.EngineCoolantTemperature",
    "Vehicle.OBD.OilTemperature",
    "Vehicle.OBD.EngineSpeed",
    "Vehicle.OBD.Speed",
    "Vehicle.OBD.ThrottlePosition",
    "Vehicle.OBD.FuelLevel",
    "Vehicle.OBD.DemandEngineTorque",
    "Vehicle.OBD.Odometer",
    "Vehicle.OBD.ControlModuleVoltage"
]
EOF
Model manifestを作成して有効化
aws iotfleetwise create-model-manifest \
--name $MODEL_MANIFEST \
--signal-catalog-arn $SIGNAL_CATALOG_ARN \
--nodes file://obd-model-nodes.json

aws iotfleetwise update-model-manifest \
--name $MODEL_MANIFEST \
--status ACTIVE
Decoder Manifestの作成
DECODER_MANIFEST_NAME=$MODEL_NAME-decoder-manifest
MODEL_MANIFEST_ARN=`aws iotfleetwise get-model-manifest --name $MODEL_MANIFEST --query "arn" --output text`
Model Manifestに登録したSignalのdecode情報を obd-decoders.json から抜粋して作成
cat << EOF > ./$MODEL_NAME-obd-decoders.json
[
  {
    "fullyQualifiedName": "Vehicle.OBD.CoolantTemperature",
    "interfaceId": "0",
    "type": "OBD_SIGNAL",
    "obdSignal": {
      "byteLength": 1,
      "offset": -40,
      "pid": 5,
      "pidResponseLength": 1,
      "scaling": 1,
      "serviceMode": 1,
      "startByte": 0,
      "bitMaskLength": 8,
      "bitRightShift": 0
    }
  },
  {
    "fullyQualifiedName": "Vehicle.OBD.EngineCoolantTemperature",
    "interfaceId": "0",
    "type": "OBD_SIGNAL",
    "obdSignal": {
      "byteLength": 1,
      "offset": 0,
      "pid": 103,
      "pidResponseLength": 3,
      "scaling": 1,
      "serviceMode": 1,
      "startByte": 0,
      "bitMaskLength": 8,
      "bitRightShift": 0
    }
  },
  {
    "fullyQualifiedName": "Vehicle.OBD.OilTemperature",
    "interfaceId": "0",
    "type": "OBD_SIGNAL",
    "obdSignal": {
      "byteLength": 1,
      "offset": -40,
      "pid": 92,
      "pidResponseLength": 1,
      "scaling": 1,
      "serviceMode": 1,
      "startByte": 0,
      "bitMaskLength": 8,
      "bitRightShift": 0
    }
  },
  {
    "fullyQualifiedName": "Vehicle.OBD.EngineSpeed",
    "interfaceId": "0",
    "type": "OBD_SIGNAL",
    "obdSignal": {
      "byteLength": 2,
      "offset": 0,
      "pid": 12,
      "pidResponseLength": 2,
      "scaling": 0.25,
      "serviceMode": 1,
      "startByte": 0,
      "bitMaskLength": 8,
      "bitRightShift": 0
    }
  },
  {
    "fullyQualifiedName": "Vehicle.OBD.Speed",
    "interfaceId": "0",
    "type": "OBD_SIGNAL",
    "obdSignal": {
      "byteLength": 1,
      "offset": 0,
      "pid": 13,
      "pidResponseLength": 1,
      "scaling": 1,
      "serviceMode": 1,
      "startByte": 0,
      "bitMaskLength": 8,
      "bitRightShift": 0
    }
  },
  {
    "fullyQualifiedName": "Vehicle.OBD.ThrottlePosition",
    "interfaceId": "0",
    "type": "OBD_SIGNAL",
    "obdSignal": {
      "byteLength": 1,
      "offset": 0,
      "pid": 17,
      "pidResponseLength": 1,
      "scaling": 0.39215686274509803922,
      "serviceMode": 1,
      "startByte": 0,
      "bitMaskLength": 8,
      "bitRightShift": 0
    }
  },
  {
    "fullyQualifiedName": "Vehicle.OBD.FuelLevel",
    "interfaceId": "0",
    "type": "OBD_SIGNAL",
    "obdSignal": {
      "byteLength": 1,
      "offset": 0,
      "pid": 47,
      "pidResponseLength": 1,
      "scaling": 0.39215686274509803922,
      "serviceMode": 1,
      "startByte": 0,
      "bitMaskLength": 8,
      "bitRightShift": 0
    }
  },
  {
    "fullyQualifiedName": "Vehicle.OBD.DemandEngineTorque",
    "interfaceId": "0",
    "type": "OBD_SIGNAL",
    "obdSignal": {
      "byteLength": 1,
      "offset": -125,
      "pid": 97,
      "pidResponseLength": 1,
      "scaling": 1,
      "serviceMode": 1,
      "startByte": 0,
      "bitMaskLength": 8,
      "bitRightShift": 0
    }
  },
  {
    "fullyQualifiedName": "Vehicle.OBD.Odometer",
    "interfaceId": "0",
    "type": "OBD_SIGNAL",
    "obdSignal": {
      "byteLength": 4,
      "offset": 0,
      "pid": 166,
      "pidResponseLength": 4,
      "scaling": 0.1,
      "serviceMode": 1,
      "startByte": 0,
      "bitMaskLength": 8,
      "bitRightShift": 0
    }
  },
  {
    "fullyQualifiedName": "Vehicle.OBD.ControlModuleVoltage",
    "interfaceId": "0",
    "type": "OBD_SIGNAL",
    "obdSignal": {
      "byteLength": 2,
      "offset": 0,
      "pid": 66,
      "pidResponseLength": 2,
      "scaling": 0.001,
      "serviceMode": 1,
      "startByte": 0,
      "bitMaskLength": 8,
      "bitRightShift": 0
    }
  }
]
EOF
decoder manifestを作成
aws iotfleetwise create-decoder-manifest \
--name $DECODER_MANIFEST_NAME \
--model-manifest-arn $MODEL_MANIFEST_ARN \
--network-interfaces file://network-interface-obd.json \
--signal-decoders file://$MODEL_NAME-obd-decoders.json

aws iotfleetwise update-decoder-manifest \
--name $DECODER_MANIFEST_NAME \
--status ACTIVE
Vehicleの作成
VEHICLE_NAME=z900rs
DECODER_MANIFEST_ARN=`aws iotfleetwise get-decoder-manifest --name $DECODER_MANIFEST_NAME --query "arn" --output text`

aws iotfleetwise create-vehicle \
--vehicle-name $VEHICLE_NAME \
--model-manifest-arn $MODEL_MANIFEST_ARN \
--decoder-manifest-arn $DECODER_MANIFEST_ARN
キャンペーンを作成
キャンペーン用のRoleを作成
cat << EOF > ./trust-policy.json
{
  "Version": "2012-10-17",
  "Statement": [
    {
      "Effect": "Allow",
      "Principal": {
        "Service": "iotfleetwise.amazonaws.com"
      },
      "Action": "sts:AssumeRole"
    }
  ]
}
EOF
Roleの作成
CAMPAIGNE_ROLE=BikeCampaigneRole

aws iam create-role --role-name $CAMPAIGNE_ROLE \
--assume-role-policy-document file://trust-policy.json
Timestream DBに書き込む権限を持つPolicyを作成
TS_TABLE_ARN=`aws timestream-write describe-table --database-name BikeDatabase --table-name BikeTable --query "Table.Arn" --output text`

cat << EOF > ./permissions-policy.json
{
  "Version": "2012-10-17",
  "Statement": [
    {
      "Sid": "timestreamIngestion",
      "Effect": "Allow",
      "Action": [
        "timestream:WriteRecords",
        "timestream:Select",
        "timestream:DescribeTable"
      ],
      "Resource": "$TS_TABLE_ARN"
    },
    {
      "Sid": "timestreamDescribeEndpoint",
      "Effect": "Allow",
      "Action": [
        "timestream:DescribeEndpoints"
      ],
      "Resource": "*"
    }
  ]
}
EOF

aws iam create-policy --policy-name ${CAMPAIGNE_ROLE}_TSPolicy \
--policy-document file://permissions-policy.json
PolicyをRoleにアタッチ
POLICY_ARN=`aws iam list-policies --query "Policies[?PolicyName=='${CAMPAIGNE_ROLE}_TSPolicy'].Arn" --output text`

aws iam attach-role-policy \
--policy-arn $POLICY_ARN \
--role-name $CAMPAIGNE_ROLE
キャンペーンに必要なARNを確認
TARGET_ARN=`aws iotfleetwise get-vehicle --vehicle-name $VEHICLE_NAME --query "arn" --output text`
ROLE_ARN=`aws iam get-role --role-name $CAMPAIGNE_ROLE --query "Role.Arn" --output text`
キャンペーンで収集するシグナルを定義
cat << EOF > ./campaigne-nodes.json
[
    {
        "maxSampleCount": 10,
        "minimumSamplingIntervalMs": 1000,
        "name": "Vehicle.OBD.CoolantTemperature"
    },
    {
        "maxSampleCount": 10,
        "minimumSamplingIntervalMs": 1000,
        "name": "Vehicle.OBD.EngineCoolantTemperature"
    },
    {
        "maxSampleCount": 10,
        "minimumSamplingIntervalMs": 1000,
        "name": "Vehicle.OBD.OilTemperature"
    },
    {
        "maxSampleCount": 10,
        "minimumSamplingIntervalMs": 1000,
        "name": "Vehicle.OBD.EngineSpeed"
    },
    {
        "maxSampleCount": 10,
        "minimumSamplingIntervalMs": 1000,
        "name": "Vehicle.OBD.Speed"
    },
    {
        "maxSampleCount": 10,
        "minimumSamplingIntervalMs": 1000,
        "name": "Vehicle.OBD.ThrottlePosition"
    },
    {
        "maxSampleCount": 10,
        "minimumSamplingIntervalMs": 1000,
        "name": "Vehicle.OBD.FuelLevel"
    },
    {
        "maxSampleCount": 10,
        "minimumSamplingIntervalMs": 1000,
        "name": "Vehicle.OBD.DemandEngineTorque"
    },
    {
        "maxSampleCount": 1,
        "minimumSamplingIntervalMs": 1000,
        "name": "Vehicle.OBD.Odometer"
    },
    {
        "maxSampleCount": 1,
        "minimumSamplingIntervalMs": 1000,
        "name": "Vehicle.OBD.ControlModuleVoltage"
    }
]
EOF
キャンペーンを作成
aws iotfleetwise create-campaign \
--name bike-timebase-10sec \
--signal-catalog-arn $SIGNAL_CATALOG_ARN \
--target-arn $TARGET_ARN \
--collection-scheme "timeBasedCollectionScheme={periodMs=10000}" \
--spooling-mode TO_DISK \
--data-destination-configs "timestreamConfig={timestreamTableArn=$TS_TABLE_ARN,executionRoleArn=$ROLE_ARN}" \
--signals-to-collect file://campaigne-nodes.json
キャンペーンを有効化
aws iotfleetwise update-campaign \
--name bike-timebase-10sec \
--action APPROVE
キャンペーンを有効化すると、targetに登録されているFleetWise agentに設定情報が配信され、自動的に収集が開始されます。