VS CodeのTerminalからRaspberry PiにSSH接続
Windows上のvs CodeのTerminalからRaspberry piにssh接続することにより、Windows上vs codeでRaspberry pi上のファイルを編集することが出来ます。もちろん、単にterminal(windows環境なのでWindows subsystem for linux)からssh接続してVim等のエディタを用いて編集することは可能なのですが、自身はvs CodeのVim拡張の方が使いやすかったので、こちらの方法で編集していました。以下に作業環境のバージョンを示します。
| ソフトもしくはハード | バージョン |
|---|---|
| VS Code | 1.28.2 |
| Raspberry pi | Model 3 B+ |
以下においては、クライアント側(Windows上のVS Code)とサーバ側(Raspberry Pi)の処理に分けて接続方法を説明します。
サーバ側(Raspberry PI)
-
1. raspi-configにおいてSSH接続を許可する
- raspi-configはRaspberry piのterminalから以下のコマンドで開けます
$sudo raspi-config
- 2. 以下のコマンドを実行する
$sudo wget -O /usr/bin/rmate https://raw.github.com/aurora/rmate/master/rmate
$sudo chmod a+x /usr/bin/rmate
以上がサーバ側での設定となります。
クライアント側(Vs Code側)
-
1. VS Codeを開き、拡張機能で”remote VSCode”を追加する
- 以下に該当の拡張機能の画像を示します。

-
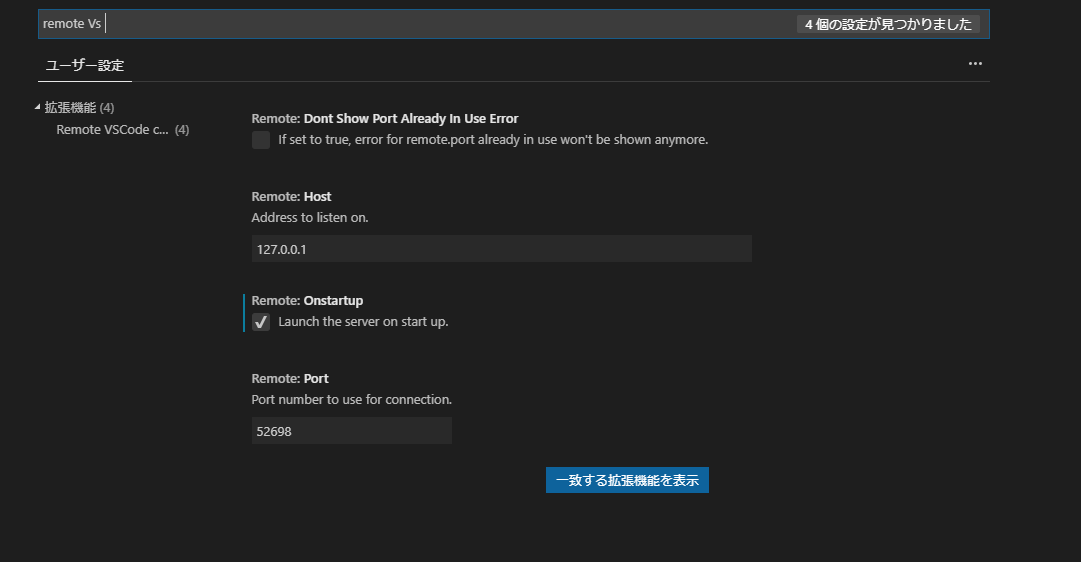
2. VS Codeのファイル>基本設定>設定>Remote VSCodeから, 設定を変更する
- 変更点を以下の表及び画像に示します。
| 変更点 | 変更内容 |
|---|---|
| Remote:Host | 127.0.0.1 |
| Remote:Port | 52698 |
| Remote:Onstartup | "Launch the server on start up"に チェックを入れる |
- 3. %USERPROFILE%/.ssh/configに以下を追記して保存する。
Host pi
   HostName 192.168.100.103
   user "Userの名前"
   ForwardAgent yes
   RemoteForward 52698 127.0.0.1:52698
- 4. VS Code上でターミナルを開く
-
5. 以下のコマンドをでログインする
- ログインする前にサーバ側のIPアドレスをifconfig等で知っておく必要があります。
$ssh -R 52698:127.0.0.1:52698 pi@"Raspberry PiのIPアドレス"
- 6. ログイン状態で編集したいファイルに対して以下を実行するとローカルのVS Code上で開かれる
$rmate -p 52698 test.py
以上がクライアント側の設定となります。
参考資料