
バージョン: 2.2.4
Keras Documentation
Keras Documentation (日本語) ←更新が遅い(?)ので非推奨
このまとめは、Kerasで画像を用いて深層学習をする際の流れに沿ってドキュメントから要点をまとめたものです。
一通りドキュメントに目を通すのが一番ですが、面倒くさい、あるいは読んだけどいちいちドキュメントから探すの面倒くさいって時にでも役に立ててください。
サンプル
-
このまとめの手順に沿って作成したJupyter Notebook
https://github.com/souring001/deep-learning/blob/master/cifar10_cnn_keras.ipynb -
Keras公式のサンプル(画像分類、LSTM、文字認識、文章生成など)
https://github.com/keras-team/keras/tree/master/examples
インポート例
深層学習をするときに使うパッケージやOptimizer等のインポートは、必要に応じて以下のように行う。
import tensorflow as tf
import numpy as np
import pandas as pd
import random as rn
import keras
import PIL
import matplotlib.pyplot as plt
from keras.preprocessing.image import ImageDataGenerator
from keras.datasets import cifar10
from keras.applications.vgg16 import VGG16
from keras.optimizers import Adam, SGD
from keras.models import Model
from keras.layers import Dense, Dropout, Activation, Flatten
from keras.layers import Conv2D, MaxPooling2D, BatchNormalization
乱数固定
開発中のパフォーマンスの変化が実際のモデルやデータの変更によるものなのか、単に新しいランダムサンプルの結果によるものなのかを判断するために、乱数を固定して再現性を持たせると良い。
(※しかし、以下のコードを冒頭に記してもlossやaccuracyが毎回異なる場合がある。原因究明中)
import numpy as np
import tensorflow as tf
import random as rn

# Python 3.2.3以降で必要、ハッシュベースの操作に関して再現性を持たせる
import os
os.environ['PYTHONHASHSEED'] = '0'

# Numpy, Pythonでの乱数の固定
np.random.seed(42)
rn.seed(12345)

# TensorFlowはマルチスレッドだと再現性が無いので、シングルスレッドにする
session_conf = tf.ConfigProto(intra_op_parallelism_threads=1, inter_op_parallelism_threads=1)

# TensorFlowのバックエンドの乱数を固定
from keras import backend as K
tf.set_random_seed(1234)
sess = tf.Session(graph=tf.get_default_graph(), config=session_conf)
K.set_session(sess)
Keras Documentation - How can I obtain reproducible results using Keras during development?
データセットの準備
訓練、検証、テストデータに分割
データの数・バラつきとかハイパーパラメータの数によるが、比率70:15:15とか、60:20:20とかに分割する。
ImageDataGeneratorを使うとvalidation_splitで好きな比率にtestとvalidationに分割できる。
画像のロード
ImageDataGeneratorを使わない場合
x_train, y_train, x_test, y_testという配列(ndarray)を用意する。データ型はfloat32にする。
以下はCIFAR10のデータを読み込んで適切に変換した場合。shapeとdtypeが以下のようになっていれば良い。
x_train shape: (50000, 32, 32, 3) 	dtype: float32
y_train shape: (50000, 10) 			dtype: float32
x_test shape: (10000, 32, 32, 3) 	dtype: float32
y_test shape: (10000, 10) 			dtype: float32
32x32x3か3x32x32かは、バックエンドの設定がchannel_lastかchannel_firstかによる。
何もしていなければchannel_lastのはず。詳しくはこちら→Keras Documentation - Backend
画像分類の場合、ロス計算のためにOne-Hotベクトルに変換する。例:6→[0. 0. 0. 0. 0. 0. 1. 0. 0. 0.]
num_classes = 10
y_train = keras.utils.to_categorical(y_train, num_classes)
y_test = keras.utils.to_categorical(y_test, num_classes)
画像はデータ型float32にして0~255を0~1の値にする。
x_train = x_train.astype('float32')
x_test = x_test.astype('float32')
x_train /= 255
x_test /= 255
画像が正しく設定できているか確認
データが思い通りになっているかのテストコード。
画像が横向きになっていたり、入力と出力のインデックスがずれていたりすることがある。
idx = 0 # i番目のデータ
plt.imshow(x_train[idx])
plt.show()
print(y_train[idx])
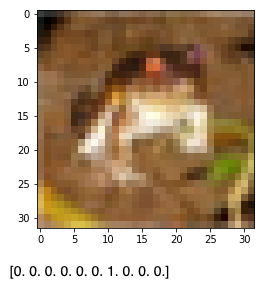
6とはカエル(frog)を意味するラベル。これカエルなんだ...。
ImageDataGeneratorを使う場合
画像分類の場合は以下のようなディレクトリ構造にしておく。
data/
    train/
        dogs/
            dog001.jpg
            dog002.jpg
            ...
        cats/
            cat001.jpg
            cat002.jpg
            ...
    validation/
        dogs/
            dog001.jpg
            dog002.jpg
            ...
        cats/
            cat001.jpg
            cat002.jpg
            ...
class_modeは、2値分類ならばbinary、多クラス分類ならcategoricalとする。
train_datagen = ImageDataGenerator(rescale=1./255)
train_generator = train_datagen.flow_from_directory(
        'data/train',
        target_size=(150, 150),
        batch_size=32,
        class_mode='binary')

test_datagen = ImageDataGenerator(rescale=1./255)
validation_generator = test_datagen.flow_from_directory(
        'data/validation',
        target_size=(150, 150),
        batch_size=32,
        class_mode='binary')
回帰問題を扱う場合は、flow_from_dataframeを使用する。
pandasでcsvから読み取ったデータをdataframeに指定して、class_modeはotherとする。
Keras Documentation - ImageDataGenerator class
画像が正しく設定できているか確認
データの中身を表示するためのテストコード。
next()で中身を取得しているので、実行の都度内容が変わることに注意。
また、デフォルトだとshuffle=Trueなので、最初の画像とは限らない。
batch = train_generator.next()
x, y = batch

idx = 0 # i番目のデータ
plt.imshow(x[idx])
plt.show()
print(y[idx])
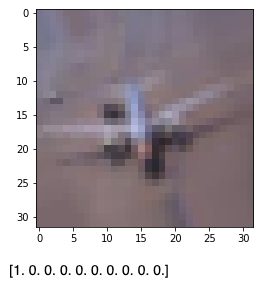
1とは飛行機(airplane)を意味するラベル。
既存のデータセット
Kerasには用意されたデータセットがあり、以下のようにすることで、使うことができる。
ただし、ラベルをOne-Hotベクトルやfloat32型に変換する必要あり。
from keras.datasets import cifar10
(x_train, y_train), (x_test, y_test) = cifar10.load_data()
以下のデータセットが使用可能(2019年6月17日現在)
- CIFAR10 画像分類
- CIFAR100 画像分類
- IMDB映画レビュー感情分類
- ロイターのニュースワイヤー トピックス分類
- MNIST 手書き数字データベース
- Fashion-MNIST ファッション記事データベース
- ボストンの住宅価格回帰データセット
Keras Documentation - Datasets
ネットワークモデルの作成
SequentialモデルAPIを使う方法と、Functional APIを使う方法の2種類がある。
以下のコードでは、Sequentialモデルを使ったCNNを作成する。
input_shapeは32x32x3(x_train.shape[1:])、outputは10(num_classes)としてある。
model = Sequential()
model.add(Conv2D(32, (3, 3), padding='same', input_shape=x_train.shape[1:]))
model.add(Activation('relu'))
model.add(Conv2D(32, (3, 3)))
model.add(Activation('relu'))
model.add(MaxPooling2D(pool_size=(2, 2)))
model.add(Dropout(0.25))

model.add(Conv2D(64, (3, 3), padding='same'))
model.add(Activation('relu'))
model.add(Conv2D(64, (3, 3)))
model.add(Activation('relu'))
model.add(MaxPooling2D(pool_size=(2, 2)))
model.add(Dropout(0.25))

model.add(Flatten())
model.add(Dense(512))
model.add(Activation('relu'))
model.add(Dropout(0.5))
model.add(Dense(num_classes))
model.add(Activation('softmax'))
Keras Documentation - About Keras models
最適化アルゴリズム(Optimizer)を定義
引数を設定しなければデフォルトの値となる。
opt = RMSprop(lr=0.0001, decay=1e-6)
モデルにロス関数や最適化アルゴリズムを設定
model.compile(loss='categorical_crossentropy',
              optimizer=opt,
              metrics=['accuracy'])
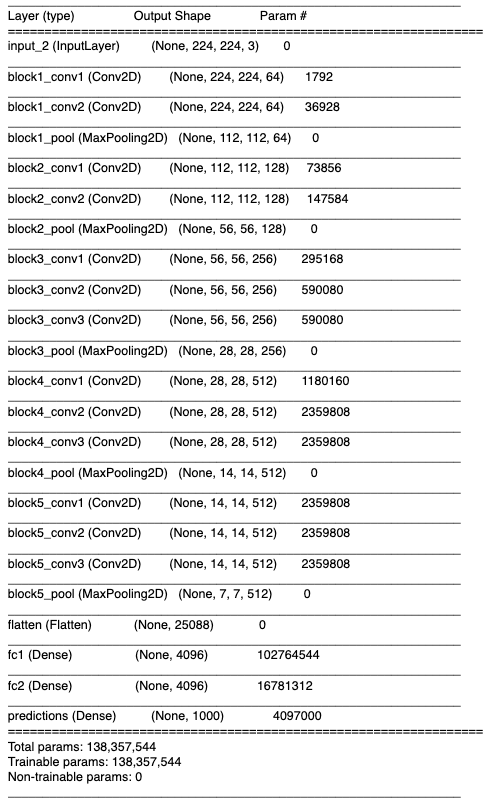
モデルの要約を出力
VGG16のモデルの場合、以下のような要約が出力される。
model.summary()
学習
model.fitで学習が始まる。
batch_size = 32
epochs = 20

model.fit(x_train, y_train,
            batch_size=batch_size,
            epochs=epochs,
            validation_data=(x_test, y_test),
            shuffle=True)
ImageDataGeneratorを使う場合は、model.fit_generatorを使う。
num_train_samples = 50000
model.fit_generator(
        train_generator,
        steps_per_epoch=num_train_samples/batch_size,
        epochs=epochs,
        validation_data=validation_generator,
        validation_steps=800)
テストデータで推定
model.predict(x_test)で学習済みモデルを用いて推定を行う。
y = model.predict(x_test)
plt.imshow(x_test[0])
plt.show()
print(y[0])
print('pred_y:', np.argmax(y[0]), ', label:', np.argmax(y_test[0]))
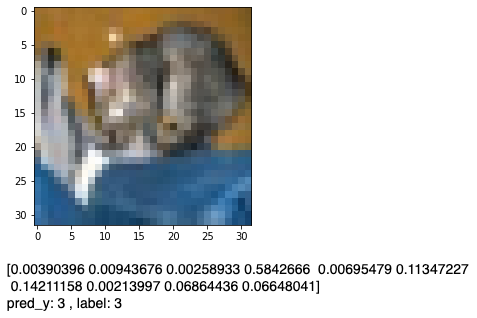
これが本当に猫なのかは人間にもわからない。
転移学習(fine-tuning)
VGGなどの学習済み(pre-trained)モデルをロードし、ネットワークの前半部分をfreezeして重みを更新できなくすると、少ないデータでも学習が可能となる。
以下の学習済みモデルが使用可能(2019年6月17日現在)
- Xception
- VGG16
- VGG19
- ResNet, ResNetV2, ResNeXt
- InceptionV3
- Inception-ResNetV2
- MobileNet
- MobileNetV2
- DenseNet
- NASNet
Keras Documentation - Available models
学習済みモデルのロード
from keras.applications.vgg16 import VGG16
model = VGG16(weights='imagenet', include_top=True)
特定のレイヤーの重み更新をしない(freeze)
コンストラクタから
frozen_layer = Dense(32, trainable=False)
インスタンス化後にプロパティから変更
layer = Dense(32)
layer.trainable = False
入力層側の18レイヤーをfreezeする。
for layer in model.layers[:18]:
    print(layer.name)
    layer.trainable = False
Keras Documentation - How can I "freeze" Keras layers?
データ拡張(Data Augmentation)
入力画像に回転やシフトを施して入力データを拡張することで、より汎用的な結果が得られる。
KerasではImageDataGeneratorでデータ拡張ができる。
batch_size = 32
epochs = 20
num_train_samples = 50000

datagen = ImageDataGenerator(
          width_shift_range=0.2,
          height_shift_range=0.2,
          shear_range=0.2,
          zoom_range=0.2,
          rotation_range=20,
          horizontal_flip=True
          )

train_generator = datagen.flow(x_train, y_train, batch_size=batch_size)

# 学習
model.fit_generator(train_generator,
                    epochs=epochs,
                    steps_per_epoch=num_train_samples/batch_size,
                    validation_data=(x_test, y_test))
| 拡張前 | 拡張後 |
|---|---|
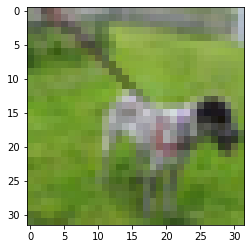 |
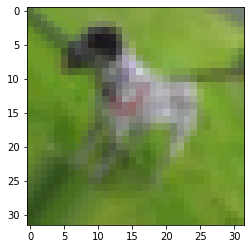 |
ただし、物体検知や姿勢推定などの画像位置に関する回帰問題の場合は、回転や拡大した場合に出力値も同様の処理をする必要があるので、 generatorを自作する必要がある。
Keras Documentation - ImageDataGenerator class
多入力多出力
以下のような多入力多出力のモデルは、Functional APIによって作成できる。
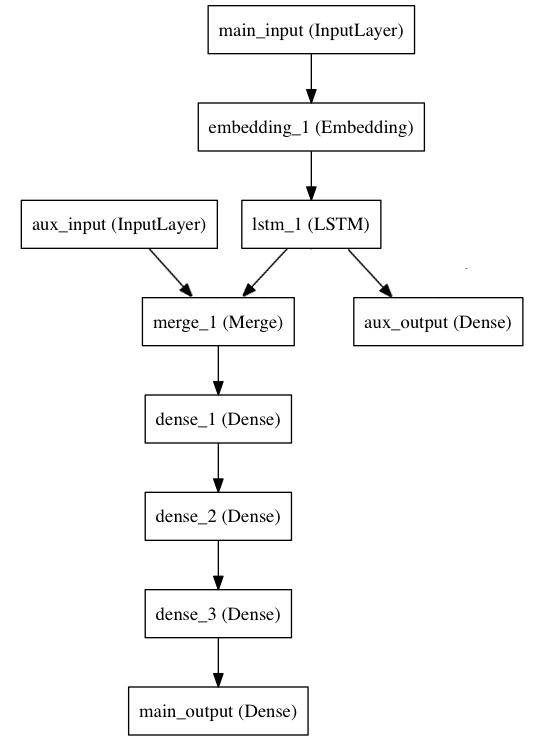
モデルの作成
モデルを作成した後に、入力と出力をリストで渡す。
# 右上
main_input = Input(shape=(100,), dtype='int32', name='main_input')
x = Embedding(output_dim=512, input_dim=10000, input_length=100)(main_input)
lstm_out = LSTM(32)(x)

# 右下
auxiliary_output = Dense(1, activation='sigmoid', name='aux_output')(lstm_out)

# 左上
auxiliary_input = Input(shape=(5,), name='aux_input')
x = keras.layers.concatenate([lstm_out, auxiliary_input])

# 左下
x = Dense(64, activation='relu')(x)
x = Dense(64, activation='relu')(x)
x = Dense(64, activation='relu')(x)
main_output = Dense(1, activation='sigmoid', name='main_output')(x)

model = Model(inputs=[main_input, auxiliary_input], outputs=[main_output, auxiliary_output])
ロスの設定
出力に対してロス関数を個別で設定する場合は、リストで渡す。
以下のように、重みだけを個別で設定することもできる。
model.compile(optimizer='rmsprop', loss='binary_crossentropy', loss_weights=[1., 0.2])
学習
入力、出力データもリストで渡す。
model.fit([headline_data, additional_data], [labels, labels], epochs=50, batch_size=32)
Keras Documentation - Multi-input and multi-output models
評価関数の作成
評価関数を自作したくなったら以下のように定義する。
import keras.backend as K

def mean_pred(y_true, y_pred):
    return K.mean(y_pred)

model.compile(optimizer='rmsprop',
              loss='binary_crossentropy',
              metrics=['accuracy', mean_pred])
Keras Documentation - Custom metrics
ロス関数の作成
ヒートマップの出力などをする場合は、通常のロス関数では全て0になってしまうなど、うまくいかないことがある。
その場合ロス関数を自作する。
MSEであれば以下のように定義できる。
def my_loss(y_true,y_pred):
    return K.mean(K.square(y_pred - y_true), axis=-1)
使える関数(Backend functions)については、こちら→Keras Documentation - Backend functions
学習したモデルの保存&ロード
モデルの保存
model_name = 'model.h5'
model.save(model_name)
保存したモデルを使ってリアルタイムにCatかDogに分類するコード
import tensorflow as tf
import cv2
import keras
import numpy as np

# モデルのロード
model = keras.models.load_model("model.h5")

# キャプチャの開始
cap = cv2.VideoCapture(0)

while True:
    ret, frame = cap.read()
    height, width = frame.shape[:2]
    # キャプチャの中心を正方形に切り取る
    frame = frame[0:height, int(width/2-height/2):int(width/2+height/2)]

    cv2.imshow('frame', frame)

    # 入力のサイズ(32x32)にリサイズする
    small = cv2.resize(frame,(32,32))
    # 4次元にリシェイプ
    small = small.reshape((1,32,32,3))/255
    # モデルで推定
    result = model.predict(small)

    if np.argmax(result) == 1:
        print("dog")
    else:
        print("cat")

    if cv2.waitKey(1) & 0xFF == ord('q'):
        break

cap.release()
cv2.destroyAllWindows()
おわりに
何か間違いとか、その他これもよく使うよなどあれば教えてください。