ParityのPoA(Proof of Authority)を使用したプライベートネットの立て方を記載します。
環境
以下の記事の parityをインストール の項目まで実施した環境を使います。
parityのバージョン
Parity/v1.9.3-beta-804ddfe-20180219/x86_64-linux-gnu/rustc1.24.0
手順
Demo PoA-Tutorialを参考に、ミニマムの手順で動作確認まで行います。
チュートリアルとして1つのサーバに2つのparityノードを立ててPoAによるプライベートネットを構築しています。
チュートリアル用の資材を準備
git clone https://github.com/keorn/parity-poa-tutorial.git
cd parity-poa-tutorial
アカウント作成&設定
node0に2つ、node1に1つ作成します。
parity account new --config node0.toml # validator_1
parity account new --config node0.toml # user_1
parity account new --config node1.toml # validator_2
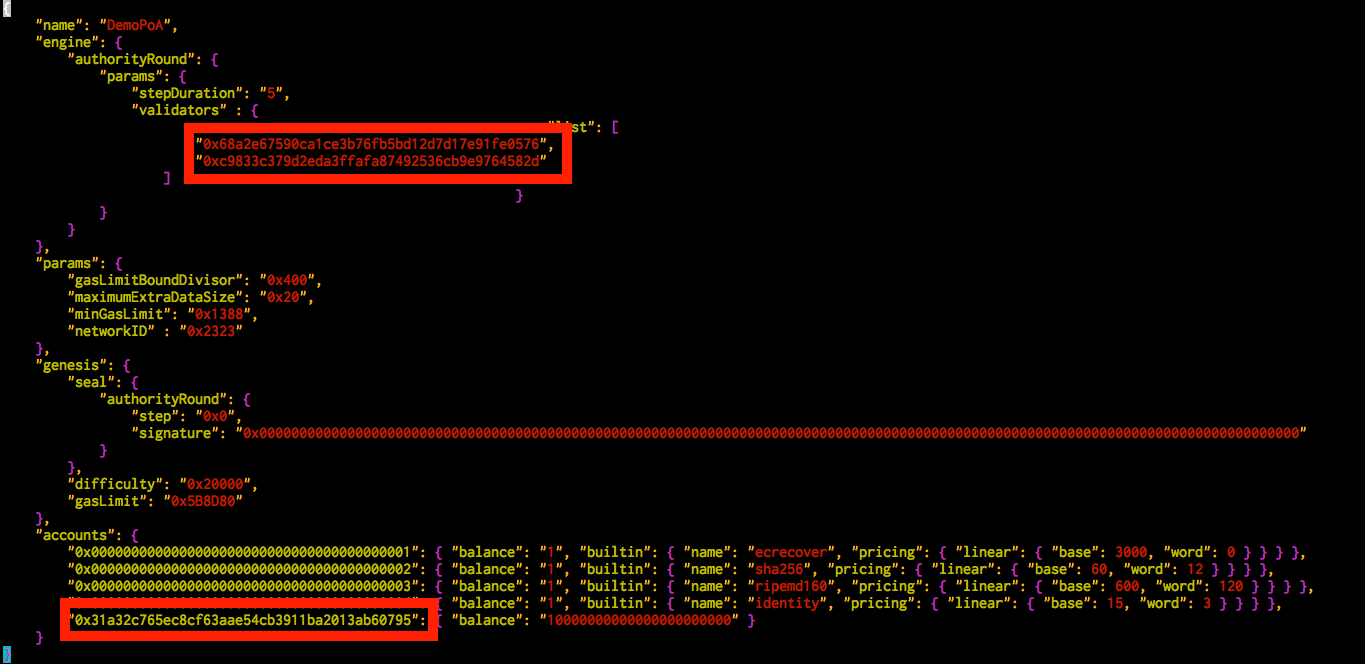
標準出力にアカウントが表示されるので、それをdemo-spec.jsonの該当箇所に上書きします。
vi demo-spec.json
validators に validator_1とvalidator_2を、accountsにuser_1を上書きします。
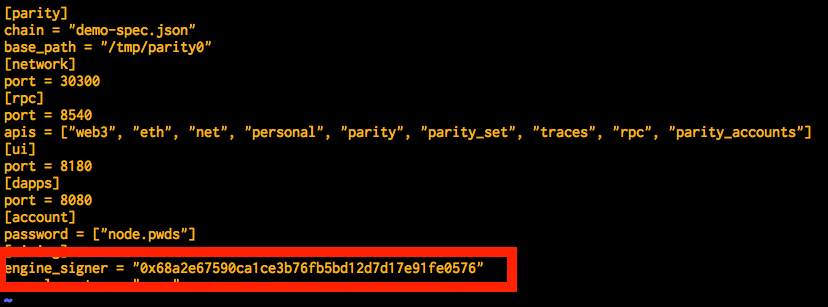
node0.tomlのengine_signerにvalidator_1のアドレスを上書きします。
vi node0.toml
同様に、node1.tomlのengine_signerにもvalidator_2のアドレスを上書きします。
Parityを起動
2つのparityノードをそれぞれ起動します。
ターミナルやペインを分けて起動してください。
node0
cd ~/parity-poa-tutorial
parity --config node0.toml
node1
cd ~/parity-poa-tutorial
parity --config node1.toml
2つのノードを接続
node0 のenode addressを取得。
curl --data '{"jsonrpc":"2.0","method":"parity_enode","params":[],"id":0}' -H "Content-Type: application/json" -X POST localhost:8540
以下のように出力される。
{"jsonrpc":"2.0","result":"enode://768c58633647d1b657cec999cbddc4b792f8c393bd8d42e2decd479869b05aa3a857cf548821ceeca9265c114718b102875806ae822713e4625ef5a0495741dd@172.xx.xx.xxx:30300","id":0}
この出力のresultに含まれるenode://768...(略)...xx.xxx:30300 が enode address。
以下のコマンドのenode部分にこのアドレスを記載してコマンドを叩き、node1に接続する。
curl --data '{"jsonrpc":"2.0","method":"parity_addReservedPeer","params":["enode://768c58633647d1b657cec999cbddc4b792f8c393bd8d42e2decd479869b05aa3a857cf548821ceeca9265c114718b102875806ae822713e4625ef5a0495741dd@172.xx.xx.xxx:30300"],"id":0}' -H "Content-Type: application/json" -X POST localhost:8541
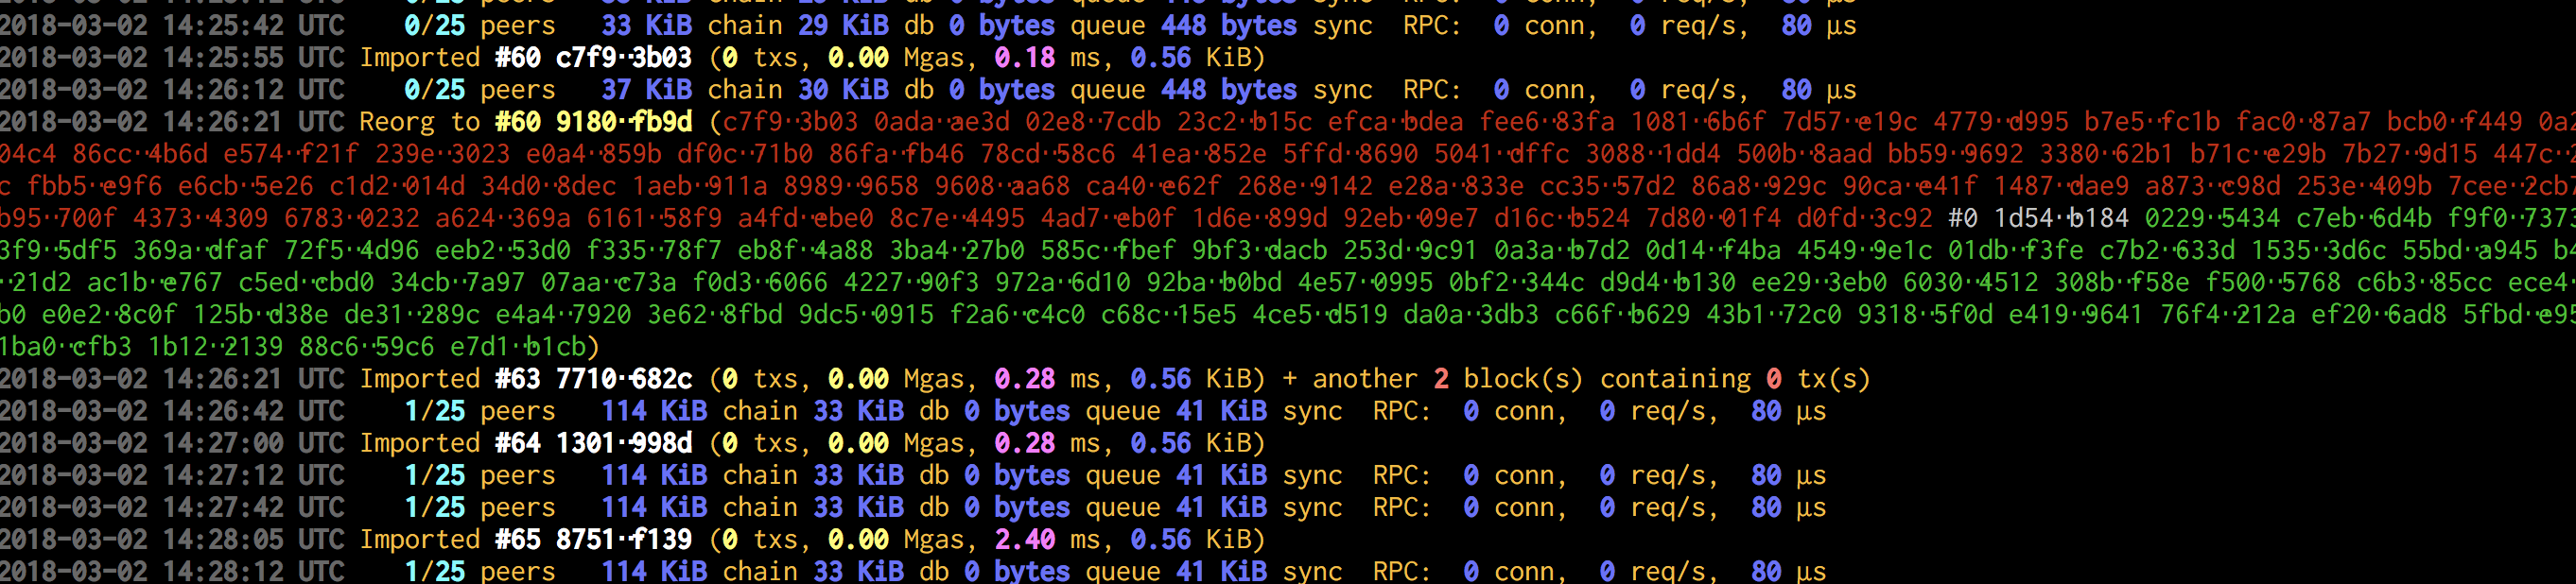
成功したら以下のようなログが出力される。
接続が成功したので、以降は1/25 peersと表示されていることを確認する。
挙動確認
validator_0のbalanceを見てみます。
サーバに接続して↓のcurlコマンドを叩きます。アドレス部分はご自分の環境に合わせて書き換えてください。
$ curl --data '{"jsonrpc":"2.0","method":"eth_getBalance","params":["0x68a2e67590ca1ce3b76fb5bd12d7d17e91fe0576", "latest"],"id":1}' -H "Content-Type: application/json" -X POST localhost:8540
{"jsonrpc":"2.0","result":"0x0","id":1}
0ですね。
次にuser_1のbalanceを見てみます。
$ curl --data '{"jsonrpc":"2.0","method":"eth_getBalance","params":["0x31a32c765ec8cf63aae54cb3911ba2013ab60795", "latest"],"id":1}' -H "Content-Type: application/json" -X POST localhost:8540
{"jsonrpc":"2.0","result":"0x21e19e0c9bab2400000","id":1}
demo-spec.jsonで指定した値が格納されています。
0x21e19e0c9bab2400000はweiのhexdecimal(16進数)です。10000 ether(10000000000000000000000 wei)を表します。
user_1からvalidator_0に1 etherを送ってみます。
$ curl --data '{"jsonrpc":"2.0","method":"personal_sendTransaction","params":[{"from":"0x31a32c765ec8cf63aae54cb3911ba2013ab60795","to":"0x68a2e67590ca1ce3b76fb5bd12d7d17e91fe0576","value":"0xde0b6b3a7640000"}, "node0"],"id":0}' -H "Content-Type: application/json" -X POST localhost:8540
{"jsonrpc":"2.0","result":"0xfae59052b071aa1a6102ad3fca60fc22350e23e8e2014bf5269f77a34ee50111","id":0}
トランザクションIDが帰ります。
すぐに、起動しているノードで以下のように該当トランザクションIDがmineされた旨が出力されます。

再度、validator_0のbalanceを見てみます。
$ curl --data '{"jsonrpc":"2.0","method":"eth_getBalance","params":["0x68a2e67590ca1ce3b76fb5bd12d7d17e91fe0576", "latest"],"id":1}' -H "Content-Type: application/json" -X POST localhost:8540
{"jsonrpc":"2.0","result":"0xde0b6b3a7640000","id":1}
0xde0b6b3a7640000(= 1 ether)が無事送信されたことを確認できました。
以上です。