先日、業務にてSpring BatchをLambda関数を動かしたいと依頼がありました。
すぐにできるだろうと調べて動かしてみたところ、思ったよりスムーズに実装できなかったので詰まったところを備忘録として残そうと思います。
はじめに
Springのバージョンアップに伴い、Spring Batchで使用されていたメソッドがいくつか使用できなくなっています。
最新バージョンでのSpring Batchを記述しながら、Lambda関数として実行する手順について記します。
Step1:Spring Batchの用意
Lambda関数にて実行するプロジェクトを作成していきます。
実行環境
・Spring Boot3(ver:3.4.2) - Spring Batch5
・java21
・IDE:Eclipse
・ビルドプラグイン:Maven
1. Job-Step-Taskletの実装
Spring Batchの仕組みに関しては割愛いたします。
気になる方は以下などを参照ください。
Job-Stepを実装するクラス
// @Configurationアノテーションを付与する
@Configuration
public class SpringConfig {

    @Autowired
    private HelloTasklet helloTasklet;

    @Bean
    public Job helloWorldJob(JobRepository jobRepository, PlatformTransactionManager transactionManager) {
        System.out.println("Hello Tasklet1!!!");
        return new JobBuilder("helloWorldJob", jobRepository) //Job名を指定
            .incrementer(new RunIdIncrementer())
            .start(helloWorldStep(jobRepository, transactionManager)) //実行するStepを指定
            .build();
    }

    @Bean
    public Step helloWorldStep(JobRepository jobRepository, PlatformTransactionManager transactionManager) {
        return new StepBuilder("helloWorldStep", jobRepository) //Step名を指定
        .tasklet(helloTasklet , transactionManager) //実行するTaskletを指定
        .build();
    }
}
Taskletを実装するクラス
//@Componentアノテーションによって、Spring Beanとして登録される
@Component("Hello Tasklet1")
// StepScopeアノテーションによって、インスタンスをステップごとに生成・破棄する
@StepScope
// Tasklet インターフェイスexecuteメソッドを実装する
public class HelloTasklet implements Tasklet {
    // taskletは実際の処理を記述する

    @Override
    public RepeatStatus execute(StepContribution contribution, ChunkContext chunkContext) throws Exception {
        System.out.println("Hello Tasklet1!!!");
        // RepeatStatus.FINISHEDは、executeメソッドが正常終了したことを示す
        return RepeatStatus.FINISHED;
    }
}
このTasklet内に実際の処理を記載します。
今回の処理ではログを出力する処理のみとします。
次にこれらを実行するためのMainクラスを作成します。
Mainクラス
@SpringBootApplication
public class DemoApplication {

    public static void main(String[] args) {
        System.out.println("Hello World!!!");
        SpringApplication.run(DemoApplication.class, args);
    }
}
runメソッドが呼ばれることでJobの実行が行われるため、コンソールには
Hello World
↓
Spring起動ログ
↓
Jobのログ
のような形になります。
最後にpom.xmlを編集します。
pom.xml
<dependency>
    <groupId>org.springframework.boot</groupId>
    <artifactId>spring-boot-starter-batch</artifactId>
</dependency>
<dependency>
    <groupId>org.springframework.boot</groupId>
    <artifactId>spring-boot-starter-web</artifactId>
</dependency>
<dependency>
    <groupId>org.springframework.boot</groupId>
    <artifactId>spring-boot-starter</artifactId>
</dependency>
<dependency>
    <groupId>com.h2database</groupId>
    <artifactId>h2</artifactId>
</dependency>
<dependency>
    <groupId>org.springframework.boot</groupId>
    <artifactId>spring-boot-devtools</artifactId>
    <scope>runtime</scope>
    <optional>true</optional>
</dependency>
<dependency>
    <groupId>org.projectlombok</groupId>
    <artifactId>lombok</artifactId>
    <optional>true</optional>
</dependency>
<dependency>
    <groupId>org.springframework.boot</groupId>
    <artifactId>spring-boot-starter-test</artifactId>
    <scope>test</scope>
</dependency>
<dependency>
    <groupId>org.springframework.batch</groupId>
    <artifactId>spring-batch-test</artifactId>
    <scope>test</scope>
</dependency>
私は、上記の構成を追加しました。
このソースコードではデータベースを使用していませんが、Spring Batchではデータベースが必須になるため、H2をインストールします。
実行
一度、Eclipse上で実行してみます。
プロジェクトを右クリック→実行→Spring Bootアプリケーション で実行します。
Hello World!!!
. ____ _ __ _ _
/\\ / ___'_ __ _ _(_)_ __ __ _ \ \ \ \
( ( )\___ | '_ | '_| | '_ \/ _` | \ \ \ \
\\/ ___)| |_)| | | | | || (_| | ) ) ) )
' |____| .__|_| |_|_| |_\__, | / / / /
=========|_|==============|___/=/_/_/_/

[32m :: Spring Boot :: [39m [2m (v3.4.2)[0;39m

<< 実行ログが出力される >>

Hello Tasklet1!!!

<< 実行ログが出力される >>

Hello Tasklet1!!!
細かなログは長くなってしまうため省かせていただきました。
設定した「Hello Tasklet1!!!」が2度出力されていることがわかります。
1度目はJobのメソッド内、
2度目はTaskletのメソッド内での出力になります。
2.RequestHandlerの製造
Spring Batchが動くことを確認できたので、次はLambda関数として実行できるようにします。
Lambda関数では、関数が呼び出されるとハンドラーメソッドを実行します。このクラスではライブラリとして提供されているRequestHandlerを用いてLambda関数からの実行命令に対応します。
Spring Bootとして実行するため、aws-serverless-java-containerを用いて簡単に実行できるようにします。
aws-serverless-java-containerはSpring BootなどのフレームワークをAPI Gatewayが理解できるようにしてくれます。
RequestHandler
public class LambdaFunctionHandler implements RequestHandler<AwsProxyRequest, AwsProxyResponse> {
    private static SpringBootLambdaContainerHandler<AwsProxyRequest, AwsProxyResponse> handler;

        static {
            try {
                handler = SpringBootLambdaContainerHandler.getAwsProxyHandler(Application.class);
            } catch (ContainerInitializationException ex) {
                throw new RuntimeException("Unable to load spring boot application", ex);
            }
        }

        @Override
        public AwsProxyResponse handleRequest(AwsProxyRequest input, Context context) {
        context.getLogger().log("-----start.-----");

        String args[] = new String[0];
        SpringApplication.run(Demo2Application.class, args);
        context.getLogger().log("-----end.-----");
        return handler.proxy(input, context);
    }
}
処理のはじめにhandlerの初期化を行います。
その後、handleRequestメソッドが呼ばれます。
ですので、ここのメソッドにてrunを行い、Jobを実行します。
次にpom.xmlを修正します。
pom.xml
<dependency>
    <groupId>org.springframework.cloud</groupId>
    <artifactId>spring-cloud-starter-aws</artifactId>
    <version>2.2.6.RELEASE</version>
</dependency>
<dependency>
    <groupId>com.amazonaws</groupId>
    <artifactId>aws-lambda-java-core</artifactId>
    <version>1.2.1</version>
</dependency>
<dependency>
    <groupId>com.amazonaws</groupId>
    <artifactId>aws-lambda-java-events</artifactId>
    <version>3.11.0</version>
</dependency>
<dependency>
    <groupId>com.amazonaws.serverless</groupId>
    <artifactId>aws-serverless-java-container-springboot3</artifactId>
    <version>2.1.2</version>
</dependency>
上記の内容をdependencyタグの中に追加します。
最後にプロジェクトのビルドを行い、jarファイルを作成します。
Step2:AWS Lambdaにて実行
作成したjarファイルをコードソースとしてLambda関数を作成します。
詳しい作成手順は以下を参照ください。
https://docs.aws.amazon.com/ja_jp/lambda/latest/dg/lambda-java.html
ランタイムではjava21を選択します。
新たに作成したLambda関数のコードソースからアップロード元→.zipまたは.jarファイルを選択します。
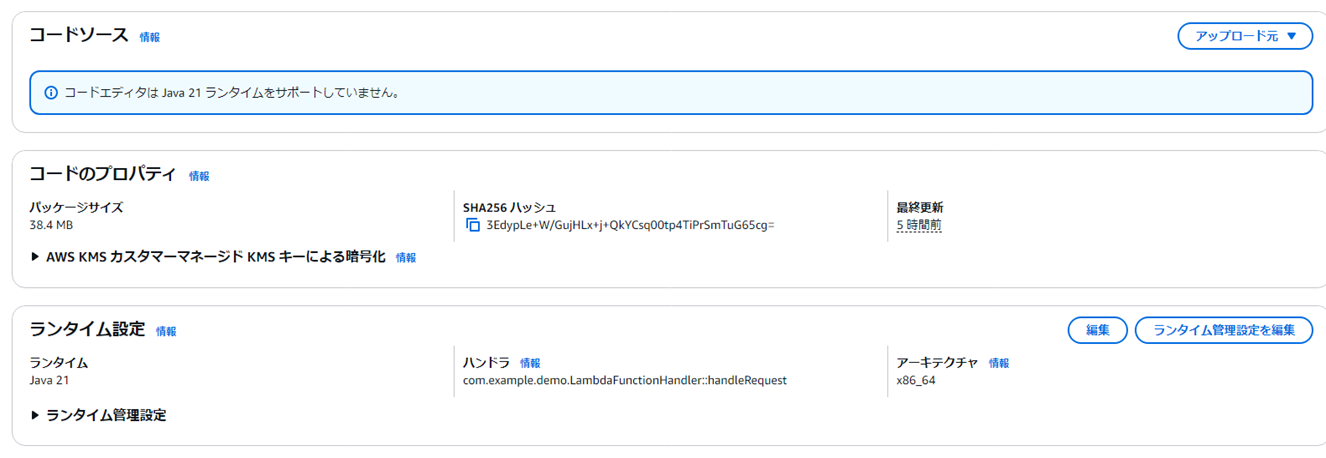
ビルドにて作成されたjarファイルをアップロードし、保存します。
ランタイム設定を編集します。
ハンドラをhandleRequestメソッドがあるクラスパスで指定します。
格納したプロジェクトをテスト実行します
テストタブより、テストイベントを作成します。
新しいイベントを選択し、イベント名を入力します。

テンプレート-オプションより、 apigateway-aws-proxyを選択します。
すぐ下のイベントJSONにテンプレートが出力されます。
引数の条件を満たすためなので今回はこのまま使用します。
テストボタンを押下すると、実行が開始されます。
出力されたログをCloudWatchにて確認

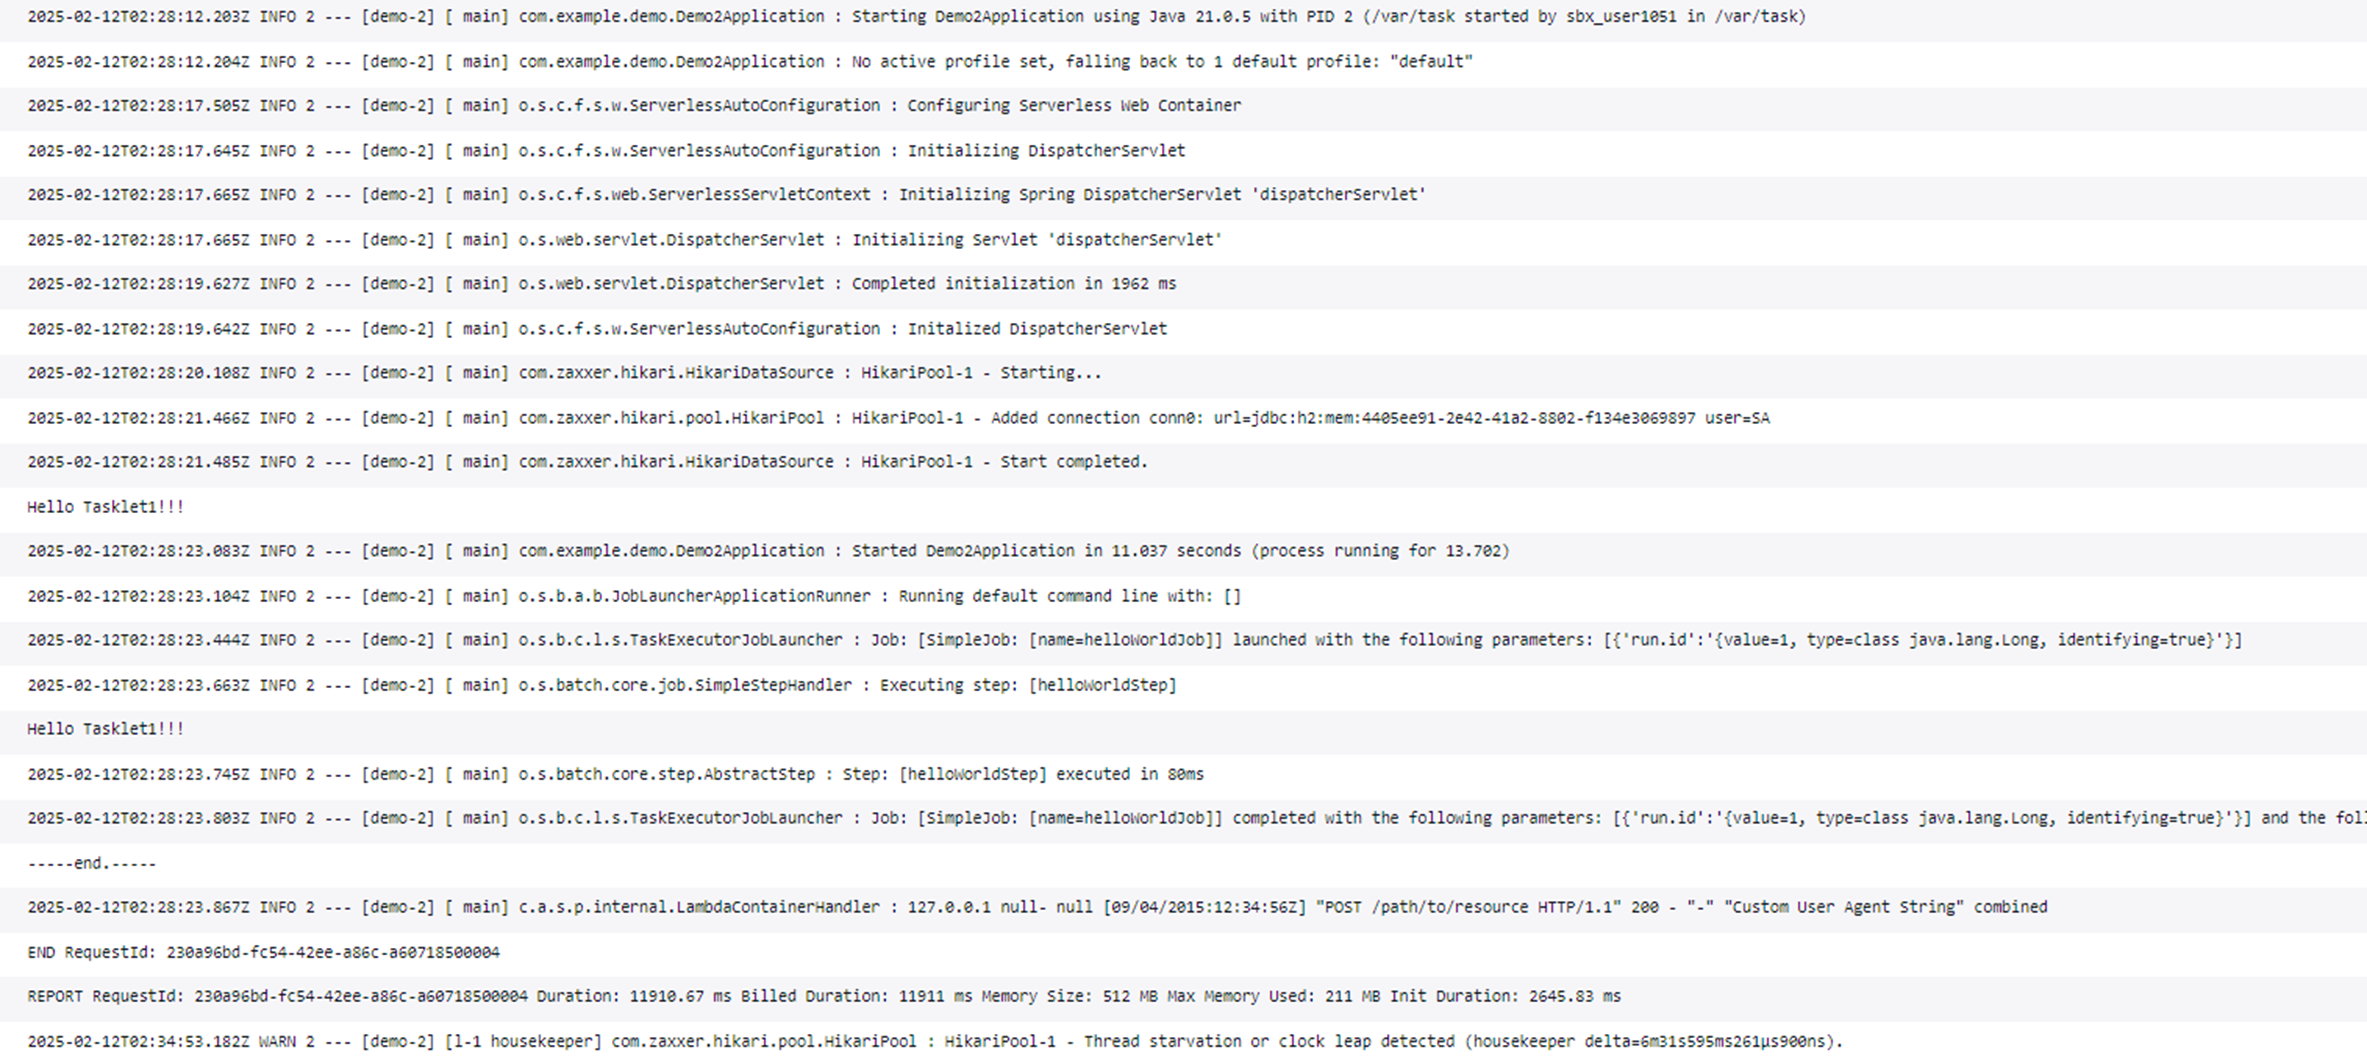
正常にログが出力されていることがわかります。
最後に
まだまだ、課題はありますが一旦は動いたことを確認できました。
参考サイト
https://qiita.com/syoichi_kitasaka/items/a08077fb523d33425bda
https://qiita.com/_wow_/items/6ff4f7121d300108594a
https://qiita.com/_wow_/items/6ff4f7121d300108594a