この記事の目的
非同期処理(ajax)でのコメント投稿機能を学んだのでアウトプットします
目標

要件
コメント投稿は非同期で行う
環境
・Ruby 2.7.1
・Rails 5.2.6
前提
・UserとPostは作成済み
・bootstrapとjquery-railsが入っている
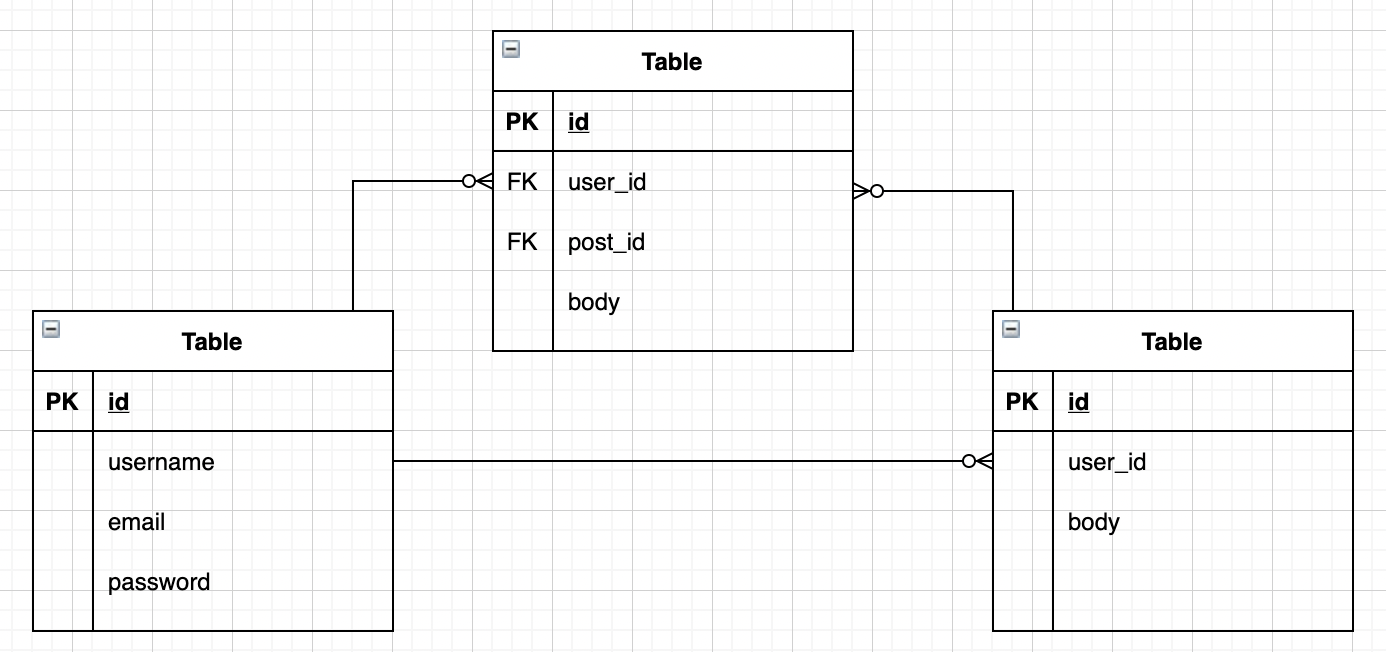
設計
ER図
ルーティング
POST  /posts/:post_id/comments  comments#create
GET  /comments/:id/edit  comments#edit
PATCH  /comments/:id  comments#update
DELETE  /comments/:id  comments#destroy
※ post_idが必要なのはコメントがcreateされる場合だけであり、一度コメントが作成されればそれらコメントは一意のidを持つので、edit,update,destroyの場合はコメントの自身のidのみで特定可能である。
よって、このようなルーティングにする。(shallow: trueで実現可能)
このようなshallowルーティングのメリットは、shallowを使わない場合と比較してルーティングがスッキリするという点である。
実装
データベース
$ rails g model Comment body:text user:references post:references実行
マイグレーションファイル編集(任意)
$ rails db:migrate実行
モデル
class Comment < ApplicationRecord
  belongs_to :user
  belongs_to :post

  validates :body, presence: true, length: { maximum: 1000 }
end
has_many :comments, dependent: :destroy
has_many :comments, dependent: :destroy
※ has_many,belongs_toはメソッドを作るためのメソッド。
※ Userモデルにhas_many :commentsを記述することで、Userモデルのインスタンスは.commentsメソッドを使い、自身のidに対応するCommentモデルのuser_idを通じて、コメント情報にアクセスできるようになる。Postも同様。
※ 逆に、Commentモデルにbelongs_to :userを記述することで、Commentモデルのインスタンスは.userメソッドを使い、自身のuser_idに対応するUserモデルのidを通じて、ユーザー情報にアクセスできるようになる。belongs_to :postでも同様。
ルーティング
resources :posts, shallow: true do
    resources :comments
end
※ 上述したルーティング設計に合わせるため、shallowルーティングを使用している
(参考:Railsの”shallow(浅い)”ルーティングを理解する)
コントローラー
class CommentsController < ApplicationController

  def create
    @comment = current_user.comments.build(comment_params)
    @comment.save
  end

  def edit
    @comment = current_user.comments.find(params[:id])
  end

  def update
    @comment = current_user.comments.find(params[:id])
    @comment.update(comment_update_params)
  end

  def destroy
    @comment = current_user.comments.find(params[:id])
    @comment.destroy!
  end

  private

  def comment_params
    params.require(:comment).permit(:body).merge(post_id: params[:post_id])
  end

  def comment_update_params
    params.require(:comment).permit(:body)
  end
end
※ current_user.comments.findをComment.findにしてしまうと、コメントしたユーザー以外のユーザーがURL直打ちなどによって他人のコメントを編集できてしまうようになるので注意。
※ ユーザから受け取った情報としてparamsにはないけれども、レコード作成時に追加したい値がある場合はmergeメソッドで含めることができる(今回のpost_id)。
mergeメソッドは、ハッシュ同士を統合できるメソッド。
x = {age: "25", email: "tarou@example.com"}
{name: "太郎"}.merge(x)
# => {name: "太郎", age: "25", email: "tarou@example.com"}
(参考)
【初学者向け】Rails mergeメソッド
mergeメソッドについて改めて理解を深めた
※ buildメソッドはnewメソッドと同じ。慣習的に、関連するモデルを生成するときはbuildを使う(参考:
railsのnewとbuildの違い)
※ createアクションの処理が終わると、views/comments/ディレクトリ配下にcreate.html.erbまたはcreate.js.erbを探しに行く。edit,update,destroyも同様。
view
jsの記述
<% if @comment.errors.present? %>
   alert("<%= @comment.errors.full_messages.join('\n') %>");
<% else %>
   $('.comments-box').prepend("<%= escape_javascript(render('comments/comment', comment: @comment) ) %>");
   $('.input-comment-body').val('');
<% end %>
※ slimならRubyのコードを囲む<%=...%>は#{...}となる
※ escape_javascriptはjと省略して書くこともできる
※ 最初の<% if @comment.errors.present? %>の部分は、ユーザーのコメントがバリデーションに引っかかった場合にエラー文を表示する処理。
・<% else %>の1行目の部分は、htmlのcomments-boxクラスで囲まれた部分にrender('comments/comment', comment: @comment) をぶちこんでいる。
イメージ
<div class="comments-box">

   <li>コメント1</li>
   <li>コメント2</li>
   <li>コメント3</li>

   <li>新規コメント</li> ⇦ こいつがjsで追加されるイメージ

</div>
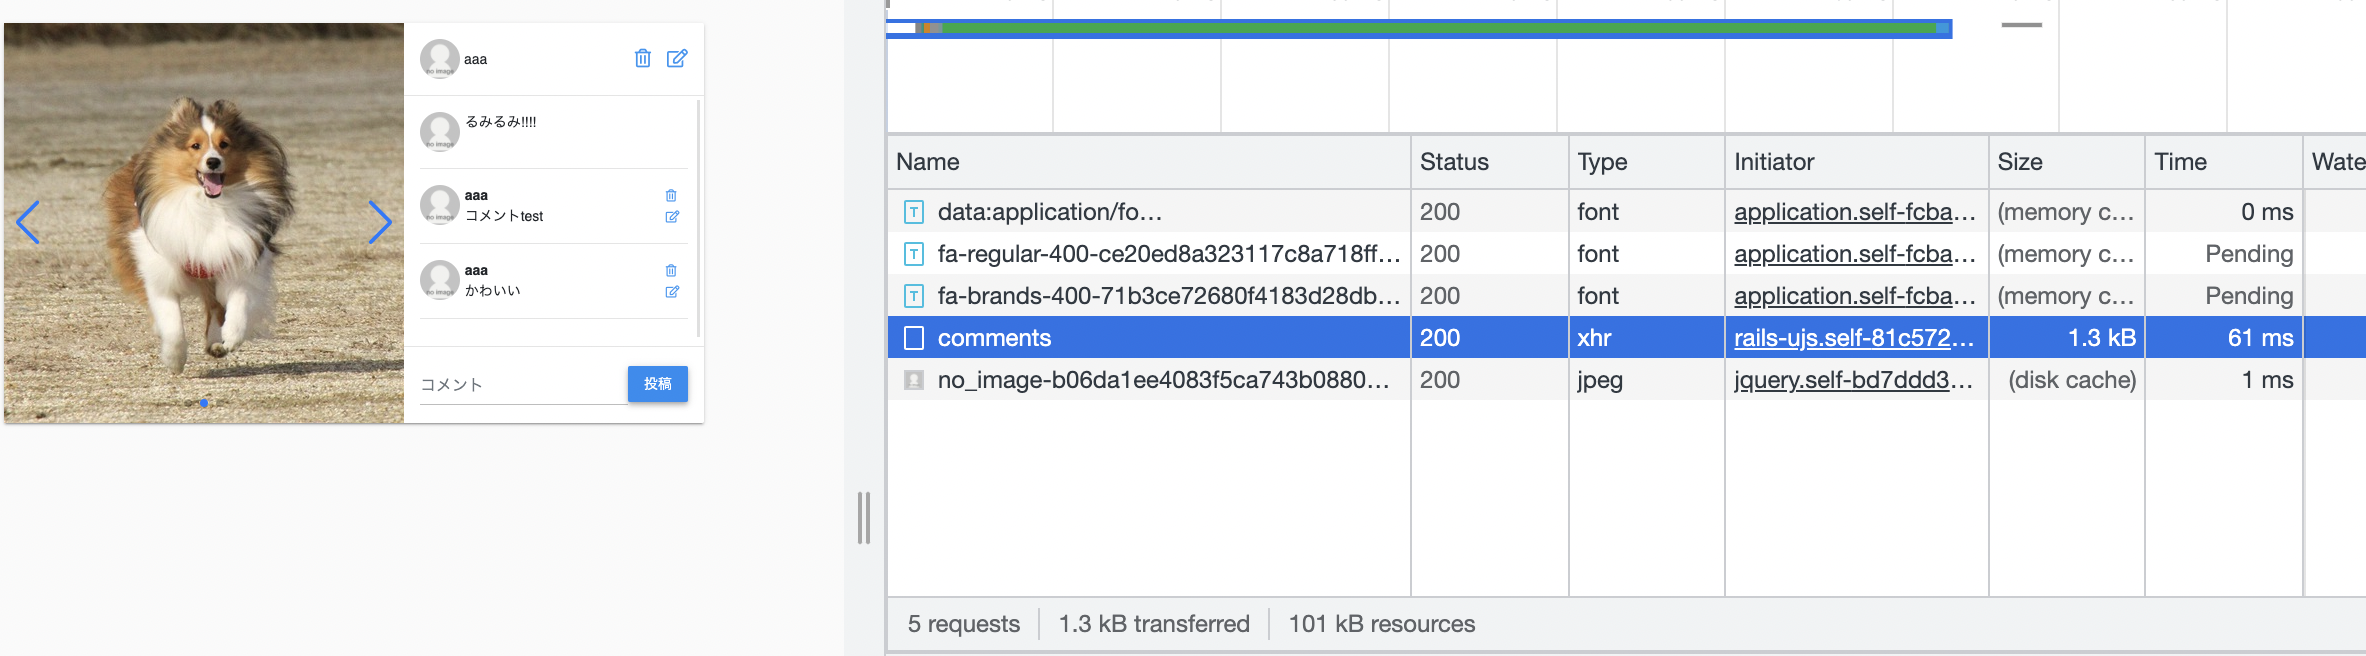
検証ツールで実際の挙動を確認

※ コメントを投稿したとき、画面遷移はせずに<div id="comment-29">...</div>だけが追加されていることがわかる
htmlの記述(投稿されたコメントの表示画面)
・
・
・
<hr>
      / コメント一覧
      <%= render 'comments/comments', comments: @comments %>

    <hr class="m-0">
       <div class="post-comment p-3">
         <%= render 'comments/form', post: @post, comment: @comment %>
       </div>
     </hr>
</hr>
<div class="comments-box">
   <%= render comments %>
</div>
※ commentsは@comments。つまりrender @commentsで_comment.html.erbに飛ばしているのと同じ(each文省略するやつ)
( @comments.each do |comment| が省略されている )
(<div class="comments-box">)
・
・
・

 / コメント一覧のうちのコメントひとつひとつ(|comment|)
  <div class="col-9">
    <span class="font-weight-bold.pr-1">
          <%= comment.user.username %>
    </span>
        <%= comment.body %>
  </div>

(</div>)
htmlの記述(コメントの入力フォーム)
<%= form_with model: [post, comment], class: 'd-flex mb-0 flex-nowrap justify-content-between', remote: true do |f| %>
  <%= f.text_field :body, class: 'form-control input-comment-body', placeholder: 'コメント' %>
  <%= f.submit '投稿', class: 'btn btn-primary btn-raised' %>
<% end %>
※ form_withはデフォルトでremote: trueなので書く必要はないが、local: trueではないことを強調するためにremote: trueを明示。
ちなみにlink_toの場合はremote: trueを必ず書かなければいけない。
※ ルーティングをネストさせているのでmodel: [post, comment]と2つ書かなければいけない
※ もしform_with model: commentにしたら、/commentsにPOSTリクエストが送られるが、ルーティングのPOST /posts/:post_id/comments comments#createにマッチしないため、post_idが不存在ということでエラーが起きる。
※ edit, update, destroyについてもcreate同様にviewを作っていく
ちなみに、検証ツールを見ればTypeがxhrになっており、form_withのremote: trueが非同期処理をしていることがわかる。
XHR(XMLHttpRequest)とは、JavaScriptなどのウェブブラウザ搭載のスクリプト言語でサーバとのHTTP通信を行うための、組み込みオブジェクト(API)である。
すでに読み込んだページからさらにHTTPリクエストを発することができ、ページ遷移することなしにデータを送受信できるAjaxの基幹技術である。(Wikipedia引用)