-
それぞれのバージョンが上がった以外は前回の Ubuntu 18.04 のときからあまり変わっていません- Bundler の binstubs を利用する手順を追加しました
- 手軽に試したい場合は公式の Docker イメージや Binder を利用するのが良いと思います(IRuby の README を参照)
大事なので2回書きます。手軽に試したい場合は公式の Docker イメージを使うか、Binder を使いましょう(IRuby の README を参照)。
下記のようなインストール手順は不要ですぐ使えます。
バージョンなど
Ubuntu 18.04(コンテナ外の作業環境)
anyenv
pyenv
  Python 3.10.3
rbenv
  Ruby 3.1.2

jupyter 1.0.0
  jupyter_core 4.10.0
  notebook 6.4.11
iruby 0.7.4
Docker の用意
Docker イメージを作るのが目的ではなく、まっさらな状態に戻してあれこれ試すために使います。
Docker なしでも大体同じだと思います。
# Dockerfile

FROM ubuntu:22.04

RUN apt-get update \
  && apt-get install -y sudo git wget build-essential nano

RUN useradd --create-home --gid sudo --shell /bin/bash user1 \
  && echo 'user1:pass' | chpasswd \
  && echo 'Defaults visiblepw'           >> /etc/sudoers \
  && echo 'user1 ALL=(ALL) NOPASSWD:ALL' >> /etc/sudoers

USER user1

WORKDIR /home/user1

CMD ["/bin/bash"]
参考: Dockerコンテナ内にsudoユーザを追加する - Qiita
ユーザ名 user1 は適当なものです。適宜読み替えます。以下同様。
イメージをビルドしてコンテナを起動。
docker build -t ubuntu_jupyter:22.04 .
docker run --rm -it -p8888:8888 ubuntu_jupyter:22.04 bash
以下はコンテナ内で作業しています。
anyenv, rbenv, pyenv のインストール
git clone https://github.com/anyenv/anyenv ~/.anyenv

  # 一応バージョン指定
( cd ~/.anyenv; git checkout v1.1.4; git status )

echo 'export PATH="$HOME/.anyenv/bin:$PATH"' >> ~/.bashrc
echo 'eval "$(anyenv init -)"'               >> ~/.bashrc

exec bash -l

  # メッセージにしたがって実行
yes | anyenv install --init

anyenv install rbenv
anyenv install pyenv

  # 一応バージョン指定
( cd ~/.anyenv/envs/rbenv; git checkout v1.2.0; git status )
( cd ~/.anyenv/envs/pyenv; git checkout v2.2.5; git status )

exec bash -l
Ruby のインストール
sudo apt install -y libssl-dev zlib1g-dev
rbenv install 3.1.2
Docker のポートマッピングの確認。先に疎通確認しておきます。
rbenv shell 3.1.2
gem install webrick
ruby -run -e httpd -- --port=8888 --bind-address=0.0.0.0 .
ホスト側から http://localhost:8888/ にアクセスできることを確認して Ctrl-C で止める。
Python のインストール
sudo apt install -y libffi-dev libsqlite3-dev
env PYTHON_CONFIGURE_OPTS='--enable-shared' pyenv install 3.10.3
env PYTHON_CONFIGURE_OPTS='--enable-shared' は後で PyCall を使うための指定
https://github.com/mrkn/pycall.rb#note-for-pyenv-users
Jupyter Notebook のインストール
  # ディレクトリと rbenv, pyenv の用意

mkdir ${HOME}/jupyter
cd ${HOME}/jupyter
pwd #=> /home/user1/jupyter

rbenv local 3.1.2
pyenv local 3.10.3

ruby -v   #=> ruby 3.1.2p20 (2022-04-12 revision 4491bb740a) [x86_64-linux]
python -V #=> Python 3.10.3
  # bundle init みたいなもの
  # "venv.d" は任意のディレクトリ名
python -m venv venv.d

  # 常に bundle exec してるみたいなモードになる
  # モードを抜けたい場合は deactivate を実行する
. venv.d/bin/activate

  # bundle add みたいなもの
pip install jupyter

jupyter notebook --no-browser --ip=0.0.0.0

  # ログイン用のトークン付きのURLが表示されるので、ホスト側のブラウザで開く
--ip=0.0.0.0 を指定しているのは Docker コンテナ内で実行してホスト側から参照するため。
確認できたら Ctrl-C で止める。
IRuby のインストール
基本的には
https://github.com/SciRuby/iruby
の説明を参考にしてインストールしました。
ただし、gem を Bundler で管理したいので、そのための手順を加えています。
Bundler 環境で iruby を実行するための方法として
- binstubs を使う方法
- ラッパースクリプトを使う方法
の2つを試しました。 binstubs を使う方が手順が簡単です。
binstubs を使う場合
sudo apt install -y libtool libffi-dev ruby ruby-dev make
sudo apt install -y libzmq3-dev libczmq-dev

bundle init
bundle config set --local path 'vendor/bundle'

bundle add ffi-rzmq iruby pycall rake

bundle binstubs iruby
  # ./bin/iruby が生成される

bin/iruby register --force
  # ~/.local/share/jupyter/kernels/ruby/kernel.json
  # が生成される

cat ~/.local/share/jupyter/kernels/ruby/kernel.json
  #=> {"argv":["/home/user1/jupyter/bin/iruby","kernel","{connection_file}"],"display_name":"Ruby 3.1.2","language":"ruby"}

  # この状態で jupyter 起動
jupyter notebook --no-browser --ip=0.0.0.0
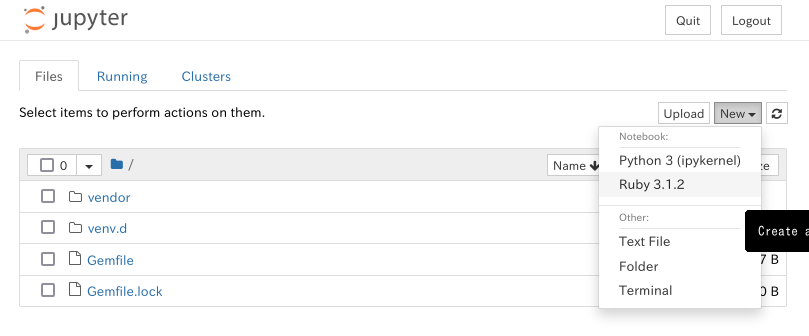
  # → Ruby 3.1.2 のノートブックが新規作成できるようになる
  #  (メニューに表示されるようになる)
ラッパースクリプトを使う場合
sudo apt install -y libtool libffi-dev ruby ruby-dev make
sudo apt install -y libzmq3-dev libczmq-dev

bundle init
bundle config set --local path 'vendor/bundle'

bundle add ffi-rzmq iruby pycall rake

bundle exec iruby register --force
  # ~/.local/share/jupyter/kernels/ruby/kernel.json
  # が生成される

cat ~/.local/share/jupyter/kernels/ruby/kernel.json
  #=> {"argv":["/home/user1/jupyter/vendor/bundle/ruby/3.1.0/bin/iruby","kernel","{connection_file}"],"display_name":"Ruby 3.1.2","language":"ruby"}

  # この状態で jupyter 起動
jupyter notebook --no-browser --ip=0.0.0.0
  # → Ruby 3.1.2 のノートブックが新規作成できるようになる
  # (メニューに表示されるようになる)
しかし、実際に新規作成を行うと次のようなエラーが jupyter を起動したターミナルに出てうまく動かない。
[I 05:17:21.886 NotebookApp] KernelRestarter: restarting kernel (3/5), new random ports
/home/user1/.anyenv/envs/rbenv/versions/3.1.2/lib/ruby/3.1.0/rubygems.rb:265:in `find_spec_for_exe': can't find gem iruby (>= 0.a) with executable iruby (Gem::GemNotFoundException)
        from /home/user1/.anyenv/envs/rbenv/versions/3.1.2/lib/ruby/3.1.0/rubygems.rb:284:in `activate_bin_path'
        from /home/user1/jupyter/vendor/bundle/ruby/3.1.0/bin/iruby:25:in `<main>'
これはおそらく rbenv + bundler 環境で実行できていないせいなので、iruby コマンドのラッパー iruby.sh を用意して対処してみる。
(他に良い方法があるかもしれませんが、とりあえずこれで動きました。)
cat <<'EOB' > iruby.sh
#!/bin/bash

JUPYTER_DIR=~/jupyter

export PYENV_ROOT="${HOME}/.anyenv/envs/pyenv"
export LIBPYTHON=${PYENV_ROOT}/versions/3.10.3/lib/libpython3.10.so.1.0
export PYTHON=${JUPYTER_DIR}/venv.d/bin/python
  # これでもいい?
  # export PYTHON=${PYENV_ROOT}/shims/python

export RBENV_ROOT="${HOME}/.anyenv/envs/rbenv"
export PATH="${RBENV_ROOT}/bin:${PATH}"
eval "$(rbenv init -)"

rbenv shell 3.1.2

BUNDLE_GEMFILE=${JUPYTER_DIR}/Gemfile \
  bundle exec iruby "$@"
EOB
  # 実行権限を付ける
chmod u+x iruby.sh

  # iruby のパスを修正
nano ~/.local/share/jupyter/kernels/ruby/kernel.json

{
  "argv": [
    "/home/user1/jupyter/iruby.sh",  ...ここだけ修正
    "kernel",
    "{connection_file}"
  ],
  "display_name":"Ruby 3.1.2",
  "language":"ruby"
}

  # もう一度 jupyter を起動
jupyter notebook --no-browser --ip=0.0.0.0
これで ruby カーネルが動くようになった。
IRuby のノートブックを使う
基本的な使い方については IRuby Notebook 利用者ガイド が参考になります。
matplotlib を使っている箇所があるので、下記でインストールしておく必要があります。
pip install matplotlib
bundle add matplotlib
ライブラリの追加
Python のライブラリを追加したい場合
pip install lib_foo
Ruby のライブラリを追加したい場合
bundle add lib_foo
カーネルを再起動(ノートブックのページのメニューの Kernal → Restart)すると require できるようになる。
バージョン詳細
pip freeze
argon2-cffi==21.3.0
argon2-cffi-bindings==21.2.0
asttokens==2.0.5
attrs==21.4.0
backcall==0.2.0
beautifulsoup4==4.11.1
bleach==5.0.0
cffi==1.15.0
debugpy==1.6.0
decorator==5.1.1
defusedxml==0.7.1
entrypoints==0.4
executing==0.8.3
fastjsonschema==2.15.3
ipykernel==6.13.0
ipython==8.3.0
ipython-genutils==0.2.0
ipywidgets==7.7.0
jedi==0.18.1
Jinja2==3.1.2
jsonschema==4.5.1
jupyter==1.0.0
jupyter-client==7.3.0
jupyter-console==6.4.3
jupyter-core==4.10.0
jupyterlab-pygments==0.2.2
jupyterlab-widgets==1.1.0
MarkupSafe==2.1.1
matplotlib-inline==0.1.3
mistune==0.8.4
nbclient==0.6.2
nbconvert==6.5.0
nbformat==5.4.0
nest-asyncio==1.5.5
notebook==6.4.11
packaging==21.3
pandocfilters==1.5.0
parso==0.8.3
pexpect==4.8.0
pickleshare==0.7.5
prometheus-client==0.14.1
prompt-toolkit==3.0.29
psutil==5.9.0
ptyprocess==0.7.0
pure-eval==0.2.2
pycparser==2.21
Pygments==2.12.0
pyparsing==3.0.8
pyrsistent==0.18.1
python-dateutil==2.8.2
pyzmq==22.3.0
qtconsole==5.3.0
QtPy==2.1.0
Send2Trash==1.8.0
six==1.16.0
soupsieve==2.3.2.post1
stack-data==0.2.0
terminado==0.13.3
tinycss2==1.1.1
tornado==6.1
traitlets==5.1.1
wcwidth==0.2.5
webencodings==0.5.1
widgetsnbextension==3.6.0
jupyter --version
Selected Jupyter core packages...
IPython          : 8.3.0
ipykernel        : 6.13.0
ipywidgets       : 7.7.0
jupyter_client   : 7.3.0
jupyter_core     : 4.10.0
jupyter_server   : not installed
jupyterlab       : not installed
nbclient         : 0.6.2
nbconvert        : 6.5.0
nbformat         : 5.4.0
notebook         : 6.4.11
qtconsole        : 5.3.0
traitlets        : 5.1.1
cat Gemfile.lock
GEM
  remote: https://rubygems.org/
  specs:
    data_uri (0.1.0)
    ffi (1.15.5)
    ffi-rzmq (2.0.7)
      ffi-rzmq-core (>= 1.0.7)
    ffi-rzmq-core (1.0.7)
      ffi
    io-console (0.5.11)
    irb (1.4.1)
      reline (>= 0.3.0)
    iruby (0.7.4)
      data_uri (~> 0.1)
      ffi-rzmq
      irb
      mime-types (>= 3.3.1)
      multi_json (~> 1.11)
      native-package-installer
    mime-types (3.4.1)
      mime-types-data (~> 3.2015)
    mime-types-data (3.2022.0105)
    multi_json (1.15.0)
    native-package-installer (1.1.4)
    pycall (1.4.1)
    rake (13.0.6)
    reline (0.3.1)
      io-console (~> 0.5)

PLATFORMS
  x86_64-linux

DEPENDENCIES
  ffi-rzmq (~> 2.0)
  iruby (~> 0.7.4)
  pycall (~> 1.4)
  rake (~> 13.0)

BUNDLED WITH
   2.3.7
参考
- 2018-04 IRuby インストールガイド (RubyData/workshop-materials)
- 2017-05 Rubyist が pyenv を使うときに知っておいてほしいこと - Qiita
この記事を読んだ人は(ひょっとしたら)こちらも読んでいます
