2020/11/19 15:00 追記
これ全然ダメでした。 nuxt.config.js がパッケージに含まれていないため、modules が読み込めない。
nuxt.config.js を含めたら今度は serverMiddleware が .ts なので読み込めない。
このままだと使い物にならないため、修正します。
TypeScript + Nuxt + API Gateway + AWS SAM
いちばん最後に構成図があります。(でかいので最後)
近頃では SSR よりも SSG という風潮ですが、公開速度が求められるケースでは SSG だと実現できないこともあるわけで。いまさらながら Nuxt.js を AWS Lambda + API Gateway で実行するまでのやり方を記録として残しておきます。
あと、この構成のメリットは、めちゃくちゃ安いことです。全体のコストとしては CloudFront の料金が支配的で、アクセス量によっては月額 1,000 円以内に収まります。
ぶっちゃけ、よほど Nuxt, TypeScript, AWS に自信がないかぎりやらない方がいいです。モジュール 1 つ追加するだけでも相当な Try & Error だし、切り分けがしんどいし、インフラコストに 1,000 円もかけられないんだ!という人以外には本当にオススメしません。自分は全部かなり自信がある人ですが、それでもめちゃくちゃしんどかったです。
序盤はおもにパッケージサイズとの戦いの記録です。中盤は Nuxt の API との戦い、終盤は AWS との戦いになります。
成果物はここ(記事と若干の乖離があるけど) => https://github.com/sonodar/nuxt-serverless-app
ちなみにまだ微妙に書き途中。
プロジェクト作成
プロジェクトを 1 から作る場合は create-nuxt-app で作成するのが楽です。
yarn create nuxt-app nuxt-serverless-app

create-nuxt-app v3.4.0
✨  Generating Nuxt.js project in nuxt-serverless-app
? Project name: nuxt-serverless-app
? Programming language: TypeScript               ・・・(1)
? Package manager: Yarn
? UI framework: None
? Nuxt.js modules:
? Linting tools: ESLint, Prettier, Lint staged files
? Testing framework: None
? Rendering mode: Universal (SSR / SSG)          ・・・(2)
? Deployment target: Server (Node.js hosting)    ・・・(3)
? Development tools: (Press <space> to select, <a> to toggle all, <i> to invert selection)
? Continuous integration: None
? Version control system: Git
ポイントは、Programming language で必ず TypeScript を選択すること。これを選択しないで後から TypeScript を追加するのは意外と面倒です。あと Universal (SSR / SSG) と Server (Node.js hosting) も必須ですが, 間違えても簡単に直せます。他の選択肢は任意です。
個人的には、既存のプロジェクトをマイグレーションする場合でも, 先に
create-nuxt-appで雛形を作成してから components などのファイルをコピーして適宜修正しています。足回りを実装し直すよりも楽なことが多いので。特に ESLint とかはバージョンによって全然変わるし辛い。すでに大規模なシステムではできないと思いますけど。
srcDir 変更
サーバーサイドのソースコードは nuxt とは完全に分離する必要があるため, srcDir を変更して nuxt 管理のソースを nuxt-src, Lambda で実行されるサーバーサイドを server とします。
mkdir nuxt-src
mv assets components layouts middleware pages plugins static store nuxt-src/
 export default {
+  srcDir: './nuxt-src',
tsconfig.json の paths も忘れずに変更します。
~ を nuxt-src に, ~~ をプロジェクトルートにマッピングします。
プロジェクトルートのマッピングは serverMiddleware にパスを追加する際に絶対に必要です。ないと nuxt が serverMiddleware を解決できません。
     "paths": {
       "~/*": [
-        "./*"
+        "./nuxt-src/*"
       ],
-      "@/*": [
+      "~~/*": [
         "./*"
       ]
     },
最初からある@は邪悪なので消します。scssでは ~ しか使えないので, 表記を統一するため @ は毎回消しています。既存プロジェクトで、すでに利用している場合は ~ と同じ修正をします。
jest.config.js がある場合は,
moduleNameMapperやcollectCoverageFromも忘れずに修正します。
Lambda ハンドラーの作成
Lambda 関数も TypeScript で実装したいので webpack をインストールします。webpack や rollup のようなバンドラーを利用しないと Lambda 関数のデプロイパッケージがあっという間に上限の 50 MB を超えるためバンドラーは必須です。
nuxt に webpack は含まれているので, cli と loader のみを追加します。
yarn add -D webpack-cli ts-loader
aws-serverless-express を利用した Lambda 関数を実装するために必要なファイルを揃えます。express などは webpack でバンドルするので, 依存はすべて devDependencies に入れます。
yarn add -D express @types/express cors @types/cors
yarn add -D aws-serverless-express @types/aws-serverless-express @types/aws-lambda
# 以下は必要に応じて
yarn add -D cookie-parser @types/cookie-parser
また、nuxt パッケージそのものは babel などに依存があり, パッケージサイズが肥大化するため, nuxt-start を別途インストールして node_modules の容量を削減します。
まず、package.json の dependencies をすべて devDependencies に移動します。
-  "dependencies": {
-    "@nuxt/typescript-runtime": "^2.0.0",
-    "core-js": "^3.6.5",
-    "nuxt": "^2.14.6"
-  },
+  "dependencies": {},
   "devDependencies": {
     "@nuxt/types": "^2.14.6",
     "@nuxt/typescript-build": "^2.0.3",
+    "@nuxt/typescript-runtime": "^2.0.0",
     "@nuxtjs/eslint-config": "^3.1.0",
     "@nuxtjs/eslint-config-typescript": "^3.0.0",
     "@nuxtjs/eslint-module": "^2.0.0",
@@ -35,6 +31,7 @@
     "@types/express": "^4.17.8",
     "aws-serverless-express": "^3.3.8",
     "babel-eslint": "^10.1.0",
+    "core-js": "^3.6.5",
     "eslint": "^7.10.0",
     "eslint-config-prettier": "^6.12.0",
     "eslint-plugin-nuxt": "^1.0.0",
@@ -42,6 +39,7 @@
     "express": "^4.17.1",
     "husky": "^4.3.0",
     "lint-staged": "^10.4.0",
+    "nuxt": "^2.14.6",
yarn add nuxt-start@2.14.7 # バージョンは nuxt に合わせる
@nuxtjs/axiosなど, nuxt の module や plugin も dependencies に含める必要があります。
Lambda やサーバーサイドのソース用に server ディレクトリを作成します。
mkdir server
Lambda 関数のハンドラーを実装します。プログラマティックに Nuxt を扱う方法は公式サイトにありますが, 現時点では TypeScript の型定義はないので自前で用意します。
また, 公式サイトにあるような nuxt ではなく nuxt-start を利用します。
declare module 'nuxt-start' {
  const loadNuxt: (command: string) => Promise<any>
}
express のインスタンス生成は別ファイルでやります。このファイルは、後に serverMiddleware としても利用可能なように, express のインスタンスを default export します。(必ず default で export します)
import express from 'express'
import cors from 'cors'

const app = express()
app.use(express.json())
app.use(express.urlencoded({ extended: true }))

// express の動作確認用に API のエンドポイントを追加しておきます
const apiRouter = express.Router()
apiRouter.use(cors())
apiRouter.post('/echo', (req, res) => res.json(req.body))
app.use('/api', apiRouter)

export default app
これにより、ローカル開発では通常の express アプリケーションとして
serverMiddlewareで扱うことができ, 開発効率が大幅に向上します。
import http from 'http'
import { APIGatewayProxyHandler } from 'aws-lambda'
import awsServerlessExpress from 'aws-serverless-express'
import awsServerlessExpressMiddleware from 'aws-serverless-express/middleware'
import { loadNuxt } from 'nuxt-start'
import app from './index'

const binaryMimeTypes = [
  'application/javascript',
  // 'application/json',
  'application/octet-stream',
  'application/xml',
  'font/eot',
  'font/opentype',
  'font/otf',
  'image/jpeg',
  'image/png',
  'image/svg+xml',
  'text/comma-separated-values',
  'text/css',
  'text/html',
  'text/javascript',
  'text/plain',
  'text/text',
  'text/xml',
]

let server: http.Server

async function createServer(): Promise<http.Server> {
  const nuxt = await loadNuxt('start')
  app.use(awsServerlessExpressMiddleware.eventContext())
  app.use(nuxt.render)
  server = awsServerlessExpress.createServer(app, undefined, binaryMimeTypes)
  return server
}

// ここでは async function 不可
export const handler: APIGatewayProxyHandler = (event, context) => {
  createServer().then((server) =>
    awsServerlessExpress.proxy(server, event, context)
  )
}
Lambda 関数の TypeScript トランスパイル用に webpack.config.js を作成します。
ポイントは, 出力先を .nuxt/dist ディレクトリにすることと, externals に nuxt-start を含めることです。
const path = require('path')

module.exports = {
  mode: 'production',
  entry: {
    lambda: path.resolve(__dirname, './server/lambda.ts'),
  },
  output: {
    path: path.resolve(__dirname, './.nuxt/dist'),
    filename: '[name].js',
    libraryTarget: 'commonjs',
  },
  target: 'node',
  externals: ['nuxt-start'],
  module: {
    rules: [
      {
        test: /\.ts$/,
        use: 'ts-loader',
        exclude: /node_modules/,
      },
    ],
  },
  resolve: {
    extensions: ['.ts', '.js'],
  },
}
nuxt build 後に webpack が走るように postbuild を package.json に追加します。
   "scripts": {
     "dev": "nuxt-ts",
     "build": "nuxt-ts build",
+    "postbuild": "webpack",
     "start": "nuxt-ts start",
試しに build してみます。
yarn build
このままだと以下のように Error: TypeScript emitted no output というエラーが出ます。
ERROR in ./server/lambda.ts
Module build failed (from ./node_modules/ts-loader/index.js):
Error: TypeScript emitted no output for /Users/ryohei-sonoda/git/nuxt-serverless-app/server/lambda.ts.
    at makeSourceMapAndFinish (/Users/ryohei-sonoda/git/nuxt-serverless-app/node_modules/ts-loader/dist/index.js:53:18)
    at successLoader (/Users/ryohei-sonoda/git/nuxt-serverless-app/node_modules/ts-loader/dist/index.js:40:5)
    at Object.loader (/Users/ryohei-sonoda/git/nuxt-serverless-app/node_modules/ts-loader/dist/index.js:23:5)
error Command failed with exit code 1.
info Visit https://yarnpkg.com/en/docs/cli/run for documentation about this command.
tsconfig.json で noEmit を false にします。
     "strict": true,
-    "noEmit": true,
+    "noEmit": false,
     "experimentalDecorators": true,
これでビルドが通ります。
最後に, nuxt.config.js で serverMiddleware を追加します。
   // Build Configuration (https://go.nuxtjs.dev/config-build)
   build: {},
+
+  serverMiddleware: ['~~/server/index.ts'],
 }
まず、ローカルで express が動作するか確認します。
yarn dev
127.0.0.1:3000 で LISTEN されるので, 先程生やした動作確認用のエンドポイントに POST してみます。
curl -v -H "Content-Type: application/json" localhost:3000/api/echo -d '{"message":"hoge"}'
*   Trying 127.0.0.1...
* TCP_NODELAY set
* Connected to localhost (127.0.0.1) port 3000 (#0)
> POST /api/echo HTTP/1.1
> Host: localhost:3000
> User-Agent: curl/7.54.0
> Accept: */*
> Content-Type: application/json
> Content-Length: 18
>
* upload completely sent off: 18 out of 18 bytes
< HTTP/1.1 200 OK
< X-Powered-By: Express
< Content-Type: application/json; charset=utf-8
< Content-Length: 18
< ETag: W/"12-HG8TY3NadWW3zeWB3QbSQHxbAxc"
< Date: Thu, 05 Nov 2020 14:16:51 GMT
< Connection: keep-alive
<
* Connection #0 to host localhost left intact
{"message":"hoge"}
ローカルではちゃんと nuxt の serverMiddleware として機能しています。
Lambda アップロードパッケージ作成
続いて, パッケージ作成処理です。
ビルドしたファイルのうち、含めるのは以下のみです。
- .nuxt/dist/server/
- .nuxt/dist/client/
- .nuxt/dist/lambda.js
- node_modules/
assets を CloudFront で配信するので,
.nuxt/dist/clientは実質不要になる。手順の便宜上ここでは含める。
# devDependencies のパッケージを node_modules から削除
yarn install --production
zip -rq upload.zip .nuxt/dist node_modules
だいたい 8 MB くらいのサイズになります。なお, nuxt-start ではなく nuxt をそのまま使うと 31 MB にもなります。
なお, 自分の場合, 毎回 devDependencies を削除していたら開発スピードが落ちるので, パッケージの作成は docker コンテナ上で実施しています。利用している docker イメージは
lambci/lambda:build-nodejs12.xです。
sam テンプレート作成
sam のテンプレートを作成します。ここでは 2 ファイルのみなので sam init コマンドは使いません。
AWSTemplateFormatVersion: 2010-09-09
Description: Serverless Nuxt App

Transform:
  - AWS::Serverless-2016-10-31

Resources:
  NuxtApi:
    Type: AWS::Serverless::Api
    Properties:
      Name: serverless-nuxt-app
      StageName: v1
  NuxtFunction:
    Type: AWS::Serverless::Function
    Properties:
      FunctionName: serverless-nuxt-app
      CodeUri: ./upload.zip
      Handler: .nuxt/dist/lambda.handler
      Runtime: nodejs12.x
      MemorySize: 512
      Timeout: 10
      Description: Serverless Nuxt App
      Environment:
        Variables:
          NODE_ENV: production
      Events:
        Root:
          Type: Api
          Properties:
            Path: "/"
            Method: any
            RestApiId: !Ref NuxtApi
        Nuxt:
          Type: Api
          Properties:
            Path: "/{proxy+}"
            Method: any
            RestApiId: !Ref NuxtApi
  # Lambda 関数用の CloudWatch LogGroup
  # あらかじめ作成してログ保持日数が指定しておく
  NuxtFunctionLog:
    Type: AWS::Logs::LogGroup
    Properties:
      LogGroupName: /aws/lambda/serverless-nuxt-app
      RetentionInDays: 7

Outputs:
  ApiEndpoint:
    Description: "API Gateway endpoint URL"
    Value: !Sub "https://${NuxtApi}.execute-api.${AWS::Region}.amazonaws.com/v1/"
この状態でローカル実行してみます。
sam local start-api
127.0.0.1:3000 で起動したというメッセージが出てきます。
Mounting NuxtFunction at http://127.0.0.1:3000/{proxy+} [DELETE, GET, HEAD, OPTIONS, PATCH, POST, PUT]
Mounting NuxtFunction at http://127.0.0.1:3000/ [DELETE, GET, HEAD, OPTIONS, PATCH, POST, PUT]
You can now browse to the above endpoints to invoke your functions. You do not need to restart/reload SAM CLI while working on your functions, changes will be reflected instantly/automatically. You only need to restart SAM CLI if you update your AWS SAM template
2020-11-05 23:27:53  * Running on http://127.0.0.1:3000/ (Press CTRL+C to quit)
で、ブラウザで http://127.0.0.1:3000 にアクセスすると、しばらくたって以下の様な 200 OK のログが出ます。
Invoking .nuxt/dist/lambda.handler (nodejs12.x)
Decompressing /Users/ryohei-sonoda/git/nuxt-serverless-app/upload.zip
Failed to download a new amazon/aws-sam-cli-emulation-image-nodejs12.x:rapid-1.1.0 image. Invoking with the already downloaded image.
Mounting /private/var/folders/x2/_5zc52s57jv5vsjrg3hxnwqr0000gp/T/tmp597u_xzy as /var/task:ro,delegated inside runtime container
START RequestId: 674bfa66-7dee-1b63-3f58-afbc633de810 Version: $LATEST
END RequestId: 674bfa66-7dee-1b63-3f58-afbc633de810
REPORT RequestId: 674bfa66-7dee-1b63-3f58-afbc633de810  Init Duration: 937.57 ms        Duration: 3220.72 ms    Billed Duration: 3300 ms        Memory Size: 512 MB     Max Memory Used: 98 MB
2020-11-05 23:28:15 127.0.0.1 - - [05/Nov/2020 23:28:15] "GET / HTTP/1.1" 200 -
でもブラウザは真っ白もしくはエラー画面です。
curl で確認してみると Base64 にエンコードされた HTML が返り, ブラウザではデコードできずにエラーになっています。
* Rebuilt URL to: localhost:3000/
*   Trying 127.0.0.1...
* TCP_NODELAY set
* Connected to localhost (127.0.0.1) port 3000 (#0)
> GET / HTTP/1.1
> Host: localhost:3000
> User-Agent: curl/7.54.0
> Accept: */*
>
* HTTP 1.0, assume close after body
< HTTP/1.0 200 OK
< x-powered-by: Express
< etag: "e93-aSp1uNPhobCrmddhNg5VzLYfihY"
< content-type: text/html; charset=utf-8
< accept-ranges: none
< content-length: 3731
< vary: Accept-Encoding
< date: Thu, 05 Nov 2020 14:46:43 GMT
< connection: close
< Server: Werkzeug/1.0.1 Python/3.7.8
<
* Closing connection 0
PCFkb2N0eXBlIGh0bWw+CjxodG1sIGRhdGEtbi1oZWFkLXNz...
現状はおとなしく sam local start-api でのブラウザ確認を諦めるしかありません。
最初から deflate 圧縮しちゃえばバイナリ扱いになってイケるかな?と思って
compressionパッケージを試しましたが, compression された後に Base64 エンコードされるので結局ダメでした。
デプロイの設定を samconfig.toml に書きます。
version = 0.1
[default]
[default.deploy]
[default.deploy.parameters]
stack_name = "serverless-nuxt-app"
s3_bucket = "your-bucket-name"
s3_prefix = "sam-src/serverless-nuxt-app"
region = "ap-northeast-1"
capabilities = "CAPABILITY_IAM"
デプロイします。
cd sam
export AWS_ACCESS_KEY_ID=your-aws-access-key-id
export AWS_SECRET_ACCESS_KEY=your-aws-secret-access-key
sam deploy
CloudFormation outputs from deployed stack
----------------------------------------------------------------------------------------------------------------------------------------------
Outputs
----------------------------------------------------------------------------------------------------------------------------------------------
Key                 ApiEndpoint
Description         API Gateway endpoint URL
Value               https://xxxxxxxxxxxx.execute-api.ap-northeast-1.amazonaws.com/v1/
----------------------------------------------------------------------------------------------------------------------------------------------

Successfully created/updated stack - serverless-nuxt-app in ap-northeast-1
出力された ApiEndpoint にブラウザでアクセスすると, 無事に nuxt の画面が表示されました。
axios モジュールを試す
せっかく動作確認用の API があるので, axios モジュールをインストールして asyncData で実行してみます。
yarn add @nuxtjs/axios
   // Modules (https://go.nuxtjs.dev/config-modules)
-  modules: [],
+  modules: ['@nuxtjs/axios'],
これだけだと $axios が認識されないので, tsconfig.json に追記。
     },
     "types": [
       "@types/node",
-      "@nuxt/types"
+      "@nuxt/types",
+      "@nuxtjs/axios"
     ]
   },
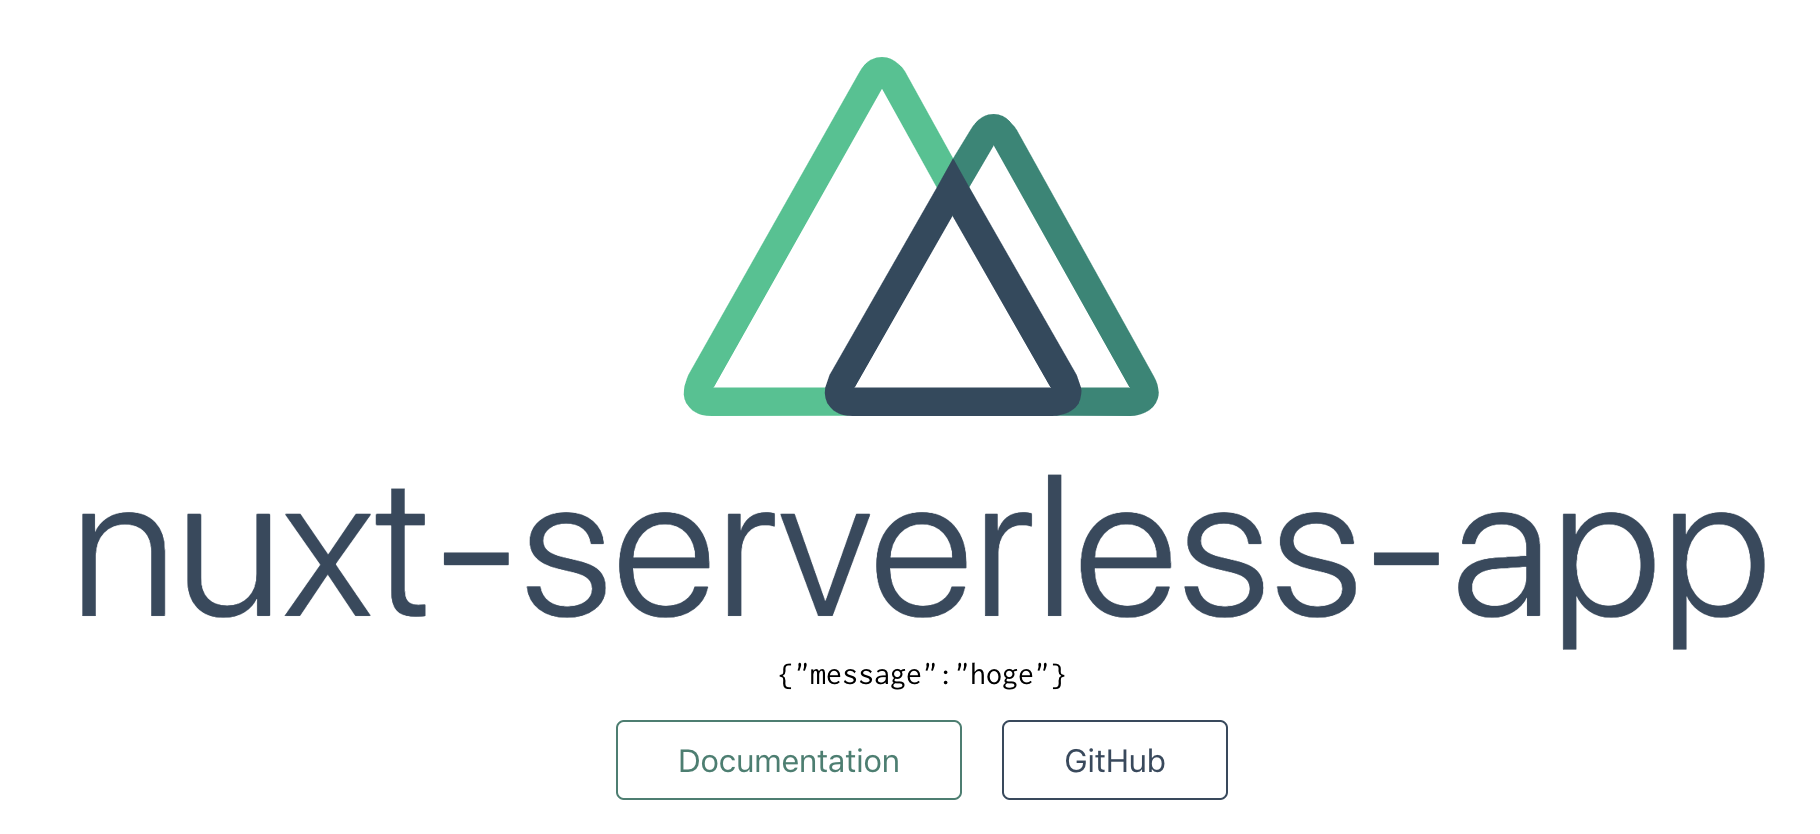
トップページで echo API を実行してレスポンスを画面表示する処理を追記。
     <div>
       <Logo />
       <h1 class="title">nuxt-serverless-app</h1>
+      <pre>{{ data }}</pre>
       <div class="links">
         <a
           href="https://nuxtjs.org/"
@@ -27,8 +28,14 @@

 <script lang="ts">
 import Vue from 'vue'
+import { Context } from '@nuxt/types'

-export default Vue.extend({})
+export default Vue.extend({
+  async asyncData(ctx: Context) {
+    const { data } = await ctx.$axios.post('/api/echo', { message: 'hoge' })
+    return { data: JSON.stringify(data) }
+  },
+})
 </script>

 <style>
ローカルで実行(yarn dev)してみます。ちゃんと {"message":"hoge"} が表示されます。
デプロイしてみる。
rm -rf .nuxt upload.zip
yarn build
yarn install --production
zip -rq upload.zip .nuxt/dist node_modules
sam deploy
ダメでした。Internal Server Error になります。Lambda のログを確認。
{
    "errorType": "Runtime.UnhandledPromiseRejection",
    "errorMessage": "Error: connect ECONNREFUSED 127.0.0.1:3000",
    "reason": {
        "message": "connect ECONNREFUSED 127.0.0.1:3000",
        "name": "Error",
        "stack": "Error: connect ECONNREFUSED 127.0.0.1:3000\n    at TCPConnectWrap.afterConnect [as oncomplete] (net.js:1141:16)",
        "config": {
...
axios で 127.0.0.1:3000 に繋ぎにいってる。Lambda では LISTEN プロセスがいるわけではないので, 当然これだとエラーになる。
なので baseURL を指定してあげればいい。環境変数から渡すようにしよう。
   // Modules (https://go.nuxtjs.dev/config-modules)
   modules: ['@nuxtjs/axios'],
+
+  axios: {
+    baseURL: process.env.BASE_URL || 'http://localhost:3000',
+  },
+
   // Build Configuration (https://go.nuxtjs.dev/config-build)
-  build: {},
+  build: {
+    publicPath: (process.env.BASE_URL || '') + '/_nuxt/',
+  },
+
+  router: {
+    base: (process.env.BASE_PATH || '') + '/',
+  },
ついでに忘れてた publicPath と router.base も修正。API Gateway の場合, 必ずステージ名が URL の末尾にパスとして追加されるので, これをしないと相対パスが解決できずに画像や js が読み込めなくなる。
例えば
/_nuxt/assets/hoge.imgの場合
https://xxxxxxxxxxxx.execute-api.ap-northeast-1.amazonaws.com/v1/_nuxt/assets/hoge.img
が正解なのに
https://xxxxxxxxxxxx.execute-api.ap-northeast-1.amazonaws.com/_nuxt/assets/hoge.img
になっちゃう。API Gateway みたいに baseURL がサブディレクトリで終わらなければ無問題。
      Environment:
        Variables:
          NODE_ENV: production
+         BASE_PATH: /v1/
+         BASE_URL: !Sub "https://${NuxtApi}.execute-api.${AWS::Region}.amazonaws.com/v1/"
rm -rf .nuxt upload.zip
yarn build
yarn install --production
zip -rq upload.zip .nuxt/dist node_modules
sam deploy
sam のエラー。循環参照になってるからダメだよって。
Error: Failed to create changeset for the stack: sonoda-nuxt-api-test,
  ex: Waiter ChangeSetCreateComplete failed: Waiter encountered a terminal failure state Status: FAILED.
  Reason: Circular dependency between resources: [NuxtFunctionRootPermissionv1, NuxtFunction, NuxtApiDeploymentb5e0e7a20a, NuxtFunctionNuxtPermissionv1, NuxtApi, NuxtApiv1Stage]
仕方ないので, ベタ書き。どうせ後でドメインを割り当てるんだから, いったんはこれで行く。
      Environment:
        Variables:
          NODE_ENV: production
          BASE_PATH: /v1/
-         BASE_URL: !Sub "https://${NuxtApi}.execute-api.${AWS::Region}.amazonaws.com/v1/"
+         BASE_URL: https://xxxxxxxxxxxx.execute-api.ap-northeast-1.amazonaws.com/v1
で, デプロイして動作確認すると・・・, 同じエラー connect ECONNREFUSED 127.0.0.1:3000
どうやら nuxt.config.js での process.env はビルド時の環境変数を参照して, 出力されたファイルに埋め込まれるようだ。なので、ビルド時に指定する。
template.yml は戻しておく。
      Environment:
        Variables:
          NODE_ENV: production
-         BASE_PATH: /v1/
-         BASE_URL: https://xxxxxxxxxxxx.execute-api.ap-northeast-1.amazonaws.com/v1
rm -rf .nuxt upload.zip
# ビルドの前に指定
export BASE_PATH=/v1/
export BASE_URL=https://xxxxxxxxxxxx.execute-api.ap-northeast-1.amazonaws.com/v1
yarn build
yarn install --production
zip -rq upload.zip .nuxt/dist node_modules
sam deploy
今度はうまくいきました。
TODO 以下、書きかけ
CloudFront 経由にする場合、axios モジュールは via ヘッダを削除する
https://qiita.com/ykunimoto/items/9509aad5f024cb547fb1
https://qiita.com/kubotak/items/fc1a877f99a569fc54bb
yarn add axios する
@nuxtjs/axios だけだと dependencies に含まれているはずなのに axios が認識されない。(未調査)
参考リンク
- https://qiita.com/hiroyky/items/298e8a475dcd6dc70727
- https://github.com/sketchnotes/nuxt-express-ts
- https://github.com/tonyfromundefined/nuxt-serverless
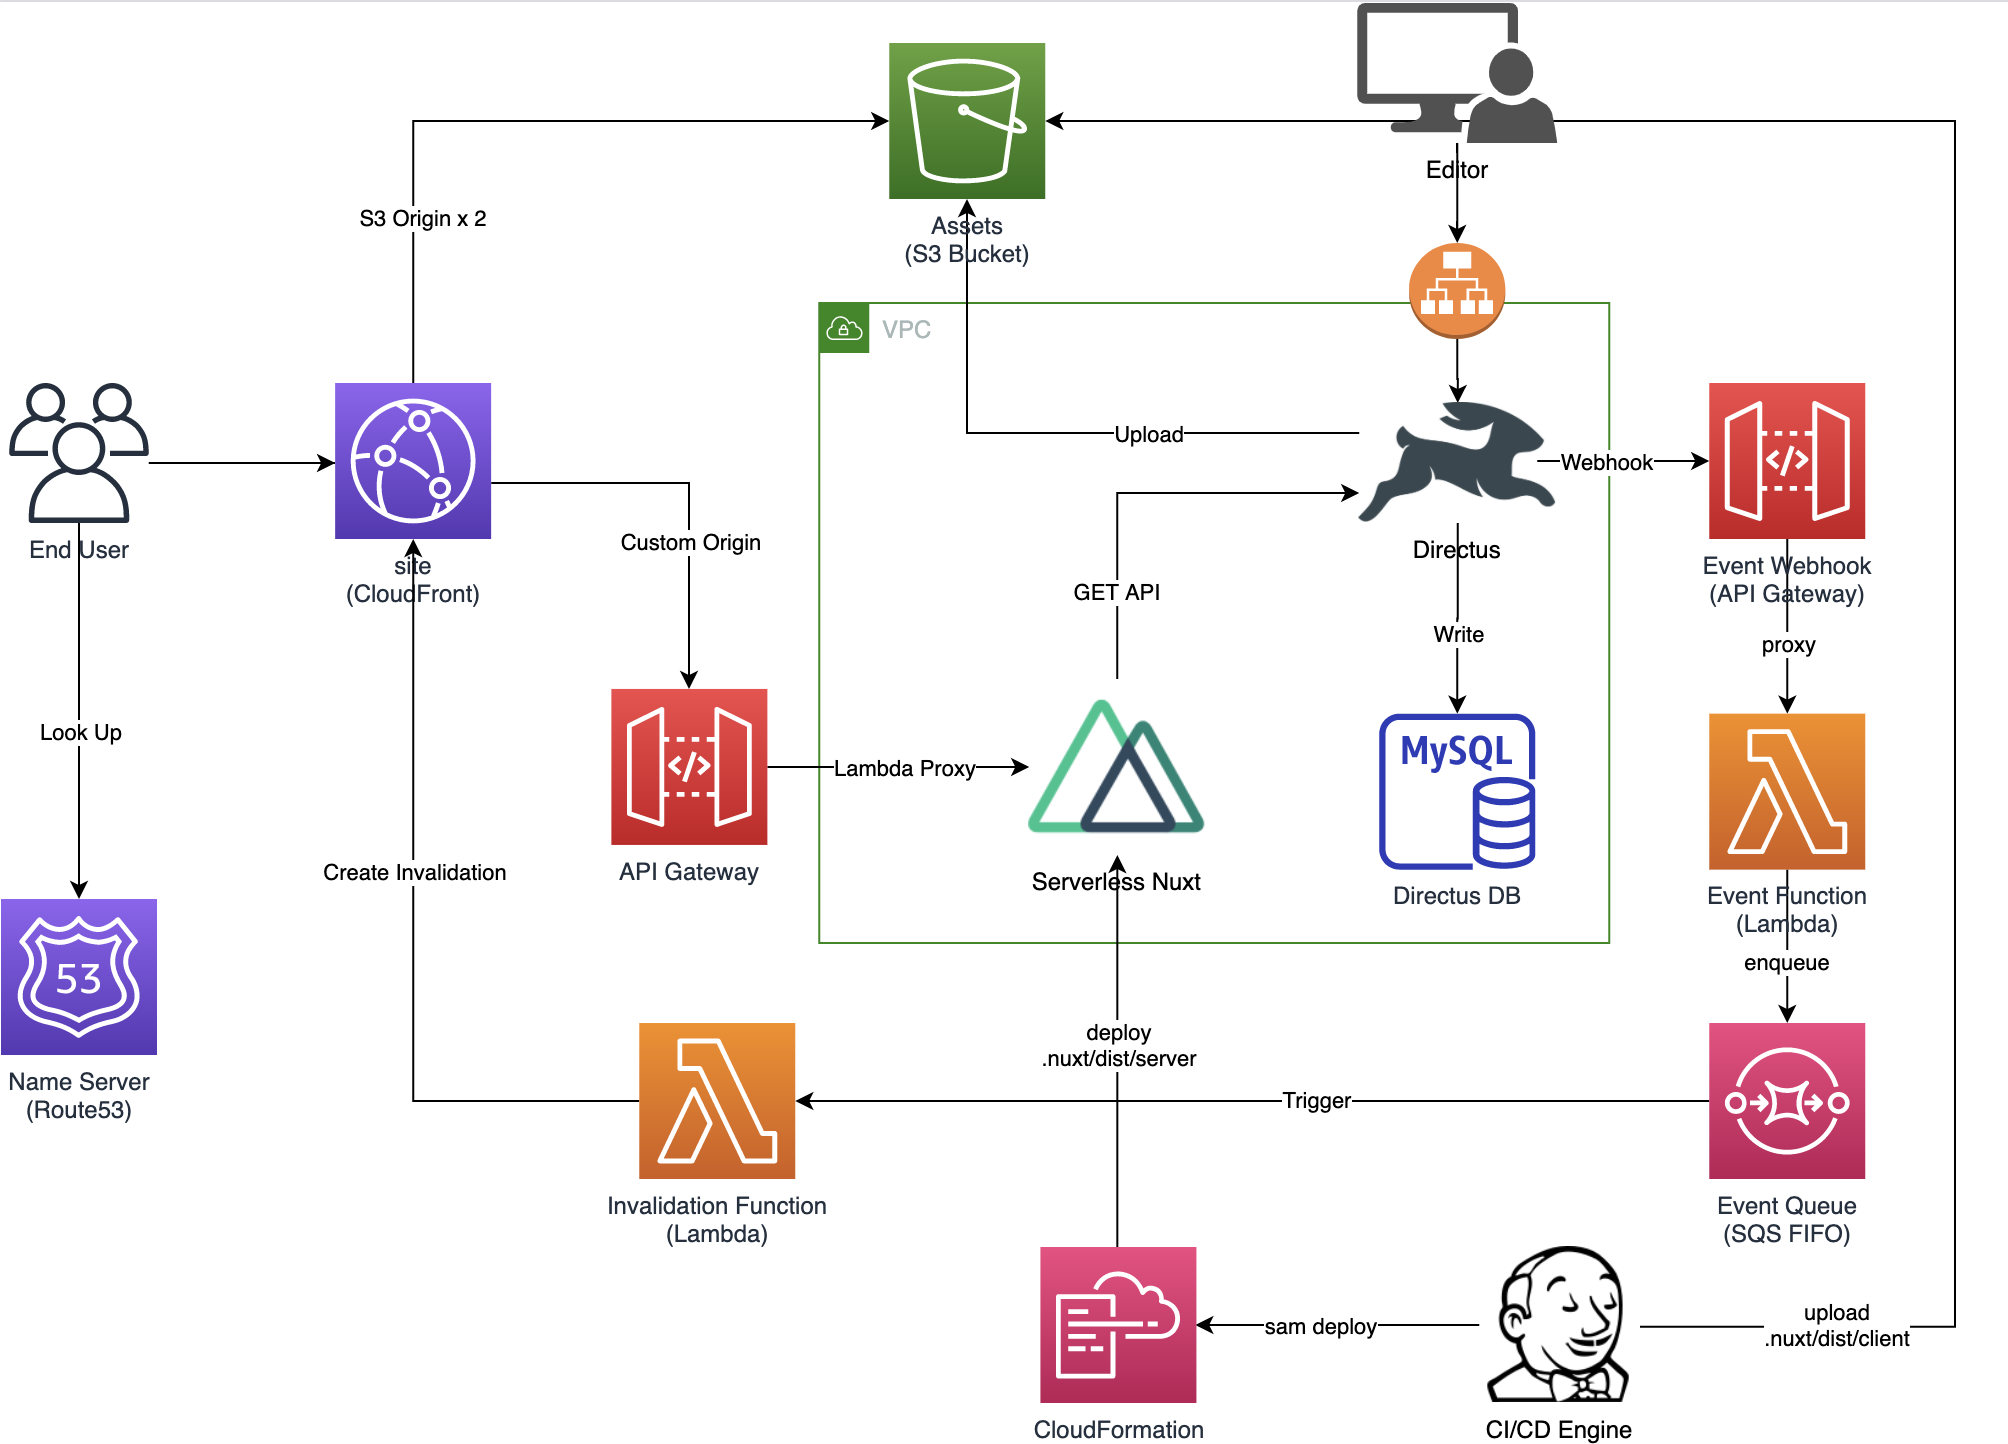
実際の構成図
- Directus という OSS の Headless CMS を利用しています。ここは Contentful や microCMS でも問題ないです。
- 実際の構成では CMS が VPC にいるので、Lambda も VPC に入れています。
- 1 つの CloudFront でパスを分けて 3 つのオリジンを構成しています。
- キャッシュクリアにキューを使っている主な目的はバッファリングのためです。