はじめに
今更ながらCenterNet (Objects as Points)を使ってみました。
検出モデルではYOLOを使うことが多いですが、YOLOv3より圧倒的に強いようです。
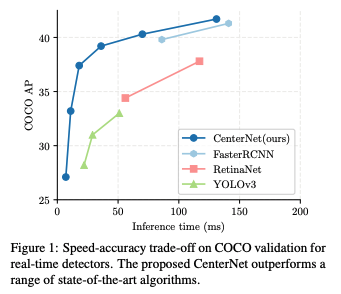
速くて精度が高いということで、リアルタイム検知に使えそうですね!
CenterNetとは
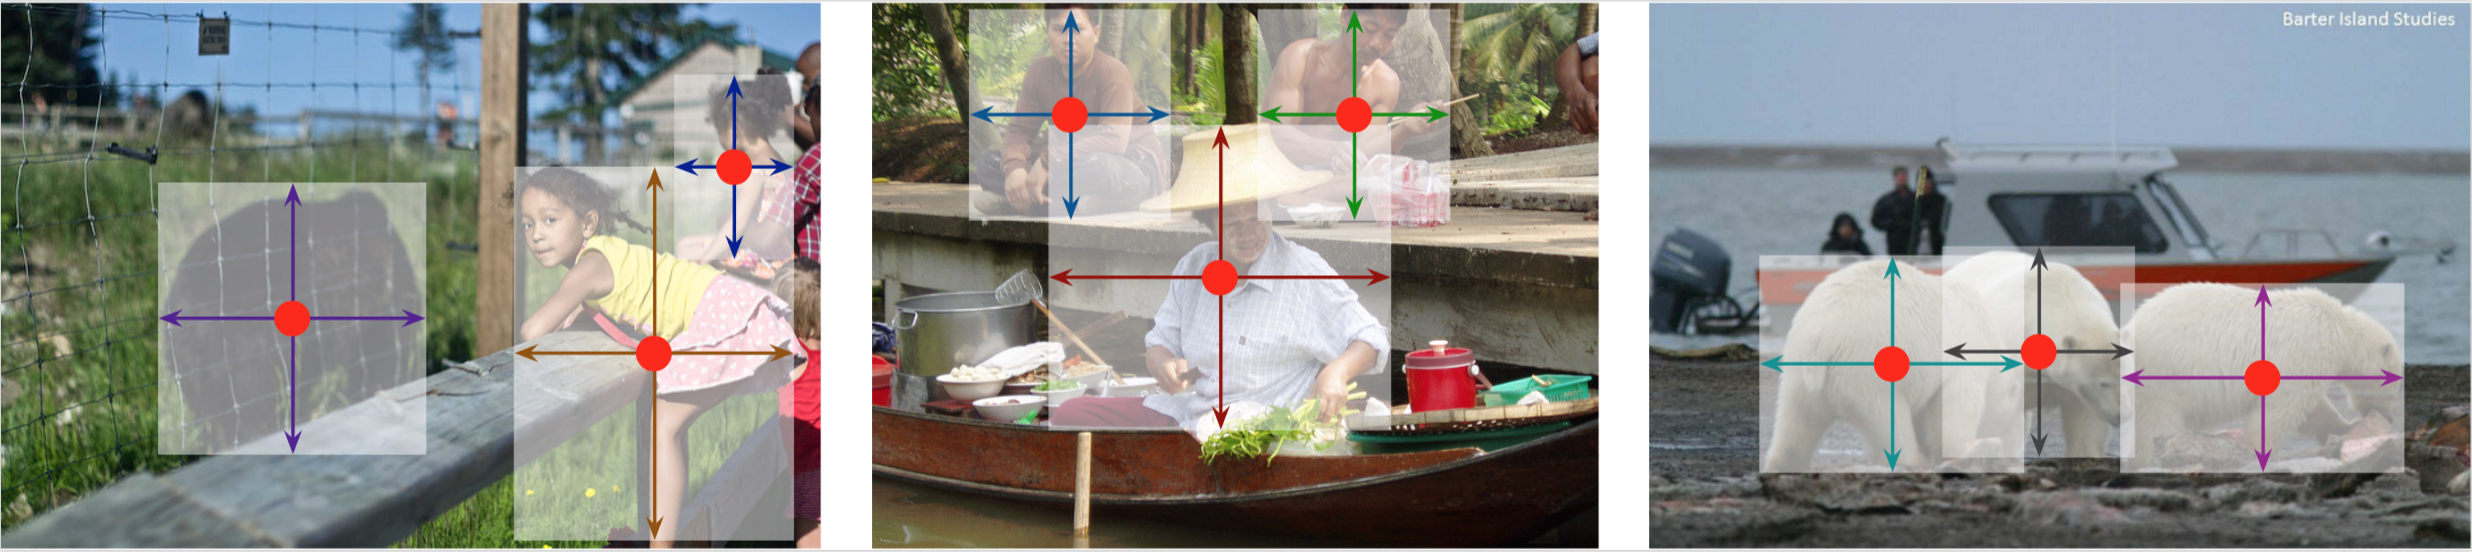
物体検出で領域(矩形)を予測するのではなく、人物姿勢推定で主流になっているヒートマップによるキーポイント検出を、物体検出に適用し、中心点のみ予測を行い領域の大きさや角度などはその属性として推定しようという研究です。
具体的には、入力画像をストライド幅でダウンサンプルし、ガウシアンカーネルを用いてヒートマップを作理、それを推定するという形をとっています。ガウス分布のσの決め方は難しそうです。。
Google Colab上でCenterNetを使う
CenterNetの公式pytorch実装はdeformable convolutionを使っているため、CPUでは動かせません。Keras実装ではCPUで動きますが、手元のmacでは4秒くらいかかり使い物にはなりませんでした。。
そこで、無料で簡単にGPUが使えるGoogle Colaboratoryで動かします。
ちなみに、AWSt2.xlargeあたりを使えば、githubのインストールに従ってそのまま簡単にインストールできました。
インストール
インストールは基本的にはCenterNetのgithubに従います。
ここでは、google driveのルート直下にColab Notebooksというフォルダを作り、その中にlib_centerというフォルダを作り作業します。
マウント
from google.colab import drive
drive.mount('/content/drive')
クローン
CenterNetレポジトリをクローンし移動します
from google.colab import drive
drive.mount('/content/drive')
cudaのバージョン変更
!wget https://developer.nvidia.com/compute/cuda/9.0/Prod/local_installers/cuda-repo-ubuntu1604-9-0-local_9.0.176-1_amd64-deb
!dpkg --install cuda-repo-ubuntu1604-9-0-local_9.0.176-1_amd64-deb
!sudo apt-key add /var/cuda-repo-9-0-local/7fa2af80.pub
!sudo apt-get update
!sudo apt-get install cuda-9-0
!nvcc --version
%cd '/content/drive/My Drive/Colab Notebooks/lib_center/cudnn'
!sudo dpkg -i libcudnn7_7.1.4.18-1+cuda9.0_amd64.deb
!sudo dpkg -i libcudnn7-dev_7.1.4.18-1+cuda9.0_amd64.deb
!sudo dpkg -i libcudnn7-doc_7.1.4.18-1+cuda9.0_amd64.deb
Pytorchのバージョン変更
!pip install -U torch==0.4.1 torchvision==0.2.2
requirementsのインストール
%cd '/content/drive/My Drive/Colab Notebooks/lib_center/CenterNet'
!pip install -r requirements.txt
CenterNetのmake
%cd '/content/drive/My Drive/Colab Notebooks/lib_center/CenterNet/src/lib/models/networks/DCNv2/src/cuda'
!sudo apt-get install gcc-6 g++-6
%cd /usr/bin
!sudo rm gcc g++
!sudo ln -s gcc-6 gcc
!sudo ln -s g++-6 g++
# compile dcn
!nvcc -c -o dcn_v2_im2col_cuda.cu.o dcn_v2_im2col_cuda.cu -x cu -Xcompiler -fPIC
!nvcc -c -o dcn_v2_im2col_cuda_double.cu.o dcn_v2_im2col_cuda_double.cu -x cu -Xcompiler -fPIC
# compile dcn-roi-pooling
!nvcc -c -o dcn_v2_psroi_pooling_cuda.cu.o dcn_v2_psroi_pooling_cuda.cu -x cu -Xcompiler -fPIC
!nvcc -c -o dcn_v2_psroi_pooling_cuda_double.cu.o dcn_v2_psroi_pooling_cuda_double.cu -x cu -Xcompiler -fPIC
%cd '/content/drive/My Drive/Colab Notebooks/lib_center/CenterNet/src/lib/models/networks/DCNv2'
!python build.py
!python build_double.py
%cd '/content/drive/My Drive/Colab Notebooks/lib_center/CenterNet/src/lib/external'
!make
実際に動かす!
モデルのダウンロード
github上のリンクからctdet_coco_dla_2x.pthをダウンロードしCenterNet/models以下に配置。
import
%cd "/content/drive/My Drive/Colab Notebooks/lib_center/CenterNet/src"
import sys
import cv2
import matplotlib.pyplot as plt
from detectors.detector_factory import detector_factory
from opts import opts
%matplotlib inline
CENTERNET_PATH = "/content/drive/My Drive/Colab Notebooks/lib_center/CenterNet/src/lib"
sys.path.insert(0, CENTERNET_PATH)

MODEL_PATH = "../models/ctdet_coco_dla_2x.pth"
TASK = 'ctdet' # or 'multi_pose' for human pose estimation
opt = opts().init('{} --load_model {}'.format(TASK, MODEL_PATH).split(' '))
detector = detector_factory[opt.task](opt)

coco_names = ['person', 'bicycle', 'car', 'motorbike', 'aeroplane', 'bus', 'train', 'truck', 'boat', 'traffic light', 'fire hydrant', 'stop sign', 'parking meter', 'bench', 'bird', 'cat', 'dog', 'horse', 'sheep', 'cow', 'elephant', 'bear', 'zebra', 'giraffe', 'backpack', 'umbrella', 'handbag', 'tie', 'suitcase', 'frisbee', 'skis', 'snowboard', 'sports ball', 'kite', 'baseball bat', 'baseball glove', 'skateboard', 'surfboard', 'tennis racket', 'bottle', 'wine glass', 'cup', 'fork', 'knife', 'spoon', 'bowl', 'banana', 'apple', 'sandwich', 'orange', 'broccoli', 'carrot', 'hot dog', 'pizza', 'donut', 'cake', 'chair', 'sofa', 'pottedplant', 'bed', 'diningtable', 'toilet', 'tvmonitor', 'laptop', 'mouse', 'remote', 'keyboard', 'cell phone', 'microwave', 'oven', 'toaster', 'sink', 'refrigerator', 'book', 'clock', 'vase', 'scissors', 'teddy bear', 'hair drier', 'toothbrush',]
物体検知
from PIL import Image, ImageFont, ImageDraw
import numpy as np
import colorsys
from pylab import rcParams

rcParams['figure.figsize'] = 10,10

# Generate colors for drawing bounding boxes.
hsv_tuples = [(x / len(coco_names), 1., 1.)
              for x in range(len(coco_names))]
colors = list(map(lambda x: colorsys.hsv_to_rgb(*x), hsv_tuples))
colors = list(
    map(lambda x: (int(x[0] * 255), int(x[1] * 255), int(x[2] * 255)),
        colors))
np.random.seed(10101)  # Fixed seed for consistent colors across runs.
np.random.shuffle(colors)

def write_rect(image, box, cl, score):
    font = ImageFont.truetype(font='/content/drive/My Drive/Colab Notebooks/lib_center/FiraMono-Bold.otf', size=np.floor(3e-2 * image.size[1] + 0.5).astype('int32'))
    thickness = (image.size[0] + image.size[1]) // 300


    label = '{} {:.2f}'.format(coco_names[cl], score)
    draw = ImageDraw.Draw(image)
    label_size = draw.textsize(label, font)

    left, top, right, bottom = box
    top = max(0, np.floor(top + 0.5).astype('int32'))
    left = max(0, np.floor(left + 0.5).astype('int32'))
    bottom = min(image.size[1], np.floor(bottom + 0.5).astype('int32'))
    right = min(image.size[0], np.floor(right + 0.5).astype('int32'))

    if top - label_size[1] >= 0:
        text_origin = np.array([left, top - label_size[1]])
    else:
        text_origin = np.array([left, top + 1])

    # My kingdom for a good redistributable image drawing library.
    for i in range(thickness):
        draw.rectangle(
            [left + i, top + i, right - i, bottom - i],
            outline=colors[cl])
    draw.rectangle(
        [tuple(text_origin), tuple(text_origin + label_size)],
        fill=colors[cl])
    draw.text(text_origin, label, fill=(0, 0, 0), font=font)
実行
img = "/content/drive/My Drive/Colab Notebooks/lib_center/CenterNet/images/17790319373_bd19b24cfc_k.jpg"
rets = detector.run(img)['results']

img = Image.open(img)

for i in range(len(rets)):
    ret = rets.get(i+1)
    if ret.shape[0]==0:
        continue
    # score>0.3以上だけ表示
    ret = ret[ret[:,4]>0.3]
    for box in ret:
        write_rect(img, box[:4], i, box[4])

plt.imshow(img)
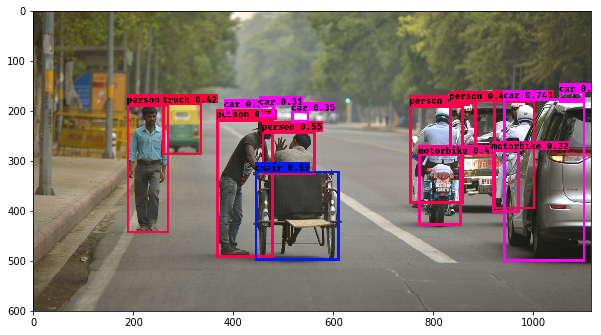
以下のような画像が得られれば成功です。
おわり
実際にCenterNetを動かすことができました。
CPUだと遅いので使えないですが、GPUが使える環境では強力な武器になりそうですね。
次は、自前データでの学習をさせてみます。