我々P&Dのアドベントカレンダーもいよいよ19日目となりました。あくまで我々はIT開発・運用学生団体を名乗っているので、ここらでまともなコーディング記事があっても良いのではないのか?
ということで、ITの力でクリスマス気分を味わっていきたいと思います!
動作環境
- macOS Mojave 10.14.2
前提条件
- nodeとnpmはインストール済みであることとします。
- 長めの記事になりそうなので、時間に余裕のある人を対象にしておきます。
Angularの環境構築
Angular日本語ドキュメンテーションを読みながら進めていけば、間違いなく進めていけると思います。
ここでは、globalを絶対汚したくないマンの私が個人的な方法で環境構築を行なっていきます。
まずは、作業ディレクトリに移動してnpm initからやっていきます。
$ mkdir Angular
$ cd Angular
$ npm init
続いてAngularのインストールですが、Angular日本語ドキュメンテーションにはnpm install -g @angular/cliと記載されています。ただこれではglobalにインストールされてしまうので、今回はあえてローカル環境用にしておきます。
$ npm i -D @angular/cli
$ npx ng --version

     _                      _                 ____ _     ___
    / \   _ __   __ _ _   _| | __ _ _ __     / ___| |   |_ _|
   / △ \ | '_ \ / _` | | | | |/ _` | '__|   | |   | |    | |
  / ___ \| | | | (_| | |_| | | (_| | |      | |___| |___ | |
 /_/   \_\_| |_|\__, |\__,_|_|\__,_|_|       \____|_____|___|
                |___/


Angular CLI: 7.1.3
Node: 11.2.0
OS: darwin x64
Angular: undefined
...

Package                      Version
------------------------------------------------------
@angular-devkit/architect    0.11.3
@angular-devkit/core         7.1.3
@angular-devkit/schematics   7.1.3
@angular/cli                 7.1.3
@schematics/angular          7.1.3
@schematics/update           0.11.3
rxjs                         6.3.3
typescript                   3.1.6
このような出力が出れば問題ないと思います。
注意点としては、一つ目のコマンドはnpm ...であるのに対し、二つ目のコマンドはnpx ...になっています。これはローカル環境にインストールしたCLIのコマンドを呼び出す一つのやり方なので、覚えておくと何かと便利とおもいます。
作るもの
せっかくなので以下の条件のもと作ろうと思います。
- PCでもスマホでも閲覧可能なもの
- リアクティブもつけてみたい!
- 当然クリスマス気分になれるもの
- サンタさんからたくさんのプレゼントをもらいたい!
最後のとかただの願望でしかない...これでも大学生ですよ...
とりあえずこんな感じのものを目標に作っていきます。
コーディング
設計
最初にどんなコンポーネントが必要になるか、考えてみましょう。
コンポーネントの分け方は各自流派があると思いますが、今回は大まかに以下で分けていきます。
- ツリー(一応こいつがメイン)
- プレゼント(背景とか)
- アクションボタン
これ以外にも随時コンポーネントを作成していくと思いますが、概ねこの3つが基礎部分を構成するコンポーネントになります(なる予定です)。
アプリケーションの作成
CLIでサクッとアプリの雛形を作成します。
$ npx ng new merry-christmas
? Would you like to add Angular routing? Yes
? Which stylesheet format would you like to use?
  CSS
❯ SCSS   [ http://sass-lang.com   ]
  SASS   [ http://sass-lang.com   ]
  LESS   [ http://lesscss.org     ]
  Stylus [ http://stylus-lang.com ]

...省略...

    Successfully initialized git.
コマンドを実行するとWould you like to add Angular routing?と聞かれると思います。今回はルーティングは不要のつもりですが、もしかしたら使う可能性もあるのでとりあえずyにしておきます。
次の質問では、スタイルシートの記述言語を選択します。私はSCSSを選択していますが、ここは自分が一番使い慣れているもので問題ないです。
それでは雛形が完成したので、ローカルサーバーを立ち上げてみましょう。
$ ng s
** Angular Live Development Server is listening on localhost:4200, open your browser on http://localhost:4200/ **

Date: 2018-12-16T13:29:44.974Z
Time: 6957ms
chunk {main} main.js, main.js.map (main) 11.6 kB [initial] [rendered]
chunk {polyfills} polyfills.js, polyfills.js.map (polyfills) 223 kB [initial] [rendered]
chunk {runtime} runtime.js, runtime.js.map (runtime) 6.08 kB [entry] [rendered]
chunk {styles} styles.js, styles.js.map (styles) 16.7 kB [initial] [rendered]
chunk {vendor} vendor.js, vendor.js.map (vendor) 3.67 MB [initial] [rendered]
ℹ 「wdm」: Compiled successfully.
localhost:4200をブラウザで開いて、以下のような画面になれば準備完了です。

コンポーネントの作成
ひとまず基礎部分をさくっと作ります。必要なコンポーネントは先ほど挙げた3つなので、適当に名前をつけて作ってしまいます。
コマンドを先に解説しておくと、以下で入力しているコマンドはng generate component <component name>の省略形を用いてng g c <component name>としています。
$ ng g c tree
CREATE src/app/tree/tree.component.scss (0 bytes)
CREATE src/app/tree/tree.component.html (23 bytes)
CREATE src/app/tree/tree.component.spec.ts (614 bytes)
CREATE src/app/tree/tree.component.ts (262 bytes)
UPDATE src/app/app.module.ts (467 bytes)

$ ng g c presents
CREATE src/app/presents/presents.component.scss (0 bytes)
CREATE src/app/presents/presents.component.html (27 bytes)
CREATE src/app/presents/presents.component.spec.ts (642 bytes)
CREATE src/app/presents/presents.component.ts (278 bytes)
UPDATE src/app/app.module.ts (557 bytes)

$ ng g c actions
CREATE src/app/actions/actions.component.scss (0 bytes)
CREATE src/app/actions/actions.component.html (26 bytes)
CREATE src/app/actions/actions.component.spec.ts (635 bytes)
CREATE src/app/actions/actions.component.ts (274 bytes)
UPDATE src/app/app.module.ts (643 bytes)
これでコンポーネントが作成できました。
ここからようやくコーディングに入っていきます!
ライブラリの導入
今回はマテリアルも導入していきます。いい感じの記事があったので参考にしつつ、公式サイトを読みながら進めていきます。
参考サイト
$ npm install --save @angular/material @angular/cdk @angular/animations
いい感じに導入してくれるコマンドがあるそうなので、実行してみます。
$ ng add @angular/material
Installing packages for tooling via npm.
? Choose a prebuilt theme name, or "custom" for a custom theme: (Use arrow keys)
  Indigo/Pink        [ Preview: https://material.angular.io?theme=indigo-pink ]
  Deep Purple/Amber  [ Preview: https://material.angular.io?theme=deeppurple-amber ]
  Pink/Blue Grey     [ Preview: https://material.angular.io?theme=pink-bluegrey ]
  Purple/Green       [ Preview: https://material.angular.io?theme=purple-green ]
❯ Custom
$ ng add @angular/material
Installing packages for tooling via npm.
? Choose a prebuilt theme name, or "custom" for a custom theme: Custom
? Set up HammerJS for gesture recognition? Yes
? Set up browser animations for Angular Material? Yes
UPDATE package.json (1404 bytes)
audited 40183 packages in 7.028s
found 0 vulnerabilities

UPDATE src/main.ts (391 bytes)
UPDATE src/app/app.module.ts (752 bytes)
UPDATE src/styles.scss (1514 bytes)
UPDATE src/index.html (482 bytes)
マテリアルデザインの導入では、必要なモジュールのインポートを自分で行う必要があるようなので、先ほどの記事を参考にインポートを行います。
公式のサンプルソースにもある様な感じのマテリアルのモジュールを作る。
terminal$ ng generate module shared/material --flat実行するとsrc/app/shared/material.module.tsが作成される。
作成したモジュールを下記の様に編集する。(全文)src/app/shared/material.module.ts
material.module.tsimport {DragDropModule} from '@angular/cdk/drag-drop';
import {ScrollingModule} from '@angular/cdk/scrolling';
import {CdkTableModule} from '@angular/cdk/table';
import {CdkTreeModule} from '@angular/cdk/tree';
import {NgModule} from '@angular/core';
import {
MatAutocompleteModule,
MatBadgeModule,
MatBottomSheetModule,
MatButtonModule,
MatButtonToggleModule,
MatCardModule,
MatCheckboxModule,
MatChipsModule,
MatDatepickerModule,
MatDialogModule,
MatDividerModule,
MatExpansionModule,
MatGridListModule,
MatIconModule,
MatInputModule,
MatListModule,
MatMenuModule,
MatNativeDateModule,
MatPaginatorModule,
MatProgressBarModule,
MatProgressSpinnerModule,
MatRadioModule,
MatRippleModule,
MatSelectModule,
MatSidenavModule,
MatSliderModule,
MatSlideToggleModule,
MatSnackBarModule,
MatSortModule,
MatStepperModule,
MatTableModule,
MatTabsModule,
MatToolbarModule,
MatTooltipModule,
MatTreeModule,
} from '@angular/material';@NgModule({
exports: [
CdkTableModule,
CdkTreeModule,
DragDropModule,
MatAutocompleteModule,
MatBadgeModule,
MatBottomSheetModule,
MatButtonModule,
MatButtonToggleModule,
MatCardModule,
MatCheckboxModule,
MatChipsModule,
MatStepperModule,
MatDatepickerModule,
MatDialogModule,
MatDividerModule,
MatExpansionModule,
MatGridListModule,
MatIconModule,
MatInputModule,
MatListModule,
MatMenuModule,
MatNativeDateModule,
MatPaginatorModule,
MatProgressBarModule,
MatProgressSpinnerModule,
MatRadioModule,
MatRippleModule,
MatSelectModule,
MatSidenavModule,
MatSliderModule,
MatSlideToggleModule,
MatSnackBarModule,
MatSortModule,
MatTableModule,
MatTabsModule,
MatToolbarModule,
MatTooltipModule,
MatTreeModule,
ScrollingModule,
]
})
export class MaterialModule {}/** Copyright 2018 Google Inc. All Rights Reserved.
Use of this source code is governed by an MIT-style license that
can be found in the LICENSE file at http://angular.io/license */</div></details>app.module.tsimport { MaterialModule } from './shared/material.module';
..省略@NgModule({
..省略
imports: [
MaterialModule
..省略..
})><details><summary>・app.module.ts(全文)</summary><div> >```typescript:app.module.ts import { BrowserModule } from '@angular/platform-browser'; import { NgModule } from '@angular/core'; >import { AppRoutingModule } from './app-routing.module'; import { AppComponent } from './app.component'; import { TreeComponent } from './tree/tree.component'; import { PresentsComponent } from './presents/presents.component'; import { ActionsComponent } from './actions/actions.component'; import { BrowserAnimationsModule } from '@angular/platform-browser/animations'; import { MaterialModule } from './shared/material.module'; >@NgModule({ declarations: [ AppComponent, TreeComponent, PresentsComponent, ActionsComponent ], imports: [ BrowserModule, AppRoutingModule, BrowserAnimationsModule, MaterialModule ], providers: [], bootstrap: [AppComponent] }) export class AppModule { }これでマテリアルデザインを導入できたはずです!
HTML
とりあえずCSSは後にして、必要なものをさっさと書き込んでしまいましょう。
app.component.html<h1><span>Merry</span> <span>Christmas</span></h1> <app-tree></app-tree> <app-presents></app-presents> <app-actions></app-actions> <router-outlet></router-outlet>tree.component.html<img alt="tree" src="../../assets/christmastree_nude.png">presents.component.html<img alt="present" src="../../assets/christmas_presents.png">actions.component.html<button mat-raised-button>ツリーにかざる</button> <button mat-raised-button>プレゼントを願う</button>一旦ブラウザで現在の状態を確認してみましょう。
ローカルサーバーを閉じている人は再度立ち上げてください。
terminal$ ng s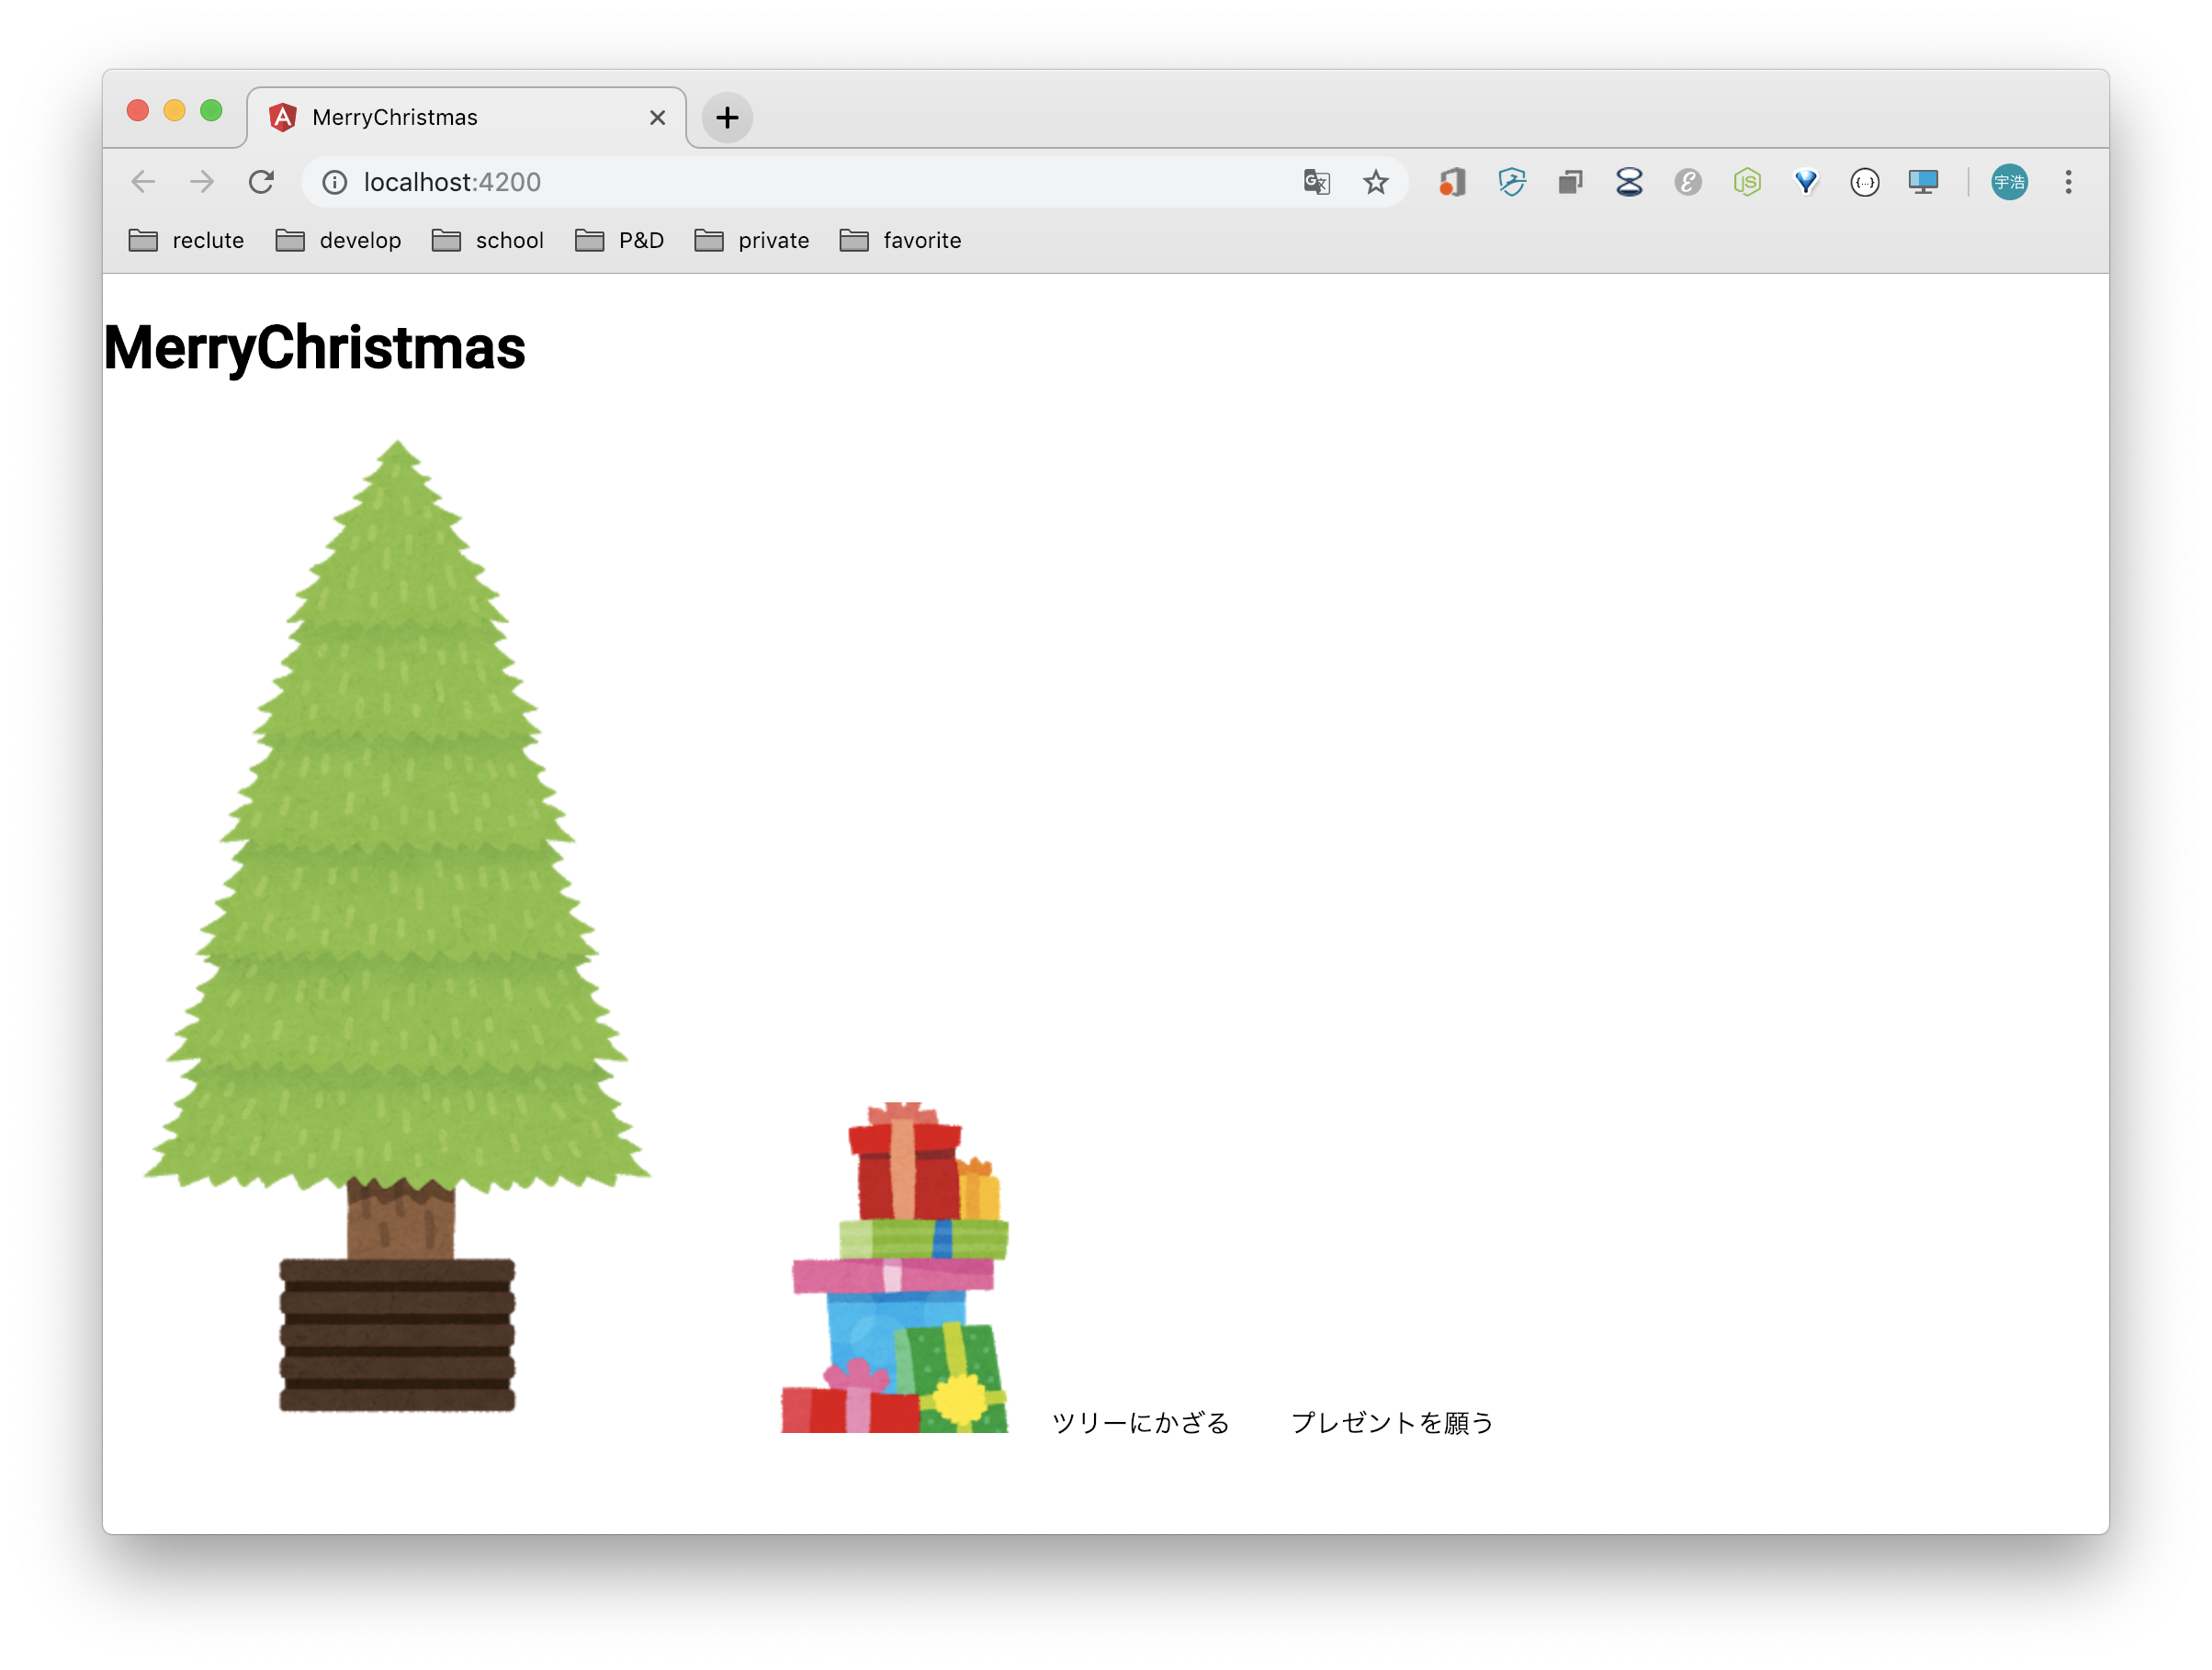
まぁぼちぼちって感じですね。でもボタンの部分はしっかりマテリアルになっていますね!(^_^)
ここから見た目を整えていきます。CSS/SCSS
では、先ほど用意したHTMLの見た目を整えていきましょう。
まずはスタイルの初期化を行います。
本当はスタイルの初期化は別のSCSSファイルを用意した方がわかりやすいのですが、ひとまずは全要素のmarginとpaddingを0に統一するだけなのでstyle.scssの末尾に書いてしまいます。style.scss...省略... * { margin: 0; padding: 0; }まずは全体の中心となる
tree.componentを整えます。tree.component.html<div class="tree"> <img alt="tree" src="../../assets/christmastree_nude.png"> </div>tree.component.scss.tree { text-align: center; height: 70vh; img{ height: 100%; object-fit: contain; } }とりあえずはこんなもんでしょう...
次に
app.componentに必要なSCSSを記述します。
とはいってもh1しか置いてないので、font-familyとfont-sizeを変更して、中央揃えにし、いい感じに角度をつけたら終わりです。
ついでにレスポンシブにも対応させておきましょう。app.component.scssh1{ font-family: 'Aguafina Script', cursive; font-size: 72px; text-align: center; padding-top: 30px; margin-left: 5vw; @media screen and (max-width:479px) { margin-top: 20px; font-size: 48px; } span{ position: relative; display: inline-block; padding: 0 5vw; transform: rotate(-10deg); @media screen and (max-width:479px) { padding: 0 2vw; } } }フォントは
google fontsを使用しているので、index.htmlのheadの中にlinkを用意してあげます。
参照: Google fontsindex.html<head> ...省略... <link href="https://fonts.googleapis.com/css?family=Aguafina+Script" rel="stylesheet"> </head>index.html(全文)
index.html<!doctype html> <html lang="en"> <head> <meta charset="utf-8"> <title>MerryChristmas</title> <base href="/"> <meta name="viewport" content="width=device-width, initial-scale=1"> <link rel="icon" type="image/x-icon" href="favicon.ico"> <link href="https://fonts.googleapis.com/icon?family=Material+Icons" rel="stylesheet"> <link href="https://fonts.googleapis.com/css?family=Roboto:300,400,500" rel="stylesheet"> <link href="https://fonts.googleapis.com/css?family=Aguafina+Script" rel="stylesheet"> </head> <body> <app-root></app-root> </body> </html>こんな感じで残りのコンポーネントもいい感じに調整していきます。
presents.component.html<div class="present"> <img alt="present" src="../../assets/christmas_presents.png"> </div>presents.component.scss.present{ position: absolute; bottom: 20vh; right: 10vw; height: 20vh; img{ height: 100%; object-fit: contain; } }action.component.html<ul class="action-button"> <li class="action-button__decoration"><button mat-raised-button>ツリーにかざる</button></li> <li class="action-button__present"><button mat-raised-button>プレゼントを願う</button></li> </ul>action.component.scssul{ list-style: none; text-align: center; margin-top: 10px; margin-left: 2.5vw; height: 32px; @media screen and (max-width:479px) { margin-top: 10px; height: 24px; } li{ display: inline-block; height: 100%; margin: 0 20px; @media screen and (max-width:479px) { margin-bottom: 20px; } button{ font-size: 27px; border: 3px solid #33CBEC; box-sizing: border-box; box-shadow: 0px 4px 4px rgba(0, 0, 0, 0.25); border-radius: 27px; } } }モックデータの流し込み
ベースができたところで、モックデータを作ってクリスマスっぽく飾り付けをしていきます!
データの雛形の作成
terminal$ ng g class present CREATE src/app/present.ts (25 bytes) $ ng g class decorates CREATE src/app/decorates.ts (27 bytes)各ファイルの中を以下のように編集します。
present.tsexport class Present { id: number; name: string; src: string; }decorate.tsexport class Decorate { id:number; name: string; src: string; }モックデータの作成
これらを元に、適当な数だけモックを作っていきます。
mock-presents.tsimport { Present } from "./present"; export const PRESENTS: Present[] = [ {id: 1, name: "green_present", src: "christmas_mark2_present.png"}, {id: 2, name: "many_present", src: "christmas_presents.png"}, {id: 3, name: "socks_present", src: "christmas_socks.png"}, ];mock-decorates.tsimport { Decorate } from "./decorate"; export const DECORATES:Decorate[] = [ {id: 1, name: "red ball", src: "christmas_kugel01_red.png"}, {id: 2, name: "pink ball", src: "christmas_kugel02_pink.png"}, {id: 3, name: "blue ball", src: "christmas_kugel06_blue.png"}, {id: 4, name: "lime ball", src: "christmas_kugel08_lime.png"}, {id: 5, name: "yellow ball", src: "christmas_kugel10_yellow.png"}, {id: 6, name: "santa", src: "christmas_ornament01_santa.png"}, {id: 7, name: "snowman", src: "christmas_ornament03_snowman.png"}, {id: 8, name: "snowman_hat", src: "christmas_ornament04_snowman.png"}, {id: 9, name: "present red", src: "christmas_ornament05_present.png"}, {id: 10, name: "present green", src: "christmas_ornament06_present.png"}, {id: 11, name: "sock", src: "christmas_ornament08_sock.png"}, {id: 12, name: "double bells", src: "christmas_ornament09_bells.png"}, {id: 13, name: "star", src: "christmas_ornament11_star.png"}, {id: 14, name: "candy", src: "christmas_ornament12_candy.png"}, {id: 15, name: "matsubokkuri", src: "christmas_ornament15_matsubokkuri.png"}, {id: 16, name: "candy", src: "christmas_ornament12_candy.png"}, ];データの流し込み
まずはプレゼントコンポーネントを変更してみます。
HTML/CSSに少し変更を加えて、データを流し込みます。present.component.html<div class="present" *ngFor="let present of presents"> <div class="present__{{present.id}}"> <img alt="{{present.name}}" src="../../assets/{{present.src}}"> </div> </div>present.component.scss.present{ @media screen and (max-width:480px) { display: none; } &__1{ position: absolute; top: 25vh; right: 20vw; height: 20vh; } &__2{ position: absolute; bottom: 27vh; left: 12vw; height: 30vh; transform: scale(-1, 1); } &__3{ position: absolute; bottom: 20vh; right: 10vw; height: 20vh; } img{ height: 100%; object-fit: contain; } }present.component.tsimport { Component, OnInit } from '@angular/core'; import { PRESENTS } from '../mock-presents'; import { Present } from '../present'; @Component({ selector: 'app-presents', templateUrl: './presents.component.html', styleUrls: ['./presents.component.scss'] }) export class PresentsComponent implements OnInit { presents: Present[] = PRESENTS; constructor() { } ngOnInit() { } }あとはボタンに反応して、いい感じにすれば完成です!
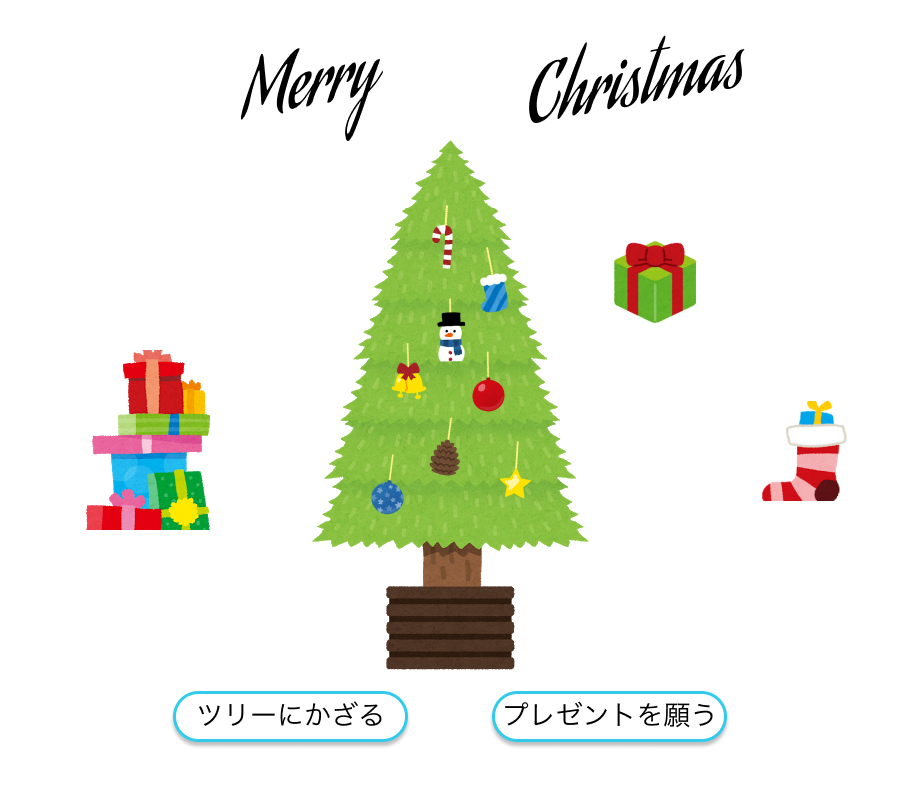
...が流石に長くなりすぎたので記事を2部作にします。(>人<;)次回作まで少々お待ちくださいm(_ _)m
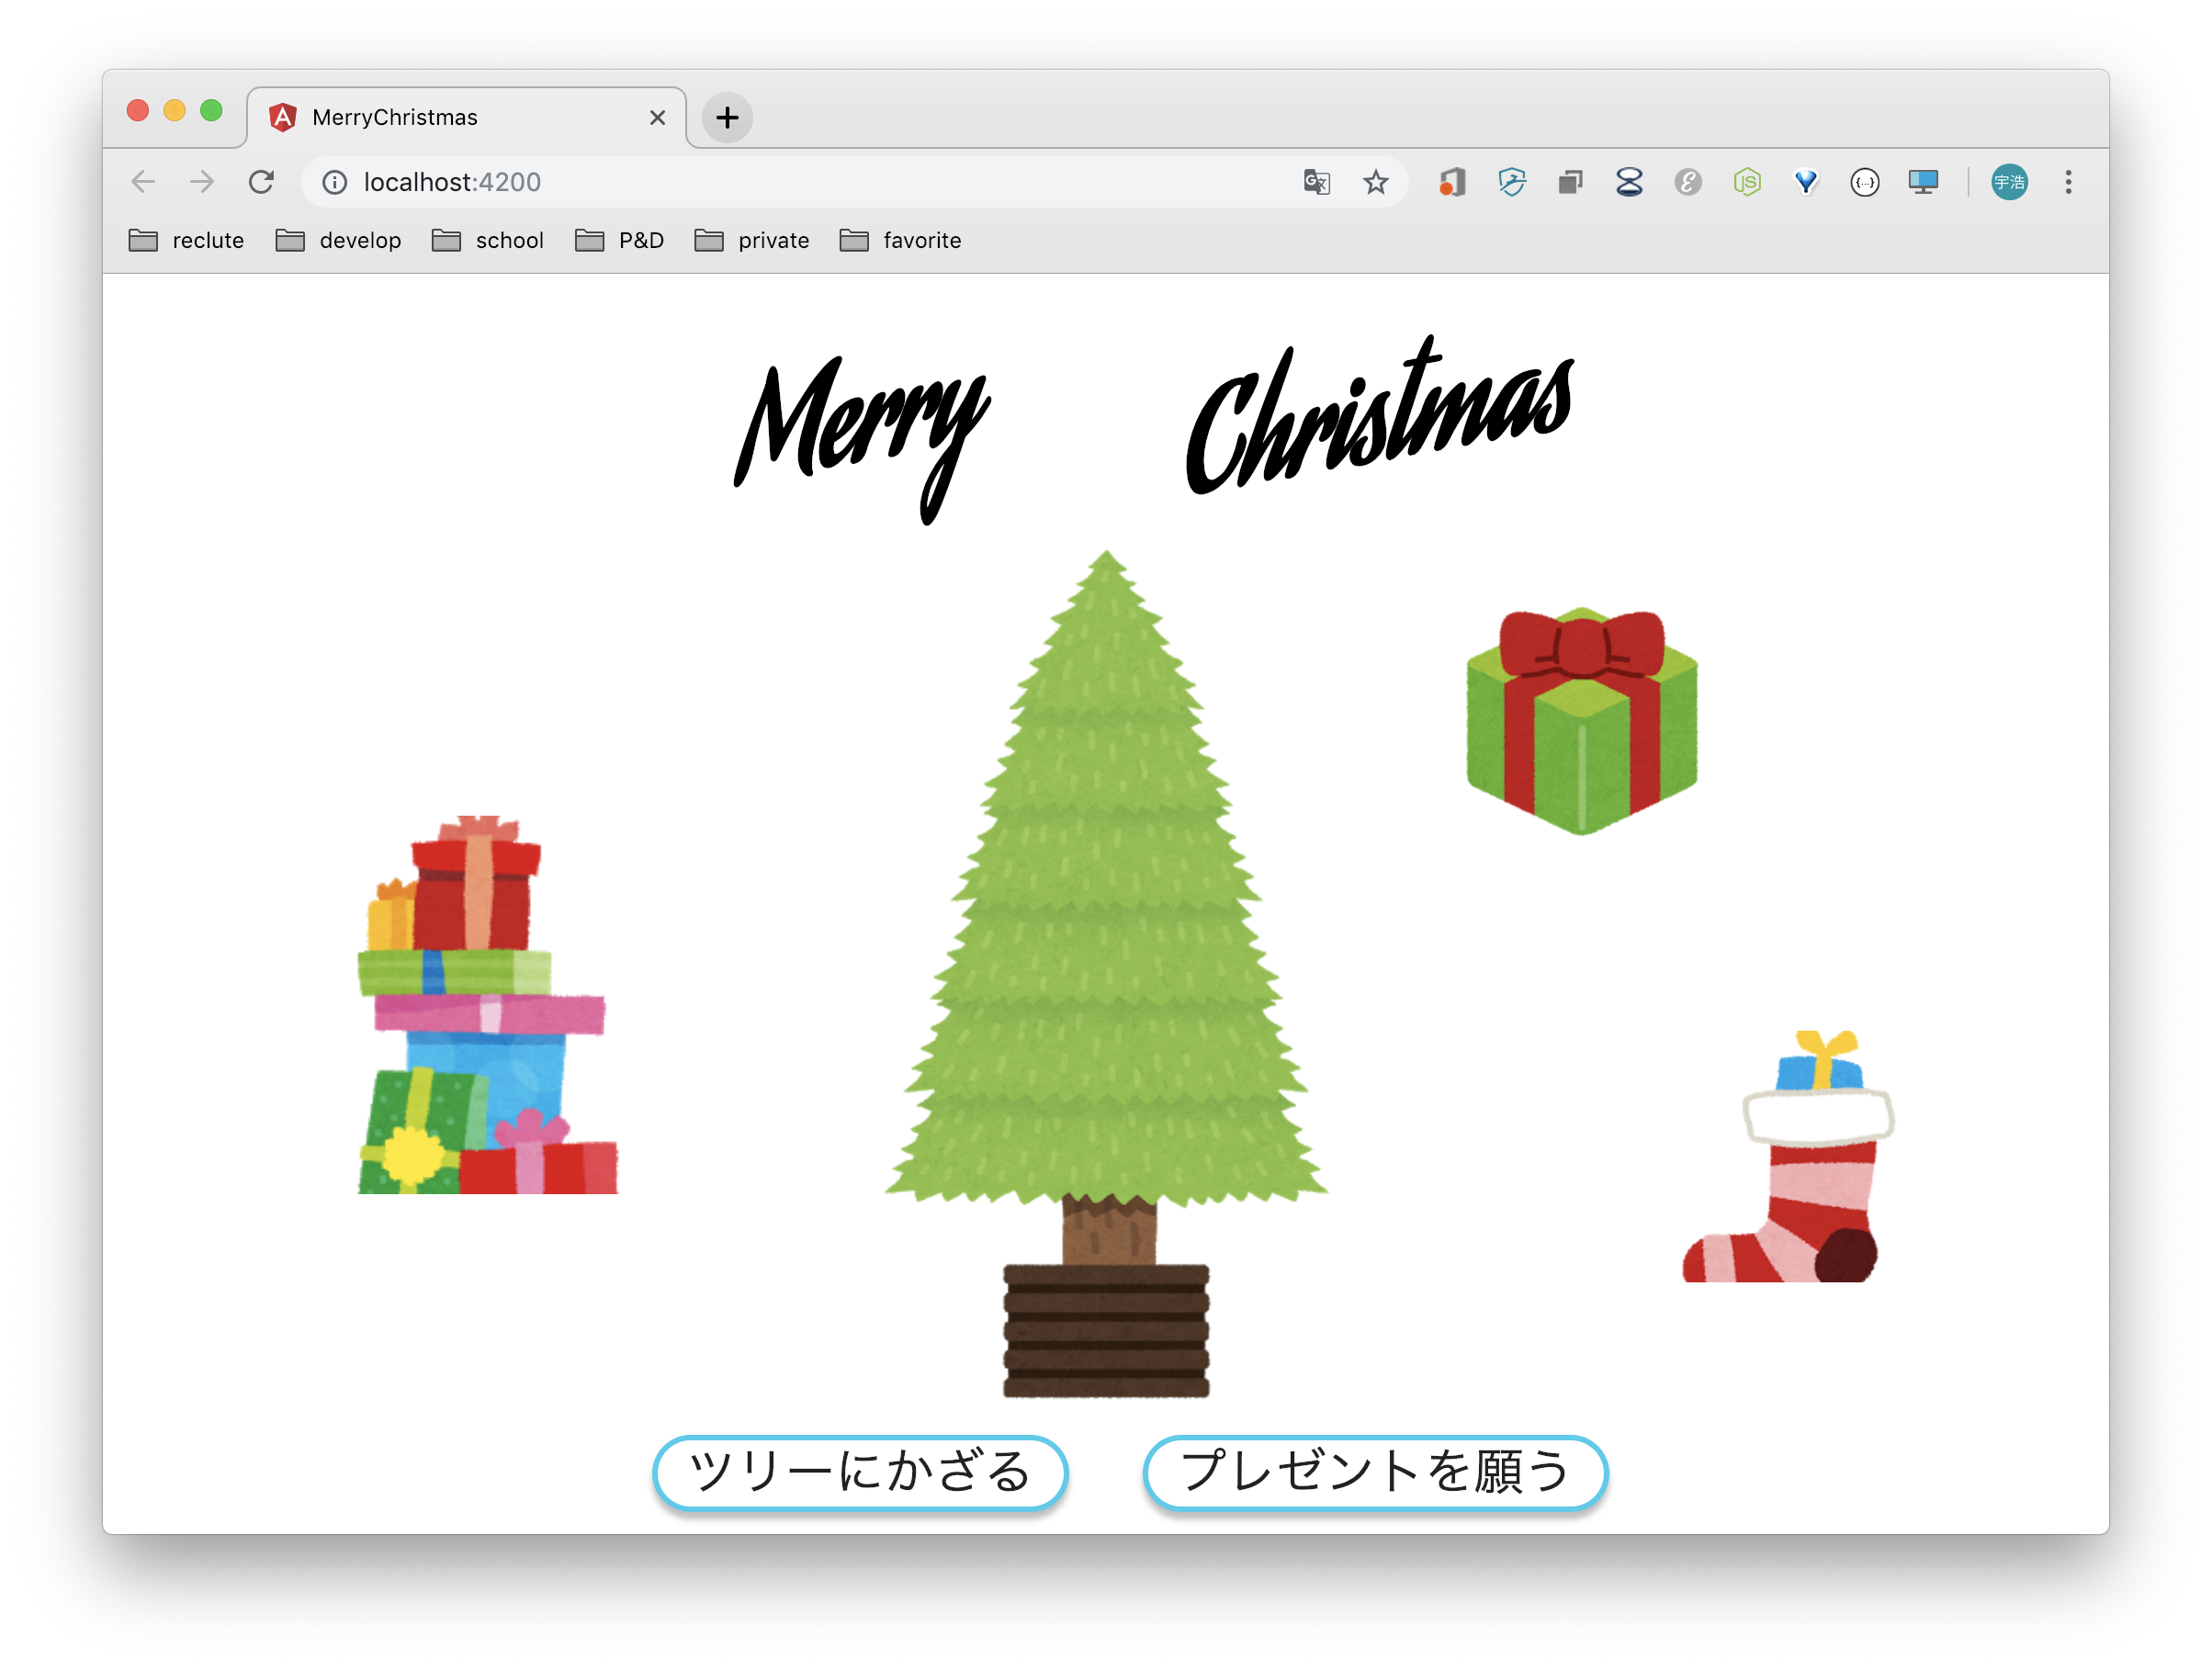
完成形
現状の形は以下のようになっていれば、OKです。
お疲れ様でした!
ちょっとした雑談
このくらいのサイズ感なら何も考えずにコンポーネントを作ってコードをどんどん書いていく方が楽しいですね笑
また気が向いたときにでも、いい感じにクリスマス気分を味わいましょうかね(・∀・)作っている最中に気づいたんですが、ローカルにインストールしたCLIでもnpxとかのコマンドなしで使えるんですね!
と思ったけどAngularがscriptを用意してくれているだけだった...package.json"scripts": { "ng": "ng", "start": "ng serve", "build": "ng build", "test": "ng test", "lint": "ng lint", "e2e": "ng e2e" }どこまでも優秀なやつだなAngularさんは(≧∀≦)
今回のソースコードはこちら
参考資料
Angular7 + AngularMaterial 環境構築
Angular 日本語ドキュメンテーション
Angular Material