はじめに
こちらはラクス Advent Calendar 2018 19日目の記事になります。
数十台の RDS(Postgress) のバージョンアップをterraformで行った記事になります。
TL;DR
要約すると以下の通りになります
- terraforming で既存リソースをコード化した
- コードや構成を少し綺麗にした
- バージョン毎に git branch を切り替えて terraform apply を実行した
背景
今回のバージョンアップ作業で
terraform を選択した理由は以下の通りとなります。
-
目的のメジャーバージョンにするには2回アップデートする必要があった
-
OK:9.a.x -> 9.b.y -> 9.c.z
-
NG:9.a.x -> 9.c.z
-
一台ずつコンソールポチポチは大変
-
awscliでのシェルスクリプトも考えたが、インフラリソースはコード管理しておきたい
-
terraform は触ったことがあった
作業の流れ
- terraform 初期設定
- terrafoming で既存リソースのコード生成
- tfstate ファイルへの export
- コード整理、追記
- アップデート作業用ブランチの用意
- terraform plan/apply の実行
terraform 初期設定
まずは terraform 初期設定を行います。
今回は profile を作業端末に配置して backend として s3バケットを使用します。
※ 事前に s3バケットや aws credential を作成しておきます。
※ terraform の install や aws credential の作成等については割愛します
初期設定で作成した .tfファイルです
main.tf
provider "aws" {
  region  = "ap-northeast-1"
  profile = my_profile
}

terraform {

  backend "s3" {
    bucket  = "terraform"
    key     = "tfstate.aws"
    region  = "ap-northeast-1"
    profile = "my_profile_s3_only"
  }
}
main.tf があるディレクトリで$ terraform initを実行すれば初期設定は完了です。
terraforming でのコード生成
RDSインスタンスは既存のリソースとなっていますので
現在の構成を terraform で管理する必要があります。
コードを作成 -> terraform import 実行 という方法もありますが
ありがたいことに terraforming という既存リソースから terraform コード生成してくれるツールがあるので
使用させて頂きました。
インストールに関しては dockerコンテナイメージがあったのでシェルスクリプトでの
実行という形で使用しました。
※terraform もコンテナイメージでの提供はされてますが割愛します
docker_terraforming.sh
# !/bin/sh
docker run \
    --rm \
    --name terraforming \
    -e AWS_ACCESS_KEY_ID=xxx \
    -e AWS_SECRET_ACCESS_KEY=xxx \
    -e AWS_DEFAULT_REGION=ap-northeast-1 \

    # 後々、tfstateファィルをマージしたいのでホストディレクトリをマウントしておく
    -v /home/xxxx/git/terraform-dir/:/tmp \
    quay.io/dtan4/terraforming:latest \
    terraforming $@
引数指定して実行するとRDSの台数分のコードが生成されます。
$ ./docker_terraforming.sh rds > rds.tf
$ cat rds.tf

resource "aws_db_instance" "rds_a_01" {
  identifier                = "rds_a_01"
  allocated_storage         = xx
  storage_type              = "xx"
  engine                    = "postgres"
  engine_version            = "9.a"
  instance_class            = "db.t2.micro"
  name                      = "xxxxxxxx"
  username                  = "xxxxxxxx"
  password                  = "xxxxxxxx"
  port                      = xxxx
  publicly_accessible       = xxxxxxxx
  availability_zone         = "xxxxxxxx"
  security_group_names      = []
  vpc_security_group_ids    = ["sg-xxxxxxxx"]
  db_subnet_group_name      = "default"
  parameter_group_name      = "default.postgres9.a"
  multi_az                  = true
  backup_retention_period   = x
  backup_window             = "xx:xx-xx:xx"
  maintenance_window        = "mon:yy:dd-mon:yy:dd"
  final_snapshot_identifier = "rds_a_01-final"

(*snip*)
tfstate ファイルへのexport
コードは生成できましたが、tfstate ファイルの状態は空です
terraforming には tfstate ファイルへの export merge 機能が
あるのでこちらを使用します。
手順としては以下の通りです
1.terraform 初期設定をしたAWSアカウントから tfstate ファイルを取得
$ terraform state pull > tfstate_original
2.terraforming の merge を機能を利用
$ ./docker_terraforming.sh s3 --tfstate --merge=/tmp/tfstate_original > tfstate_merge_after
3.merge された tstate ファイルを push
$ terraform state push tfstate_merge_after
tfstate ファイルの push 後に terraform plan を実行した所、
差分の表示がありましたがコードで指定していないとデフォルトのパラメータとして
適用されてしまう設定でしたのでRDSの設定を確認して適宜追記をしました。
(例) auto_minor_version_upgrade = false (デフォルトだと true))
最終的にRDSの現状設定とplanでの差分で大きな差分がない事を確認して
terraform apply を行いました。
これで既存RDSリソースのエクスポートは完了です。
コード整理、追記
terraformingで生成したコードは単一のファイルになっているので確認や修正が大変です。
RDSのグループによって構成を分けたいと考えて module の設定をしました
.tf ファイル構成
.
├── main.tf
└── modules
    |
    |
    └── rds
        ├── rds_a
        │   ├── rds_a_01.tf
        │   ├── rds_a_02.tf
        │   ├── rds_a_03.tf
        ├── rds_b
        │   ├── rds_b_01.tf
        │   ├── rds_b_02.tf
        │   ├── rds_b_03.tf
        └── rds_c
            ├── rds_c_01.tf
            ├── rds_c_02.tf
            └── rds_c_03.tf
(*snip*)
main.tf
terraform {

  backend "s3" {
    bucket  = "terraform"
    key     = "tfstate.aws"
    region  = "ap-northeast-1"
    profile = "my_profile_s3"
  }
}

provider "aws" {
  region  = "ap-northeast-1"
  profile = my_profile
}

# module を追記

module "rds_a" {
  source = "./modules/rds/rds_a"
}

module "rds_b" {
  source = "./modules/rds/rds_b"
}

module "rds_c" {
  source = "./modules/rds/rds_c"
}
以下はアップデート用に追記した tfファイルになります。
rds_a.tf
# terraforming が生成してくれた部分
resource "aws_db_instance" "rds_a_01" {
  identifier                = "rds_a_01"
  allocated_storage         = xx
  storage_type              = "xx"
  engine                    = "postgres"
  engine_version            = "9.a"
  instance_class            = "db.t2.micro"
  name                      = "xxxxxxxx"
  username                  = "xxxxxxxx"
  password                  = "xxxxxxxx"
  port                      = xxxxxxxx
  publicly_accessible       = xxxxxxxx
  availability_zone         = "xxxxxxxx"
  security_group_names      = []
  vpc_security_group_ids    = ["sg-xxxxxxxx"]
  db_subnet_group_name      = "default"
  parameter_group_name      = "default.postgres9.a"
  multi_az                  = xxxxxxxx
  backup_retention_period   = x
  backup_window             = "xx:xx-xx:xx"
  maintenance_window        = "mon:yy:dd-mon:yy:dd"
  final_snapshot_identifier = "rds_a_01-final"

# terrafrom plan 確認後に追記した部分
  monitoring_interval        = 60
  auto_minor_version_upgrade = false
  skip_final_snapshot        = false

# メジャーバージョンアップを行う為に追加
  apply_immediately           = true
  allow_major_version_upgrade = true

# アップデートの処理で terraformのプロセスがタイムアウトしないように追加
  timeouts {
    create = "5h"
    update = "5h"
    delete = "5h"
  }
}
コード変更後は module の設定を取得する為に terraform getを実行します
$ terraform get
- module.rds_a
- module.rds_b
- module.rds_c
(*snip*)
state mv の 実行
構成はすっきりしましたが
このまま terraform plan を実行しても別リソースとして見られて差分がでてしまいます。
この場合 コード内の resource とtfsatteファイルの整合性をとる必要があります。
解決策としては tfstate ファイルを手動編集する方法もありますが
ここでは terraform state mvを実行して resource の移動を行います。
$ terraform state mv aws_db_instance.rds_a_01 module.aws_db_instance.rds_a_01
$ terraform state mv aws_db_instance.rds_a_02 module.aws_db_instance.rds_a_02
$ terraform state mv aws_db_instance.rds_a_03 module.aws_db_instance.rds_a_03
for や while で数十台分回してから terraform planで差分がないことを確認すればOKです。
アップデート作業用のブランチの用意
アップデートするバージョン毎にブランチを作成して
以下のパラメータを変更します。
# ブランチ毎に変更
engine_version             = "9.b.y"
# メジャーバージョンにあったパラメータグループを作成して指定
parameter_group_name       = "pg-9.b.y"
terraform plan/apply の実行
ブランチの用意ができたので
バーションアップ毎にブランチを切り替えて terraform apply を実行していきます
- 9.a.x ブランチ が現在の状態である
- 9.b.y ブランチに切り替えて
plan-> apply` で実行 - 9.c.z ブランチに切り替えて
plan->applyで実行
最終的にすべてのRDSが完了したら 9.c.z ブランチをmasterにマージすれば完了です
実際のバージョンアップ作業
適用範囲の指定
全てのRDS本番機を一気にアップデートできるほど自分の心臓は強くないので
-target オプションで 適用する resourceの範囲を指定しました。
$ terraform apply -target=aws_db_instance.rds_a_01 -target=aws_db_instance.rds_a_02
バージョンアップ作業のジョブ化
またバージョンアップでの RDSのシャットダウン = サービス停止となるのでメンテナンス日時を設ける必要があります。
RDSバージョンアップ前後の処理(アプリの停止やアップデート後の動作確認)も発生します。
解決策としてバージョンアップ作業を rundeck でジョブを作成して深夜時間に自動実行しました。
ジョブ化にあたって、 terraform apply実行前に 適用するかどうか yes/no の入力が必要となるので -auto-approve オプションでスキップしました。
$ terraform apply -auto-approve
以下はrundeck ジョブの実行順序となります。
※ rundeck での設定内容については割愛します
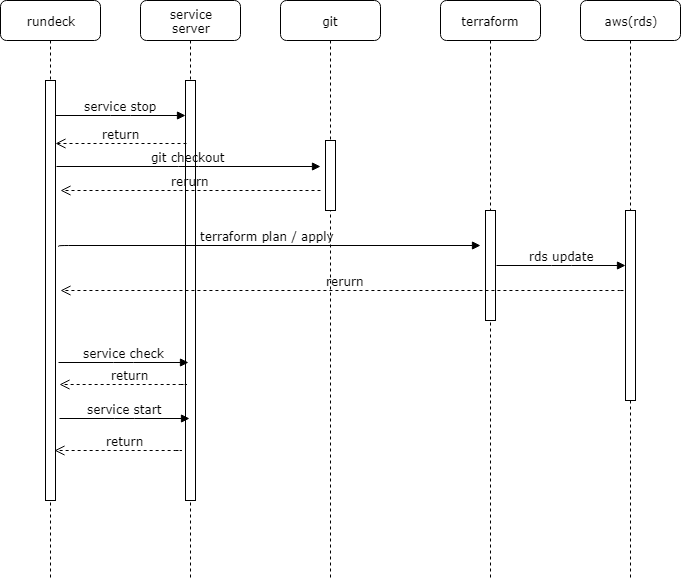
こうして、 terraform + rundeck で数十台 RDSのバージョンアップ作業を乗り切る事ができました。
振り返り
事前の設計や作業方針を詳細に決めてなかった
- terraform 利用の設計や方針を事前に決めてたら
state mvでの作業は不要だったなと思いました
作業の見通しが甘かった
-
ジョブ化は当初想定しておらず検証時の時間とRDSアップデートの並列実行(五台同時)にスケジューリングして手動で行っていく予定だったが予想以上に時間と作業規模が大きかった。
-
解決策としての rundeck については自分ではなく別メンバの方がジョブを作作成しました、この場を借りてお礼申し上げます
今後やりたいこと
今回はRDSのみとなっていますが、VPCや security group といった他のリソースも
コード化をして管理していきたいと考えてます。
とはいえ、現状、手動での設定変更も発生のでAWSリソース、tfstate、コードの状態に
差分がないことを維持する必要があるので以下の構成を考えています
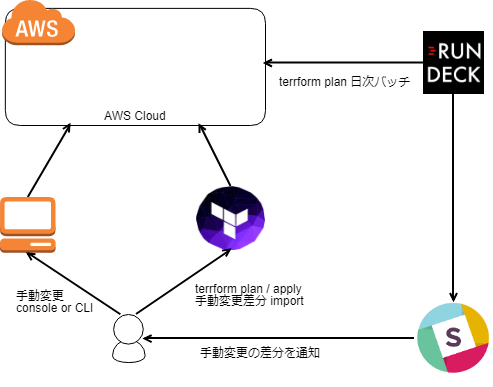
1.rundeck で terraform plan 実行
差分があれば slackへ通知
2.差分があった場合は
手動で適用
またコードがベタ書きなので リファクタリングも行えればなと考えています
module、変数、workspace あたりもちゃんと使ってみたいです
参考
rundeck
terraforming
teraform
Terraform の state mv を使ってべた書きしたリソースをモジュールに移す