はじめに
たくさんのボタンを使いたかったから、ESP8266に4x4マトリックス・キーパッドを接続してみました。
ボタンを押したら Webhook を叩く仕様にしました。
ファームウェアはNodeMCUを使い、Lua言語でプログラミングしてみました。
開発環境はUbuntu 18.04.1です。
使った4x4マトリックス・キーパッド
5個で700円です。
HiLetgo 5個セットマトリックスフィルムボタンキーボード メンブレン式キーボード 4*4 Arduinoに対応 [並行輸入品]
書き込みツール esptool をインストールします
$ sudo apt-get install python-pip
$ pip install esptool
$ cd
$ cp -p .bashrc .bashrc.org
$ echo export PATH=$HOME/.local/bin:$PATH | tee -a .bashrc
$ source .bashrc
NodeMCUの最新ファームウェアをビルド・ダウンロードします
NodeMCU custom buildsでファームウェアを作成します。
メールアドレスを入力し、「http」モジュールを追加し、「Start your build」を押します。
作成されたものはメールでダウンロード・リンクが通知されます。
Your NodeMCU custom build finished successfully. You may now download the firmware:
- float: https://transfer.sh/G17jW/nodemcu-master-8-modules-YYYY-MM-DD-HH-MM-SS-float.bin
- integer: https://transfer.sh/6jwUN/nodemcu-master-8-modules-YYYY-MM-DD-HH-MM-SS-integer.bin

This was built against the master branch and includes the following modules: file, gpio, http, net, node, tmr, uart, wifi.
The files are guaranteed to be available for download for 24h.

*** NEW FLASHING TOOL *** NEW FLASHING TOOL *** NEW FLASHING TOOL ***
I invite you to try the new GUI tool https://github.com/marcelstoer/nodemcu-pyflasher

Learn how to flash the firmware: https://nodemcu.readthedocs.io/en/master/en/flash/. If you're upgrading from a previous version you should carefully study the "Upgrading Firmware" instructions on that page.

Please help keep this service alive: http://nodemcu-build.com/faq.php#support
「float」の方をダウンロードします。
$ wget http://nodemcu-build.com/builds/nodemcu-master-8-modules-YYYY-MM-DD-HH-MM-SS-float.bin
ダウンロードしたファームウェアを書き込みます
パソコンとESP8266をUSBケーブルで接続し、デバイス名を確認します。
$ ls -al /dev/ttyUSB0
crw-rw-rw- 1 root dialout 188, 0  1月  8 10:30 /dev/ttyUSB0
フラッシュメモリのサイズを確認します。
$ esptool.py --port=/dev/ttyUSB0 --baud 115200 flash_id
esptool.py v2.5.1
Serial port /dev/ttyUSB0
Connecting....
Detecting chip type... ESP8266
Chip is ESP8266EX
Features: WiFi
MAC: XX:XX:XX:XX:XX:XX
Uploading stub...
Running stub...
Stub running...
Manufacturer: e0
Device: 4016
Detected flash size: 4MB
Hard resetting via RTS pin...
フラッシュメモリを初期化します。
$ esptool.py --port=/dev/ttyUSB0 erase_flash
esptool.py v2.5.1
Serial port /dev/ttyUSB0
Connecting....
Detecting chip type... ESP8266
Chip is ESP8266EX
Features: WiFi
MAC: XX:XX:XX:XX:XX:XX
Uploading stub...
Running stub...
Stub running...
Erasing flash (this may take a while)...
Chip erase completed successfully in 0.0s
Hard resetting via RTS pin...
ファームウェアをフラッシュメモリに書き込みます。
$ esptool.py --port=/dev/ttyUSB0 --baud 115200 write_flash --flash_size=4MB 0x00000 nodemcu-master-8-modules-2019-01-01-12-17-14-float.bin
esptool.py v2.5.1
Serial port /dev/ttyUSB0
Connecting....
Detecting chip type... ESP8266
Chip is ESP8266EX
Features: WiFi
MAC: XX:XX:XX:XX:XX:XX
Uploading stub...
Running stub...
Stub running...
Configuring flash size...
Flash params set to 0x0240
Compressed 438272 bytes to 284067...
Wrote 438272 bytes (284067 compressed) at 0x00000000 in 25.1 seconds (effective 139.8 kbit/s)...
Hash of data verified.

Leaving...
Hard resetting via RTS pin...
シリアル・コンソールでNodeMcuインタプリタに接続します
参考:
"Hello World!" してみます。
$ sudo apt-get install screen
$ screen /dev/ttyUSB0 115200 cs8 -ixon -ixoff -istrip

> node.restart()

NodeMCU custom build by frightanic.com
        branch: master
        commit: 11592951b90707cdcb6d751876170bf4da82850d
        SSL: false
        modules: file,gpio,http,net,node,tmr,uart,wifi
 build created on 2019-01-01 12:16
 powered by Lua 5.1.4 on SDK 2.2.1(6ab97e9)
lua: cannot open init.lua

> print("Hello World!")
Hello World!
[Ctrl]+[a][k]で screen を終了します。
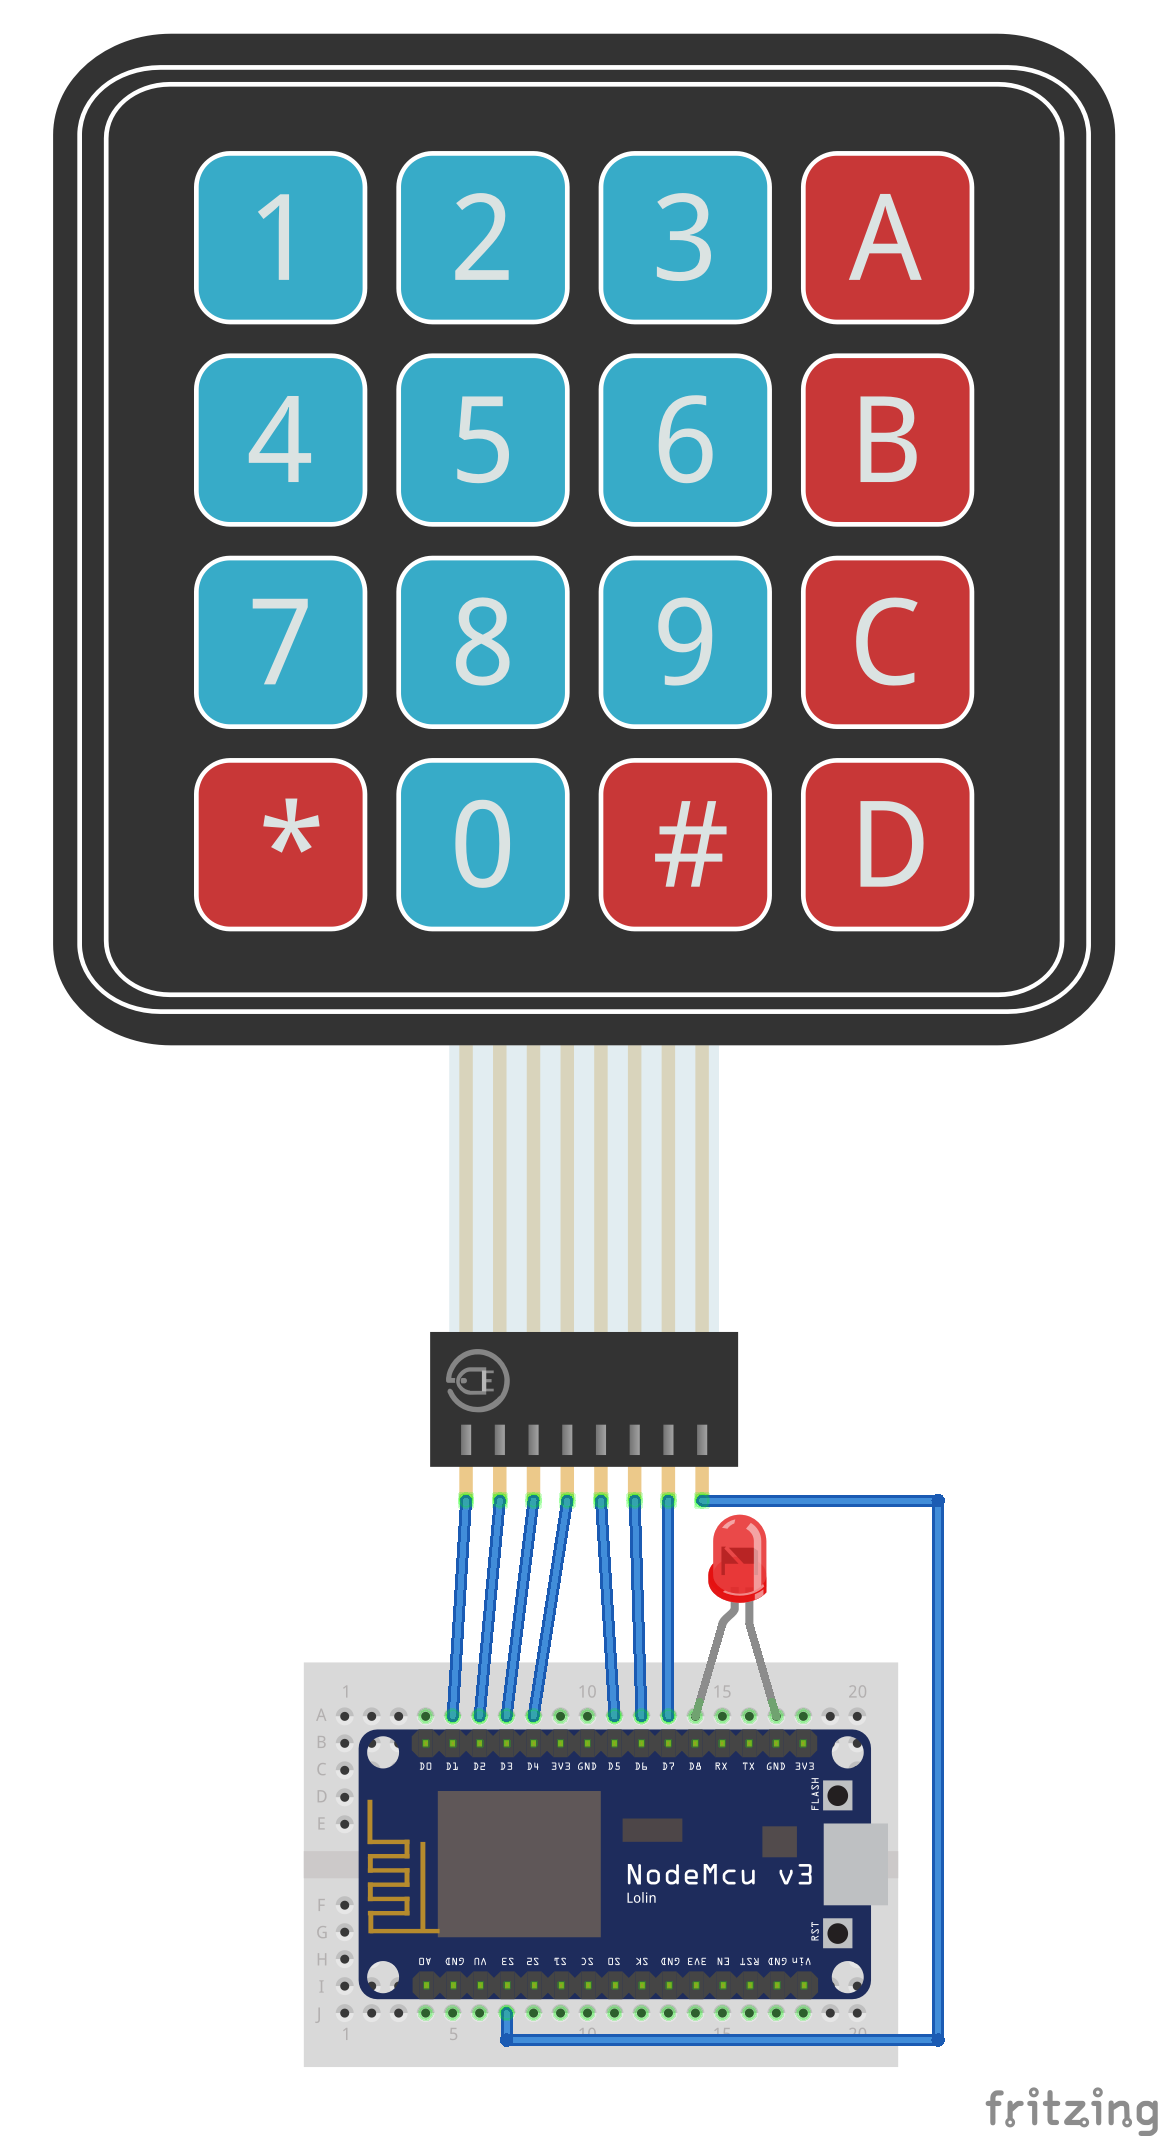
ESP8266に4x4マトリックス・キーパッドを接続し、Luaスクリプトをアップロードします
参考:12 KEY ALPHA NUMERIC KEYPAD
参考:GitHub - rafacouto/lua-matrix-keypad
4x4マトリックス・キーパッドのライブラリ lua-matrix-keypad をダウンロードします。
$ pip install nodemcu-uploader
$ sudo apt-get install git
$ git clone https://github.com/rafacouto/lua-matrix-keypad
$ cd lua-matrix-keypad
NodeMCUが起動したとき最初に読み込まれるファイルが init.lua です。
init.lua でデバッグ・モードにするか切り分けします。
デバッグ・モードONなら何もしません。OFFなら user.lua を自動実行します。
ONかOFFかは特定ポートがGNDに接続されているかどうかでチェックします。
$ vi init.lua
PIN_USER_SW = 11  -- GPIO:9(ID:11,SD2)
FileToExecute="user.lua"

gpio.mode(PIN_USER_SW, gpio.INPUT)
val = gpio.read(PIN_USER_SW)

if val == 0 then
  print("\n*** DEBUG MODE ON ***")
else
  print("\n*** DEBUG MODE OFF ***")
  print("---")
  print("DEBUG MODE ON -> switch GPIO:9(ID:11,SD2) to GND")
  print("---")
  l = file.list()
  for k,v in pairs(l) do
    if k == FileToExecute then
      print("Executing ".. FileToExecute)
      dofile(FileToExecute)
    end
  end
end
$ vi user.lua
--[[
- Lua matrix-keypad driver for NodeMCU (ESP8266)
- License: GPLv3 https://www.gnu.org/licenses/gpl-3.0.html
- Author: Rafa Couto <caligari@treboada.net>
- Documentation and examples: https://github.com/rafacouto/lua-matrix-keypad
--]]
-- 無線LAN APの設定
wifi.setmode(wifi.STATION)
wifi.sta.config {ssid="********", pwd="********"}
print(wifi.sta.getip())
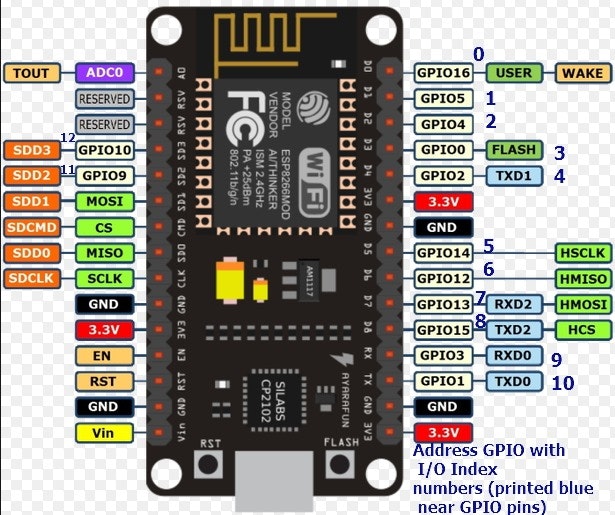
--[[
NodeMcu(ESP8266) GPIOのマッピング
index label pin
0 D0 GPIO16
1 D1 GPIO5
2 D2 GPIO4
3 D3 GPIO0
4 D4 GPIO2
5 D5 GPIO14
6 D6 GPIO12
7 D7 GPIO13
8 D8 GPIO15
9 RX GPIO3
10 TX GPIO1
11 SD2 GPIO9
12 SD3 GPIO10
--]]
-- MyWebhookのURLを設定
local url = "http://192.168.3.100:3000/api?p="
-- 赤色LEDの初期化(ボタンが押された時に点滅)
local pin_pushed = 8 -- D8 GPIO15
gpio.mode(pin_pushed, gpio.OUTPUT)
gpio.write(pin_pushed, gpio.LOW)
-- Lua matrix-keypad driver for NodeMCU(ESP8266) を実行
dofile("keypad.lua")
-- matrix-keypadから見たNodeMCU(ESP8266)の接続ピンを設定
-- 1 2 3 A
-- 4 5 6 B
-- 7 8 9 C
-- * 0 # D
-- ||||||||
-- 左からRow1,Row2,Row3,Row4,Col1,Col2,Col3,Col4の順
-- indexで設定する
local KEYPAD_ROW_PINS = { 1, 2, 3, 4 }
local KEYPAD_COL_PINS = { 5, 6, 7, 12 }
-- matrix-keypadのラベルを指定
local KEYPAD_LABELS = "123A456B789C*0#D"
-- matrix-keypadの初期化
local myKeypad = require "keypad"
myKeypad.init(KEYPAD_ROW_PINS, KEYPAD_COL_PINS, KEYPAD_LABELS)
-- キー入力を監視する
myKeypadScan = function()
local key = myKeypad.scan()
local url2
-- キーが押されたら
if key then
print(key)
gpio.write(pin_pushed, gpio.HIGH)
tmr.alarm(2, 100, tmr.ALARM_SINGLE, function() -- 100ms
gpio.write(pin_pushed, gpio.LOW)
end)
if (key == '#') then
url2 = url..'S'
else
url2 = url..key
end
-- MyWebhookを呼び出す
http.get(url2, nil, function(code, data)
if (code < 0) then -- 接続エラーなら
print("HTTP request failed")
else
print(code, data)
end
end)
tmr.delay(500*1000); -- 500ms
end
end
-- 300ms毎にキー入力を監視する
tmr.alarm(1, 300, tmr.ALARM_AUTO, myKeypadScan)
プログラムをESP8266にアップロードします。
$ nodemcu-uploader upload keypad.lua
$ nodemcu-uploader upload init.lua
$ nodemcu-uploader upload user.lua
プログラムがアップロードされたか確認します。
$ nodemcu-uploader file list
opening port /dev/ttyUSB0 with 115200 baud
Listing files
for key,value in pairs(file.list()) do print(key,value) end
init.lua	475
user.lua	2314
keypad.lua	1379
>
おわりに
これクルマで使いたいと思っています。(=^・^=)