前説
$\style{background-color:black;}{遠い昔、はるかかなたの銀河系で……}$
$\style{background-color:black;}{ }$
$\style{background-color:black;}{Qiitaには混乱が渦巻いていた。非公開にされる記事の基準の是非で意見が割れたのだ。}$
$\style{background-color:black;}{数千のユーザーがQiitaからの離脱を表明したのだ。}$
$\style{background-color:black;}{この非常事態にコメント欄は果てしない討議をただ繰り返すばかり。}$
$\style{background-color:black;}{戦争だ!それはともかく、「フォースにバランスをもたらす者」と言われた美少年アナキン=スカイウォーカーであったが、}$
$\style{background-color:black;}{なんやかんやあって、年齢も重ね、変なニックネームも付き、住所不定になっていた。}$
$\style{background-color:black;}{そこで少年時代(Episode1)とおっさん時代(Episode4)での変化を差分で表示してみよう。}$
$\style{background-color:black;}{人類を救い銀河に自由を取り戻すために....}$
概要
この記事ではWPFで2つの文字列の差分を表示できるDiffPlexというライブラリを紹介します。GitなどのDiff表示的なやつです。

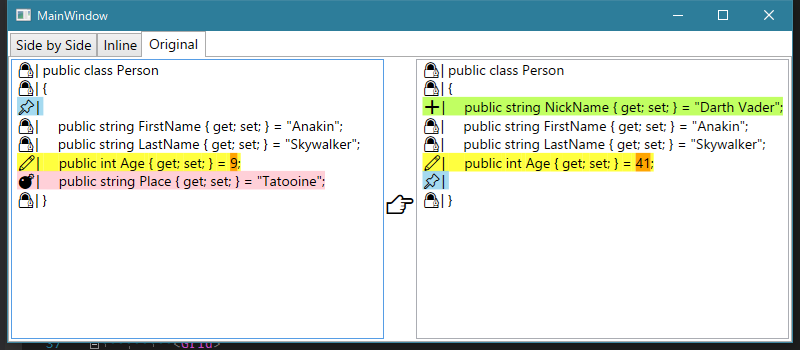
こんな感じに左右で2つのテキストを比較できます。
変なニックネームがついたので3行目にNickNameプロパティが追加され、年をとったので5行目のAgeプロパティが変更され、住所不定になったので6行目のPlaceプロパティが削除されています。
方法
左右分割表示
WPFアプリを作成して、nugetで、DiffPlex.Wpfを取得
MainWindow.xamlにdiffplex:DiffViewerを追加して、比較したいテキストを追加します。
<Window
...
   xmlns:diffplex="clr-namespace:DiffPlex.Wpf.Controls;assembly=DiffPlex.Wpf"
...>
      <diffplex:DiffViewer
         NewText="{Binding NewText}"
         OldText="{Binding OldText}"/>
</Window>
これだけです。
あとはオプションで差分のタイトル部分に文字指定をしたかったらOldTextHeader・NewTextHeaderを使用してください。
インライン表示
また、左右分割ではなく、インライン表示もできます。

こちらはなぜかXAMLからはできないので、コードビハインドで変更します。
プルリク送ったら採用してくれて、Ver1.1.2からXAMLで指定できるようになりました。
<Window
...
   xmlns:diffplex="clr-namespace:DiffPlex.Wpf.Controls;assembly=DiffPlex.Wpf"
...>
      <diffplex:DiffViewer
         IsSideBySide ="false"
         NewText="{Binding NewText}"
         OldText="{Binding OldText}"/>
</Window>
カスタム表示
さらにもっとカスタムして、Viewを独自形式にすることもできます。
変更内容で背景色と行頭絵文字を変更しています。
今回はRichTextBoxで表示することにします。
View
<Window
...
   xmlns:diffplex="clr-namespace:DiffPlex.Wpf.Controls;assembly=DiffPlex.Wpf"
...>
   <Grid>
      <Grid.ColumnDefinitions>
         <ColumnDefinition Width="*" />
         <ColumnDefinition Width="Auto" />
         <ColumnDefinition Width="*" />
      </Grid.ColumnDefinitions>
      <RichTextBox Grid.Column="0" local:RichTextBoxHelper.Document="{Binding DiffModel.OldText, Converter={StaticResource RichTextVmToFlowDocumentConverter}}" />
      <TextBlock
         Grid.Column="1" VerticalAlignment="Center"
         FontSize="24" Text="👉" />
      <RichTextBox Grid.Column="2" local:RichTextBoxHelper.Document="{Binding DiffModel.NewText, Converter={StaticResource RichTextVmToFlowDocumentConverter}}" />
   </Grid>
</Window>
描画内容がほとんどViewModelとConverterに書いてあるので、Viewはシンプルです。
RichTextBoxHelper.Document添付プロパティについては下記リンクを参照ください。
今回は下記リンク内の方法3 添付プロパティとConverterで柔軟にBindingするを使用します。
ViewModel
RichTextBoxの中身(Document)にViewModelで相当するのが、DiffPaneModelクラスです。
class MainWindowViewModel : INotifyPropertyChanged
    {
...
        private SideBySideDiffModel _DiffModel;
        public SideBySideDiffModel DiffModel
        {
            get => _DiffModel;
            set
            {
                _DiffModel = value;
                RaisePropertyChanged();
            }
        }

        public MainWindowViewModel()
        {
            var builder = new SideBySideDiffBuilder(new Differ());
            DiffModel = builder.BuildDiffModel(OldText, NewText);
        }
   }
SideBySideDiffModelはDiffPlexライブラリ内のクラスです。
new SideBySideDiffBuilder(new Differ())で差分表示データを作るためのビルダーが生成されます。
そこにbuilder.BuildDiffModel(古文字列, 新文字列)で比較したい文字列を入力して、差分表示データが生成します。
SideBySideDiffModelクラスのDiffPaneModel型のOldTextとNewTextのプロパティが差分比較対象の文字列に相当します。
DiffPaneModelのList<DiffPiece>型のLinesプロパティが文字列内の各行に相当します。
DiffPieceのChangeType型のTypeプロパティがその行の変更状態を表しています。
| ChangeType | 内容 |
|---|---|
| Unchanged | 変更なし |
| Deleted | 行削除 |
| Inserted | 行追加 |
| Imaginary | 追加される前・削除された後の行 |
| Modified | 行内の文字列変更 |
さらにDiffPieceのList<DiffPiece>型のSubPiecesプロパティが各単語に相当します。
例えば、単語の区切りに|を追加してみるとこのようになります。
public int Age { get; set; } = 9;
| |public| |int| |Age| { |get|; |set|; } |=| |9|;
そして単語ごとにもTypeプロパティがあります。行のChangeTypeがModifiedの場合は変更部分の単語だけChangeTypeがUnchanged以外になっています。
上の例では最後から2つ目の9のDiffPieceはChangeTypeがDeletedになっています。
Converter
このViewModelをConverterでRichTextBoxの中身(Document)にBindingできるよう、FlowDocument型に変換しています。
    public object Convert(object value, Type targetType, object parameter, System.Globalization.CultureInfo culture)
    {
        if (!(value is DiffPaneModel diffVM))
            return Binding.DoNothing;

        var paragraph = new Paragraph();
        foreach (var lineVM in diffVM.Lines)
        {
            List<Run> lineView = ConvertLinveVmToRun(lineVM);

            paragraph.Inlines.AddRange(lineView);

            //改行を追加
            paragraph.Inlines.Add(new LineBreak());
        }
        return new FlowDocument(paragraph);
    }

    private static List<Run> ConvertLinveVmToRun(DiffPiece lineVM)
    {
        //差分タイプによって、行頭の文字列内容と背景色を決定
        var (color, preFix) = lineVM.Type switch
        {
            ChangeType.Deleted => (Colors.Pink, "💣| "),
            ChangeType.Inserted => (Colors.GreenYellow, "➕| "),
            ChangeType.Imaginary => (Colors.SkyBlue, "📌| "),
            ChangeType.Modified => (Colors.Yellow, "✏| "),
            _ => (Colors.Transparent, "🔏| "),
        };

        //見やすいように少し半透明にしておく
        color.A = 0xC0;
        var baseColorBrush = new SolidColorBrush(color);
        var modifiedPieceBrush = new SolidColorBrush(Colors.Orange);

        //ChangeType.Modified以外は行全体で同じ書式
        if (lineVM.Type != ChangeType.Modified)
        {
            var lineView = new Run()
            {
                Text = preFix + lineVM.Text,
                Background = baseColorBrush,

            };
            return new List<Run> { lineView };
        }

        //ChangeType.Modifiedだったら変更された部分だけハイライトしたいのでSubPieceからいろいろやる
        var prefixRun = new Run()
        {
            Text = preFix,
            Background = baseColorBrush,
        };
        var runs = new List<Run> { prefixRun };

        foreach (var piece in lineVM.SubPieces)
        {
            runs.Add(new Run
            {
                Text = piece.Text,
                Background = piece.Type == ChangeType.Unchanged
                    ? baseColorBrush
                    : modifiedPieceBrush,
            });
        }
        return runs;
    }
FlowDocumentとDiffPaneModelの対応は以下のようにしました。
| DiffPaneModel | FlowDocument | 内容 |
|---|---|---|
| DiffPaneModel | Paragraph | 文字列全体 |
| DiffPiece DiffPaneModel.Lines[n] | Run + LineBreak | 1行 (ChangeType.Modified以外の場合) |
| DiffPiece DiffPaneModel.Lines[n] | List + LineBreak | 1行 (ChangeType.Modifiedの場合) |
| DiffPiece DiffPiece.SubPieces[n] | Run | 1単語 (ChangeType.Modifiedの場合) |
このように、VMからView(Run)に変換します。
ある行がChangeType.Modified以外の場合は行全体で1個のRunになります。
ChangeType.Modifiedの場合は、変更する単語部分だけハイライトしたいので、1行を複数のRunで構成します。
変換する際にChangeTypeに応じて、文字の背景色と行頭に絵文字を追加しています。
これにより、ViewModelのDiffPaneModelからViewのRichTextBoxに変換してBindingができました。
全体コード
以下に置いておきます。
https://github.com/soi013/DiffPlexDemo
参考
https://github.com/mmanela/diffplex
https://github.com/halllo/WpfDiff
環境
VisualStudio 2019
.NET Core 3.1
C# 8
DiffPlex 1.7.0
DiffPlex.Wpf 1.3.1
あとがき
Qiita のHTMLタグで遊んでみたかった。