概要
WPF/UWPで同じControlの組み合わせをあちこちで書いている、ということは無いでしょうか。
D.R.Y.!そしてデザインの統一性のためにUserControlでの部品化を行います。
一般的な説明では、UserControlのコードビハインドで依存関係プロパティを定義して、イベントが、、、
とあって、強力で色々できるのは分かりますが、正直結構めんどいです。
かといって対応したViewModelを起こすほどでもないし、Viewで完結していて欲しい。
そんな用途に限定した、可能な限りシンプルにしたUserControlの作り方・使い方を説明します。
※17/04/18追記 UWP版を追加しました
説明はWPFで行いますが、UWPでもあまり変わりません。
最後にUWP版の完全コードを載せてあります。
XAMLのみ完全固定版
まず最も単純なプロパティも含めて完全固定版を作ります。
<UserControl
    x:Class="TestUserControlSimple.SimpleUserControl"
    xmlns="http://schemas.microsoft.com/winfx/2006/xaml/presentation"
    xmlns:x="http://schemas.microsoft.com/winfx/2006/xaml">
    <StackPanel Orientation="Horizontal">
        <Rectangle Width="50" Fill="Red" />
        <TextBlock Text=":" />
        <TextBox Text="HogeHoge" />
    </StackPanel>
</UserControl>
<Window
    x:Class="TestUserControlSimple.MainWindow"
    xmlns="http://schemas.microsoft.com/winfx/2006/xaml/presentation"
    xmlns:x="http://schemas.microsoft.com/winfx/2006/xaml"
    xmlns:local="clr-namespace:TestUserControlSimple"
    Width="200" Height="200">
    <StackPanel Margin="10">
        <!--  Viewで直接指定  -->
        <local:SimpleUserControl/>
        <local:SimpleUserControl/>
    </StackPanel>
</Window>
どちらもコードビハインドは使用しません。
実行した結果が下記です。
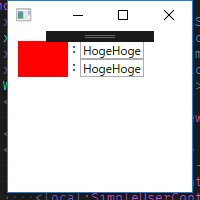
コードビハインドも使用していないし、XAMLも短い、サイコー。
多分これが一番簡単だと思います。
……で終わったら、苦労しません。
このようにXAMLの内容が全く同一であれば、簡単にUserControlを作ることが出来ます。
しかしほとんどの場合、プロパティ値の一部分だけ(ほぼ文字列)変更する必要があります。
それが次です。
XAMLのみプロパティ変更可能版
UserControlのプロパティ値を使用する側から指定したものが以下です。
<UserControl
    x:Class="TestUserControlSimple.SimpleUserControl"
    xmlns="http://schemas.microsoft.com/winfx/2006/xaml/presentation"
    xmlns:x="http://schemas.microsoft.com/winfx/2006/xaml"
    x:Name="parent">
    <StackPanel DataContext="{Binding ElementName=parent}" Orientation="Horizontal">
        <Rectangle Width="50" Fill="{Binding Path=Foreground}" />
        <TextBlock Text=":" />
        <TextBox Text="{Binding Path=DataContext}" />
    </StackPanel>
</UserControl>
<!--  Viewで直接指定  -->
<local:SimpleUserControl DataContext="Fix1" Foreground="Turquoise" />
<local:SimpleUserControl DataContext="Fix2" Foreground="Gold" />
コードビハインドは今回もありません。
実行した結果が下記です。

この付箋みたいな物がユーザーコントロールです。
ここでのポイントは
UserControlのx:Name="parent"と
その直下のStackPanelのDataContext="{Binding ElementName=parent}"
です。
こうすることで、UserControlのプロパティに対してStackPanel以下の階層からBindできるようになります。
RelativeSourceとかAncestor~とかは不要です。
この例ではStackPanelですが、GridやWrapPanelでも、UserControlの直下の要素に同様の記述をすれば問題ありません。
そしてそのバインドされるプロパティは本来は独自の依存関係プロパティを定義すべきですが、
既存のDataContextとForegroundを流用します!
荒っぽい気がしますが、動作はして、コードが短くなります。
使用する時は
DataContextにTextBoxに表示したい文字列、
Foregroundに付箋の色
を指定します。
Contentに文字列を指定しそうになりますが、UserControlのContentはStackPanelなので上書きするとStackPanel以下が消滅します。
(実用的なものでは)多分これが一番簡単だと思います。
ViewModelとの組み合わせ
単なるラベルとしての利用であれば、XAMLのみで良いですが、
ViewModelと結びつけて入力コントロールとして使用した版が下記です。
<Window
    x:Class="TestUserControlSimple.MainWindow"
    xmlns="http://schemas.microsoft.com/winfx/2006/xaml/presentation"
    xmlns:x="http://schemas.microsoft.com/winfx/2006/xaml"
    xmlns:local="clr-namespace:TestUserControlSimple"
    Width="200" Height="200">
    <Window.DataContext>
        <local:MainWindowViewModel />
    </Window.DataContext>
    <StackPanel Margin="10">
        <!--  Viewで直接指定  -->
        <local:SimpleUserControl DataContext="Fix1" Foreground="Turquoise" />
        <local:SimpleUserControl DataContext="Fix2" Foreground="Gold" />

        <Separator />
        <!--  文字をMainWindowViewModelとBind  -->
        <local:SimpleUserControl DataContext="{Binding Input, Mode=TwoWay}" Foreground="Purple" />
        <local:SimpleUserControl DataContext="{Binding Input}" Foreground="GreenYellow" />
        <!--  Buttonの中にも入れられる  -->
        <Button>
            <local:SimpleUserControl DataContext="{Binding Input}" IsEnabled="False" />
        </Button>
    </StackPanel>
</Window>
using System.ComponentModel;
namespace TestUserControlSimple
{
    public class MainWindowViewModel : INotifyPropertyChanged
    {
        public event PropertyChangedEventHandler PropertyChanged;
        private string input = "DefaultText";
        public string Input
        {
            get { return input; }
            set
            {
                input = value;
                PropertyChanged(this, new PropertyChangedEventArgs(nameof(Input)));
            }
        }
    }
}
UserControlは同一です。
実行した結果が下記です。

(起動時)
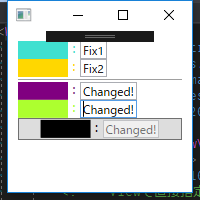
(変更後)
ここでのポイントはMainWindowで使用する際にDataContextにMode=TwoWayを指定する必要が有ることです。
上の例では黄緑色のUserControlの値を変更しても、反映されません。
TextBoxのBindingのデフォルト値はTwoWayですが、UserControlはOnewayなのでそちらが適用されます。
これをUserControl側でTwoWayにする方法は調べたけどわかりませんでした。
17/11/12追記:勘違いしていましたが、BindingのデフォルトモードはControlごとではなく、プロパティごとに決まっています。
つまり、これがOnewayなのはUserControlのDataContextプロパティのFrameworkPropertyMetadataのデフォルト値に依るものなので、変更することはできません。
UserControlは変更していないので、
(実用的なものでは)多分これも一番簡単だと思います。
コードビハインド解禁版
コードビハインドを使用してさらに拡張します。
多分これは一番簡単ではないです。
IDプロパティとそれに対応するLabelを追加しました。
<UserControl
    x:Class="TestUserControlSimple.SimpleUserControl"
    xmlns="http://schemas.microsoft.com/winfx/2006/xaml/presentation"
    xmlns:x="http://schemas.microsoft.com/winfx/2006/xaml">
    <StackPanel Orientation="Horizontal">
        <Label Content="{Binding Path=Id}" />
        <Rectangle Width="50" Fill="{Binding Path=Foreground}" />
        <TextBlock Text=":" />
        <TextBox Text="{Binding Path=DataContext}" />
    </StackPanel>
</UserControl>
using System.Windows;
using System.Windows.Controls;

namespace TestUserControlSimple
{
    public partial class SimpleUserControl : UserControl
    {
        public int Id { get; set; } = -1;

        public SimpleUserControl()
        {
            InitializeComponent();
            (this.Content as FrameworkElement).DataContext = this;
        }
    }
}
<local:SimpleUserControl Id="10" DataContext="Fix1" Foreground="Turquoise"/>
MainWindowViewModelは変更していないので省略します。
実行した結果が下記です。
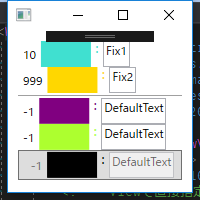
ここでのポイントはStackPanelとUserControlのDataContexの結びつけ
XAMLからコードビハインドに移動することです。
DataContext="{Binding ElementName=parent}"
↓
(this.Content as FrameworkElement).DataContext = this;
移動前の状態だとIdプロパティは変更できませんでした。
原因は不明。
Idプロパティは実行時に変更しないので通常のCLRのプロパティです。
以上がシンプルなUserControlを最も簡単に実装する方法を探った結果です。
さらに
- Idプロパティを動的に変更したい
- NumericUpDownのようなボタンを組み込んで値を変更したい
- TextBoxの位置に使用時に任意のコントロールを入れたい
と複雑になってきたら、以下のリンクをご参考下さい。
UWP版 ※17/04/18追記
WPF版のコードビハインド解禁版と基本的に同じです。
一部x:Bindを使用しています。
<UserControl
    x:Class="TestUWP.SimpleUserControl"
    xmlns="http://schemas.microsoft.com/winfx/2006/xaml/presentation"
    xmlns:x="http://schemas.microsoft.com/winfx/2006/xaml">
    <StackPanel Orientation="Horizontal">
        <TextBlock Text="{x:Bind Path=Id}" />
        <Rectangle Width="50" Fill="{x:Bind Path=Foreground}" />
        <TextBlock Text=":" />
        <TextBox Text="{x:Bind Path=DataContext, Mode=TwoWay}" />
    </StackPanel>
</UserControl>
UserControlはBinding⇒x:Bindに変更しました。
using Windows.UI.Xaml;
using Windows.UI.Xaml.Controls;

namespace TestUWP
{
    public sealed partial class SimpleUserControl : UserControl
    {
        public int Id { get; set; } = -1;

        public SimpleUserControl()
        {
            this.InitializeComponent();
            (this.Content as FrameworkElement).DataContext = this;
        }
    }
}
<Page
    x:Class="TestUWP.MainPage"
    xmlns="http://schemas.microsoft.com/winfx/2006/xaml/presentation"
    xmlns:x="http://schemas.microsoft.com/winfx/2006/xaml"
    xmlns:local="using:TestUWP">
    <Page.DataContext>
        <local:MainPageViewModel />
    </Page.DataContext>
    <StackPanel>
        <!--  Viewで直接指定  -->
        <local:SimpleUserControl
            DataContext="Fix1"
            Foreground="Turquoise"
            Id="10" />
        <local:SimpleUserControl
            DataContext="Fix2"
            Foreground="Gold"
            Id="999" />
        <!--  文字をMainWindowViewModelとBind  -->
        <local:SimpleUserControl DataContext="{Binding Input, Mode=TwoWay}" Foreground="Purple" />
        <local:SimpleUserControl DataContext="{Binding Input}" Foreground="GreenYellow" />
        <!--  Buttonの中にも入れられる  -->
        <Button>
            <local:SimpleUserControl DataContext="{Binding Input}" IsEnabled="False" />
        </Button>
    </StackPanel>
</Page>
MainPageのコードビハインドは何も書いていないので省略します。
using System.ComponentModel;
namespace TestUWP
{
    public class MainPageViewModel : INotifyPropertyChanged
    {
        public event PropertyChangedEventHandler PropertyChanged;

        private string input = "DefaultText";
        public string Input
        {
            get { return input; }
            set
            {
                input = value;
                PropertyChanged(this, new PropertyChangedEventArgs(nameof(Input)));
            }
        }
    }
}
ViewModelはWPF版と同じです。
参考
A Simple Pattern for Creating Re-useable UserControls in WPF / Silverlight
[Walkthrough: Two-way binding inside a XAML User Control]
(http://blog.jerrynixon.com/2013/07/solved-two-way-binding-inside-user.html)
[WPF4.5入門 その53 「ユーザーコントロール」 - かずきのBlog@hatena]
(http://blog.okazuki.jp/entry/2014/09/08/203943)
[UWP]同じようなXAMLを書きたくない。テンプレートコントロールを使う
環境
VisualStudio2017
.NET Framework 4.6
C#6