はじめに
APIの経験がないから、試してみたい
→axiosというのがいいらしい
コーディングに注力したい(楽をしたい)
→AWS API Gatewayを使おう
どうせなら構成はコード管理したい
→SAMを使おう
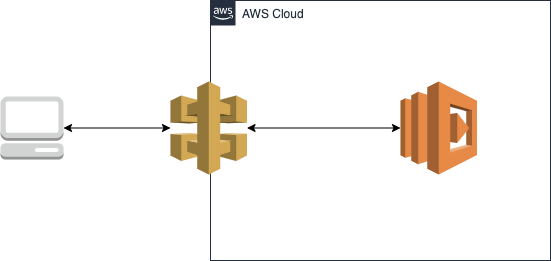
というわけで以下の構成を考えてみました。
フロント及びバックエンド両方とも処理部分はとてもシンプルなものにしたのですが、
それでも「SAMってどうやるの?」「GETメソッドがローカルから叩けない…」「GETが
できたと思ったら、今度はPOSTが叩けない…」等々でだいぶハマりました。
本稿では「ローカルからGET及びPOSTメソッドのAPIを叩く」までを振り返り、
私が躓いたところをまとめようと思います。
※開発環境はMacです。
やったこと
今回私は以下のような流れで進めました。
-
SAMを利用して、API Gateway及びlambdaを構築 - ローカルから先程作成した
API GatewayのGETメソッドを叩く - ローカルから先程作成した
API GatewayのPOSTメソッドを叩く
今回は各ステップの内容について計3回に分けて触れていきたいと思います。
1. SAMを利用して、API Gateway及びlambdaを構築
SAMとは、Serverless Application Modelの略で、サーバーレスアプリケーション構築用のオープンソースフレームワークです。CloudFormationのサーバーレスリソース用に特化したようなもので、CloudFormationと併用する事もできます。これを利用することで、各リソースをコード管理することができます。
SAMを利用するためには、事前にAWS SAM CLIをインストールする必要があります(公式ドキュメントはこちら)。その後、sam initを入力し、ウィザードに従って初期化します。以下に私が今回実行した例を載せます。
$sam init
Which template source would you like to use?
	1 - AWS Quick Start Templates
	2 - Custom Template Location
Choice: 1 ←1を選ぶといい感じの雛形を作ってくれるので、最初はこっちのほうがいいと思います。

Which runtime would you like to use?
	1 - nodejs12.x
	2 - python3.8
	3 - ruby2.7
	4 - go1.x
	5 - java11
	6 - dotnetcore3.1
	7 - nodejs10.x
	8 - python3.7
	9 - python3.6
	10 - python2.7
	11 - ruby2.5
	12 - java8
	13 - dotnetcore2.1
Runtime: 8 ←ランタイムを決めるところ。お好きなのをどうぞ。

Project name [sam-app]: demo-sam-app ←今回SAMで作成するプロジェクト名。

Cloning app templates from https://github.com/awslabs/aws-sam-cli-app-templates.git

AWS quick start application templates:
	1 - Hello World Example
	2 - EventBridge Hello World
	3 - EventBridge App from scratch (100+ Event Schemas)
	4 - Step Functions Sample App (Stock Trader)
Template selection: 1 ←どんなテンプレートを利用するか。今回は1を利用

-----------------------
Generating application:
-----------------------
Name: demo-sam-app
Runtime: python3.7
Dependency Manager: pip
Application Template: hello-world
Output Directory: .

Next steps can be found in the README file at ./demo-sam-app/README.md
そうすると、先程入力したプロジェクト名でディレクトリが作成されているので、そこに移動すると、以下の構成になっています。
demo-sam-app/
           ┃━events/
           ┃      ┗event.json
           ┃
           ┃━hello_world/
           ┃           ┃━__init__.py
           ┃           ┃
           ┃           ┃━app.py
           ┃           ┃
           ┃           ┗requirement.txt
           ┃
           ┃━test/
           ┃    ┗unit/
           ┃        ┃━__init__.py
           ┃        ┃
           ┃        ┗test_handler.py
           ┃
           ┃
           ┃━.gitignore
           ┃
           ┃━README.md
           ┃
           ┗template.yaml
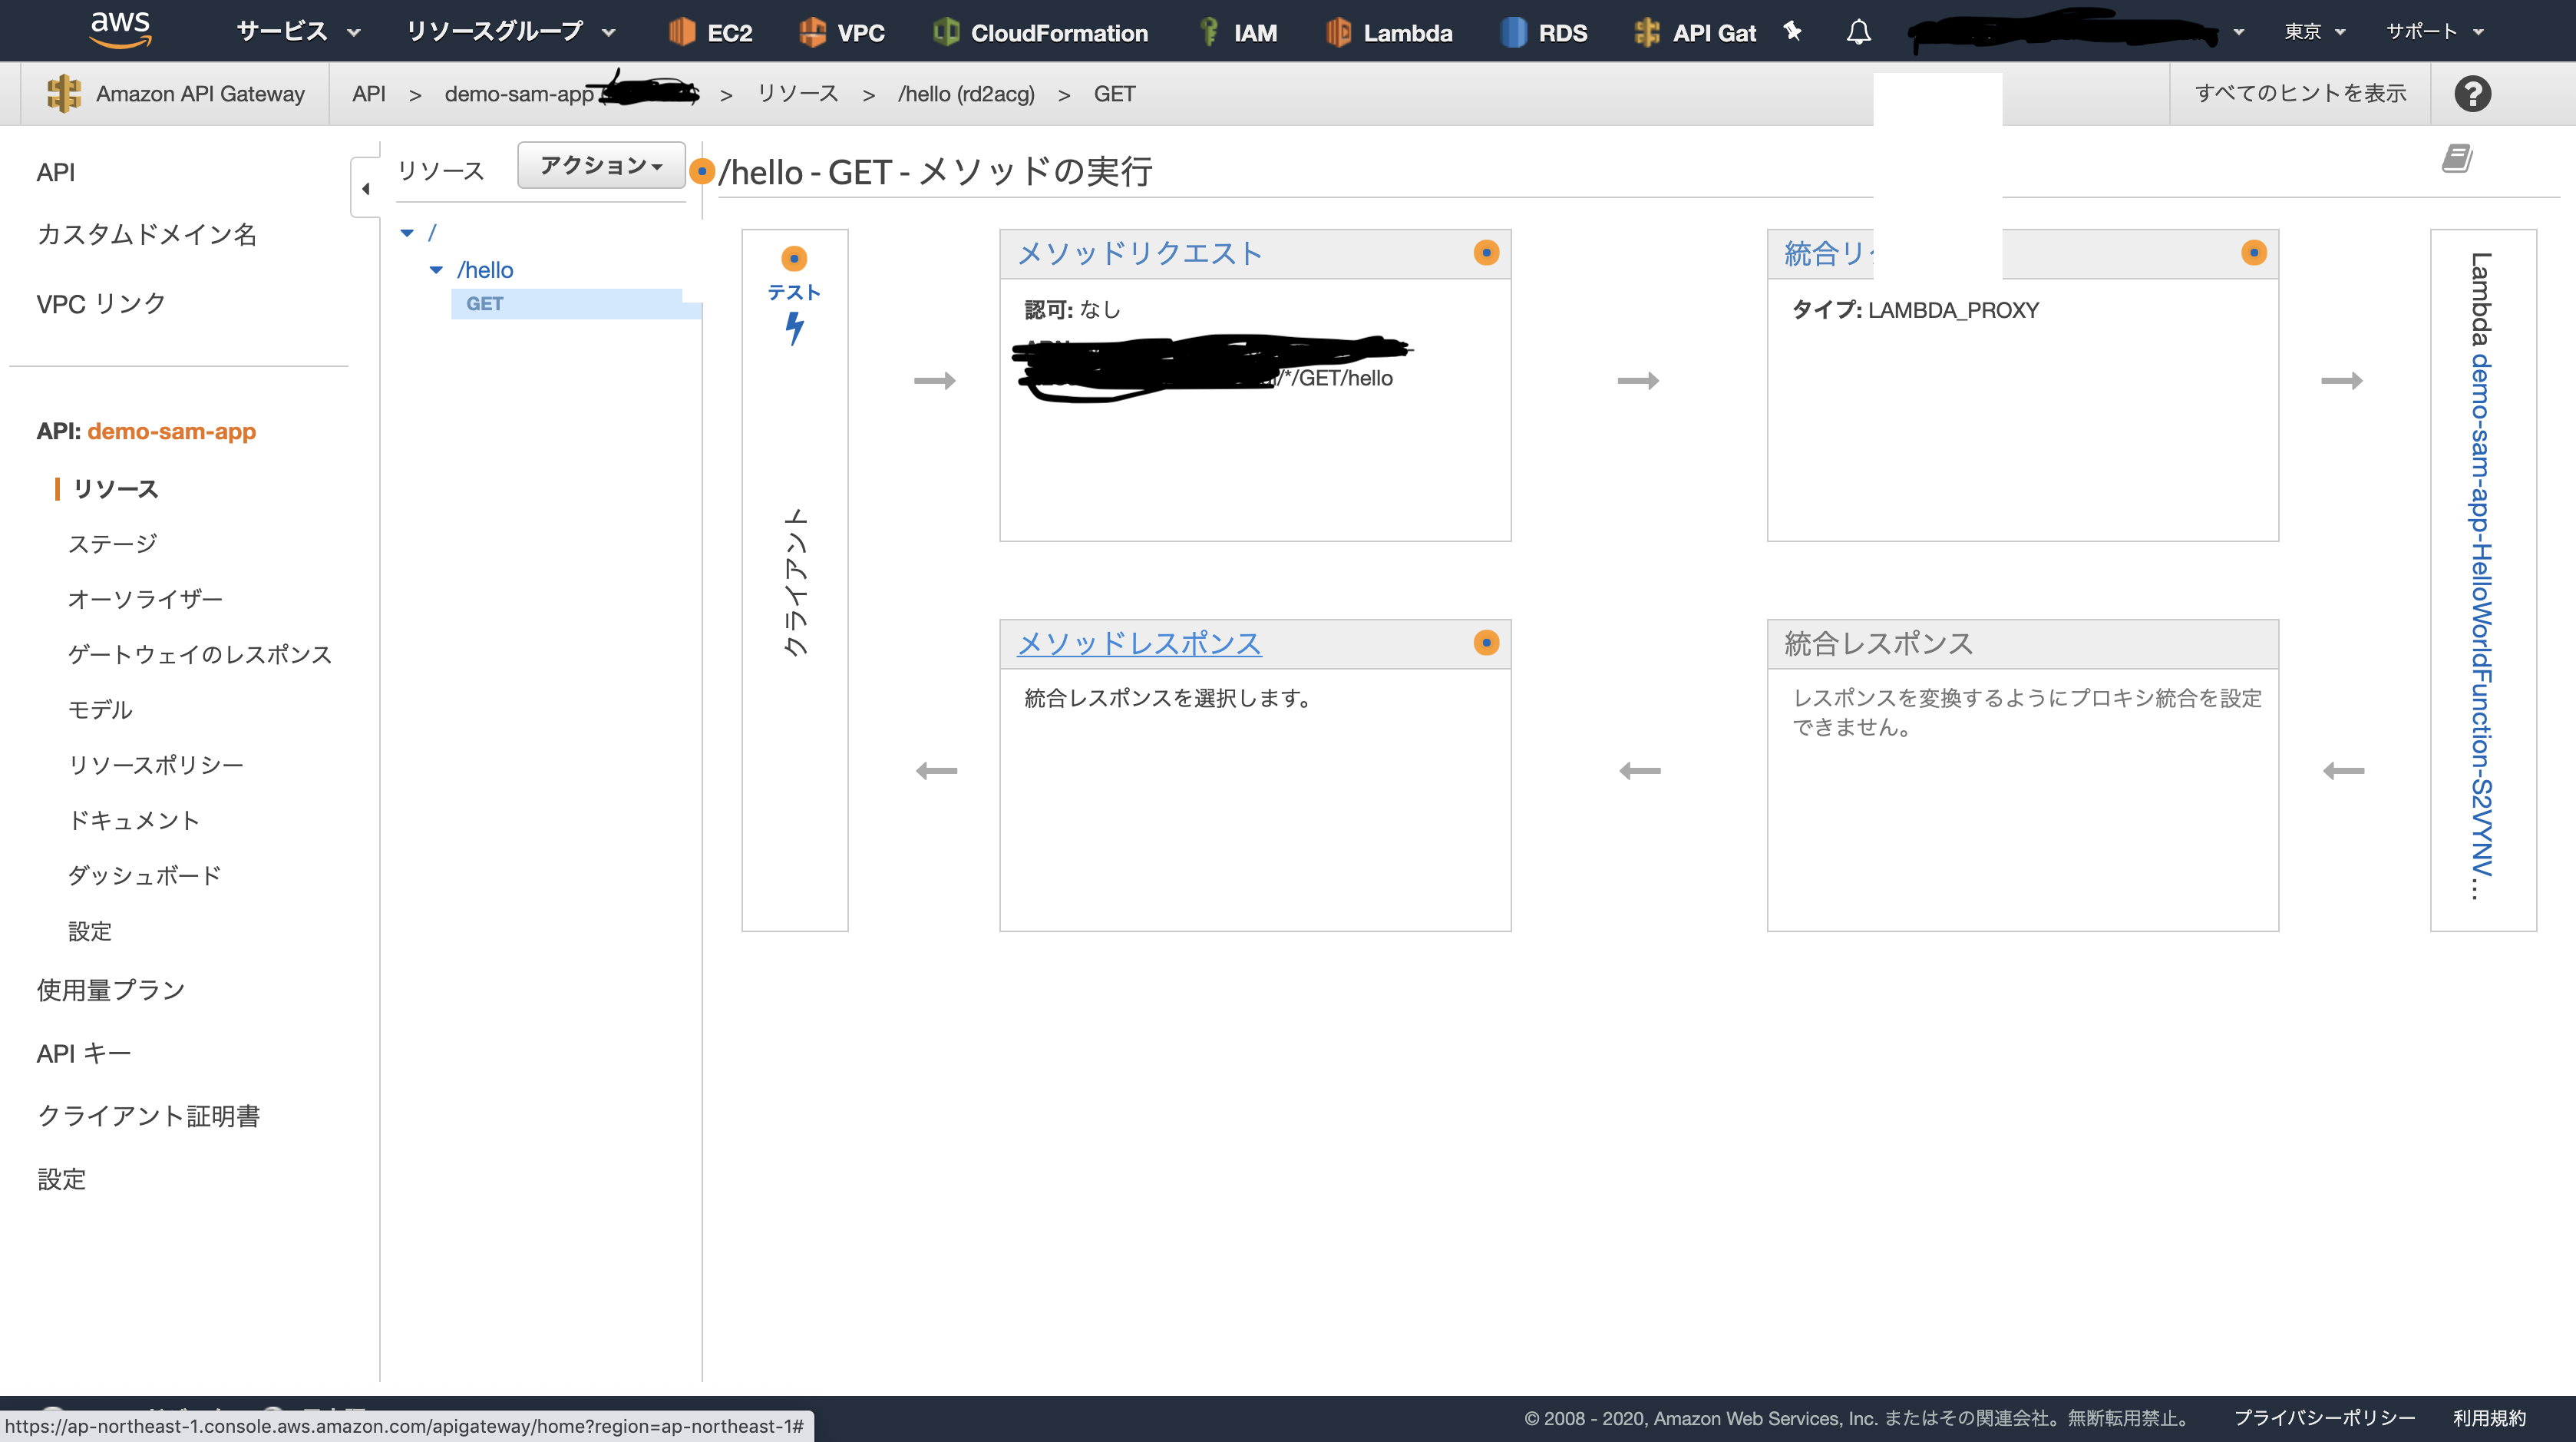
重要なのは、template.yamlでここでどんなアプリケーションの構成にするか記述します。
以下にResources部分を抜粋します。
Resources:
  HelloWorldFunction:
    Type: AWS::Serverless::Function # More info about Function Resource: https://github.com/awslabs/serverless-application-model/blob/master/versions/2016-10-31.md#awsserverlessfunction
    Properties:
      CodeUri: hello_world/
      Handler: app.lambda_handler
      Runtime: python3.7
      Events:
        HelloWorld:
          Type: Api # More info about API Event Source: https://github.com/awslabs/serverless-application-model/blob/master/versions/2016-10-31.md#api
          Properties:
            Path: /hello
            Method: get
要点をかいつまんで説明すると、
- Type: AWS::Serverless::Function
本リソースの種類。今回はlambda。 - CodeUri: hello_world/
本リソースを構成するコードはどこにあるか(今回は./hello_world)。 - Type: Api
リソース属性。今回はApiとなっているので、「この関数はAPI Gatewayを介して呼ばれるものですよ」ということを言っている。こうすると勝手に対応したAPI Gatewayを作成してくれるので便利! - Path: /hello
APIのパス(URLの指定)。 - Method: get
APIのメソッド。
という感じです。
では、本リソースをビルド・デプロイしたいと思います。ビルドには sam build、デプロイにはsam deployを利用します。初回デプロイはsam deploy --guidedとしたほうがいいです。sam deploy --guidedとしたときにいくつかの選択肢がでます。ここでSave arguments to samconfig.toml [Y/n]: yとすることで、次回以降今回入力した情報を引き継いでくれるので、--guidedが不要になります。
$ sam deploy --guided
Looking for samconfig.toml :  Not found

Setting default arguments for 'sam deploy'
=========================================
Stack Name [sam-app]: demo-sam-app
AWS Region [us-east-1]: ap-northeast-1
# Shows you resources changes to be deployed and require a 'Y' to initiate deploy
Confirm changes before deploy [y/N]: y
# SAM needs permission to be able to create roles to connect to the resources in your template
Allow SAM CLI IAM role creation [Y/n]: y
HelloWorldFunction may not have authorization defined, Is this okay? [y/N]: y
Save arguments to samconfig.toml [Y/n]: y ←これ
これでテンプレートにかかれた内容を元に、API Gateway及びlambdaが作成されます。
では今回作成したAPIをcurlを利用して叩いてみたいと思います。
$ curl https://{メソッドのURL}/Prod/hello
{"message": "hello world!"}
確かにメッセージが返ってきたことが確認できました。
終わりに
今回はSAMを使ったAPI環境の構築を行いました。次回はlocalhostを立てて、そこからAPIを叩いた際に直面した問題について触れたいと思います。