はじめに
言語やフレームワークの勉強をしていてはじめに出力する内容は決まって「Hello World!」だと思います。ただ、私は実行してみていつも思います。
いや、localにはHello!出来てるけどWorldにはHello!出来てなくない?
ということで今回はAngular×AWSでWorldにHello!するまでの流れを記載しました。
目指すアーキテクチャ
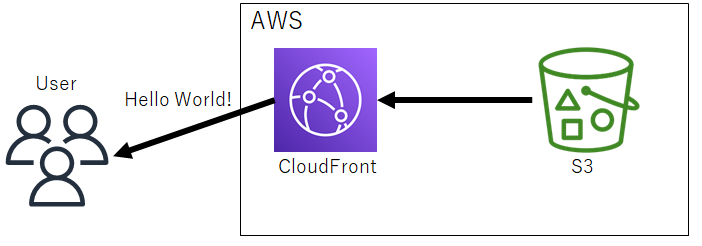
アーキテクチャとしてはS3に入れたAngularのアプリをCloudFrontでホスティングする仕組みをゴールとします。
まずはlocalにHello!
WolrdにHello!する前にまずはlocalにHello!出来てないと始まらないので、まずはlocalにHello!します。
これに関しては、Angularの公式のセットアップを見るのをおすすめしますが、ざっくりと手順をまとめました。
Angular公式
環境構築
まずはNode.jsをインストールします。
※Node.jsのバージョンを管理されたい方はnvm経由でインストールするようにしましょう。
インストールするとNode.jsと共にnpmパッケージマネージャーがインストールされるのでnpmを使ってAngularをインストールしていきます。
npm install -g @angular/cli
これでAngularがインストール出来ました。
次にAngularのアプリを作成していきます。
ng new my-app
これで新しいAngularアプリケーションが作成されました。簡単ですね。
それでは、作成されたアプリケーションを実行してみましょう。
cd my-app
ng serve --open
これでlocalにHello!は完了です。
ビルドしてみよう
これまでの処理でアプリケーションの実行までは出来ました。しかし、これをホスティングするためにはビルドする必要があります。
ビルドは下記のコマンドで出来ます。
ng build --aot
このコマンドを実行するとアプリケーションのルートディレクトリにdistというディレクトリが出来ていると思います。
dist/my-app配下のファイルがホスティングするべきファイル群になります。
これをS3に配置することでどこからでもアプリケーションを見ることが出来るようになります。
AWS周りの設定をしよう
上までの手順でアプリケーション本体のファイルは作成することが出来ました。
それでは次に基盤周りの設定をしていきましょう。
今回は作成をより簡略化するためにCloudFormationのテンプレートでリソースを作っていきます。
テンプレートはyaml形式で記載しています。
パラメータ設定
まずは、パラメータを設定します。
S3のバケット名やアプリを入れるディレクトリ名は自由に変えたいケースが多いのでパラメータ化しておきます。
Parameters:
  AngularBucketName:
    Type: String
    Default: "angular-app-bucket"
    Description: "S3 bucket to Create"
    AllowedPattern: "[a-zA-Z][a-zA-Z0-9_-]*"
  DirName:
    Type: String
    Default: "app"
    Description: "S3 bucket to Create"
    AllowedPattern: "[a-zA-Z][a-zA-Z0-9_-]*"
S3の作成
次にS3のバケットを作成します。
今回アプリはバケット内にディレクトリを切ってその中に入れたいと思っているので、ディレクトリ作成までテンプレートで行います。
まずはバケット作成です。
...
省略
...
Resources:
  AngularBucket:
    Type: AWS::S3::Bucket
    Properties:
      BucketName: !Ref AngularBucketName
これでS3にバケットが作成できます。
それでは次にバケット内にディレクトリを作成します。
ディレクトリはテンプレートで直接作ることが出来ないのでカスタムリソースでLambdaを作成してそのLambdaでディレクトリを作成していきます。
...
省略
...
  AngularDir:
    Type: Custom::S3CustomResource
    Properties:
      ServiceToken: !GetAtt AWSLambdaFunction.Arn
      the_bucket: !Ref AngularBucket
      dir_to_create: !Ref DirName
  AWSLambdaFunction:
    Type: "AWS::Lambda::Function"
    Properties:
      Description: "Work with S3 bucket"
      FunctionName: !Sub '${AWS::StackName}-${AWS::Region}-lambda'
      Handler: index.handler
      Role: !GetAtt AWSLambdaExecutionRole.Arn
      Timeout: 360
      Runtime: python3.6
      Code:
        ZipFile: |
          import boto3
          import cfnresponse
          def handler(event, context):
            # Init ...
            the_event = event['RequestType']
            print("The event is: ", str(the_event))
            response_data = {}
            s_3 = boto3.client('s3')
            # Retrieve parameters
            the_bucket = event['ResourceProperties']['the_bucket']
            dir_to_create = event['ResourceProperties']['dir_to_create']
            try:
              if the_event in ('Create', 'Update'):
                print("Requested folders: ", str(dir_to_create))
                print("Creating: ", str(dir_to_create))
                s_3.put_object(Bucket=the_bucket, Key=(dir_to_create + '/'))
              elif the_event == 'Delete':
                print("Deleting S3 content")
                b_operator = boto3.resource('s3')
                b_operator.Bucket(str(the_bucket)).objects.all().delete()
              print("Operation successfull")
              cfnresponse.send(event,context,cfnresponse.SUCCESS, response_data)
            except Exception as e:
              print("Operation failed...")
              print(str(e))
              response_data['Data'] = str(e)
              cfnresponse.send(event, context, cfnresponse.FAILED, response_data)
  AWSLambdaExecutionRole:
    Type: AWS::IAM::Role
    Properties:
      AssumeRolePolicyDocument:
        Statement:
        - Action:
          - sts:AssumeRole
          Effect: Allow
          Principal:
            Service:
            - lambda.amazonaws.com
        Version: '2012-10-17'
      Path: "/"
      Policies:
      - PolicyDocument:
          Statement:
          - Action:
            - logs:CreateLogGroup
            - logs:CreateLogStream
            - logs:PutLogEvents
            Effect: Allow
            Resource: arn:aws:logs:*:*:*
          Version: '2012-10-17'
        PolicyName: !Sub ${AWS::StackName}-${AWS::Region}-AWSLambda-CW
      - PolicyDocument:
          Statement:
          - Action:
            - s3:PutObject
            - s3:DeleteObject
            - s3:List*
            Effect: Allow
            Resource:
            - !Sub arn:aws:s3:::${AngularBucket}/*
            - !Sub arn:aws:s3:::${AngularBucket}
          Version: '2012-10-17'
        PolicyName: !Sub ${AWS::StackName}-${AWS::Region}-AWSLambda-S3
      RoleName: !Sub ${AWS::StackName}-${AWS::Region}-AWSLambdaExecutionRole
非常に長いコードになっていますが、やっていることとしては三つです。
- CloudFormationが実行されるたびに実行されるカスタムリソースを定義
- 実行されるラムダの定義
- 実行されるラムダのRoleの定義
CloudFrontの作成
これまでの処理でS3バケットとディレクトリまで作成できました。
それでは次にディレクトリに入っているデータをホスティングするCloudFrontを作っていきましょう。
...
省略
...
  AngularBucketPolicy:
    Type: AWS::S3::BucketPolicy
    Properties:
      Bucket: !Ref AngularBucket
      PolicyDocument:
        Statement:
          - Action: s3:GetObject
            Effect: Allow
            Resource: !Sub arn:aws:s3:::${AngularBucket}/${DirName}/*
            Principal:
              AWS: !Sub arn:aws:iam::cloudfront:user/CloudFront Origin Access Identity ${CloudFrontOriginAccessIdentity}
  CloudForntDistribution:
    Type: AWS::CloudFront::Distribution
    Properties:
      DistributionConfig:
        Origins:
        - DomainName: !GetAtt AngularBucket.DomainName
          Id: AngularOrigin
          OriginPath: !Sub /${DirName}
          S3OriginConfig:
            OriginAccessIdentity: !Sub origin-access-identity/cloudfront/${CloudFrontOriginAccessIdentity}
        Enabled: 'true'
        DefaultRootObject: index.html
        DefaultCacheBehavior:
          AllowedMethods:
          - GET
          - HEAD
          TargetOriginId: AngularOrigin
          ForwardedValues:
            QueryString: 'false'
          ViewerProtocolPolicy: allow-all
        PriceClass: PriceClass_200
  CloudFrontOriginAccessIdentity:
    Type: AWS::CloudFront::CloudFrontOriginAccessIdentity
    Properties:
      CloudFrontOriginAccessIdentityConfig:
        Comment: !Ref AWS::StackName
最初にAngularBucketPolicyがあり、「おや?」と思った方もいらっしゃるかもしれません。
こちらは、CloudFrontからS3にアクセスするための設定です。
S3のデータは公開設定にしていない限り外部から見ることが出来ないのでOriginAccessIdentityを設定する必要があります。
これでテンプレートの準備は出来ました。
template.yamlの全体
Parameters:
  AngularBucketName:
    Type: String
    Default: "angular-app-bucket"
    Description: "S3 bucket to Create"
    AllowedPattern: "[a-zA-Z][a-zA-Z0-9_-]*"
  DirName:
    Type: String
    Default: "app"
    Description: "S3 bucket to Create"
    AllowedPattern: "[a-zA-Z][a-zA-Z0-9_-]*"
Resources:
  AngularBucket:
    Type: AWS::S3::Bucket
    Properties:
      BucketName: !Ref AngularBucketName
  AngularBucketPolicy:
    Type: AWS::S3::BucketPolicy
    Properties:
      Bucket: !Ref AngularBucket
      PolicyDocument:
        Statement:
          - Action: s3:GetObject
            Effect: Allow
            Resource: !Sub arn:aws:s3:::${AngularBucket}/${DirName}/*
            Principal:
              AWS: !Sub arn:aws:iam::cloudfront:user/CloudFront Origin Access Identity ${CloudFrontOriginAccessIdentity}
  AngularDir:
    Type: Custom::S3CustomResource
    Properties:
      ServiceToken: !GetAtt AWSLambdaFunction.Arn
      the_bucket: !Ref AngularBucket
      dir_to_create: !Ref DirName
  AWSLambdaFunction:
    Type: "AWS::Lambda::Function"
    Properties:
      Description: "Work with S3 bucket"
      FunctionName: !Sub '${AWS::StackName}-${AWS::Region}-lambda'
      Handler: index.handler
      Role: !GetAtt AWSLambdaExecutionRole.Arn
      Timeout: 360
      Runtime: python3.6
      Code:
        ZipFile: |
          import boto3
          import cfnresponse
          def handler(event, context):
            # Init ...
            the_event = event['RequestType']
            print("The event is: ", str(the_event))
            response_data = {}
            s_3 = boto3.client('s3')
            # Retrieve parameters
            the_bucket = event['ResourceProperties']['the_bucket']
            dir_to_create = event['ResourceProperties']['dir_to_create']
            try:
              if the_event in ('Create', 'Update'):
                print("Requested folders: ", str(dir_to_create))
                print("Creating: ", str(dir_to_create))
                s_3.put_object(Bucket=the_bucket, Key=(dir_to_create + '/'))
              elif the_event == 'Delete':
                print("Deleting S3 content")
                b_operator = boto3.resource('s3')
                b_operator.Bucket(str(the_bucket)).objects.all().delete()
              print("Operation successfull")
              cfnresponse.send(event,context,cfnresponse.SUCCESS, response_data)
            except Exception as e:
              print("Operation failed...")
              print(str(e))
              response_data['Data'] = str(e)
              cfnresponse.send(event, context, cfnresponse.FAILED, response_data)
  AWSLambdaExecutionRole:
    Type: AWS::IAM::Role
    Properties:
      AssumeRolePolicyDocument:
        Statement:
        - Action:
          - sts:AssumeRole
          Effect: Allow
          Principal:
            Service:
            - lambda.amazonaws.com
        Version: '2012-10-17'
      Path: "/"
      Policies:
      - PolicyDocument:
          Statement:
          - Action:
            - logs:CreateLogGroup
            - logs:CreateLogStream
            - logs:PutLogEvents
            Effect: Allow
            Resource: arn:aws:logs:*:*:*
          Version: '2012-10-17'
        PolicyName: !Sub ${AWS::StackName}-${AWS::Region}-AWSLambda-CW
      - PolicyDocument:
          Statement:
          - Action:
            - s3:PutObject
            - s3:DeleteObject
            - s3:List*
            Effect: Allow
            Resource:
            - !Sub arn:aws:s3:::${AngularBucket}/*
            - !Sub arn:aws:s3:::${AngularBucket}
          Version: '2012-10-17'
        PolicyName: !Sub ${AWS::StackName}-${AWS::Region}-AWSLambda-S3
      RoleName: !Sub ${AWS::StackName}-${AWS::Region}-AWSLambdaExecutionRole
  CloudForntDistribution:
    Type: AWS::CloudFront::Distribution
    Properties:
      DistributionConfig:
        Origins:
        - DomainName: !GetAtt AngularBucket.DomainName
          Id: AngularOrigin
          OriginPath: !Sub /${DirName}
          S3OriginConfig:
            OriginAccessIdentity: !Sub origin-access-identity/cloudfront/${CloudFrontOriginAccessIdentity}
        Enabled: 'true'
        DefaultRootObject: index.html
        DefaultCacheBehavior:
          AllowedMethods:
          - GET
          - HEAD
          TargetOriginId: AngularOrigin
          ForwardedValues:
            QueryString: 'false'
          ViewerProtocolPolicy: allow-all
        PriceClass: PriceClass_200
  CloudFrontOriginAccessIdentity:
    Type: AWS::CloudFront::CloudFrontOriginAccessIdentity
    Properties:
      CloudFrontOriginAccessIdentityConfig:
        Comment: !Ref AWS::StackName
Hello World!
アプリも基盤もそろったのでいよいよWorldにHello!しましょう。
まず、作成したS3のバケットのディレクトリにAngularでビルドした成果物を入れます。
そして、CloudFrontのディストリビューションドメイン名にブラウザからアクセスするとアプリが表示されると思います。
これでHello World!達成です。
まとめ
最近では、IaCが流行ってきているので大変かもしれませんがCloudFormationのテンプレートでリソースを作っていくのが大事になるのかなと思います。
また、基本的にオプションなどは外しているので実際にお試しいただく時は色々なオプションを付けて試してもらえるといいかなと思います。