pyATSを動かそうとした話
本記事の目的
完全に個人のための記事です
自分がやっていた検証で、覚えたこと、詰まったこと、使えそうだと思ったことをまとめてます
興味がない方はブラウザバックを推奨します。
いろいろな記事やサイトを周回し自分なりに集めた情報になります、認識違いや間違いがございましたら優しくご指摘ください。
10ヶ月ぶりの記事になってしまいましたが、私は未だにネットワーク屋としてひっそり日々業務に追われております。
最近に自動化ブームに必要不可欠な検証用ツール
最近何かと話題になる自動化
サーバやアプリ側では確かにガンガン進んでいっている印象
それはなぜか、私が思うに人の手でやるより高品質で低コストでできる手法が確立していることや
そもそも開発のスピードを上げるために今までのやり方では無理がでてきた、といった背景からではないかと思っています。
例えば...
- Ansible構成管理
- JenkinsまたはAnsibleTowerで権限管理やスケジュール管理
- コードの管理はGithubまたはGitlab
- テストのツールはServerSpec
それではこれをネットワークで置き換えてみると
- Ansible構成管理
- JenkinsまたはAnsibleTowerで権限管理やスケジュール管理
- コードの管理はGithubまたはGitlab
- 検証はBatfishやpyATS
とここで本記事の目的であるpyATSが登場します。
pyATSって何?
下記のDocumetationを原文ママ翻訳
https://developer.cisco.com/docs/pyats/#!introduction/pyats-genie
pyATSは、この生態系に対するテスト・フレームワーク根拠です。
それはデータによって再使用できるテストを専門として、アジャイルな、迅速な開発繰り返しのために設計されます。
この強力な、高く接続可能なパイソン枠は、小さくて、単純で、線形テストケースによる開発者スタート、そして大きくて、複合で、非同期テスト・スイートの方のスケールを可能にするように設計されています。
この文章で私は意味がわからずに、Python製のテストツールということ。
更に、ライブラリが充実しているようでパーサーのGenie,ロボットフレームワークなどもできるようです。
わたしは英語が弱いので、この程度で。。得意な方は上記のDocumentationから探って読むのが確実です。
検証の構成
検証環境の説明
↓CiscoDevnetのSandBoxを予約して検証しました
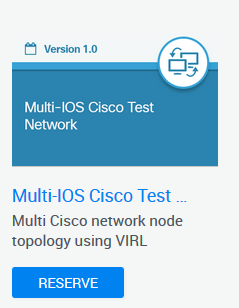
このSandBoxの構成や機器を記載しようとしましたが、今回はこの中の数台の機器にloginや簡単なコマンド実行のテストのみなので詳細は記載しません。
OSは2種類で以下の通り
- nxos
- iosxe
CentOS8にpipでpyats[full]でインストール
このときpyats[genie]とか指定したらpyats+genieのライブラリとか取れるらしい。
今回はすべてほしかったので[full]を指定
(pyATS) [root@localhost ~]#pip install -y pyats[full]
pyATSのversion
(pyATS) [root@localhost ~]# pyats version
You are currently running pyATS version: 19.9.2
Python: 3.6.8 [64bit]

  Package              Version
  -------------------- -------
  pyats                19.9.2
  pyats.aereport       19.9
  pyats.aetest         19.9.1
  pyats.async          19.9
  pyats.connections    19.9
  pyats.datastructures 19.9
  pyats.easypy         19.9.3
  pyats.kleenex        19.9.1
  pyats.log            19.9.1
  pyats.reporter       19.9.1
  pyats.results        19.9
  pyats.robot          19.9.1
  pyats.tcl            19.9
  pyats.topology       19.9
  pyats.utils          19.9
インストール後に下記のコマンドでプロジェクト作成します。
内容はプロジェクトのテンプレートを作成してくれるコマンドで実行すると
Testケース名を入力するプロンプトが表示される
今回は何も決まってないのでそのままEnterを押下
外部のDatafilesをテストケースとして使う?的なことが聞かれているのでn押下
(pyATS) [root@localhost ~]# pyats create project --name TestProject
Testcase names [enter to finish]:
  1.
Will you be using testcase datafiles [Y/n]:n
Generating your project...

(pyATS) [root@localhost ~]#
コマンド実施後、プロジェクト名でディレクトリが作成されている。
TestProject/
    TestProject.py
    TestProject_job.py
TestProject.pyって方にテストケース作成していく
TestProject_job.pyでpyats run jobコマンド実行する
接続先の情報はTestbedファイルを別途作成する必要がある。
Testbed
ここからはpyatsで使う各種ファイル説明
Yamlファイルで定義されたテスト構成
ホスト名やOS、IPや接続方式などを定義している。
testbed:
  name: pyATS_IOS_Example_Testbed
  tacacs:
      username: cisco
  passwords:
      tacacs: cisco

devices:
  access5:
    connections:
      defaults:
        class: 'unicon.Unicon'
      vty:
        protocol: ssh
        ip: 172.16.30.52
        port: 22
    os: nxos
    type: nxos

  core1:
    connections:
      defaults:
        class: 'unicon.Unicon'
      vty:
        protocol: ssh
        ip: 172.16.30.55
        port: 22
    os: iosxr
    type: iosxr

  branch10-router10:
     connections:
       defaults:
         class: 'unicon.Unicon'
       vty:
         protocol: ssh
         ip: 172.16.30.54
         port: 22
     os: iosxe
     type: iosxe

  dist3:
    connections:
      defaults:
        class: 'unicon.Unicon'
      vty:
        protocol: ssh
        ip: 172.16.30.57
        port: 22
    os: nxos
    type: nxos
もっとスマートに書けるよ!って方いましたらぜひ教えていただきたいです。。
jobファイルとテストファイル
ここについてはProject作成時に作成されたものを純粋に使っていく、
テストケースは存在しなく、テストを実施するために、ter lenなどの設定を統一してSetupしている模様
接続確認
接続にはUniconというライブラリを使って行っているらしい
Job実行
※上記で作成した、TestProjectは今回の記事用に作成したもので、検証時にはDevnetというProjectで実施しています
いざ、コマンド実行
(pyATS) [root@localhost Devnet]#
(pyATS) [root@localhost Devnet]# pyats run Devnet_job.py -yt testbed.yml
Usage:
  pyats run [options]

Subcommands:
    job                 runs the provided pyATS job file
    robot               runs the provided RobotFramework script

General Options:
  -h, --help            Show help
  -v, --verbose         Give more output, additive up to 3 times.
  -q, --quiet           Give less output, additive up to 3 times, corresponding to WARNING, ERROR,
                        and CRITICAL logging levels

argument : invalid choice: 'Devnet_job.py' (choose from 'job', 'robot')

(pyATS) [root@localhost Devnet]# pyats run Devnet_job.py -t testbed.yml job
2019-10-21T21:52:28: %EASYPY-INFO: Starting job run: Devnet_job
2019-10-21T21:52:28: %EASYPY-INFO: Runinfo directory: /root/.pyats/runinfo/Devnet_job.2019Oct21_21:52:27.809520
2019-10-21T21:52:28: %EASYPY-INFO: --------------------------------------------------------------------------------
2019-10-21T21:52:28: %EASYPY-INFO: Testbed file testbed.yml exists and is readable.
2019-10-21T21:52:42: %EASYPY-INFO: Starting task execution: Task-1
2019-10-21T21:52:42: %EASYPY-INFO:     test harness = pyats.aetest
2019-10-21T21:52:42: %EASYPY-INFO:     testscript   = /root/Devnet/Devnet.py
2019-10-21T21:52:42: %AETEST-INFO: Starting common setup
2019-10-21T21:52:42: %AETEST-INFO: Starting subsection connect
[2019-10-21 21:52:43,036] +++ core1 logfile /root/.pyats/runinfo/Devnet_job.2019Oct21_21:52:27.809520/core1-default-1571709163.log +++
[2019-10-21 21:52:43,039] +++ Unicon plugin iosxr +++
[2019-10-21 21:52:43,059] +++ access5 logfile /root/.pyats/runinfo/Devnet_job.2019Oct21_21:52:27.809520/access5-default-1571709163.log +++
[2019-10-21 21:52:43,095] +++ Unicon plugin nxos +++
Password:
[2019-10-21 21:52:45,334] +++ connection to spawn: ssh -l cisco 172.16.30.55 -p 22, id: 140508028871792 +++
[2019-10-21 21:52:45,336] connection to core1


RP/0/RP0/CPU0:core1#
[2019-10-21 21:52:47,338] +++ initializing handle +++
[2019-10-21 21:52:47,344] +++ core1: executing command 'terminal length 0' +++
terminal length 0
Tue Oct 22 01:52:45.458 UTC
RP/0/RP0/CPU0:core1#
[2019-10-21 21:52:47,838] +++ core1: executing command 'terminal width 0' +++
User Access Verification

[2019-10-21 21:52:47,889] +++ connection to spawn: ssh -l cisco 172.16.30.52 -p 22, id: 140508028852208 +++
[2019-10-21 21:52:47,892] connection to access5
terminal width 0
Tue Oct 22 01:52:45.944 UTC
RP/0/RP0/CPU0:core1#
[2019-10-21 21:52:48,287] +++ core1: config +++
Password:
configure terminal
Tue Oct 22 01:52:46.433 UTC

RP/0/RP0/CPU0:core1(config)#no logging console
Cisco NX-OS Software
Copyright (c) 2002-2018, Cisco Systems, Inc. All rights reserved.
Nexus 9000v software ("Nexus 9000v Software") and related documentation,
files or other reference materials ("Documentation") are
the proprietary property and confidential information of Cisco
Systems, Inc. ("Cisco") and are protected, without limitation,
pursuant to United States and International copyright and trademark
laws in the applicable jurisdiction which provide civil and criminal
penalties for copying or distribution without Cisco's authorization.

Any use or disclosure, in whole or in part, of the Nexus 9000v Software
or Documentation to any third party for any purposes is expressly
prohibited except as otherwise authorized by Cisco in writing.
The copyrights to certain works contained herein are owned by other
third parties and are used and distributed under license. Some parts
of this software may be covered under the GNU Public License or the
GNU Lesser General Public License. A copy of each such license is
available at
http://www.gnu.org/licenses/gpl.html and
http://www.gnu.org/licenses/lgpl.html
***************************************************************************
*  Nexus 9000v is strictly limited to use for evaluation, demonstration   *
*  and NX-OS education. Any use or disclosure, in whole or in part of     *
*  the Nexus 9000v Software or Documentation to any third party for any   *
*  purposes is expressly prohibited except as otherwise authorized by     *
*  Cisco in writing.                                                      *
***************************************************************************
RP/0/RP0/CPU0:core1(config)#line console
RP/0/RP0/CPU0:core1(config-line)#exec-timeout 0 0
RP/0/RP0/CPU0:core1(config-line)#access5#
[2019-10-21 21:52:51,147] +++ initializing handle +++
[2019-10-21 21:52:51,154] +++ access5: executing command 'term length 0' +++
absolute-timeout 0
term length 0
access5#
[2019-10-21 21:52:51,393] +++ access5: executing command 'term width 511' +++
RP/0/RP0/CPU0:core1(config-line)#term width 511
access5#
[2019-10-21 21:52:51,613] +++ access5: executing command 'terminal session-timeout 0' +++
session-timeout 0
terminal session-timeout 0
access5#
[2019-10-21 21:52:51,855] +++ access5: config +++
RP/0/RP0/CPU0:core1(config-line)#config term
Enter configuration commands, one per line. End with CNTL/Z.
access5(config)# line default
no logging console
access5(config)# RP/0/RP0/CPU0:core1(config-line)#line console
access5(config-console)# exec-timeout 0 0
RP/0/RP0/CPU0:core1(config-line)#absolute-timeout 0
RP/0/RP0/CPU0:core1(config-line)#session-timeout 0
exec-timeout 0
access5(config-console)# RP/0/RP0/CPU0:core1(config-line)#terminal width 511
access5(config-console)# commit
Tue Oct 22 01:52:51.949 UTC
end
access5#
RP/0/RP0/CPU0:core1(config-line)#end
RP/0/RP0/CPU0:core1#
2019-10-21T21:52:55: %AETEST-INFO: The result of subsection connect is => PASSED
2019-10-21T21:52:55: %AETEST-INFO: The result of common setup is => PASSED
2019-10-21T21:52:55: %AETEST-INFO: Starting common cleanup
2019-10-21T21:52:55: %AETEST-INFO: The result of common cleanup is => PASSED
2019-10-21T21:52:55: %EASYPY-INFO: --------------------------------------------------------------------------------
2019-10-21T21:52:55: %EASYPY-INFO: Job finished. Wrapping up...
2019-10-21T21:52:56: %EASYPY-INFO: Creating archive file: /root/.pyats/archive/19-Oct/Devnet_job.2019Oct21_21:52:27.809520.zip
2019-10-21T21:52:56: %EASYPY-INFO: +------------------------------------------------------------------------------+
2019-10-21T21:52:56: %EASYPY-INFO: |                                Easypy Report                                 |
2019-10-21T21:52:56: %EASYPY-INFO: +------------------------------------------------------------------------------+
2019-10-21T21:52:56: %EASYPY-INFO: pyATS Instance   : /root/pyATS
2019-10-21T21:52:56: %EASYPY-INFO: Python Version   : cpython-3.6.8 (64bit)
2019-10-21T21:52:56: %EASYPY-INFO: CLI Arguments    : /root/pyATS/bin/pyats run job Devnet_job.py -t testbed.yml
2019-10-21T21:52:56: %EASYPY-INFO: User             : root
2019-10-21T21:52:56: %EASYPY-INFO: Host Server      : localhost.localdomain
2019-10-21T21:52:56: %EASYPY-INFO: Host OS Version  : CentOS Linux 8 Core (x86_64)
2019-10-21T21:52:56: %EASYPY-INFO:
2019-10-21T21:52:56: %EASYPY-INFO: Job Information
2019-10-21T21:52:56: %EASYPY-INFO:     Name         : Devnet_job
2019-10-21T21:52:56: %EASYPY-INFO:     Start time   : 2019-10-21 21:52:28.854980
2019-10-21T21:52:56: %EASYPY-INFO:     Stop time    : 2019-10-21 21:52:55.855655
2019-10-21T21:52:56: %EASYPY-INFO:     Elapsed time : 0:00:27.000675
2019-10-21T21:52:56: %EASYPY-INFO:     Archive      : /root/.pyats/archive/19-Oct/Devnet_job.2019Oct21_21:52:27.809520.zip
2019-10-21T21:52:56: %EASYPY-INFO:
2019-10-21T21:52:56: %EASYPY-INFO: Total Tasks    : 1
2019-10-21T21:52:56: %EASYPY-INFO:
2019-10-21T21:52:56: %EASYPY-INFO: Overall Stats
2019-10-21T21:52:56: %EASYPY-INFO:     Passed     : 2
2019-10-21T21:52:56: %EASYPY-INFO:     Passx      : 0
2019-10-21T21:52:56: %EASYPY-INFO:     Failed     : 0
2019-10-21T21:52:56: %EASYPY-INFO:     Aborted    : 0
2019-10-21T21:52:56: %EASYPY-INFO:     Blocked    : 0
2019-10-21T21:52:56: %EASYPY-INFO:     Skipped    : 0
2019-10-21T21:52:56: %EASYPY-INFO:     Errored    : 0
2019-10-21T21:52:56: %EASYPY-INFO:
2019-10-21T21:52:56: %EASYPY-INFO:     TOTAL      : 2
2019-10-21T21:52:56: %EASYPY-INFO:
2019-10-21T21:52:56: %EASYPY-INFO: Success Rate   : 100.00 %
2019-10-21T21:52:56: %EASYPY-INFO:
2019-10-21T21:52:56: %EASYPY-INFO: +------------------------------------------------------------------------------+
2019-10-21T21:52:56: %EASYPY-INFO: |                             Task Result Summary                              |
2019-10-21T21:52:56: %EASYPY-INFO: +------------------------------------------------------------------------------+
2019-10-21T21:52:56: %EASYPY-INFO: Task-1: Devnet.common_setup                                               PASSED
2019-10-21T21:52:56: %EASYPY-INFO: Task-1: Devnet.common_cleanup                                             PASSED
2019-10-21T21:52:56: %EASYPY-INFO:
2019-10-21T21:52:56: %EASYPY-INFO: +------------------------------------------------------------------------------+
2019-10-21T21:52:56: %EASYPY-INFO: |                             Task Result Details                              |
2019-10-21T21:52:56: %EASYPY-INFO: +------------------------------------------------------------------------------+
2019-10-21T21:52:56: %EASYPY-INFO: Task-1: Devnet
2019-10-21T21:52:56: %EASYPY-INFO: |-- common_setup                                                          PASSED
2019-10-21T21:52:56: %EASYPY-INFO: |   `-- connect                                                           PASSED
2019-10-21T21:52:56: %EASYPY-INFO: `-- common_cleanup                                                        PASSED
2019-10-21T21:52:56: %EASYPY-INFO: Sending report email...
2019-10-21T21:52:56: %EASYPY-INFO: Missing SMTP server configuration, or failed to reach/authenticate/send mail. Result notification email failed to send.
2019-10-21T21:52:56: %EASYPY-INFO: Done!
(pyATS) [root@localhost Devnet]#
なにやらうまく行った模様
Robotフレームワークも動かしてみた。
こっちのほうが直感的に理解しやすいような気もします。
こんなファイルをプロジェクト内に作成しています。
*** Settings ***
Libraryats.robot.pyATSRobot
Librarygenie.libs.robot.GenieRobot
Libraryunicon.robot.UniconRobot
Suite setup    Setup


*** Variables ***
${testbed}    testbed.yml

*** Test Cases ***
Send show version
    ${output}=    execute "show version" on device "access5"
    ${output}=    execute "show version" on device "branch10-router10"
    ${output}=    execute "show version" on device "core"

*** Keywords ***
Setup
    use genie testbed "${testbed}"
    connect to device "core1"
    connect to device "access5"
(pyATS) [root@localhost Devnet]#
こんなのを作って、以下のコマンドを実行
(pyATS) [root@localhost Devnet]#robot RobotTest.robot
==============================================================================
RobotTest
==============================================================================
[ WARN ] Could not load the Datafile correctly
Send show version                                                     ...                                                                              Send show version                                                     | PASS |
------------------------------------------------------------------------------
RobotTest                                                             | PASS |
1 critical test, 1 passed, 0 failed
1 test total, 1 passed, 0 failed
==============================================================================
Output:  /root/Devnet/output.xml
Log:     /root/Devnet/log.html
Report:  /root/Devnet/report.html
(pyATS) [root@localhost Devnet]#
成功するとLogファイル、ReportファイルがHTMLでプロジェクト内に作成されます
Outputとして作業証跡ファイルがXMLとして出力されています。
log.htmlを開くと↓のような画面が表示される。
※上で実行した結果のHTMLファイル消しちゃってましたので、参考までに。。
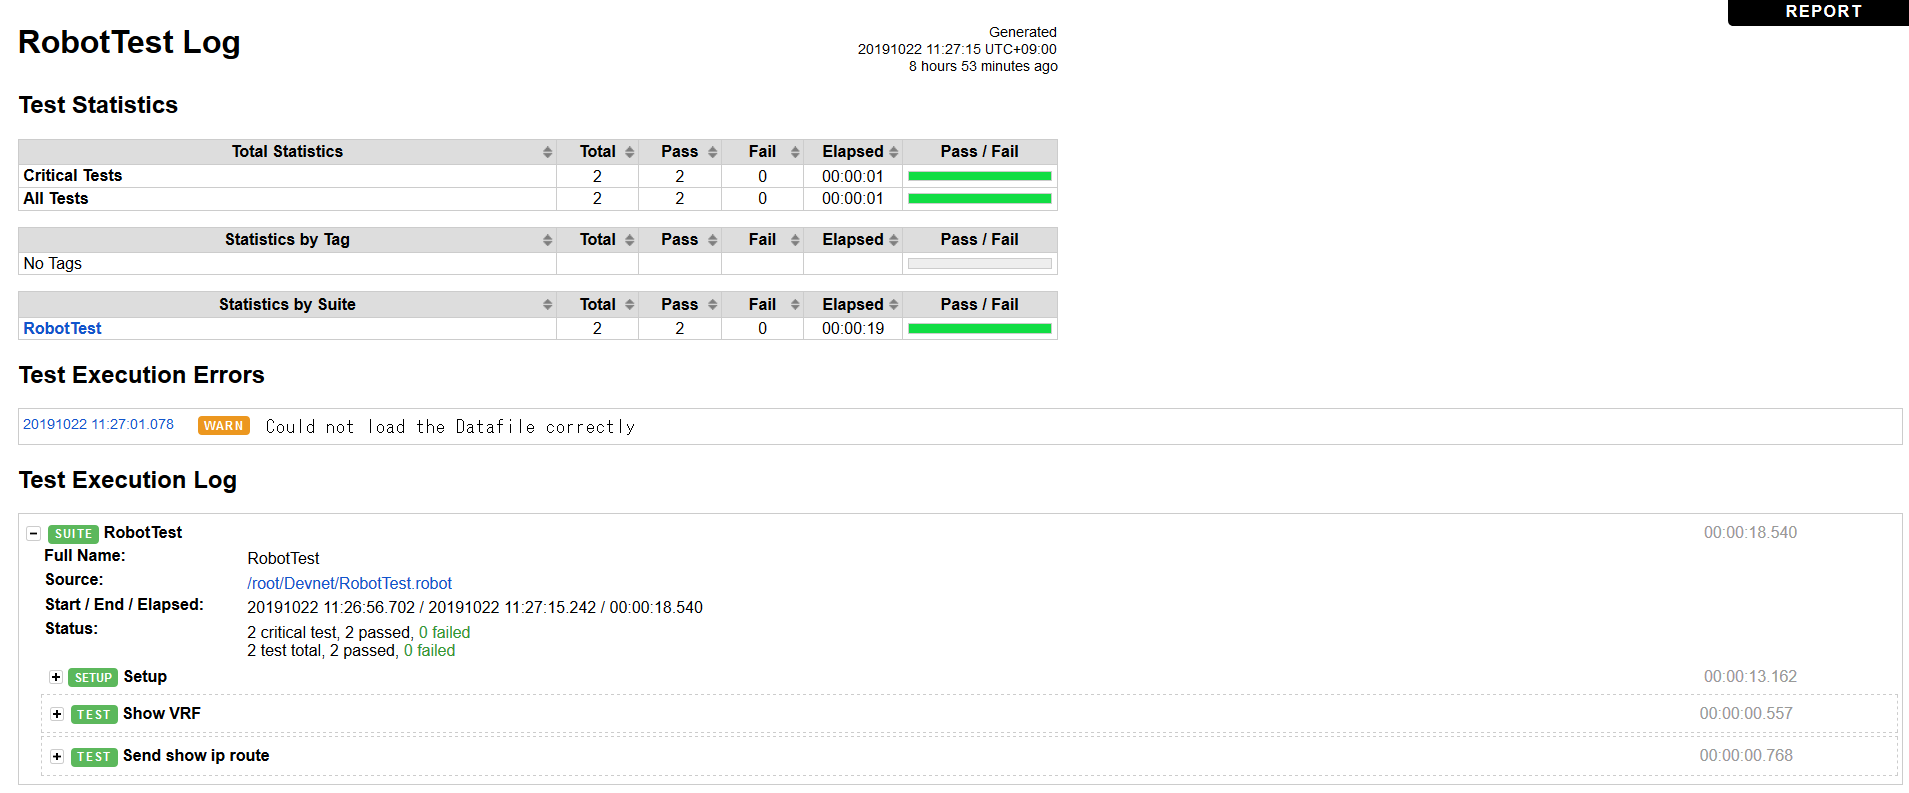
このとき左下にある[+]をクリックすると実行結果なども確認することも可能です。
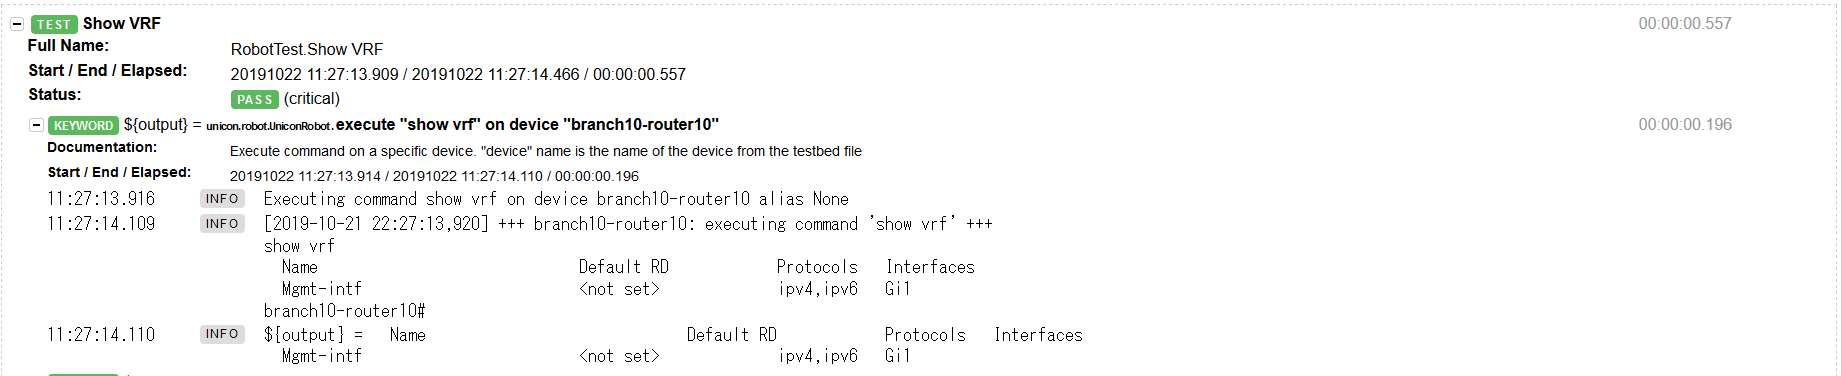
さらに、RobotTestのファイル内にあるべき結果を記載することも可能(実行結果のテキスト内にこの文字が含まれるなどなど..)
この処理によりテストの実行、結果の取りまとめをすることは可能だなと思います。
まとめ
今回はpyatsを頑張って動かしてみました。
日本語の情報が少なく、、とても苦労しました。。
pyatsとgenieとrobotとの完成や組み合わせ、テストケースの作り方などわからないことはたくさんあり、勉強のしがいあるなと思っています。
そしてテスト/検証の自動化がすすめば更に楽ができそうだなとおもいまモチベを上げて取り組みたいと思います。
冒頭で話した通り、わたしの身近でももかなり自動化の話題があがります。推進しようとしている人は「どうやって安全に進められるか?」を検討し続ける日々なのかな、人がやるほうが安全なのはもはや心理的なもののみで早く確実に正確に高品質で実現するためには自動化が不可欠なのではと思ったり、使うために時間がかかり運用が広がるまでに時間がかかるので現実的にはどうなのかなと考える人も多そうな気もします、周りや現場に振り回されずでも知識を蓄え勉強に励み自分の価値を上げていきたいと思います。