AI-102の試験のため、以下のGitHubのHandsOnの勉強を実施します。
- https://github.com/MicrosoftLearning/mslearn-ai-services
- https://github.com/MicrosoftLearning/mslearn-ai-vision
- https://github.com/MicrosoftLearning/mslearn-ai-language
- https://github.com/MicrosoftLearning/mslearn-ai-document-intelligence
-
https://microsoftlearning.github.io/mslearn-knowledge-mining
→ 本記事はこれ - https://github.com/MicrosoftLearning/mslearn-openai
本記事はAzure AI Searchのknowledge-miningについて記載します。
MSLearnのドキュメントはこちら。
最近はOpenAIばかり注目されており、Azure OpenAI On Your Dataを使うと手軽にRAGを構築できますが、データはAzure AI Searchに保存されるのがほとんど。正直今までAzure AI Searchをなんとなく雰囲気で使っていたので、この機会にAzure AI Searchの裏側の仕組みを勉強する。
MSLearnのこちらも見ながら。
単語の定義
- Index
JSON ドキュメントのコレクションで構成され、インデックス作成中に抽出された値が含まれるフィールドがあります。 クライアント アプリケーションから、インデックスに対してクエリを実行して、情報の取得、フィルター処理、および並べ替えを行うことができます。
- Indexer
インデックス作成プロセス全体を駆動するエンジンです。スキルセットのスキルを使用して抽出された出力と、元のデータ ソースから抽出されたデータおよびメタデータ値を取得し、それらをインデックスのフィールドにマップします。インデクサーは、作成時に自動的に実行され、定期的に実行されるようにスケジュールすることも、必要に応じて実行してインデックスにドキュメントを追加することもできます。
- Skillset
Azure AI 検索では、インデックス作成プロセスの一環として人工知能 (AI) "スキル" を適用して、インデックス フィールドにマップできる新しい情報でソース データをエンリッチできます。言語、キーフレーズ抽出、センチメントスコア、画像分析等
Import DataによるIndex作成
基本的にはStorage Accountにファイルをアップロードして、Azure AI Searchからファイルの内容を検索していくという流れ。Azure AI Serviceは事前にデプロイ済みの前提、PDFからデータ読み込み等する場合にOCR等を利用する場合に必要となる。
Azure AI SearchのImport DataからStorage Accountに接続する。


AI Serviceは事前にデプロイしておき、どれを使うか選ぶ。

ファイルの内容だけでなく、Skillsetを利用することで、Storage Accountのファイルからキーワードや地名、人名等の追加のデータでEnrichできる。

保存するデータの検索属性を決定する。
- key: インデックス レコードの一意のキーを定義するフィールド
- searchable: フルテキスト検索を使用してクエリを実行できるフィールド
- filterable: 指定された制約に一致するドキュメントのみを返すためにフィルター式に含めることができるフィールド
- sortable: 結果の並べ替えに使用できるフィールド
- facetable: "ファセット" (既知のフィールド値の一覧に基づいて結果をフィルター処理するために使用されるユーザー インターフェイス要素) の値を決定するために使用できるフィールド
- retrievable: 検索結果に含めることができるフィールド ("既定では、この属性が明示的に削除されていない限り、すべてのフィールドが取得可能です")

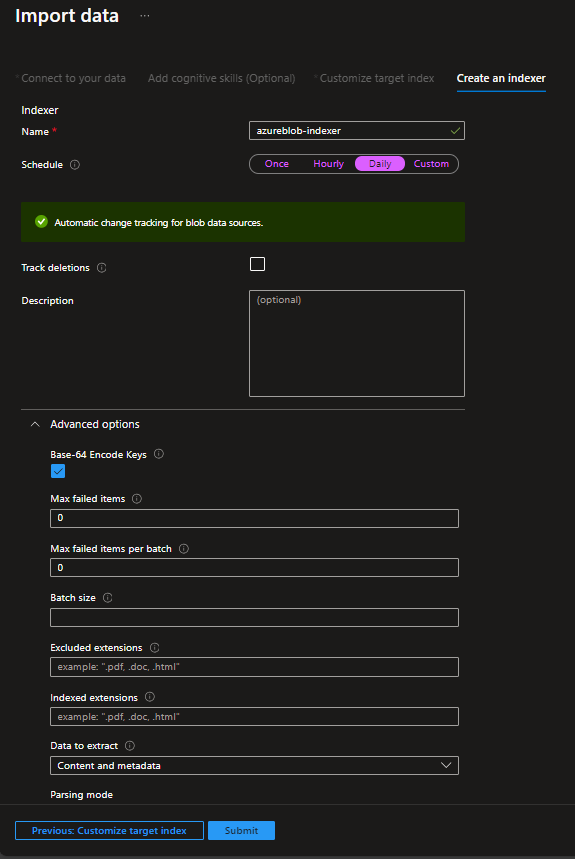
Indexerを設定する。Indexerとはデータ取得のためのCrawlerのようなものをイメージするとよい。日次実行やファイル削除検知等を設定できる。
Indexを確認
Queryを投げる
Indexが作成されたのを確認して。

Json形式でQueryを投げる。

Schema確認
Edit Jsonを選択してみると、Indexのスキーマが確認できる。
{
  "@odata.context": "https://srch-sima001.search.windows.net/$metadata#indexes/$entity",
  "@odata.etag": "\"0x8DC44BF79C6F649\"",
  "name": "margies-index",
  "defaultScoringProfile": null,
  "fields": [
    {
      "name": "content",
      "type": "Edm.String",
      "searchable": false,
      "filterable": false,
      "retrievable": true,
      "sortable": false,
      "facetable": false,
      "key": false,
      "indexAnalyzer": null,
      "searchAnalyzer": null,
      "analyzer": null,
      "normalizer": null,
      "dimensions": null,
      "vectorSearchProfile": null,
      "synonymMaps": []
    },
    {
      "name": "metadata_storage_content_type",
      "type": "Edm.String",
      "searchable": false,
      "filterable": false,
      "retrievable": false,
      "sortable": false,
      "facetable": false,
      "key": false,
      "indexAnalyzer": null,
      "searchAnalyzer": null,
      "analyzer": null,
      "normalizer": null,
      "dimensions": null,
      "vectorSearchProfile": null,
      "synonymMaps": []
    }
    ...省略...
  ],
  "scoringProfiles": [],
  "corsOptions": {
    "allowedOrigins": [
      "*"
    ],
    "maxAgeInSeconds": 300
  },
  "suggesters": [],
  "analyzers": [],
  "normalizers": [],
  "tokenizers": [],
  "tokenFilters": [],
  "charFilters": [],
  "encryptionKey": null,
  "similarity": {
    "@odata.type": "#Microsoft.Azure.Search.BM25Similarity",
    "k1": null,
    "b": null
  },
  "semantic": null,
  "vectorSearch": null
}
Indexerを確認
{
    "name": "margies-custom-indexer",
    "description": "Indexer for Margies Travel",
    "dataSourceName": "margies-custom-data",
    "skillsetName": "margies-custom-skillset",
    "targetIndexName": "margies-custom-index",
    "parameters": {
      "maxFailedItems": -1,
      "maxFailedItemsPerBatch": -1,
      "configuration": {
        "dataToExtract": "contentAndMetadata",
        "parsingMode": "default",
        "imageAction": "generateNormalizedImages"
      }
    },
    "fieldMappings": [
      {
        "sourceFieldName": "metadata_storage_path",
        "targetFieldName": "metadata_storage_path",
        "mappingFunction": {
          "name": "base64Encode"
        }
      },
      {
        "sourceFieldName": "metadata_storage_path",
        "targetFieldName": "url"
      }
    ],
    "outputFieldMappings": [
      {
        "sourceFieldName": "/document/merged_content/locations",
        "targetFieldName": "locations"
      },
      {
        "sourceFieldName": "/document/merged_content/keyphrases",
        "targetFieldName": "keyphrases"
      },
      {
        "sourceFieldName": "/document/language",
        "targetFieldName": "language"
      },
      {
        "sourceFieldName": "/document/merged_content",
        "targetFieldName": "merged_content"
      },
      {
        "sourceFieldName": "/document/normalized_images/*/text",
        "targetFieldName": "text"
      },
      {
        "sourceFieldName": "/document/normalized_images/*/layoutText",
        "targetFieldName": "layoutText"
      },
      {
        "sourceFieldName": "/document/normalized_images/*/imageTags/*/name",
        "targetFieldName": "imageTags"
      },
      {
        "sourceFieldName": "/document/normalized_images/*/imageCaption",
        "targetFieldName": "imageCaption"
      }
    ]
  }
Skillsetsを確認

Azure Portalからデフォルトで準備されているSkillsetを確認する
Azure PortalでImport Data時に何を取得するか、ポチポチ選択したのは裏ではSkillsetが実行されていた。Azure AI Servicesの機能総動員で、Vision、Text等を利用して、Import DataのPipeline時に処理を実行している。
Json定義を見てみると、Skillsetに対して、どのようなInputを渡してどのようなOutputを得るか、フィールド名をどうするかなどを定義している。以下はKeyPhrase、OCRとImage Analysisの例。
{
  "@odata.context": "https://srch-sima001.search.windows.net/$metadata#skillsets/$entity",
  "@odata.etag": "\"0x8DC44BD37F4411A\"",
  "name": "margies-skillset",
  "description": "Skillset for document extraction",
  "skills": [
    {
      "@odata.type": "#Microsoft.Skills.Text.KeyPhraseExtractionSkill",
      "name": "#2",
      "description": null,
      "context": "/document/merged_content",
      "defaultLanguageCode": "en",
      "maxKeyPhraseCount": null,
      "modelVersion": null,
      "inputs": [
        {
          "name": "text",
          "source": "/document/merged_content"
        },
        {
          "name": "languageCode",
          "source": "/document/language"
        }
      ],
      "outputs": [
        {
          "name": "keyPhrases",
          "targetName": "keyphrases"
        }
      ]
    },
    {
      "@odata.type": "#Microsoft.Skills.Vision.OcrSkill",
      "name": "#5",
      "description": null,
      "context": "/document/normalized_images/*",
      "textExtractionAlgorithm": null,
      "lineEnding": "Space",
      "defaultLanguageCode": "en",
      "detectOrientation": true,
      "inputs": [
        {
          "name": "image",
          "source": "/document/normalized_images/*"
        }
      ],
      "outputs": [
        {
          "name": "text",
          "targetName": "text"
        },
        {
          "name": "layoutText",
          "targetName": "layoutText"
        }
      ]
    },
    {
      "@odata.type": "#Microsoft.Skills.Vision.ImageAnalysisSkill",
      "name": "#6",
      "description": null,
      "context": "/document/normalized_images/*",
      "defaultLanguageCode": "en",
      "visualFeatures": [
        "tags",
        "description"
      ],
      "details": [],
      "inputs": [
        {
          "name": "image",
          "source": "/document/normalized_images/*"
        }
      ],
      "outputs": [
        {
          "name": "tags",
          "targetName": "imageTags"
        },
        {
          "name": "description",
          "targetName": "imageCaption"
        }
      ]
    }
    ### 一部省略 ###
  ],
  "cognitiveServices": {
    "@odata.type": "#Microsoft.Azure.Search.CognitiveServicesByKey",
    "description": "Azure AI services",
    "key": "af294328198649d88bdc5f6fd11f16d0"
  },
  "knowledgeStore": null,
  "indexProjections": null,
  "encryptionKey": null
}
ポータルで確認すると右側にテンプレートがあるので、見た目ほど複雑ではないかもしれない。

AzureOpen AIのEmbeddingのスキルやAzure Machine Learningのテンプレートもある。
On Your Dataで利用されているImport and Vectorizeは裏ではこのSkillsetを利用しているのだなと理解できる。
カスタムのSkillsetを呼び出す
上のスクショでCustom Web API Skill - Azure Functionsを選ぶとHttp TriggerのFunctionsをSkillsetとしてData Enrichmentに利用することができる。完全カスタムのFunctionsを作ることができるので、他の独自でトレーニングしたAI Service(LnguageやVision)のモデルを呼び出すこともできる。
長くなるが、順番としてはこのような感じ。
①Azure Functionsを作る
②Azure Functionsを呼び出すようにSkillsetを更新する
③Indexerを更新する
④Indexを更新する
⑤IndexerをResetする
⑥Indexerを実行
①Azure Functionsを作る
詳細は以下リンク参照。
要は、Azure Functionsに対して、以下のようにJson配列で他データのレコードが渡されてくるイメージ。最上位にvaluesというのがあり、recordId、data等形式が決まっている。
{
    "values": [
        {
            "recordId": "a1",
            "data":
            {
            "text":  "Tiger, tiger burning bright in the darkness of the night.",
            "language": "en"
            }
        },
        {
            "recordId": "a2",
            "data":
            {
            "text":  "The rain in spain stays mainly in the plains! That's where you'll find the rain!",
            "language": "en"
            }
        }
    ]
}
Azure Functions側ではfor eachループして回していくことになる。返却するデータは入力データと同じ形式である必要がある。
module.exports = async function (context, req) {
    context.log('JavaScript HTTP trigger function processed a request.');

    if (req.body && req.body.values) {

        vals = req.body.values;

        for (rec in vals)
        {
            // Get the record ID and text for this input
            resVal = {recordId:vals[rec].recordId, data:{}};
            txt = vals[rec].data.text;

            //独自処理のため省略、サンプルでは、各レコードのtextで再頻の単語の抽出処理を実行していた
            // Get the first ten words from the first array dimension
            resVal.data.text = topWords.slice(0,9)
              .map(function(value,index) { return value[0]; });

            res.values[rec] = resVal;
        }
    }
}
Outputは以下のようなイメージ。
{
    "values": [
    {
        "recordId": "a1",
        "data": {
            "text": [
            "tiger",
            "burning",
            "bright",
            "darkness",
            "night"
            ]
        }
    },
    {
        "recordId": "a2",
        "data": {
            "text": [
                "rain",
                "spain",
                "stays",
                "mainly",
                "plains",
                "thats",
                "youll",
                "find"
            ]
        }
    }
    ]
}
②Azure Functionsを呼び出すようにSkillsetを更新する
Skillsetは先ほどのJsonのページから上記Azure Functionsを呼び出すように設定すればよい。ここではmerged_contentとlanguageを受け取って、topWordsをtextという変数で渡すとしている。(Azure Functionsをキー認証にしているので、Azure Functionのキーをべた書きしてしまうのが気になる。)
    {
      "@odata.type": "#Microsoft.Skills.Custom.WebApiSkill",
      "name": "get-top-words",
      "description": "custom skill to get top 10 most frequent words",
      "context": "/document",
      "uri": "https://fappsima001.azurewebsites.net/api/wordcount?code={Azure Function Key}",
      "httpMethod": "POST",
      "timeout": "PT30S",
      "batchSize": 1,
      "degreeOfParallelism": null,
      "inputs": [
        {
          "name": "text",
          "source": "/document/merged_content"
        },
        {
          "name": "language",
          "source": "/document/language"
        }
      ],
      "outputs": [
        {
          "name": "text",
          "targetName": "topWords"
        }
      ],
      "httpHeaders": {}
    }
③Indexerを更新する
新しいフィールドができるので、Indexer側でもSkillsetから渡されたデータをIndexにどのようにマッピングするか定義が必要。SkillsetからtopWordsを受け取って、top_wordsにすると定義。
{
  "@odata.context": "https://srch-sima001.search.windows.net/$metadata#indexers/$entity",
  "@odata.etag": "\"0x8DC44CDD93271F2\"",
  "name": "margies-custom-indexer",
  "description": "Indexer for Margies Travel",
  "dataSourceName": "margies-custom-data",
  "skillsetName": "margies-custom-skillset",
  "targetIndexName": "margies-custom-index",
  "disabled": null,
  "schedule": null,
  "parameters": {
    "batchSize": null,
    "maxFailedItems": -1,
    "maxFailedItemsPerBatch": -1,
    "base64EncodeKeys": null,
    "configuration": {
      "dataToExtract": "contentAndMetadata",
      "parsingMode": "default",
      "imageAction": "generateNormalizedImages"
    }
  },
  ###省略
  "outputFieldMappings": [
    ###省略
    {
      "sourceFieldName": "/document/topWords",
      "targetFieldName": "top_words"
    }
  ],
  "cache": null,
  "encryptionKey": null
}
④Indexを更新する
Indexのスキーマに新しいフィールドを追加。
{
  "@odata.context": "https://srch-sima001.search.windows.net/$metadata#indexes/$entity",
  "@odata.etag": "\"0x8DC44CD8E35F3CE\"",
  "name": "margies-custom-index",
  "defaultScoringProfile": null,
  "fields": [
    ### 省略 ###
    {
      "name": "top_words",
      "type": "Collection(Edm.String)",
      "searchable": true,
      "filterable": true,
      "retrievable": true,
      "sortable": false,
      "facetable": false,
      "key": false,
      "indexAnalyzer": null,
      "searchAnalyzer": null,
      "analyzer": null,
      "normalizer": null,
      "dimensions": null,
      "vectorSearchProfile": null,
      "synonymMaps": []
    }
  ],
  "scoringProfiles": [],
  "corsOptions": null,
  "suggesters": [],
  "analyzers": [],
  "normalizers": [],
  "tokenizers": [],
  "tokenFilters": [],
  "charFilters": [],
  "encryptionKey": null,
  "similarity": {
    "@odata.type": "#Microsoft.Azure.Search.BM25Similarity",
    "k1": null,
    "b": null
  },
  "semantic": null,
  "vectorSearch": null
}
⑤IndexerをReset、⑥Indexerを実行
ポータルからポチポチ実行。

Rest API経由でSkillsetを作る
PUT https://[service name].search.windows.net/skillsets/[skillset name]?api-version=[api version]
  Content-Type: application/json
  api-key: [admin key]
上記はGUIから作った場合で、API経由からでももちろん定義することはできる。APIエンドポイントに対してSkill定義のJson食わせるイメージ。
Skillのデバッグ
Indexerが実行しているときの状態をリアルタイムで確認できる。
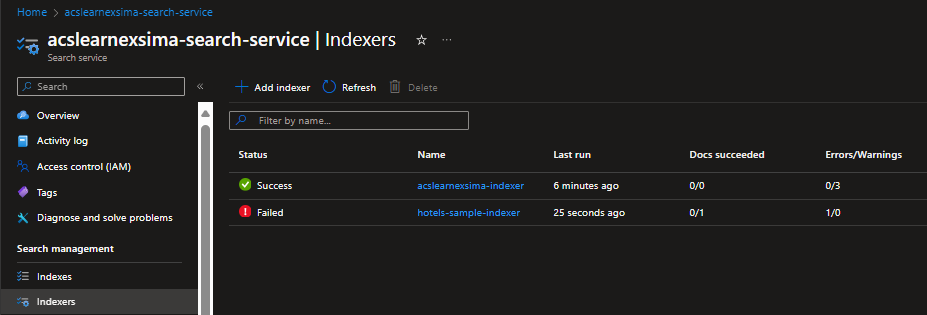
Indexerでエラーになったとき。
Add debug session。

デバッグ情報を保存するStorage Containerを指定する。Document to debugでデバッグ用に特定のデータを渡すこともできる。

Skillを実行したときのログがグラフィカルに参照できる。ここでSkillを編集、保存、再実行ができる。

修正してOKになったらCommit Changesのうえ、IndexerをResetと再実行。

Knowledge Store
Azure AI SearchのIndexだとJsonだけしか最終的に取得されない。そこで画像もついでに抽出したり、Storage AccountのTableに抽出するといった処理も一緒に実行してしまおうというもの。(画像抽出はともかく、Power BIはAzure AI Searchを直接読み込ませることができるので、必要度はイマイチかもしれないが。)
Import Dataの際に"Save enrichments to a knowledge store"で詳細を入力する。

SkillsetにKnowledge Storeが更新されていることを確認
Microsoft.Skills.Util.ShaperSkillというものが利用されている。
{
  "@odata.context": "https://srch-sima001.search.windows.net/$metadata#skillsets/$entity",
  "@odata.etag": "\"0x8DC454FB86A46D5\"",
  "name": "margies-knowledge-skillset",
  "description": "Skillset for document extraction",
  "skills": [
    ### 省略 ###
    {
      "@odata.type": "#Microsoft.Skills.Util.ShaperSkill",
      "name": "define-projection",
      "description": "Prepare projection fields",
      "context": "/document",
      "inputs": [
        {
          "name": "file_id",
          "source": "/document/metadata_storage_path"
        },
        {
          "name": "file_name",
          "source": "/document/metadata_storage_name"
        },
        {
          "name": "url",
          "source": "/document/url"
        },
        {
          "name": "language",
          "source": "/document/language"
        },
        {
          "name": "sentiment",
          "source": "/document/sentimentLabel"
        },
        {
          "name": "key_phrases",
          "sourceContext": "/document/merged_content/keyphrases/*",
          "inputs": [
            {
              "name": "phrase",
              "source": "/document/merged_content/keyphrases/*"
            }
          ]
        },
        {
          "name": "locations",
          "sourceContext": "/document/merged_content/locations/*",
          "inputs": [
            {
              "name": "location",
              "source": "/document/merged_content/locations/*"
            }
          ]
        },
        {
          "name": "image_tags",
          "sourceContext": "/document/normalized_images/*/imageTags/*",
          "inputs": [
            {
              "name": "tag",
              "source": "/document/normalized_images/*/imageTags/*/name"
            }
          ]
        }
      ],
      "outputs": [
        {
          "name": "output",
          "targetName": "knowledge_projection"
        }
      ]
    }
  ],
  "cognitiveServices": {
    "@odata.type": "#Microsoft.Azure.Search.CognitiveServicesByKey",
    "description": "Azure AI services",
    "key": "{Key}"
  },
  "knowledgeStore": {
    "storageConnectionString": "DefaultEndpointsProtocol=https;AccountName=stsima001ai;AccountKey={Key};EndpointSuffix=core.windows.net",
    "identity": null,
    "projections": [
      {
        "tables": [],
        "objects": [
          {
            "storageContainer": "margies-knowledge",
            "referenceKeyName": null,
            "generatedKeyName": "margies-knowledgeKey",
            "source": "/document/knowledge_projection",
            "sourceContext": null,
            "inputs": []
          }
        ],
        "files": []
      },
      {
        "tables": [],
        "objects": [],
        "files": [
          {
            "storageContainer": "margies-images",
            "referenceKeyName": null,
            "generatedKeyName": "margies-imagesKey",
            "source": "/document/normalized_images/*",
            "sourceContext": null,
            "inputs": []
          }
        ]
      },
      {
        "tables": [
          {
            "tableName": "KeyPhrases",
            "referenceKeyName": null,
            "generatedKeyName": "keyphrase_id",
            "source": "/document/knowledge_projection/key_phrases/*",
            "sourceContext": null,
            "inputs": []
          },
          {
            "tableName": "Locations",
            "referenceKeyName": null,
            "generatedKeyName": "location_id",
            "source": "/document/knowledge_projection/locations/*",
            "sourceContext": null,
            "inputs": []
          },
          {
            "tableName": "ImageTags",
            "referenceKeyName": null,
            "generatedKeyName": "tag_id",
            "source": "/document/knowledge_projection/image_tags/*",
            "sourceContext": null,
            "inputs": []
          },
          {
            "tableName": "docs",
            "referenceKeyName": null,
            "generatedKeyName": "document_id",
            "source": "/document/knowledge_projection",
            "sourceContext": null,
            "inputs": []
          }
        ],
        "objects": [],
        "files": []
      }
    ],
    "parameters": {
      "synthesizeGeneratedKeyName": true
    }
  },
  "indexProjections": null,
  "encryptionKey": null
}
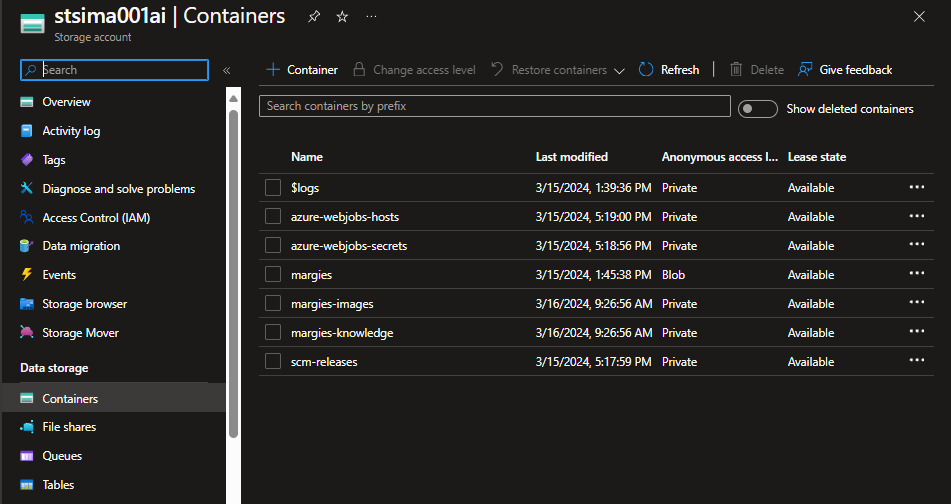
Storage Accoutに抽出されたデータが入っていることを確認
Blob Cotainersを掘っていくとドキュメントにある画像がpngファイルとして、データがjsonとして入っていることを確認できた。

Tableにも。これは例えばPower BIに読み込ませられる。

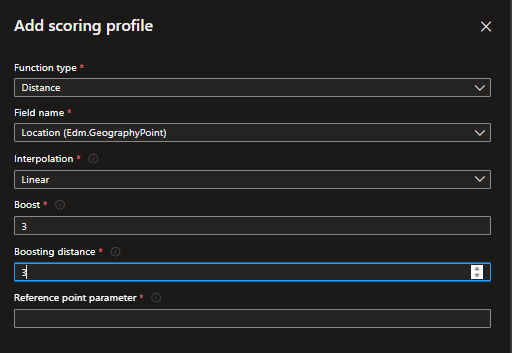
Scoring Profile
Analyzerの設定
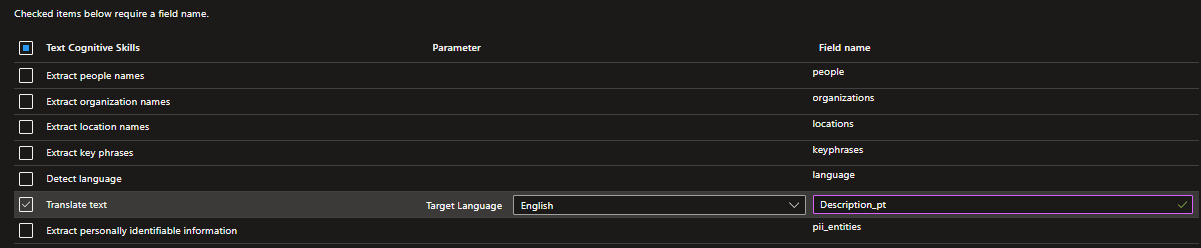
英語以外の翻訳をカラムとして追加するには専用のAnalyzerを利用し、新しくフィールドを設ける。

検索について
基本的にはJsonを渡して検索する。

通常だとApache Luceneのフルテキストが行われている。
SearchScore順に表示されるが、通常だとすべてのフィールドが同じ重みで検索される。
Scoring Profileで重要なフィールドをboostする
フィールドごとに重みづけを行う。

以下の例だと、Descriptionで検索ワードがヒットした場合、他のフィールドに比べて5倍のSearch Scoreの重みづけとなる。

その他、Scoring ProfileにはFunctionという機能があり、ある座標に距離的に近いデータ、新しいデータ等を重みづけを高くするなどちょっとしたカスタム設定ができる。(例として、ユーザーに近い喫茶店、ホテルから近い観光名所など。)
APIから実行する場合は以下のように、scoringProfileを利用することを明示的に指定する。
search=(Description:luxury OR Category:luxury)&scoringProfile=PROFILE NAME
もしくは、Query用のJsonを投げるときに特定フィールドの重みづけを5するといった形で動的に設定することも可能。
search=(Description:luxury OR Category:luxury^5)
Semantic Ranker
Azure On Your Dataだと、とりあえずSemantic SearchをOnにするの推奨とのことだったので盲目的にONにしてきたけど。
そもそもの意味。
- BM25 ランキング関数 → 要するにただのキーワードサーチで頻度による重みづけ
Azure AI 検索では、既定で BM25 順位付け関数を使用します。 BM25 ランキング関数は、検索語句がドキュメント内に出現する頻度に基づいて検索結果をランキングします。 検索語句を頻繁に含むドキュメントが最も関連性があるとする BM25 ランキング関数では優れたランキング結果を得ることができることが多いですが、常にそうだとは限りません。
- セマンティック ランク付け → 質問のContextに従ってMachineLearningで検索結果をランキングしてくれる、かつ質問に対して回答を出してくれる
セマンティック ランク付けには、言語理解に基づいてクエリ結果のランク付けを向上させることと、結果にキャプションと回答を提供することでクエリへの応答を向上させるという 2 つの機能があります。
①意味を理解した上での検索、②質問に対しての回答(キャプション)の2点が利点である。
②のセマンティックキャプションとは「ドキュメントから要約文を逐語的に抽出し、要約文の中で最も関連性の高いテキストを強調表示します。」
セマンティックは裏でベクトル検索も使っているからできること。

それでは実際に設定してみる。
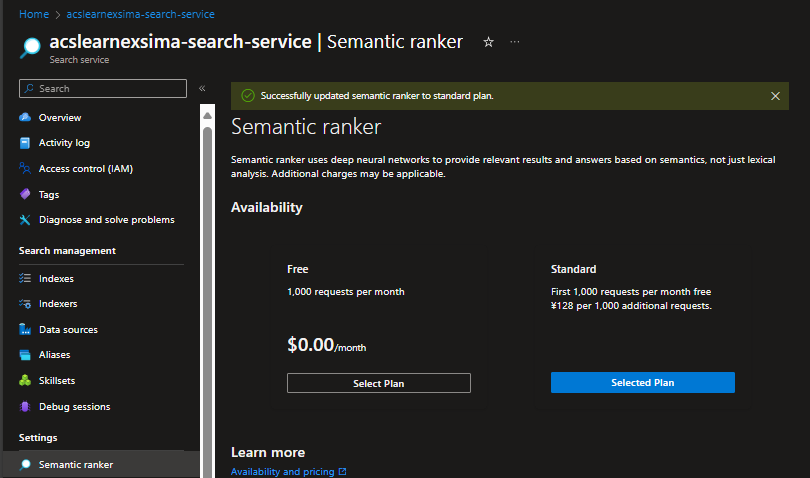
まずは有効にして。(テスト用ならFreeでも構わないけど。)
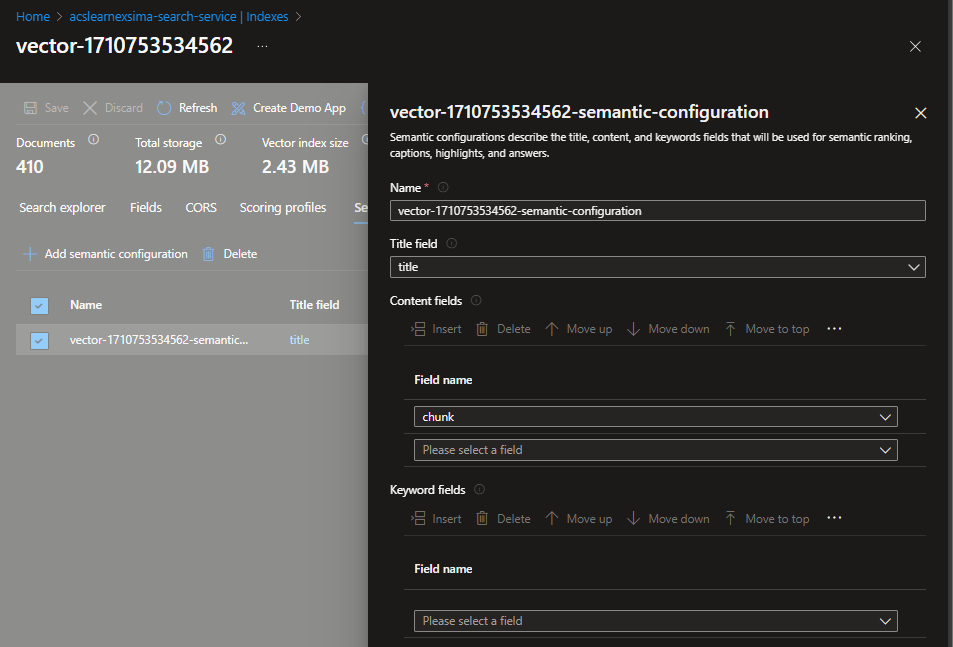
IndexからSemantic Configuration > Createを選択。(On Your Dataだとdefaultとかいうものが自動的に作られていましたね。)

Semantic searchを有効にするフィールドを選ぶ。


Queryでquerytypeをsemanticにしてやる。

コストは本番環境ならもともとAzure AI SearchもFreeは使わないだろうし、問題にならない程度と思える。
セマンティック ランク付けクエリは 1 か月あたり最大 1,000 件まで無料で使用できます。
クエリが 1 か月に 1,000 を超える場合は、Standard 価格を選択する必要があります。
Vector Search
Embeddingの詳しい説明は割愛。
ちょっと面白いと思ったのは、ベクトル検索では言葉の意味を数学的に表現するため、日本語だろうと英語だろうと、関係ないらしい。そういえばRAGにおいて言語個別によって処理が必要なのは、Import Dataの際のAnalyzerだけだった。
多言語埋め込みモデルを使用してさまざまな言語でドキュメントを表し、すべての言語でドキュメントを検索できるようにします。
Azure AI SearchからAzure OpenAIのEmbeddingを利用してベクトル化を行う。
、、、のだが、GitHubのLabが更新が追い付いていないのかLabのファイルが不足していてHandsOnを実行できなかった。
仕方ないので、こちらのQuickStartを実施してみる。
Import and Vectorize Dataから実行する。


Indexを確認するとDimensionsという今までなかったカラムがある。

Semantic ConfigurationでChunkを参照するようになっている。
Vector Algorithm、、この辺はよくわからない。。

Indexerをjsonで見ると、Skillsetが作られている。

Skillsetの中身
- Microsoft.Skills.Text.AzureOpenAIEmbeddingSkill
- Microsoft.Skills.Text.SplitSkill
- Microsoft.Skills.Text.MergeSkill
- Microsoft.Skills.Vision.OcrSkill
{
  "@odata.context": "https://acslearnexsima-search-service.search.windows.net/$metadata#skillsets/$entity",
  "@odata.etag": "\"0x8DC472D432C45E1\"",
  "name": "vector-1710753534562-skillset",
  "description": "Skillset to chunk documents and generate embeddings",
  "skills": [
    {
      "@odata.type": "#Microsoft.Skills.Text.AzureOpenAIEmbeddingSkill",
      "name": "#1",
      "description": null,
      "context": "/document/pages/*",
      "resourceUri": "https://{AOAI URL}.openai.azure.com",
      "apiKey": "{key}",
      "deploymentId": "text-embedding-ada-002",
      "inputs": [
        {
          "name": "text",
          "source": "/document/pages/*"
        }
      ],
      "outputs": [
        {
          "name": "embedding",
          "targetName": "vector"
        }
      ],
      "authIdentity": null
    },
    {
      "@odata.type": "#Microsoft.Skills.Text.SplitSkill",
      "name": "#2",
      "description": "Split skill to chunk documents",
      "context": "/document",
      "defaultLanguageCode": "en",
      "textSplitMode": "pages",
      "maximumPageLength": 2000,
      "pageOverlapLength": 500,
      "maximumPagesToTake": 0,
      "inputs": [
        {
          "name": "text",
          "source": "/document/mergedText"
        }
      ],
      "outputs": [
        {
          "name": "textItems",
          "targetName": "pages"
        }
      ]
    },
    {
      "@odata.type": "#Microsoft.Skills.Text.MergeSkill",
      "name": "#3",
      "description": null,
      "context": "/document",
      "insertPreTag": " ",
      "insertPostTag": " ",
      "inputs": [
        {
          "name": "text",
          "source": "/document/content"
        },
        {
          "name": "itemsToInsert",
          "source": "/document/normalized_images/*/text"
        },
        {
          "name": "offsets",
          "source": "/document/normalized_images/*/contentOffset"
        }
      ],
      "outputs": [
        {
          "name": "mergedText",
          "targetName": "mergedText"
        }
      ]
    },
    {
      "@odata.type": "#Microsoft.Skills.Vision.OcrSkill",
      "name": "#4",
      "description": null,
      "context": "/document/normalized_images/*",
      "textExtractionAlgorithm": null,
      "lineEnding": "Space",
      "defaultLanguageCode": "en",
      "detectOrientation": true,
      "inputs": [
        {
          "name": "image",
          "source": "/document/normalized_images/*"
        }
      ],
      "outputs": [
        {
          "name": "text",
          "targetName": "text"
        }
      ]
    }
  ],
  "cognitiveServices": {
    "@odata.type": "#Microsoft.Azure.Search.CognitiveServicesByKey",
    "description": null,
    "key": "{key}"
  },
  "knowledgeStore": null,
  "indexProjections": {
    "selectors": [
      {
        "targetIndexName": "vector-1710753534562",
        "parentKeyFieldName": "parent_id",
        "sourceContext": "/document/pages/*",
        "mappings": [
          {
            "name": "chunk",
            "source": "/document/pages/*",
            "sourceContext": null,
            "inputs": []
          },
          {
            "name": "vector",
            "source": "/document/pages/*/vector",
            "sourceContext": null,
            "inputs": []
          },
          {
            "name": "title",
            "source": "/document/metadata_storage_name",
            "sourceContext": null,
            "inputs": []
          }
        ]
      }
    ],
    "parameters": {
      "projectionMode": "skipIndexingParentDocuments"
    }
  },
  "encryptionKey": null
}
ポータルでは表示されなかったが、SplitSkillのここでChunkやOverlap幅をチューニングできる。
  "@odata.type": "#Microsoft.Skills.Text.SplitSkill",
  "name": "#2",
  "description": "Split skill to chunk documents",
  "context": "/document",
  "defaultLanguageCode": "en",
  "textSplitMode": "pages",
  "maximumPageLength": 2000,
  "pageOverlapLength": 500,
ベクトル検索のためのJsonは以下のような形式。

Azure SearchにデータをPushする
最初に利用した"Import Data"はいわばPull型。外部からAzure AI Searchに対してPushすることもできる。その場合、Indexer、スキルセットは不要になる。
-
Azure Data Factoryのデータコピーを使う
-
独自プログラム等からRest APIを使う

以下のようなEndpointに対して、POST https://[service name].search.windows.net/indexes/[index name]/docs/index?api-version=[api-version]
以下のようなJsonをPostする。
{
"value": [
{
"@search.action": "upload (default) | merge | mergeOrUpload | delete",
"key_field_name": "unique_key_of_document", (key/value pair for key field from index schema)
"field_name": field_value (key/value pairs matching index schema)
...
},
...
]
}
- Azure AI Search SDKを利用
インデックスのパフォーマンスは、次の 6 つの重要な要因に基づいています。
- 検索サービス レベルと、有効にしたレプリカとパーティションの数
- インデックス スキーマの複雑さ。 各フィールドに含まれるプロパティ (検索可能、ファセット可能、並べ替え可能) の数を減らしてください
- 各バッチ内のドキュメントの数。最適なサイズは、インデックス スキーマとドキュメントのサイズによって異なります
- アプローチがどのようにマルチスレッド化されているか
- エラー処理と調整。 エクスポネンシャル バックオフの再試行戦略を使用してください
- データがどこに存在するか。検索インデックスに近いデータにインデックスを付けてみてください。 たとえば、Azure 環境内からアップロードを実行します
Azure AI Searchのその他あれこれ
Security
以下3レイヤーで考える。
- ユーザーからAI Searchへの受信検索要求
- AI SearchからBlob Storage等への要求
- ユーザーから検索要求に対してのアクセス制限
キーベース認証
- キーは管理キー(書き込みとシステム照会)とクエリキー(読み取りアクセス)の2種類がある
RBAC認証
Key Vaultと似て、Control PlaneとData Planeがある。
Data Plane
- 検索サービス共同作成者 - 検索サービス管理者向けのロール (上記の共同作成者ロールと同じアクセス権) とコンテンツ (インデックス、インデクサー、データ ソース、スキルセット)
- 検索インデックス データ共同作成者 - ドキュメント コレクションのインポート、更新、またはクエリを行う開発者またはインデックス所有者向けのロール
- 検索インデックス データ閲覧者 - クエリの実行だけを必要とするアプリおよびユーザー向けの読み取り専用アクセス ロール
AI Searchとデータソース間を保護
一番セキュアなプラクティス。
- ①AI SearchからStorage Account等へアクセスするときにSystem Assigned Identityを利用。
- ②Private Endpointを利用
- ユーザーがAI Searchへアクセスするとき
- AI SearchからStorage Account等へアクセスするとき
- ③データソース側のFirewallでAI Searchのみを許可。
この辺Azure OpenAI On Your Dataを使っていると自分で設定しなくちゃいけないところなので要注意。
Securityフィルター
RAGを利用するさいに必要となるかもしれない。
ドキュメントに誰がアクセスしていいか、というフィールドを持たせて、現在のユーザーが属しているグループがアクセスOKであれば許可するというもの。
パフォーマンス確認
Kusto Query Languageで定義してMonitorでみる。
以下リンク先にクエリの平均待機時間やHttp状態コード等のサンプルがあるため、便利かも。