まだ送受信はいけませんでした。
ここでは以下を行います。
- Arduino回路構築
- Arduino ISP 書き込み
- ライタ回路構築
- hexファイル書き込み
1. Arduino回路構築
昔作った回路があったので流用しています。
画像だけのっけときます。
回路図書くのが面倒なので写真で保存しておきます。

Arduinoは右側のブレッドボードです。
左側は書き込み回路です。
抵抗値くらいは読み取れるんじゃないかと思います。
水晶は16MHzです。
ATmega328PはArduinoのブートローダ書き込み済みの物を買ってきます。
1個あればArduino ISPでターゲットマイコンをArduinoにできます。
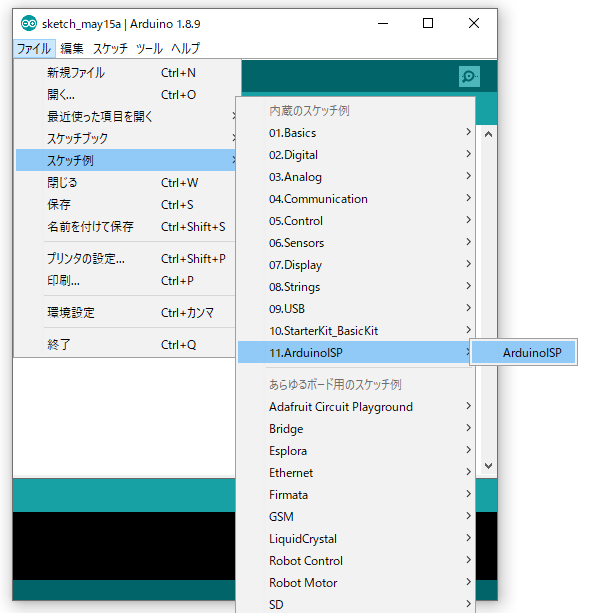
2. Arduino ISP 書き込み
そしてArduino IDEのスケッチ例からArduino ISPを選択します。

適当に書き込んだら完成です。
3.ライタ回路構築
これは先の回路画像の左側です。
画像を見ていたら水晶くっつけてあるんですがコンデンサのGND側が浮いていますね。
水晶発振にしてあるのでつけてないとターゲットマイコンが動かないんですが、
コンデンサの反対側が浮いていてもなぜか動いています。
水晶発振の仕組みをあまり理解していないのも問題ですが、
まあ動いてるしいいか・・・。
4.hexファイル書き込み
最後にhexファイルを書き込みます。
まずhexファイルですが、Atmel Studioでビルドすると
ソリューションフォルダのReleaseフォルダに吐き出されます。
なのでコマンドプロンプトを開いたらcdでhexファイルがあるReleaseフォルダに移動します。
そして下記コマンドで書き込みます。
こちらのページを参考にさせていただきました。
以上です。
とりあえずマイコンデータ送信の試験まではできているので次はそれを書きます。