ROS Bridge
Overview
Introduction
My name is Salvatore and I am a Development Engineer at 株式会社Rist.
About this article
This article is meant to be a quick and direct introduction to the ROS Bridge, based on the official documentation.
This is the first article of a series related to my work at Rist.
About me
Present
Joined Rist in February 2020, currently part of the Development Team.
Responsible for Robotics R&D, and among other things, primarily working on the following topics:
- Robot design, control, motion, perception and manipulation.
- Image analysis, recognition and classification.
- AI algorithms design and implementation.
- UI/UX design and implementation.
Background
Graduated cum laude with a master's degree in Computer Science Engineering for Intelligent Systems at University of Palermo, Italy, presenting a Thesis in Robotics on a Brain-Computer Interface Framework.
Previously graduated with the grade of 110/110 in Computer Science Engineering, presenting a Thesis in Artificial Intelligence / Latent Semantic Analysis.
ROS Bridge
What is ROS Bridge
The ROS Bridge is a ROS 2 package that makes possible to seamlessly exchange messages between ROS 1 and ROS 2, on shared topics. Once executed, the bridge taps on both ROS 1 and ROS 2 topics and, by default, establishes a communication bridge between the existing topics which bear the same name.
It is also possible to establish a bridge for any existing topics, regardless of their concurrent status in both environments.
Why it is needed
Currently, the ROS 2 core packages are still undergoing heavy development, and most of the third-party packages are still relying on ROS 1.
Therefore, by using the ROS Bridge, it is possible to make use of those packages that are still not natively running on ROS 2.
Installation
ROS 2 machine
As previously stated, the ROS Bridge is a ROS 2 package, and it is available in the official repositories.
In order to run the ROS Bridge, the machine running ROS 2 is required to also run a functional ROS 1 environment.
Environment
-
HW: Raspberry Pi 3 Model B+
(used as the computational unit for TurtleBot3 Burger/Waffle Pi)Software Version OS Ubuntu 18.04.4 LTS (Bionic Beaver) Python Python 2.7.17 (Default) Python 3.6.9 ROS ROS 1 (Melodic) ROS 2 (Dashing)
For information on setting up a ROS 2 Dashing environment on a machine running Ubuntu, refer to the official documentation.
- To proceed with the Bridge installation, execute:
$ sudo apt install ros-dashing-ros1-bridge
Bash
I have slightly customised the Bash configuration file, adding an automatic IP recognition and a convenient alias for sourcing the ROS environments.
- Add the following lines at the end of the
~/.bashrcfile:
# ROS
ROS_MASTER_IP=192.168.0.100  # Ip of the ROS 1 master machine
WIFI_INTERFACE=$(iw dev | awk '$1=="Interface"{print $2}')
WIFI_IP=$(/sbin/ip -o -4 addr list $WIFI_INTERFACE | head -1 | awk '{print $4}' | cut -d/ -f1)
export TB3_MODEL=burger
export TURTLEBOT3_MODEL=${TB3_MODEL}

# ROS1
export ROS_IP=$WIFI_IP
export ROS_HOSTNAME=$WIFI_IP
export ROS_MASTER_URI=http://$ROS_MASTER_IP:11311
alias source-ros1='source /opt/ros/melodic/setup.bash'

# ROS2
alias source-ros2='source /opt/ros/dashing/setup.bash; source ~/turtlebot3_ws/install/setup.bash; export ROS_DOMAIN_ID=30 #TURTLEBOT3'
Note: In order to retrieve the interface name, the iw package must be present in the system.
If it is not already available, proceed with its installation:
$ sudo apt install iw
ROS 1 machine
The use of the ROS Bridge is completely transparent to the ROS 1 machine, therefore the machine running ROS 1 is required to only be configured to run a ROS 1 environment and its ROS 1 related packages.
Environment
-
HW: Desktop PC
Software Version OS Ubuntu 18.04.4 LTS (Bionic Beaver) Python Python 2.7.17 Python 3.6.9 (Default) ROS ROS 1 (Melodic)
For information on setting up a ROS 1 Melodic environment on a machine running Ubuntu, refer to the official documentation.
Bash
- Similarly, add the following lines at the end of the
~/.bashrcfile:
# ROS
WIFI_INTERFACE=$(iw dev | awk '$1=="Interface"{print $2}')
WIFI_IP=$(/sbin/ip -o -4 addr list $WIFI_INTERFACE | head -1 | awk '{print $4}' | cut -d/ -f1)
export TB3_MODEL=burger
export TURTLEBOT3_MODEL=${TB3_MODEL}

# ROS1
export ROS_IP=$WIFI_IP
export ROS_HOSTNAME=$WIFI_IP
export ROS_MASTER_URI=http://$WIFI_IP:11311
alias source-ros1='source /opt/ros/melodic/setup.bash > /dev/null && source ~/catkin_ws/devel/setup.bash > /dev/null'
Running the demo example
To verify the successful installation of the Bridge, it is possible to run a simple talker/listener example between the machine running ROS 1 and the machine running ROS 2, and vice versa.
ROS 2 machine
- Install the demo examples:
$ sudo apt install ros-dashing-demo-nodes-py
Shell 1: bridge
- Launch the bridge:
$ . /opt/ros/melodic/setup.bash
$ . /opt/ros/dashing/setup.bash
$ ros2 run ros1_bridge dynamic_bridge
Shell 2: listener
- Launch the listener:
$ . /opt/ros/dashing/setup.bash
$ ros2 run demo_nodes_py listener
ROS 1 machine
- Install the demo examples:
$ sudo apt install ros-melodic-rospy-tutorials
Shell 1: roscore
- Launch roscore:
$ . /opt/ros/melodic/setup.bash
$ roscore
Shell 2: talker
- Launch the talker:
$ . /opt/ros/melodic/setup.bash
$ rosrun rospy_tutorials talker
Terminals
Switching roles
To switch the roles of the two machines, it is also possible to run the listener on the ROS 1 machine and the talker on the ROS 2 machine.
ROS 2 machine: talker
- Launch the talker:
$ ros2 run demo_nodes_py talker
ROS 1 machine: listener
- Launch the listener:
$ rosrun rospy_tutorials listener
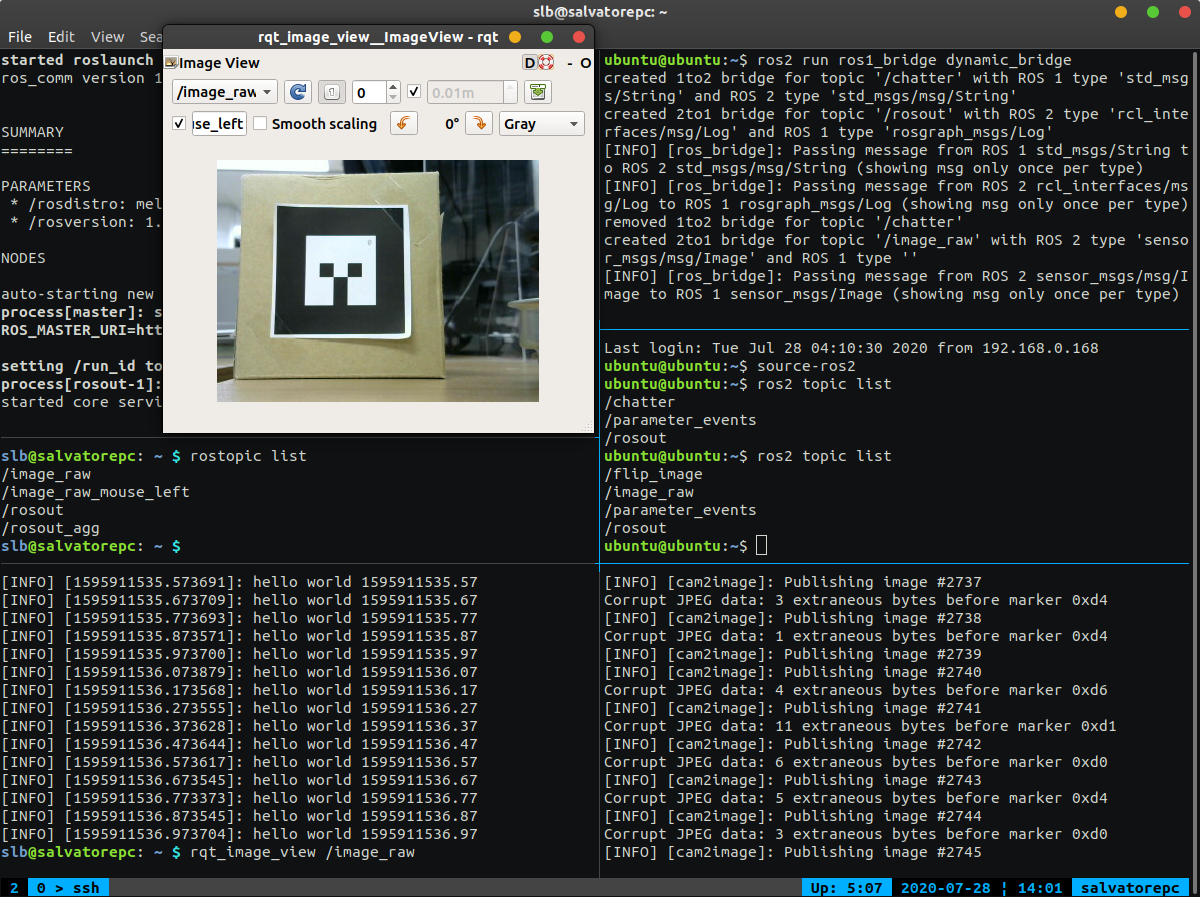
Verify the USB camera stream
ROS 2 machine
- Install the
image_toolspackage:
This package will allow the ROS 2 machine to use a regular USB camera to produce a stream of frames of specified dimensions on a chosen topic.
$ sudo apt install ros-dashing-image-tools
Shell 1: bridge
- Launch the bridge:
$ . /opt/ros/melodic/setup.bash
$ . /opt/ros/dashing/setup.bash
$ ros2 run ros1_bridge dynamic_bridge
Shell 2: cam2image
- Obtain the camera stream:
$ . /opt/ros/dashing/setup.bash
$ ros2 run image_tools cam2image -s 0 -x 320 -y 240 -t /image_raw
- For more information about the usage of the available parameters:
$ ros2 run image_tools cam2image -h
ROS 1 machine
Shell 1: roscore
- Launch roscore:
$ . /opt/ros/melodic/setup.bash
$ roscore
Shell 2: rqt_image_view
- Verify the camera stream:
$ . /opt/ros/melodic/setup.bash
$ rqt_image_view /image_raw

