JupyterLabにあるjupyterlab_templatesが便利そうなので使ってみました。
1. jupyterlab_templatesとは
Jupyter notebookのテンプレートを作っておいて呼び出せる便利な拡張機能です。
例えば標準のnotebookテンプレートを作っておいて展開したりテンプレートから作ったnotebookに修正を加えて色々なものに適応したりできそうな感じです。
2. 環境
| 項目 | 内容 |
|---|---|
| OS | RHEL7.5 |
| Docker | 1.13.1, build 8633870/1.13.1 |
| コンテナイメージ | centos:centos7 |
| JupyterLab | 0.34.12 |
| Jupyterを起動するユーザー名 | jupyter(コンテナ内にjupyterユーザーが作られているものとします) |
ここでは、DockerコンテナでJupyterLabを構築します。
3. インストール
既にJupyterLabがインストールされていることを前提とします。
以下の手順で # は root の作業です。$ は jupyterユーザー の作業です。
3-1. 必要なもの
コンテナ内にNode.jsをインストールして npm を使えるようにておいてください。
3-2. 手順(コンテナ内)
拡張機能を導入します。
# pip install jupyterlab_templates
# jupyter labextension install jupyterlab_templates
拡張機能を有効化します。
# su - jupyter
$ jupyter serverextension enable --py jupyterlab_templates
jupyterの設定ファイルにテンプレートが保存されるディレクトリ情報を記載します。
公式では以下のように書いてあります。
Adding templates
install the server extension, and add the following tojupyter_notebook_config.pyc.JupyterLabTemplates.template_dirs = ['list', 'of', 'template', 'directories']
ただ、公式通りに設定してしまうと複数のディレクトリが必要になるため、ここでは以下のように設定します。
以下は templates ディレクトリにテンプレートファイルが保存されている設定にします。
$ vi .jupyter/jupyter_notebook_config.py
(snip)
c.JupyterLabas.template_dirs = ['templates']
$ mkdir templates
jupyter_notebook_config.pyファイル(Jupyter設定)が無い場合
以下のコマンドを実行して設定フィアルを生成してください。
$ jupyter lab --generate-config
3-3. JupyterLab起動(Dockerホスト)
コンテナ内にJupyterLabを起動します。
# docker exec -u jupyter -d コンテナ名 sh -c 'cd /home/jupyter && jupyter lab'
4. テンプレートの作成・使用
4-1. テンプレート作成
notebookのテンプレートを作っています。
以下では example_template というnotebookを作ってみます。

ただし、作っただけだとテンプレートを認識してくれません。
認識させるにはJupyter自体の再起動が必要です。
Jupyterを再起動させるには以下の方法があります。
- Jupyterがインストールされているホストまたはコンテナ内に入ってkillって再起動
- これは、毎回ログインする手順が手間なのでここでは無しとします。
- JupyterLabのTerminalから再起動
- 今回はこっちの方法でやってみます。
4-2. テンプレート認識
ただし、JupyterLabのTerminalからkillしてプロセスを停止してしまうと自身も止まってブラウザから操作不能になってしまいます。
そこで、再起動するスクリプトとコマンドのエイリアスでやってみたいと思います。
4-2-1. スクリプト
# !/bin/bash
pid=`ps aux | grep -v -e grep -e jupyter_restart.sh | awk '{col="";for(i=2;i<=NF;i++) col=col $i" ";print col}' | grep -e jupyter -e ansible | awk '{print $1}'`
for i in $pid ; do
  kill -9 $pid
done
jupyter lab &
注意
再起動する時は、すべてのカーネルがシャットダウンした状態でJupyterLabを再起動した方が確実でした。
そのため、上記スクリプトではJupyterLabとansibleカーネルを確実に停止できるようにしています。
ansible-kernelは自分が個別で使っているものなので、使っていなければ削っても問題ないと思います。
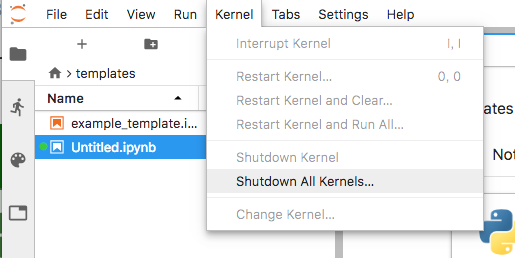
スクリプトでカーネルを停止しない場合はブラウザ上で以下の手順からカーネルを停止してください。
Kernel -> Shutdown All Kernels...
4-2-2. エイリアス
# chmod +x jupyter_reboot.sh
# vi .bashrc
(snip)
alias jupyter-reboot="/home/jupyter/jupyter_restart.sh &"
4-3. テンプレートの反映
最初は作成した example_template.ipynb が認識されていませんでしたが、JupyterLabを再起動してブラウザをリロードしてあげると認識してくれて使えるようになります。

5. 最後に
このやり方はコンテナとコンテナ外から起動したやり方でのみ動作を確認しています。
コンテナ内でJupyterLabを起動した後に同じ手順でやるとTerminalコマンドからJupyterLabの再起動が実行されませんでした。
なので、他のやり方でやる場合は考える必要があるかもしれません。