0. はじめに
MSAL.js を利用して Angular アプリを Azure AD で認証するチュートリアルが、公式ページにあります。

しかし、個人的に地味にハマった部分があったので、そのポイントを含めて手順を記載しました。本記事が同じくハマった方への助けになれば幸いです![]()
1. 公式ページのチュートリアルについて
まずはじめる前にチュートリアルがどんなアプリなのかを紹介します。
公式ページのチュートリアル自体の内容は、Azure AD 設定後 [Github] (https://github.com/Azure-Samples/active-directory-javascript-singlepageapp-angular "Github") にあるサンプルコードをデプロイするだけです ![]()
デプロイ後 ブラウザで http://localhost:4200 にアクセスすると アプリの画面が表示されます。

さらに画面右上の [Login] をクリックすることで Azure AD の認証を行うことができます。
こんな感じでホップアップが出現し、 Azure AD で認証をすることができます。

認証後に [Profile] をクリックすると Microsoft Graph API のユーザーを取得する API が実行され、認証したユーザーの情報が表示されます。サンプルコードでは赤線で示した 取得したユーザー情報のうち displayName 属性 のみ表示されます。

これだけではちょっと寂しいと思いましたので、本記事の "4.おまけ" に取得したユーザー情報すべてを表示するように改良する方法も書いておきました ! 興味があれば最後までぜひご覧ください![]()
2. チュートリアルをやってみる
さあいよいよチュートリアルの手順について解説していきます !!
2.1. 前提条件
公式ページの転載ですが、以下が準備できているか確認してみてください。
- Azure のサブスクリプション。 [無料で作成できます](https://azure.microsoft.com/free/?WT.mc_id=A261C142F)
- [Node.js](https://nodejs.org/en/download/)
- [VSCode](https://code.visualstudio.com/download) などのエディタ
- こちらはお好みのエディタを使ってください!
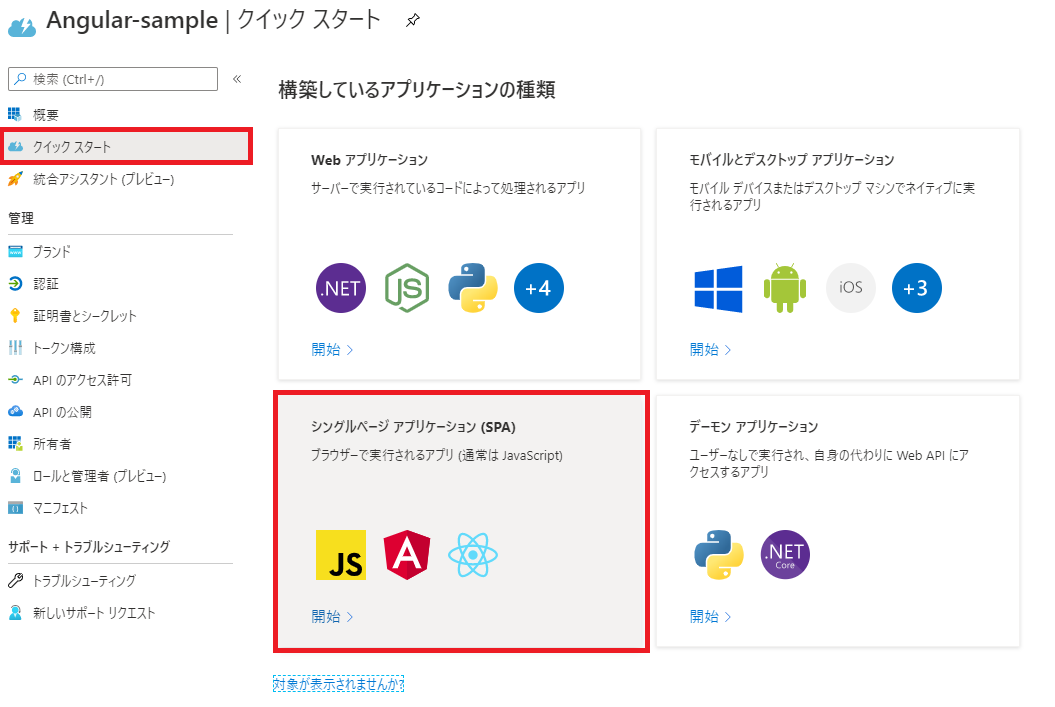
[クイック スタート] を選択し [シングルページ アプリケーション (SPA) ] をクリックします。

以上で Azure AD 側の設定は終了です! 簡単でありがたいですね![]()
ちなみに、[コードサンプルをダウンロード] をクリックしするとサンプルコードをダウンロードできます。

サンプルコードの取得は、 Power Shell などで git clone コマンドを実行して取得しても OK です!
git clone https://github.com/Azure-Samples/active-directory-javascript-singlepageapp-angular.git
最後に [概要] に移動し "アプリケーション (クライアント) ID" と "ディレクトリ (テナント) ID" をメモしておきます。
"次の手順 2.3" で使います。

2.3. サンプルコードの修正
"前の手順 2.2" で [コードサンプルをダウンロードをダウンロードします] をクリックした場合は、この章をスキップできます。
それ以外の手順でサンプルコードを取得した場合は、 ダウンロードしたコードのフォルダに移動し、 "src/app/app.module.ts" を以下のように修正していきます。
      auth: {
        clientId: 'Enter_the_Application_Id_Here',
        authority: 'Enter_the_Cloud_Instance_Id_HereEnter_the_Tenant_Info_Here',
        redirectUri: 'Enter_the_Redirect_Uri_Here',
      },
      cache: {
        cacheLocation: 'localStorage',
        storeAuthStateInCookie: isIE, // set to true for IE 11
      },
    },
    {
      popUp: !isIE,
      consentScopes: [
        'user.read',
        'openid',
        'profile',
      ],
      unprotectedResources: [],
      protectedResourceMap: [
        ['Enter_the_Graph_Endpoint_Herev1.0/me', ['user.read']]
      ],
      extraQueryParameters: {}
    })
-
変更箇所
- ・clientId
- "前の手順 2.2" でメモした "アプリケーション (クライアント) ID" を入力します
- ・authority
- "前の手順 2.2" でメモした "ディレクトリ (テナント) ID" を入力します。または Azure AD で利用しているドメイン(xxx.onmicrosoft.com など) を入力しても大丈夫です
- ・redirectUri
- http://localhost:4200 を入力します
- ・protectedResourceMap
- https://graph.microsoft.com/v1.0/me を入力します
      auth: {
        clientId: 'xxxxxxxx-xxxx-xxxx-xxxx-xxxxxxxxxxxx',
        authority: 'https://login.microsoftonline.com/xxxxxxxx-xxxx-xxxx-xxxx-xxxxxxxxxxxx',
        redirectUri: 'http://localhost:4200',
      },
      cache: {
        cacheLocation: 'localStorage',
        storeAuthStateInCookie: isIE, // set to true for IE 11
      },
    },
    {
      popUp: !isIE,
      consentScopes: [
        'user.read',
        'openid',
        'profile',
      ],
      unprotectedResources: [],
      protectedResourceMap: [
        ['https://graph.microsoft.com/v1.0/me', ['user.read']]
      ],
      extraQueryParameters: {}
    })
2.4. Angular アプリのデプロイ
サンプルコードのフォルダの一番上の階層で以下のコマンドを実行します。
npm install
npm start
※npm コマンドは package.json ファイルがあるフォルダで実行します。npm install コマンドは、このファイルに記載されているモジュールをインストールする動作を行うためです!
3. うまくできなかったら
まずは、ブラウザで http://localhost:4200 にアクセスし F12 を押しコンソールタブを確認ましょう![]()
そこで確認できるエラーがあれば、トラブルシュートの手掛かりになるはずです。
以下に参考として私がハマったケース 2 つを記載しました。
3.1. http://localhost:4200 にアクセスしたが、ページが真白 !!
私の場合は、"src/app/app.module.ts" の "authority" をミスったため、ページが真っ白という現象が発生しました。
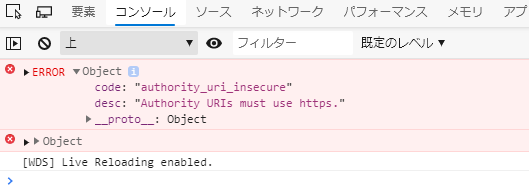
ブラウザでエラーを確認すると以下のような表示が確認できます。

この場合はもう一度 "authority" の入力形式が以下のようになっているか再度確認をしましょう。
https://login.microsoftonline.com/xxxxxxxx-xxxx-xxxx-xxxx-xxxxxxxxxxxx
または
https://login.microsoftonline.com/xxxx.onmicrosoft.com
※私は最初この設定が理解できておらず 自分の Azure AD のドメイン "xxx.net" と入力し見事にハマってました!
※正しい設定値である https://login.microsoftonline.com/xxx.net と入力し直したところ事象を解決することができました。
3.2. [Profile] を押したが、認証したユーザーの Display Name が表示されない
私の場合は、"src/app/app.module.ts" の "protectedResourceMap" の設定変更が必要なことに気づかずにハマりました。
Github から Clone すると Graph API の URL ではなく "Enter_the_Graph_Endpoint_Herev1.0/me" となっていることが原因です。
ちなみにブラウザでエラーを確認したところ以下のような表示が確認されました。

この場合は "src/app/app.module.ts" の "protectedResourceMap" の設定を確認し正しい Graph API の URL "https://graph.microsoft.com/v1.0/me" を入力しなおしてあげましょう!
4. おまけ
[profile] を押した後の結果がちょっと味気なく感じたので、サンプルコードに少しだけ手を加えて以下のようにアレンジしてみました

"src/app/profile/profile.component.html" の末尾に以下のようなコードを追記することで上記のような表示を作れます。
<p>
  Welcome {{profile?.displayName}}!
</p>

<p>Your user Profile details is under the bellow.</p>
<table class="table table-bordered">
    <thead class="thead-dark">
        <tr><th>attribute</th><th>value</th></tr>
    </thead>
    <tbody *ngFor="let item of profile | keyvalue">
        <tr><td>{{item.key}}</td><td>{{item.value}}</td></tr>
    </tbody>
</table>


