はじめに
以前、『Reactでp5.jsを使う手順』と題して React で p5.js を扱うための手順をまとめた記事を投稿しました。
上記の記事では react-p5 というパッケージを利用して p5.js を使えるようにプロジェクトを構築していきました。しかし、react-p5 とこれに依存関係のあるパッケージは廃止されているようで信頼性がありません。
そこで、本記事では2024年現在で廃止されていないパッケージを利用して React で p5.js を使う手順をまとめています。利用するパッケージを変えるだけなので、半分ほど以前の記事と重複する箇所がありますがご了承ください。参考までに Github で必要なファイルを公開しているので、次のリポジトリでご確認ください。
より簡単な方法の解説(宣伝)
本記事の内容の工数を限りなく少なくした簡易版の解説記事があります。内容として、完成するプロジェクト構成は本記事と全く同じなので、とにかく早く React で p5 を使いたいという方はこちらをご確認ください。
作業ディレクトリの用意
まずは、プロジェクト用のディレクトリを用意します。ここでは react-p5-sample というフォルダ内での作業例を示していきます。このフォルダ名は、後述の npm init -y コマンドの動作と関連します。
基礎的な React プロジェクトの構築
package.json の作成
package.json を作成します。このファイルでプロジェクトの管理を行っていきます。
npm init -y
続いて,お好みのテキストエディタで package.json に次の内容を書き込みます。プロジェクト名 はご自身の内容に合わせてください。基本的に npm init -y コマンドを実行して作られた package.json では、name の値が用意した作業ディレクトリ名 (例では react-p5-sample ) となっています。
{
  "name": "プロジェクト名",
  "version": "1.0.0",
  "description": "",
  "main": "index.js",
  "scripts": {
    "start": "react-scripts start",
    "build": "react-scripts build",
    "test": "react-scripts test",
    "eject": "react-scripts eject"
  },
  "keywords": [],
  "author": "",
  "license": "ISC",
  "dependencies": {
    "react": "^18.2.0",
    "react-dom": "^18.2.0",
    "react-scripts": "^5.0.1"
  }
}
package.json の各フィールドは次を意味します。
| フィールド | 内容 |
|---|---|
"name" |
プロジェクト名 |
"version" |
プロジェクトのバージョン |
"description" |
プロジェクトに関する簡単な説明 |
"main" |
エントリポイント |
"scripts" |
ターミナル操作で実行できるスクリプト(コマンド) |
"keywords" |
プロジェクトに関連するキーワード |
"author" |
プロジェクトの作者や制作者に関する情報 |
"license" |
プロジェクトのライセンス |
Reactパッケージのインストール
次のコマンドで React プロジェクトに必要なパッケージをインストールします。
npm install react react-dom react-scripts
ファイルとソースファイルの作成
プロジェクトのディレクトリを構築していきます。Windows と Mac でのコマンドを示しておきますが、GUI (エクスプローラー / Finder) を使って手動でフォルダやファイルを作っても構いません。
- windows
# 静的なアセットを管理するフォルダ
mkdir public
# HTML文書
New-Item ./public/index.html -type file
# Reactアプリケーションに関するファイルを管理するフォルダ
mkdir src
# エントリーポイント
New-Item ./src/index.js -type file
#  メインコンポーネント
New-Item ./src/App.js -type file
- mac (動作未確認)
# 静的なアセットを管理するフォルダを作成
mkdir public
# HTML文書を作成
touch public/index.html
# Reactアプリケーションに関するファイルを管理するフォルダを作成
mkdir src
# エントリーポイントを作成
touch src/index.js
# メインコンポーネントを作成
touch src/App.js
ソースファイルの編集
先ほど作成したソースファイルを次のように変更してください。
index.html
<!DOCTYPE html>
<html lang="ja">

  <head>
    <!-- 文書の文字エンコーディングをUTF-8に指定 -->
    <meta charset="UTF-8">
    <!-- ページのタイトルを指定 -->
    <title>サンプルスケッチ</title>
  </head>

  <body>
    <!-- Reactアプリケーションが描画されるルート要素の定義 -->
    <div id="root"></div>
  </body>

</html>
index.js
// ReactおよびReactDOMをインポート
import React from 'react';
import ReactDOM from 'react-dom/client';

// Appコンポーネントを'./App'からインポート
import App from './App';

// ルート要素を特定のDOM要素に関連付ける
const root = ReactDOM.createRoot(document.getElementById('root'));

// ルート要素にReactコンポーネントを描画する
root.render(
  // React.StrictModeコンポーネントでアプリケーションをラップする
  <React.StrictMode>
    {/* Appコンポーネントを描画 */}
    <App />
  </React.StrictMode>
);
App.js
// Appコンポーネントの定義
function App() {
  return (
    <div className="App">
      <h1>Hello, world!</h1>
    </div>
  );
}

// Appコンポーネントを他のファイルで利用できるようにエクスポート
export default App;
動作確認
次のコマンドで React アプリの動作を確認できます。
npm start
次の内容が出力されると成功です。
Compiled successfully!

You can now view react-p5-sample in the browser.

  Local:            http://localhost:3000
  On Your Network:  http://192.168.56.1:3000

Note that the development build is not optimized.
To create a production build, use npm run build.

webpack compiled successfully
しばらくすると、ブラウザが立ち上がります。起動したページで、次のように「Hello, world!」と表示されていると成功です。
次の手順で動作を停止させることができます。
-
Ctrl + Cを押す - ターミナルで次の出力が確認できるので,
yと入力する
Compiled successfully!

You can now view react-p5-sample in the browser.

  Local:            http://localhost:3000
  On Your Network:  http://192.168.56.1:3000

Note that the development build is not optimized.
To create a production build, use npm run build.

webpack compiled successfully
^C^Cバッチ ジョブを終了しますか (Y/N)? y
p5.jsの導入
自由にスケッチを書く前に、p5.jsの基本的な動作が実行できるのか確認をしていきます。
パッケージのインストール
次のコマンドで p5 というパッケージを導入できます。(以前は react-p5 というパッケージを利用していましたが、これは廃止されているパッケージであるため避けます)
npm install p5
p5.jsのソースファイル
p5.js のプログラムを記したソースファイルを src フォルダに作成します。ソースファイル名はお好みのものをご設定ください。React のファイル名は、コンポーネント名と一致させていることが多いです。コンポーネント名もお好みで設定できますが、次の点を留意していください。
- 1文字目は大文字のアルファベットから始まる
- PascalCase (複数の単語が連なる場合は最初の文字を大文字にして繋げる様式)が一般的
- ファイル名と一致させる
- あくまで慣例みたなものなので、どうしようもない場合は満たさなくてよい
- 既存のコンポーネント名は利用できない
ここではファイル名を SampleSketch.js とし、コンポーネント名を SampleSketch とします。この SampleSketch コンポーネントに p5.js の描画処理を記述していきます。
import React, { useEffect } from "react";
import p5 from 'p5';

// 描画処理
const circle = (p) => {
  p.setup = () => {
    // セットアップ処理
    p.createCanvas(400, 400);
  };

  p.draw = () => {
    p.background(220);
    p.ellipse(200, 200, 80, 80); // サークルを描画
  };
};

// p5.jsのスケッチコンポーネント
const SampleSketch = () => {
  useEffect(() => {
    new p5(circle); // p5.jsのキャンバスを生成
  }, []);

  return (<></>);
};

export default SampleSketch;
描画処理で定義している circle とその引数はお好みの名前を設定してください。基本的には p.setup() 関数や p.draw() 関数の中身を変更すれば、任意のスケッチが描画できます。注意として、p5.js で実装されている変数や関数、クラスなどは p. に続けて記述する必要があります。次に簡単な例を示します。
- キャンバスの横幅:
p.width - ベクトルの生成:
p.createVector(1, 2)
SampleSketch コンポーネントを利用するために、App.js の内容を次のように変更していきます。
import SampleSketch from "./SampleSketch"

// Appコンポーネントの定義
function App() {
  return (
    <div className="App">
      <h1>Hello, world!</h1>

      {/* p5.jsのスケッチ */}
      <SampleSketch />
    </div>
  );
}

// Appコンポーネントを他のファイルで利用できるようにエクスポート
export default App;
動作確認
先ほどと同様のコマンドで React アプリの動作を確認できます。
npm start
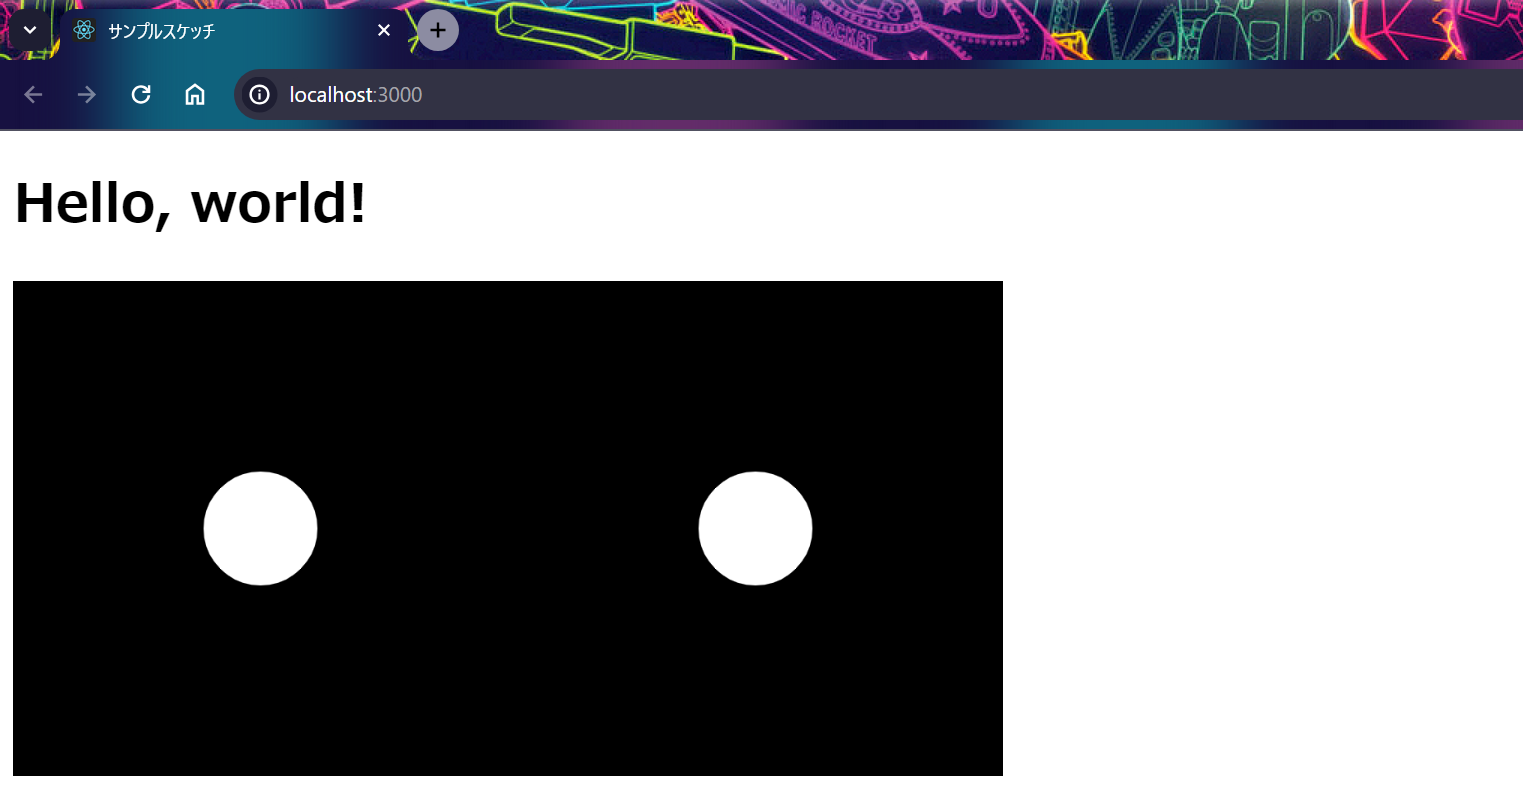
キャンバスが2つ出ることに対しては React の仕様となっています。後に簡単に説明を記します。
キャンバスが2つ出ることの解決策として、レンダリングの設定を 一時的に 変更する方法があります。
- 変更前
root.render(
  // React.StrictModeコンポーネントでアプリケーションをラップする
  <React.StrictMode>
    {/* Appコンポーネントを描画 */}
    <App />
  </React.StrictMode>
);
- 変更後
root.render(
  // React.StrictModeコンポーネントでアプリケーションをラップする
  <App />
);
変更後のコードにおける動作結果を次に示します。
Github Pages へのデプロイ
Github Pages 上でアプリを公開する手順を示します。参考[1] の情報が非常に役に立ちました。
package.json の編集
homepage、scripts フィールドの値を変更します。homepage の アカウント名 と リポジトリ名 はご自身の内容に合わせて変更してください。
  <省略>
  "homepage": "https://アカウント名.github.io/リポジトリ名/",
  "scripts": {
    "start": "react-scripts start",
    "build": "react-scripts build",
    "test": "react-scripts test",
    "eject": "react-scripts eject",
    "rm": "rm -rf docs",
    "mv": "mv build docs",
    "git": "git add . && git commit && git push origin main",
    "deploy": "npm run rm && npm run build && npm run mv && npm run git"
  },
  <省略>
デプロイ
次のコマンドでリポジトリへ push できます。注意として、Windows では rm コマンドが実行できる環境を整える必要があります。環境の例として、Git Bash の端末上で実行が可能です。
npm run deploy
次のログが出力されます。
> プロジェクト名@1.0.0 git
> git add . && git commit && git push origin main

warning: in the working copy of 'docs/asset-manifest.json', LF will be replaced by CRLF the next time Git touches it
warning: in the working copy of 'docs/static/js/main.98587e68.js', LF will be replaced by CRLF the next time Git touches it
warning: in the working copy of 'docs/static/js/main.98587e68.js.LICENSE.txt', LF will be replaced by CRLF the next time Git touches it
hint: Waiting for your editor to close the file...
ここで docs フォルダが作成されます。また、自動的に VSCode など何かしらのテキストエディターで COMMIT_EDITMSG が開かれます。
# Please enter the commit message for your changes. Lines starting
# with '#' will be ignored, and an empty message aborts the commit.
#
# On branch main
# Your branch is up to date with 'origin/main'.
#
# Changes to be committed:
# <変更内容が以下に続く>
<変更内容が以下に続く> 以降の行にある # を外して保存し、エディターを閉じてください。これで変更の内容が Github 上へ反映されます(このコマンドの実行以降に commit や push の操作は不要)。
リポジトリの設定
リポジトリの公開範囲
次の手順でレポジトリの公開範囲を設定します。
- Github のWebサイトでリポジトリのページを開く
-
[Setting > General > Danger Zone]からリポジトリをpublicにする
Github Pages の設定
[Setting > Pages > GitHub Pages > Build and deployment > Branch] で、Branch を main、folder を docs にそれぞれ変更します。
動作の確認
[Actions > All worksflows] でチェックマークがつくと、デプロイが完遂したことを示します。
該当する操作をクリックすると次の画面になります。
deploy の下にある URL をクリックすると動作が確認できます。
プロジェクトに変更を加えたときは、再度 npm run deploy コマンドを実行してデプロイの操作をすれば、変更内容が反映されます。
参考
- [1] ReactをGitHub Pagesにデプロイしよう


