(この記事はZennにも投稿しています)
こんにちは、discord botの開発などをやっているsizumita(Discord: すみどら#8931)と申します。
私が開発をしているPycordの拡張であるdiscord-ext-uiの紹介記事です。
discord.pyを取り巻く環境の変化
今年の8月に、discord.pyの開発者のDannyさんが、discordに対する意見表明と、discord.pyの開発をやめるという文章を公開しました。
これによりPythonのdiscord api wrapperであるdiscord.pyが開発終了し、アーカイブされました。
しかし、そのまま終わるわけにはいかないので、有志がdiscord.pyをforkしたりし、開発を継続しています。
私はこのまま終わったほうがdiscordに対して意見表明した意味があると思っているので、実際はあまり肯定的ではありません。
Pycordとは
Pycordとは、discord.pyをforkしたものを使っているdiscord.pyの後継です。後継の中では一番ユーザーが多く、starも多いためこちらが今後も発展していくと考えています。
discord-ext-uiについて
discord-ext-uiは、元々discord.pyの拡張として作っていました。しかし開発終了したためPycordに移り、ついでにかなりの改良を加え、復活させました。
discord-ext-uiは、SwiftUIのようにdiscordのメッセージを扱えるようなライブラリです。さらにversion 3からSwiftのCombineを模した機能を提供しています。
制作動機
discordにはメッセージにボタンを設置するためのシステムがありますが、discord.pyのボタンの送信の仕組みが私は好きではありませんでした。その頃swiftを触っていたこともあり、SwiftUIのようにViewを記述でき、メッセージの更新も意識することなく実行できればいいなと考えていました。
そこでdiscord-ext-uiを制作し、Viewという単位で綺麗に書けるようにしました。
discord-ext-uiの使い方
Viewを作る
discord-ext-uiの基本単位はViewです。このViewはdiscord.uiのViewとは全く異なります。
from discord.ext.ui import View

view = View()
基本的にこのViewを継承したクラスを作り、そのクラスを使ってプログラムを書いていきます。
from discord.ext.ui import View, Message, Button

class MyView(View):
    async def body() -> Message:
        return Message("Hello, World!").item([Button("hello!")])
このように書くだけでHello, World!と書かれたメッセージにhello!と書かれたボタンが設置されます。
ボタンが押された時の挙動はButtonクラスのon_click関数に関数を渡すことで変更できます。
...
        return Message("Hello, World!").item([
            Button("hello!").on_click(lambda _: print("hello button clicked"))
	])
渡す関数の第一引数は押されたボタンのdiscord.Interactionです。on_clickには普通の関数も子ルーチン関数もどちらも渡すことができます。
Viewを送信する
Viewを送信するためには、ViewTrackerを使います。ViewTracker.track関数にProviderを渡すことで任意の方法でViewを表示することができます。
from discord.ext.ui import ViewTracker, MessageProvider

@client.event
async def on_message(message: discord.Message):
    view = MyView()
    tracker = ViewTracker(view)
    await tracker.track(MessageProvider(message.channel))
MessageProviderはその名の通り通常のメッセージの形で送信するためのProviderです。
Interactionの返信として送信するためのInteractionProviderも存在しています。自分で作りたい場合はBaseProviderを継承してください。
変数が変更された時にViewを更新する
ボタンを押されたときにメッセージを変更したいですよね。そんな時に毎回discord.Message.editを実行するのは辛いと思います。そこで、discord-ext-uiではView内で変数が変更された時に自動的に更新できるようにしました。
from discord.ext.ui import View, Message, Button, state

class MyView(View):
    status: int = state("status")
    def __init__(self):
        super().__init__()
	self.status = 0

    def update_status(self, _):
        self.status = 1

    async def body() -> Message:
        if self.status == 0:
	    return Message("Hello, World!").item([
		    Button("nice to meet you!")
		    .on_click(self.update_status)
		])
	return Message("You too!")
status: int = state("status")のように、クラス変数をstate関数を使って定義すると、これがpropertyになります。これによってその変数が変更されたことを検知してViewを更新することができます。
引数はその変数が保存される実体の名前です。これはクラス変数のような見た目をしていますが、実際にはクラス変数ではなくインスタンス変数の挙動をします(@propertyとして定義した関数と同じような挙動をします)。
discord-ext-uiでMVVMをする
discord-ext-uiではSwiftUIのObservableObjectと同じような挙動をするObservableObjectと、@Publishedと同じような挙動をするpublishedがあります。
さらに、SwiftのCombineと同じような挙動をするdiscord.ext.ui.combineモジュールがあります。これらを使って、MVVM的な開発ができます。
ここでは こちらの記事と同じような、Qiitaの記事を一覧表示するプログラムを作ってみましょう。
完成品はGithubにあります。
Modelをつくる
まず、記事のデータの構造体を定義しましょう。ここではjsonを使うためTypedDictを使ってみます。
from typing import TypedDict

class Article(TypedDict):
    id: str
    title: str
    url: str
Protocolをつくる
Qiitaの記事を取得するfetch関数を持っているプロトコルを作成します。
from discord.ext.ui.combine import AsyncPublisher

class ArticleProtocol:
    async def fetch(self) -> AsyncPublisher:
        raise NotImplementedError
AnyPublisherをつくることができていないので、AsyncPublisher(PublisherのAsyncio版)を返しています。
リクエストするクラスを作る
先ほど作ったArticleProtocolに準拠しています。
class ArticleRequest(ArticleProtocol):
    scheme = "https"
    host = "qiita.com"
    base_path = "/api/v2"

    def fetch(self) -> AsyncPublisher:
        return URLRequestPublisher(self.api_components("/items")).json()

    def api_components(self, path: str) -> str:
        return f"{self.scheme}://{self.host}{self.base_path}{path}"
fetch関数ではqiitaのAPIから記事一覧を取ってきて、json関数でdictに変換するところまでが実装されています。
ViewModelをつくる
ここからが本題です。状態を持っているViewModelを作成します。
class ViewModel(ObservableObject):
    articles: list[Article] = published("articles")
    is_loading = published("is_loading")

    def __init__(self):
        super().__init__()
        self.articles = []
        self.is_loading = True
        self._article_request = ArticleRequest()

    async def fetch_articles(self):
        await self._article_request.fetch()\
            .sink(lambda x: self.articles.extend(x))
        self.is_loading = False
articles変数で記事一覧を持ち、is_loading変数で状態を管理しています。fetch_articles関数を実行することで記事一覧をQiita APIから取得しarticles変数に格納しています。
Viewをつくる
記事一覧を表示するViewを作成します。
view_model関数としてViewModelを保持し、bodyでis_loading変数によって出力を切り替えています。
class SampleView(View):
    def __init__(self):
        super().__init__()
        self.view_model = ViewModel()

    async def body(self) -> Message:
        if self.view_model.is_loading:
            return Message("Now loading...")
        if not self.view_model.articles:
            return Message("No results")
        return Message(
            embeds=[
                discord.Embed(
                    title="Qiita articles",
                    description="\n".join(
                        [f'[{x["title"]}]({x["url"]})' for x in self.view_model.articles]
                    )
                )
            ]
        )

    async def on_appear(self) -> None:
        await self.view_model.fetch_articles()
Viewのon_appear関数はViewが最初に表示された時に実行されます(SwiftUIで言う.onAppear)。そこで記事取得のリクエストをしています。
このようにとても綺麗にQiitaの記事取得ができました。ローディング画面を作るのも簡単です。
他のサンプルはこちらにあります: https://github.com/sizumita/discord-ext-ui/tree/master/samples
便利なView
PaginationView
class Page(PageView):
    def __init__(self, content: str):
        super(Page, self).__init__()
        self.content = content

    async def body(self, _paginator: PaginationView) -> Message | View:
        return Message(self.content)

    async def on_appear(self, paginator: PaginationView) -> None:
        print(f"appeared page: {paginator.page}")


@client.event
async def on_message(message: discord.Message):
    if message.content != "!test":
        return

    view = PaginationView([
        Page("The first page -- Morning --"),
        Page("The second page -- Noon --"),
        Page("The third page -- Afternoon --"),
        Page("The forth page -- Evening --"),
        Page("The last page -- Good night! --"),
    ])
    tracker = ViewTracker(view, timeout=None)
    await tracker.track(MessageProvider(message.channel))
Alert
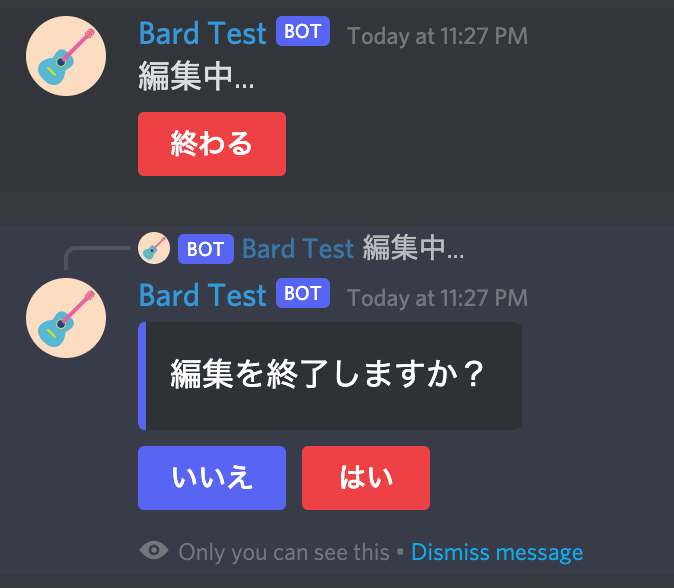
alert = Alert("編集を終了しますか?", "", [
    ActionButton("いいえ", discord.ButtonStyle.blurple, value=False),
    ActionButton("はい", discord.ButtonStyle.danger, value=True)
], ephemeral=True)
value: bool = await alert.wait_for_click(interaction)
このように書くだけで、ボタン付きアラートを表示できます。設定したvalueが返り値として帰ってきます。
最後に
SwiftUI likeとCombine likeな機能により、とても綺麗にdiscordで表示することができました。今後も開発を続けていきたいですが、Combineへの理解が足りなかったり、あまり綺麗に実装ができないことがあるかもしれません。また、テストなども不十分です。ぜひみなさんにもコントリビュートしていただきたいです。
Star, Fork, PR, issue等待ってます!

