Azure IoTの公式チュートリアルをやってみました。
必要なもの
- Azureアカウント
- Raspberry Pi
- BME280 センサー
- ブレッドボードとLEDとF/Mジャンパーワイヤ
作業概要
チュートリアル:Raspberry Pi の Azure IoT Hub への接続 (Python)
1. IoT Hubの作成とデバイスの登録
2. Raspberry Pi のセットアップ
3. Pi でのサンプル アプリケーションの実行
チュートリアル:iothub-explorer を使用してデバイスと IoT Hub 間でメッセージを送受信する
4. D2C メッセージの監視
5. C2D メッセージの送信
1. IoT Hubの作成とデバイスの登録
チュートリアル通り、IoT Hubを作成後、デバイスをIoT Hubに登録します。
この後の手順で利用する接続文字列は下記2種類あります。
- IoT Hubの接続文字列
- [共有アクセスポリシー] - [iothubowner] - [接続文字列]
- デバイスの接続文字列
- [デバイスエクスプローラー] - [作成したデバイス] - [接続文字列]
2. Raspberry Pi のセットアップ
チュートリアル通り、Raspberry PiのSSHとI2Cを有効にします。
センサーとRaspberry Piの接続ですが、購入したセンサーとチュートリアルで利用しているセンサーのピン配置等が異なるので、以下図示します。
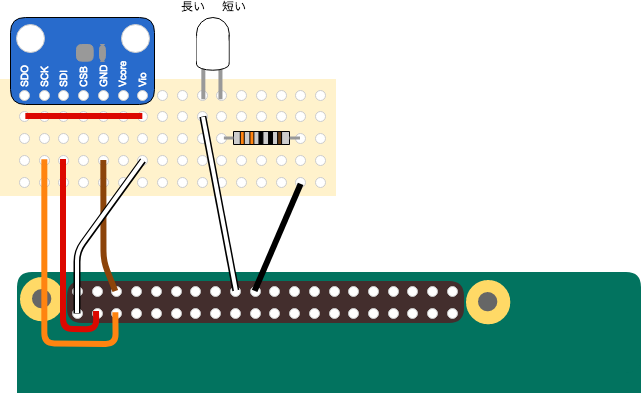
このチュートリアルのI2Cアドレスのデフォルト設定は0x77なので、SDO端子をVioにつないでおきます。
- SDO端子をGNDにつなぐと0x76
- SDO端子をVioにつなぐと0x77
3. Pi でのサンプル アプリケーションの実行
サンプルアプリケーションをビルドします。
ビルドは1時間位かかります。
$ git clone https://github.com/Azure-Samples/iot-hub-python-raspberrypi-client-app.git
$ cd iot-hub-python-raspberrypi-client-app
$ sudo chmod u+x setup.sh
$ sudo ./setup.sh
サンプルアプリケーションを実行します。
メッセージがIoT Hubに送信されるタイミングでLEDがピカピカします。
$ python app.py 'デバイスの接続文字列'

Python 2.7.9 (default, Sep 17 2016, 20:26:04)
[GCC 4.9.2]
IoT Hub Client for Python
IoTHubClient is reporting state
IoTHubClient sending 0 messages
{"deviceId": "Raspberry Pi - Python","temperature": 16.959849,"humidity": 49.980433}
IoTHubClient.send_event_async accepted message [0] for transmission to IoT Hub.
Send status: BUSY
Confirmation[0] received for message with result = OK
    message_id: message_0
    correlation_id: correlation_0
    Properties: {'temperatureAlert': 'false'}
    Total calls confirmed: 1
Confirmation for reported state received with:
status_code = [204]
context = 0
    Total calls confirmed: 1

Twin callback called with:
updateStatus = COMPLETE
payload = {
  "desired": {
    "$version": 1
  },
  "reported": {
    "newState": "standBy",
    "$version": 3
  }
}
context = 0
Total calls confirmed: 1

IoTHubClient sending 1 messages
{"deviceId": "Raspberry Pi - Python","temperature": 16.929434,"humidity": 50.008193}
IoTHubClient.send_event_async accepted message [1] for transmission to IoT Hub.
Send status: BUSY
Confirmation[1] received for message with result = OK
    message_id: message_1
    correlation_id: correlation_1
    Properties: {'temperatureAlert': 'false'}
    Total calls confirmed: 2
4. D2C メッセージの監視
iothub-explorerをPCにインストールします。
$ npm install -g iothub-explorer
下記コマンドでD2Cメッセージを監視します。
デバイスIDは、デバイスを登録する時に指定した値です。
$ iothub-explorer monitor-events デバイスID --login "IoT Hub接続文字列"

Monitoring events from device dev001...
==== From: dev001 ====
{
  "deviceId": "Raspberry Pi - Python",
  "temperature": 17.193032,
  "humidity": 51.579956
}
---- application properties ----
{
  "temperatureAlert": "false"
}
====================
==== From: dev001 ====
{
  "deviceId": "Raspberry Pi - Python",
  "temperature": 17.208239,
  "humidity": 51.301047
}
---- application properties ----
{
  "temperatureAlert": "false"
}
====================
==== From: dev001 ====
{
  "deviceId": "Raspberry Pi - Python",
  "temperature": 17.208239,
  "humidity": 51.296227
}
---- application properties ----
{
  "temperatureAlert": "false"
}
====================
5. C2Dメッセージの送信
Raspberry Piのサンプルアプリのメッセージ送信間隔を変更して、C2Dメッセージのコンソール表示がD2Cメッセージの表示に埋もれてしまわないようにします。
メッセージの送信間隔 2000ミリ秒(=2秒) → 200000ミリ秒(=200秒)
$ vi config.py
$ cat config.py
MESSAGE_TIMESPAN = 200000
SIMULATED_DATA = False
I2C_ADDRESS = 0x77
GPIO_PIN_ADDRESS = 24
BLINK_TIMESPAN = 1000
$ python app.py 'デバイスの接続文字列'
PCから、C2Dメッセージの送信を命令します。
$ iothub-explorer login 'IoT Hubの接続文字列'
$ iothub-explorer send デバイスID '送信するメッセージ'
Message sent with id: 08d8f17d-e62d-4e60-80c7-6e6a4d891375
Raspberry Pi上のコンソールに受信したC2Dメッセージが表示されます。
Confirmation[0] received for message with result = OK
    message_id: message_0
    correlation_id: correlation_0
    Properties: {'temperatureAlert': 'false'}
    Total calls confirmed: 1
Received Message [0]:
    Data: <<<dummy>>> & Size=5
    Properties: {}
    Total calls received: 2
Received Message [0]:
    Data: <<<dummy>>> & Size=5
    Properties: {}
    Total calls received: 3
雑感
- IoT Hubを[F1 - Free]で作成した場合、すぐにメッセージの上限に達してしまうので、注意が必要です。1日経つと元に戻ります。
- 一番頑張ったのは、配線図のような。。。