Coginit User Poolsにフェデレーション等の新機能が追加されましたが
新機能のサインアップ・サインイン画面をiOSから試してみました。
https://aws.amazon.com/jp/about-aws/whats-new/2017/08/amazon-cognito-launches-general-availability-of-a-built-in-customizable-user-experience-for-sign-in-oauth-2-0-support-and-federation-with-facebook-login-with-amazon-google-and-saml-providers-for-user-pools/
環境
- xcode
- aws sdk
作業概要
iOSからCognitoでサインアップ(サインイン)後、払い出されたCredentialの確認のためPollyに喋らせてみたいと思います。
- UserPoolを作成する
- Identity Poolを作成する
- xcodeでコードを書く
- Polly実行用にIAM Roleを設定する
- Simulatorで実行する
1. UserPoolを作成する
- AWSマネジメントコンソールにログインして、Cognito User Poolsを選択する
- Pool名(MyPool)を指定して、User Poolを作成する(全てデフォルト設定)
- App Clientを追加する
- [General settings]-[App Clients]を選択する
- Client名(MyApp)を指定して、Clientを追加する(全てデフォルト設定)
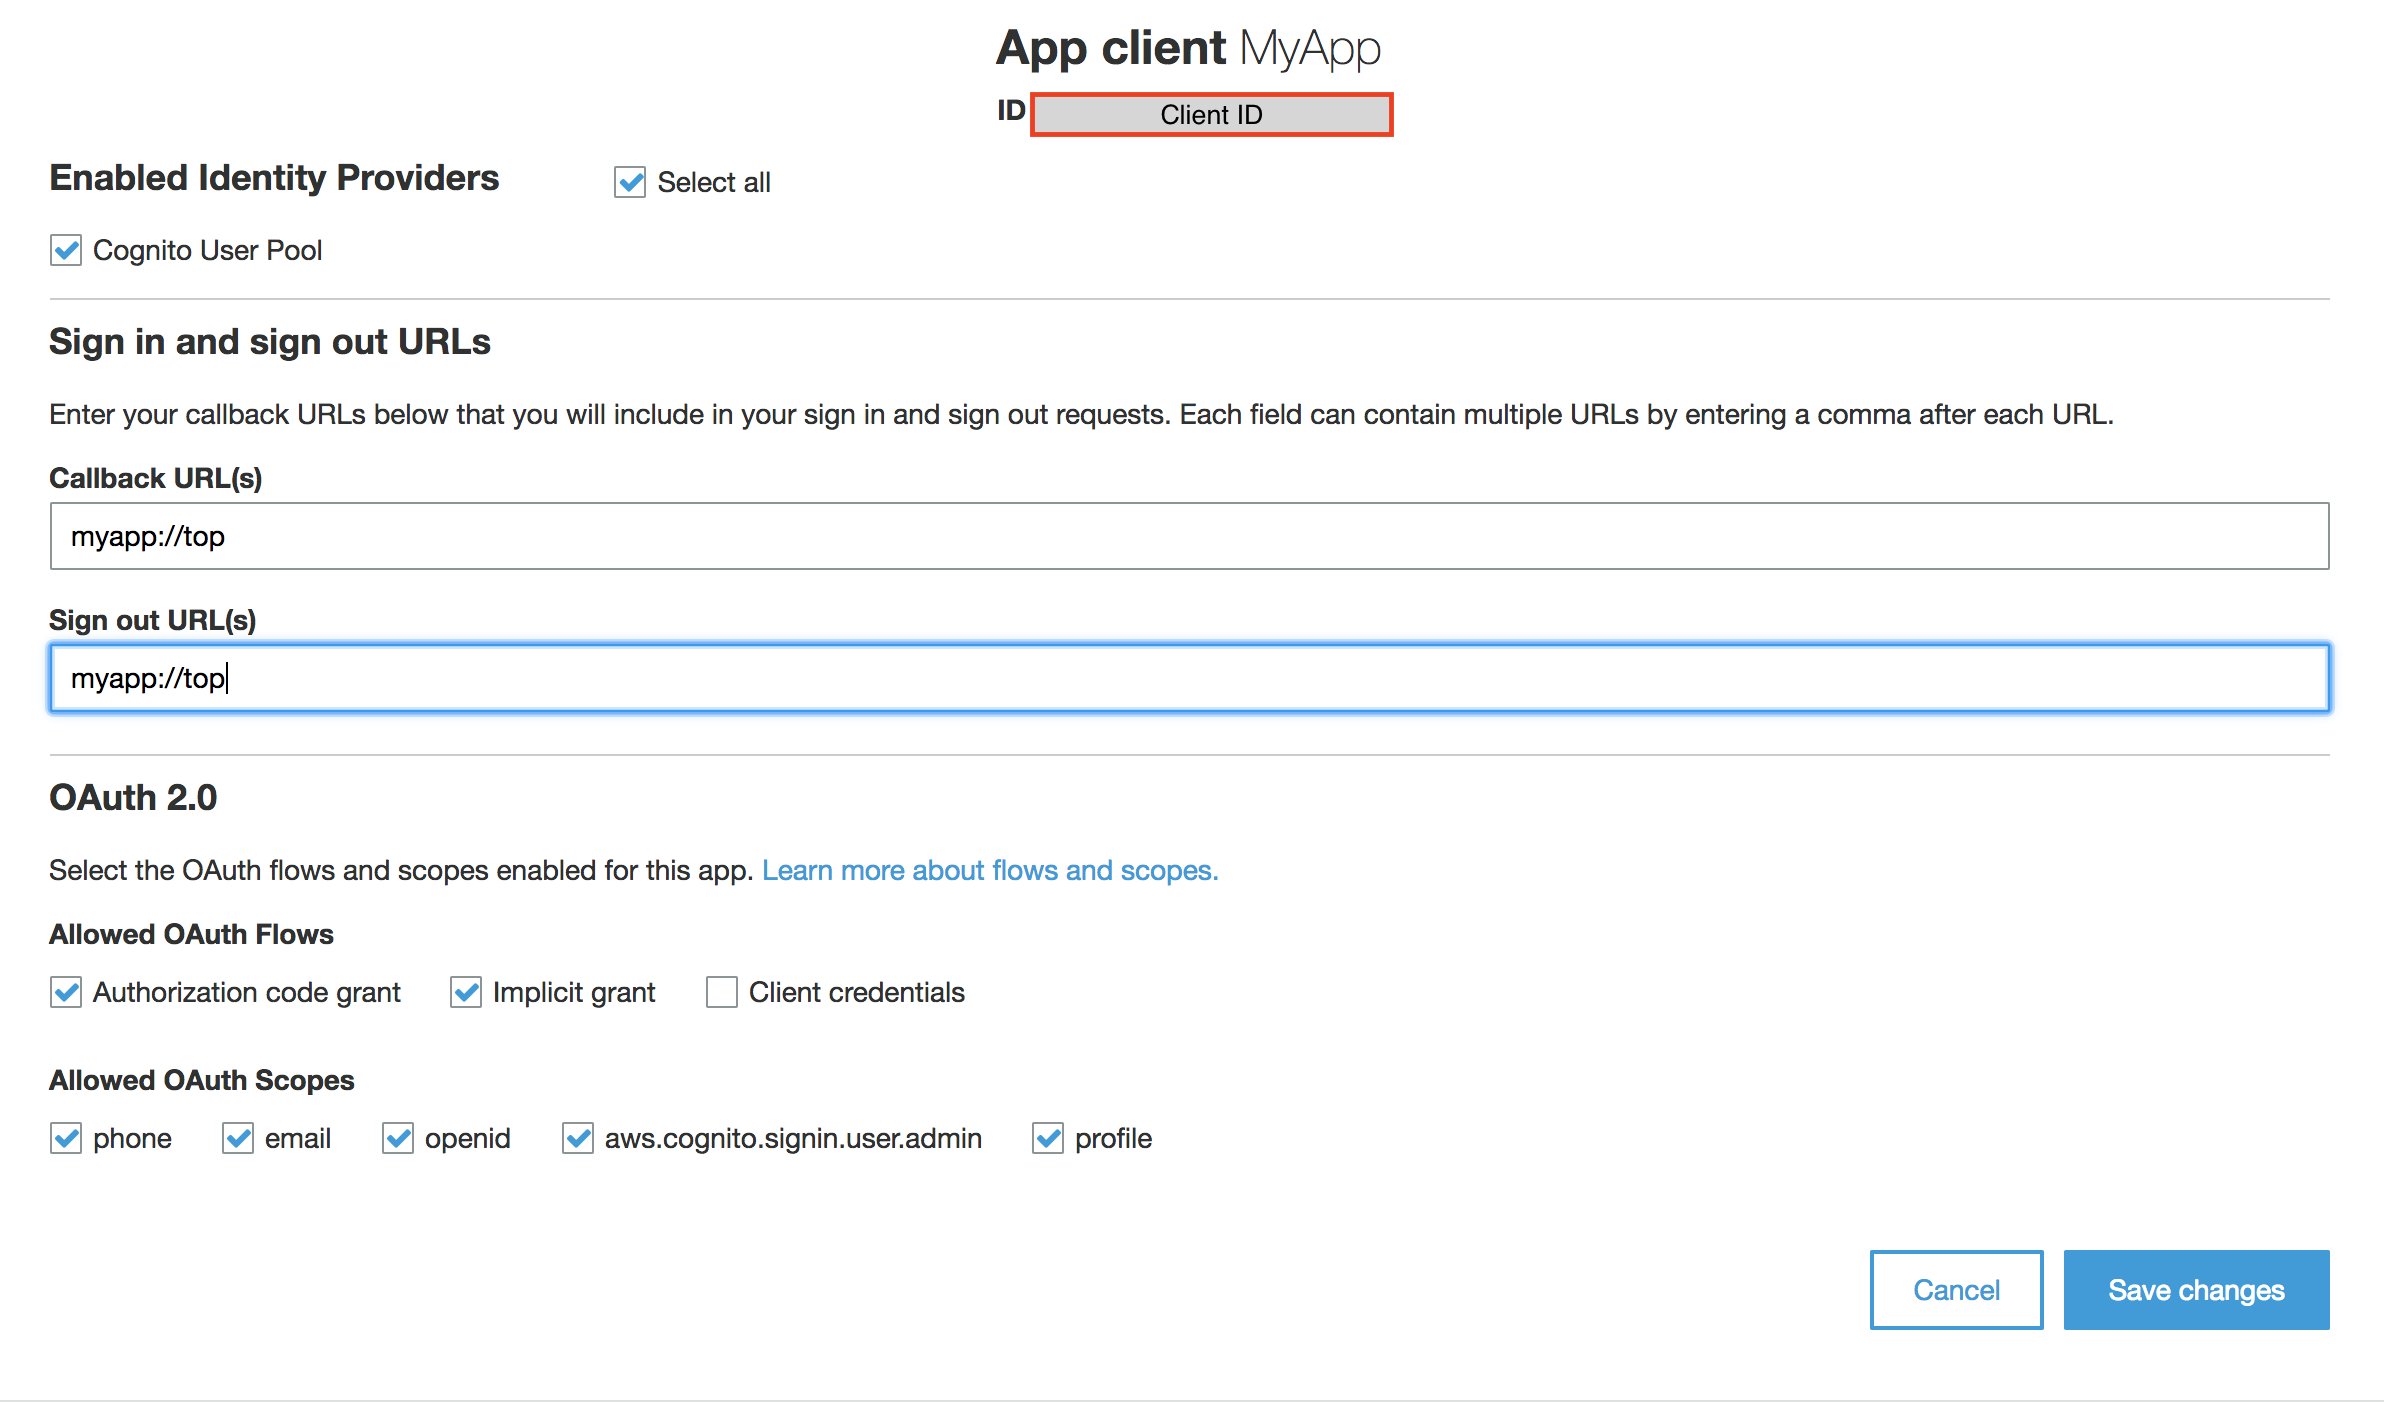
- App Integrationを設定する
- App client settingsを以下のように指定
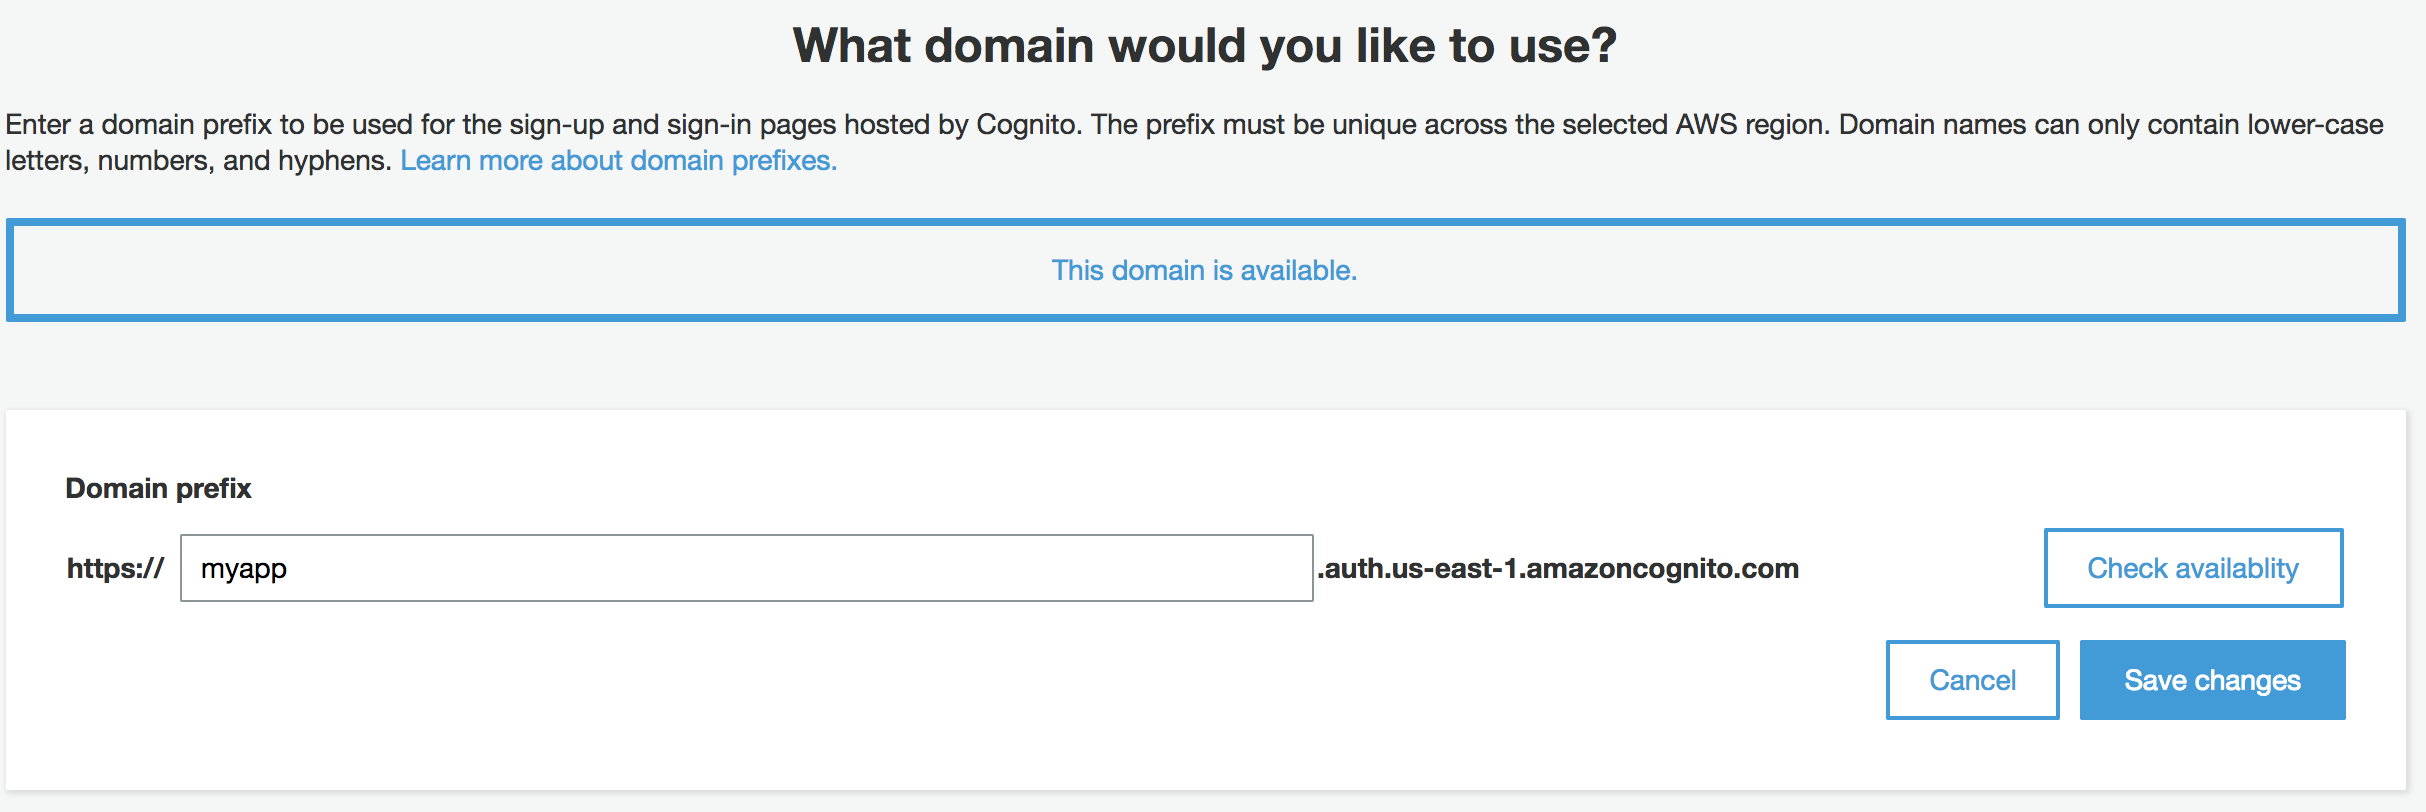
 2. Domain Nameを以下のように指定

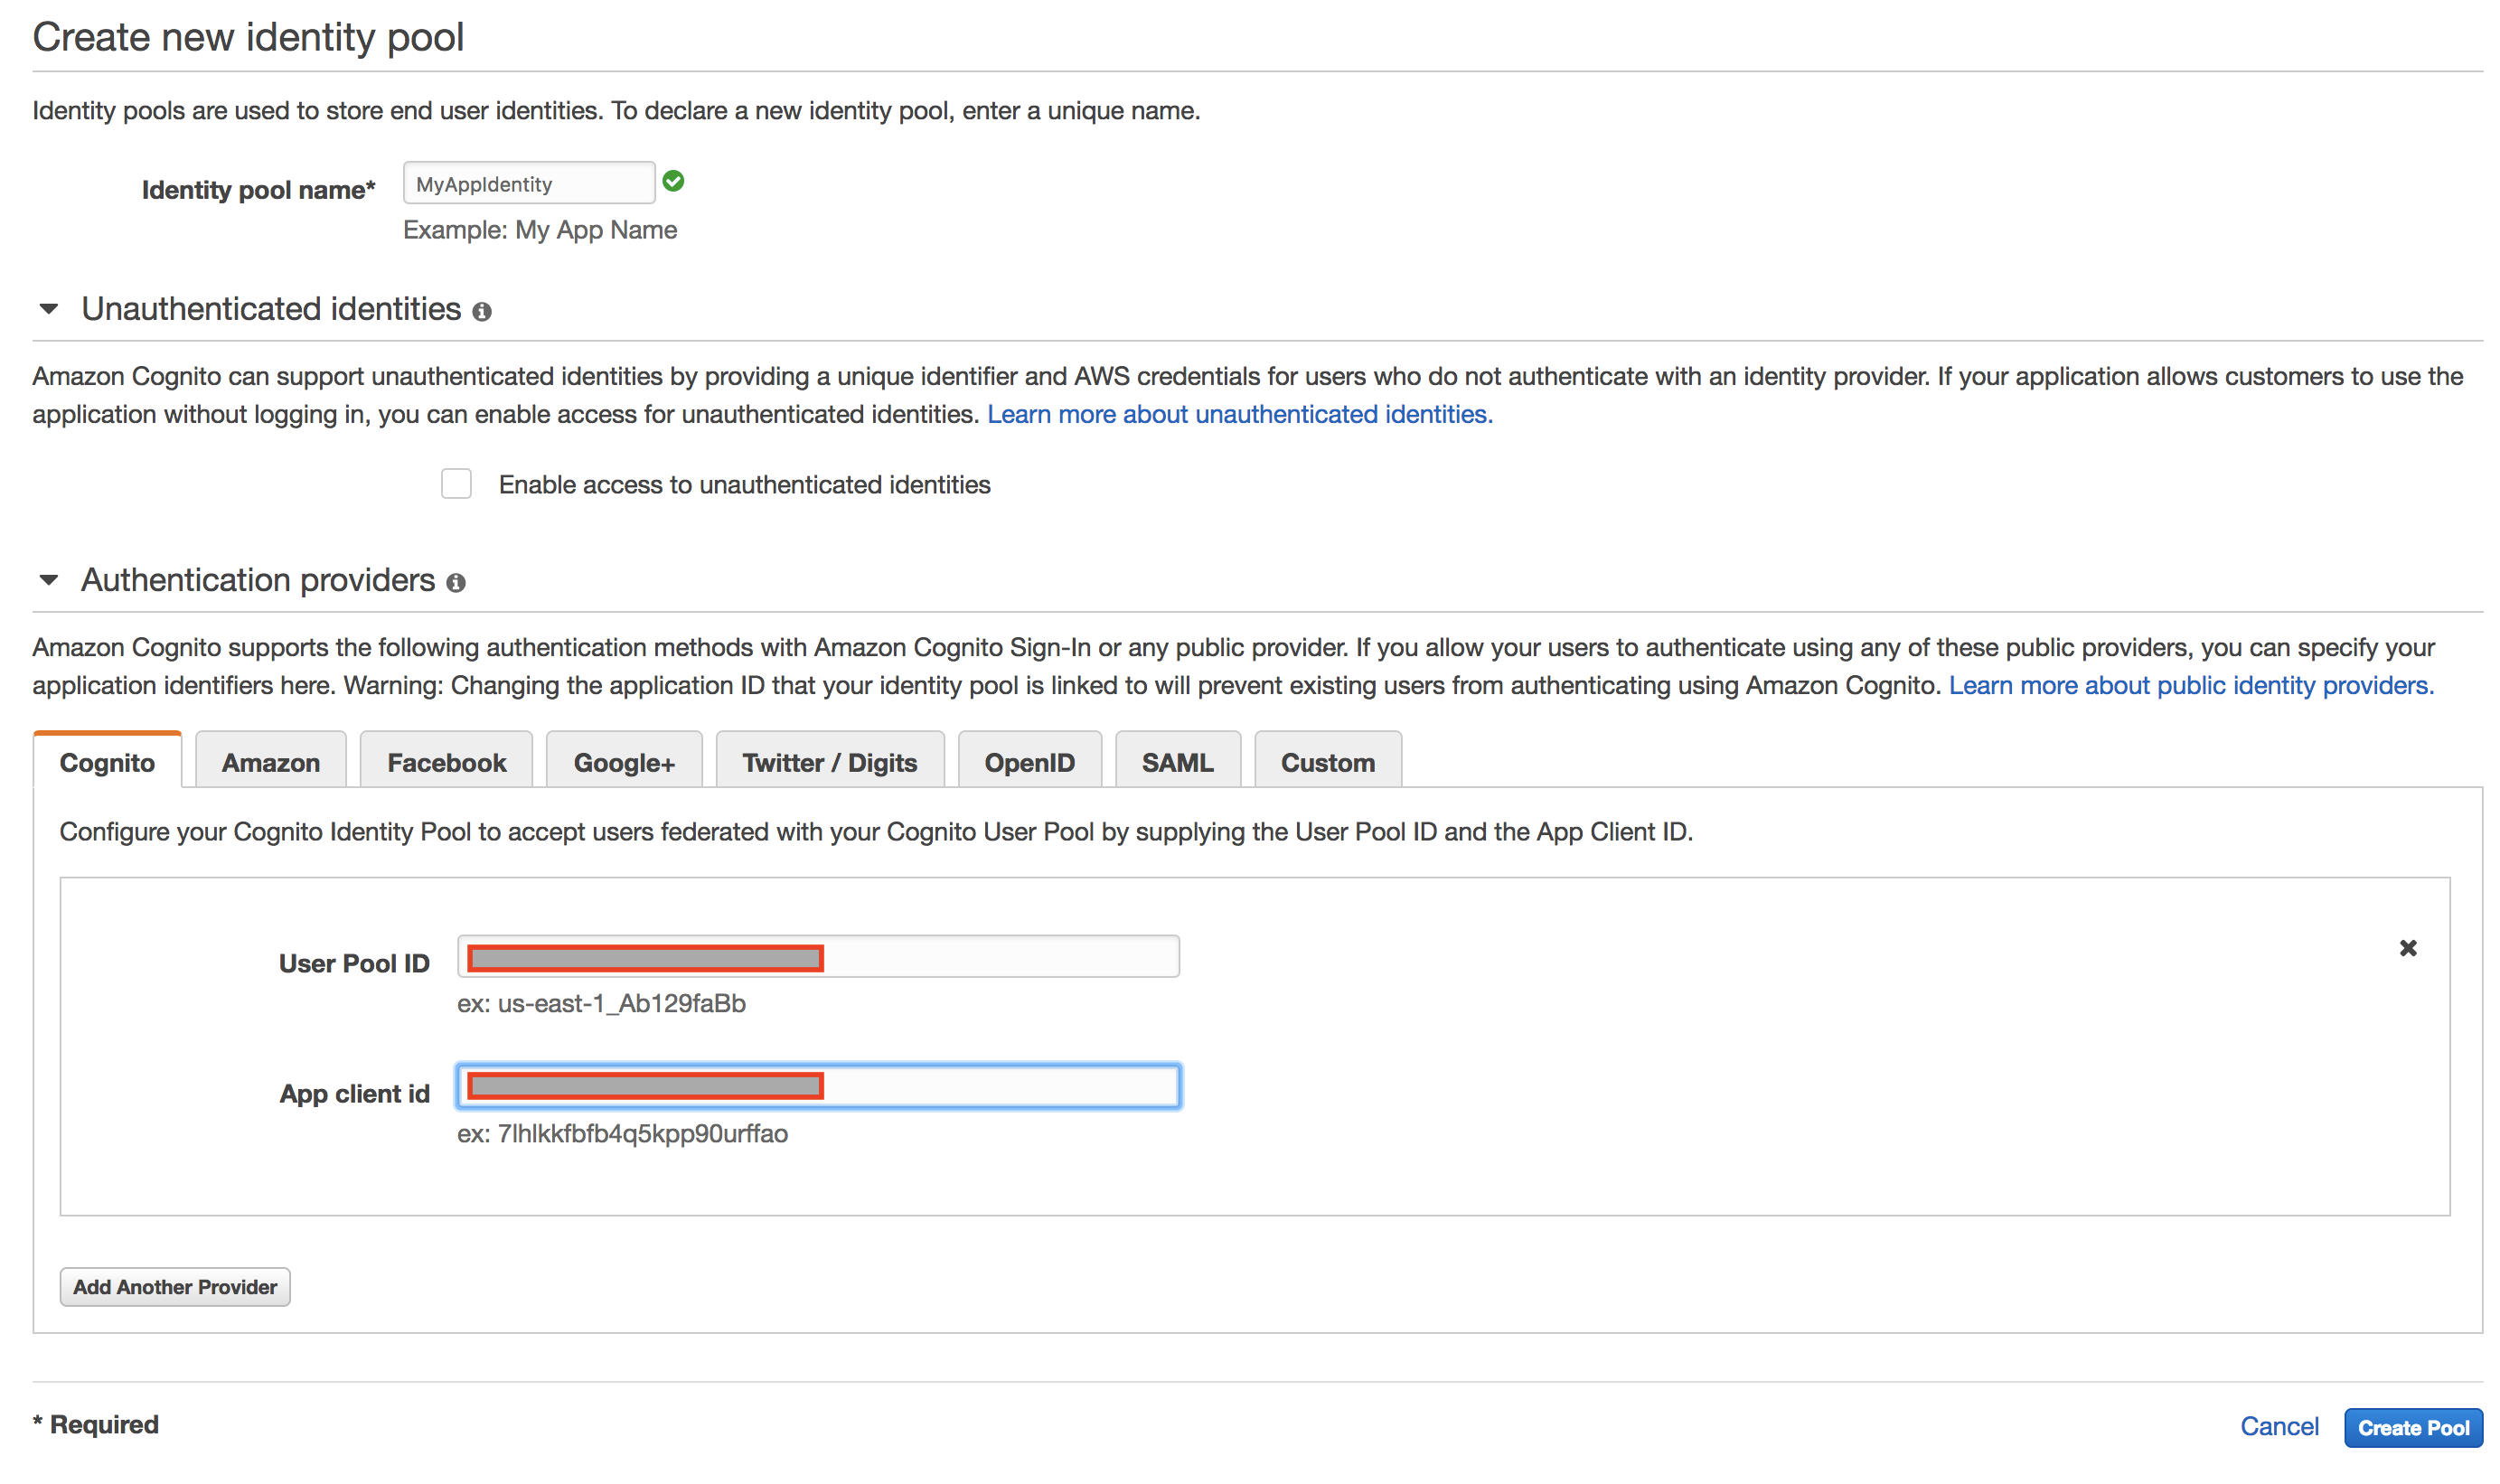
2. Identity Poolを作成する
- Federated Identitiesを選択し、User Pools画面から切替
- Identity Pool name(MyAppIdentity)とUser Pool IDとApp client idを指定してIdentity Poolを作成
3. xcodeでコードを書く
参考URL
https://github.com/awslabs/aws-sdk-ios-samples/tree/master/CognitoAuth-Sample
http://docs.aws.amazon.com/cognito/latest/developerguide/amazon-cognito-integrating-user-pools-with-identity-pools.html
Info.plist(抜粋)
<key>NSAppTransportSecurity</key>
	<dict>
		<key>NSExceptionDomains</key>
		<dict>
			<key>amazonaws.com</key>
			<dict>
				<key>NSThirdPartyExceptionMinimumTLSVersion</key>
				<string>TLSv1.0</string>
				<key>NSThirdPartyExceptionRequiresForwardSecrecy</key>
				<false/>
				<key>NSIncludesSubdomains</key>
				<true/>
			</dict>
			<key>amazonaws.com.cn</key>
			<dict>
				<key>NSThirdPartyExceptionMinimumTLSVersion</key>
				<string>TLSv1.0</string>
				<key>NSThirdPartyExceptionRequiresForwardSecrecy</key>
				<false/>
				<key>NSIncludesSubdomains</key>
				<true/>
			</dict>
		</dict>
	</dict>
    <key>AWS</key>
    <dict>
        <key>CognitoUserPool</key>
        <dict>
            <key>Default</key>
            <dict>
                <key>CognitoUserPoolAppClientId</key>
                <string>****************************</string>
                <key>CognitoUserPoolAppClientSecret</key>
                <string>****************************</string>
                <key>CognitoAuthWebDomain</key>
                <string>https://myapp.auth.us-east-1.amazoncognito.com</string>
                <key>CognitoAuthSignInRedirectUri</key>
                <string>myapp://top</string>
                <key>CognitoAuthSignOutRedirectUri</key>
                <string>myapp://top</string>
                <key>CognitoAuthScopes</key>
                <array>
                    <string>openid</string>
                </array>
            </dict>
        </dict>
    </dict>
	<key>CFBundleURLTypes</key>
	<array>
		<dict>
			<key>CFBundleURLSchemes</key>
			<array>
				<string>myapp</string>
			</array>
			<key>CFBundleURLName</key>
			<string>${PRODUCT_BUNDLE_IDENTIFIER}</string>
		</dict>
	</array>
AppDelegate.swift(抜粋)
    func application(_ app: UIApplication, open url: URL, options: [UIApplicationOpenURLOptionsKey : Any] = [:]) -> Bool {
        return AWSCognitoAuth.default().application(app, open: url, options: options)
    }

    func application(_ application: UIApplication, didFinishLaunchingWithOptions launchOptions: [UIApplicationLaunchOptionsKey: Any]?) -> Bool {
        let clientId = "App Client IDを指定"
        let clientSecret = "App Client Secretを指定"
        let poolId = "User Pool IDを指定"
        let identityPoolId = "Identity Pool IDを指定"

        let serviceConfiguration = AWSServiceConfiguration(
            region: .USEast1, // リージョンを指定(ここではバージニア)
            credentialsProvider: nil)

        let userPoolConfiguration = AWSCognitoIdentityUserPoolConfiguration(
            clientId: clientId,
            clientSecret: clientSecret,
            poolId: poolId)

        AWSCognitoIdentityUserPool.register(
            with: serviceConfiguration,
            userPoolConfiguration: userPoolConfiguration,
            forKey: "UserPool")

        let pool = AWSCognitoIdentityUserPool(forKey: "UserPool")

        let credentialsProvider = AWSCognitoCredentialsProvider(
            regionType: .USEast1, // リージョンを指定(ここではバージニア)
            identityPoolId: identityPoolId,
            identityProviderManager:pool)

        let configuration = AWSServiceConfiguration(
            region: .USEast1,  // リージョンを指定(ここではバージニア)
            credentialsProvider: credentialsProvider
        )
        AWSServiceManager.default().defaultServiceConfiguration = configuration

        return true
    }
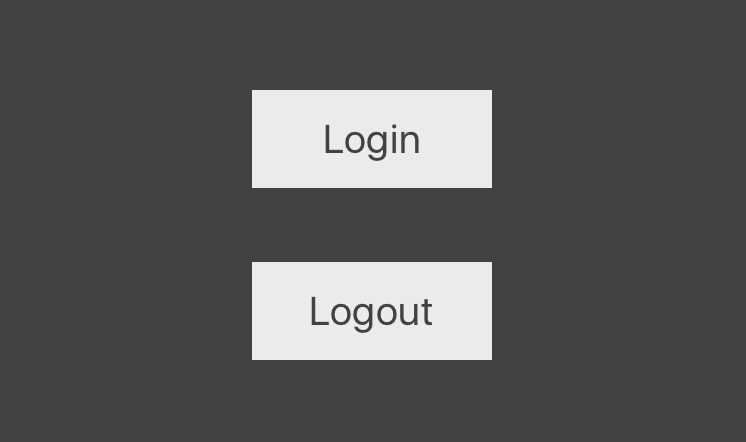
ログインボタンとログアウトボタンを配置する
ViewController.swift
import UIKit
import AWSCognitoAuth
import AWSCognitoIdentityProvider
import AVFoundation
import AWSPolly

class ViewController: UIViewController, AWSCognitoAuthDelegate {
    var audioPlayer = AVPlayer()
    let cognitoAuth = AWSCognitoAuth.default()

    override func viewDidLoad() {
        super.viewDidLoad()
        cognitoAuth.delegate = self as AWSCognitoAuthDelegate
    }

    func getViewController() -> UIViewController {
        return self
    }

    override func didReceiveMemoryWarning() {
        super.didReceiveMemoryWarning()
    }

    @IBAction func LoginButtonAction(_ sender: Any) {
        cognitoAuth.getSession(self)  { (session:AWSCognitoAuthUserSession?, error:Error?) in
            if(error != nil) {
                print((error! as NSError).userInfo["error"] as? String)
            }else {
                let message = "<speak>Hello World!</speak>"
                self.talkmessage(message: message)
                print("login")
            }
        }
    }

    @IBAction func LogoutButtonAction(_ sender: Any) {
        cognitoAuth.signOut { (error:Error?) in
            if(error != nil) {
                print((error! as NSError).userInfo["error"] as? String)
            }else {
                print("logout")
            }
        }
    }

    func talkmessage(message:String) {
        let input = AWSPollySynthesizeSpeechURLBuilderRequest()

        input.textType = AWSPollyTextType.ssml
        input.text = message
        input.outputFormat = AWSPollyOutputFormat.mp3
        input.voiceId = AWSPollyVoiceId.mizuki

        let builder = AWSPollySynthesizeSpeechURLBuilder.default().getPreSignedURL(input)

        builder.continueOnSuccessWith(block: { (awsTask: AWSTask<NSURL>) -> Any? in
            let url = awsTask.result!
            self.audioPlayer.replaceCurrentItem(with: AVPlayerItem(url: url as URL))
            self.audioPlayer.play()

            return nil
        })
    }
}
4. Polly実行用にIAM Roleを設定する
- AWSマネジメントコンソールにログインして、IAM - Rolesを選択する
- 認証されたユーザー用ロール(ここではCognito_MyAppIdentityAuth_Role)に、AmazonPollyFullAccessポリシーをアタッチする
5. Simulatorで実行する
Loginボタンをクリックする
サインアップ画面とサインイン画面
- サインアップ画面

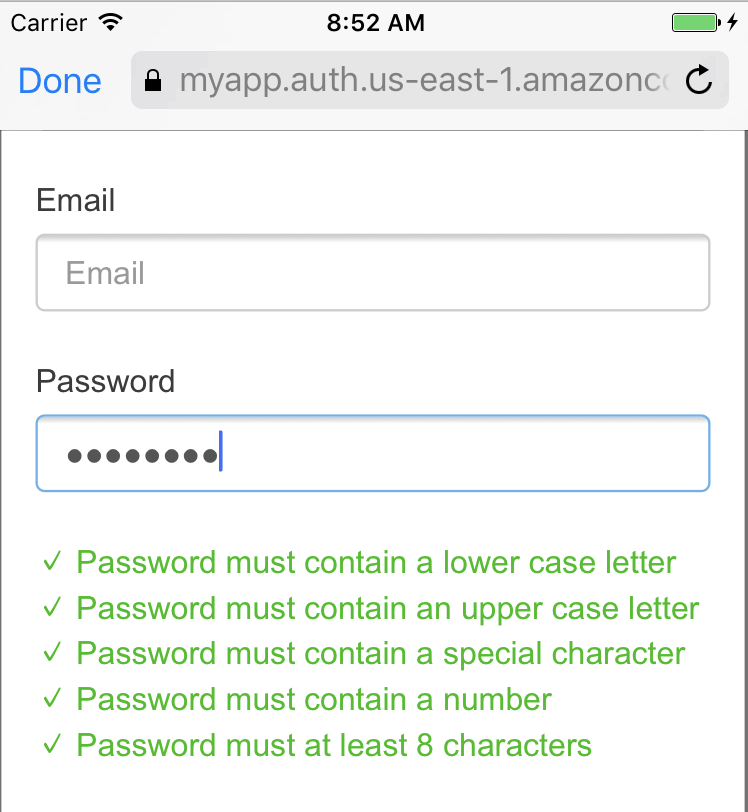
- パスワード入力中の画面
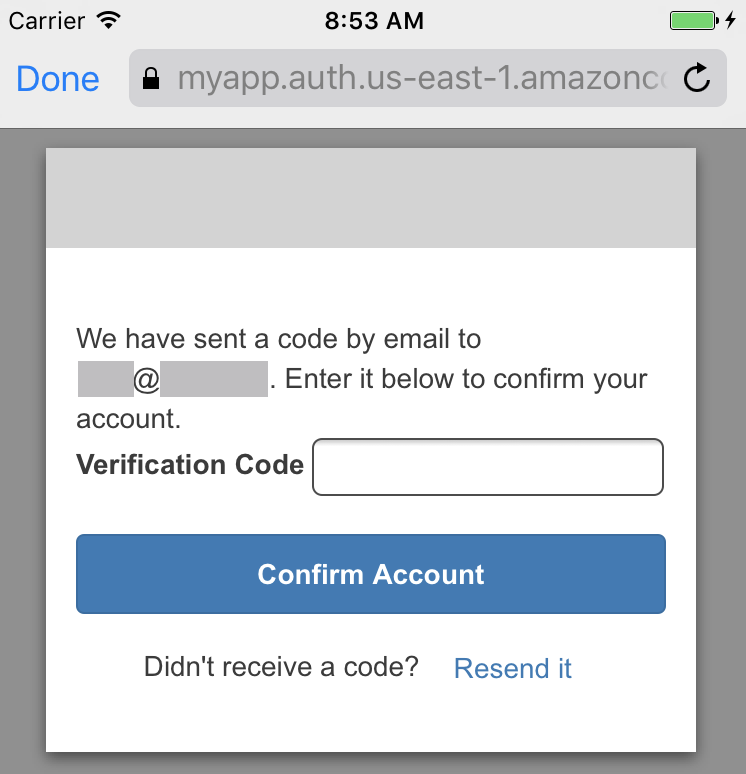
- Verify画面
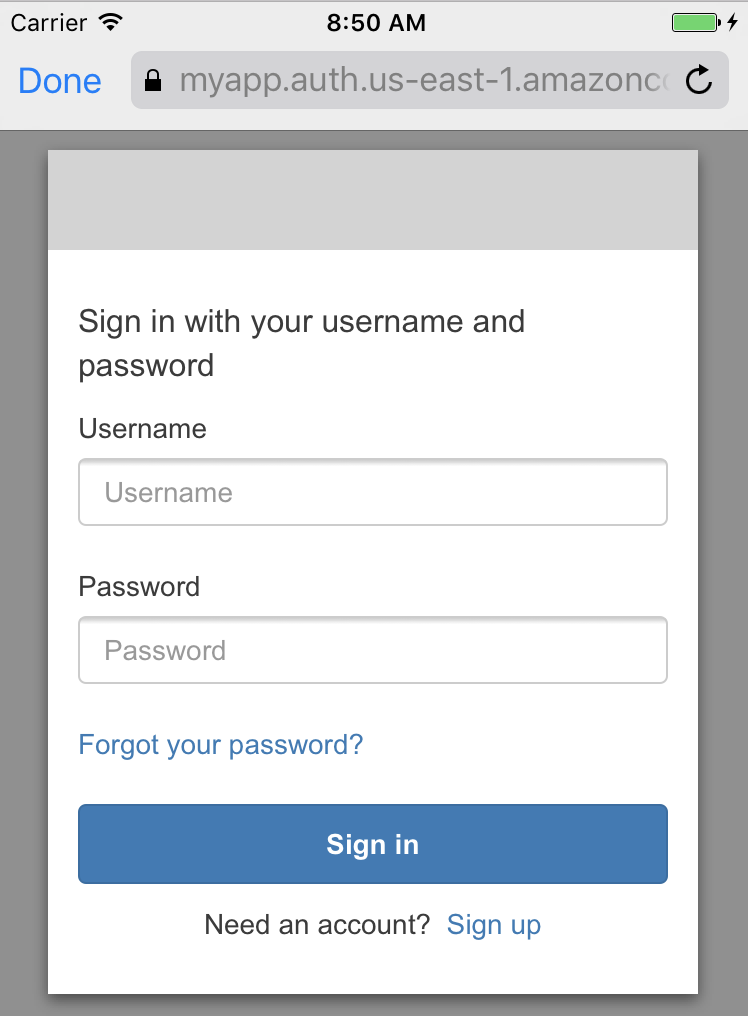
- サインイン画面
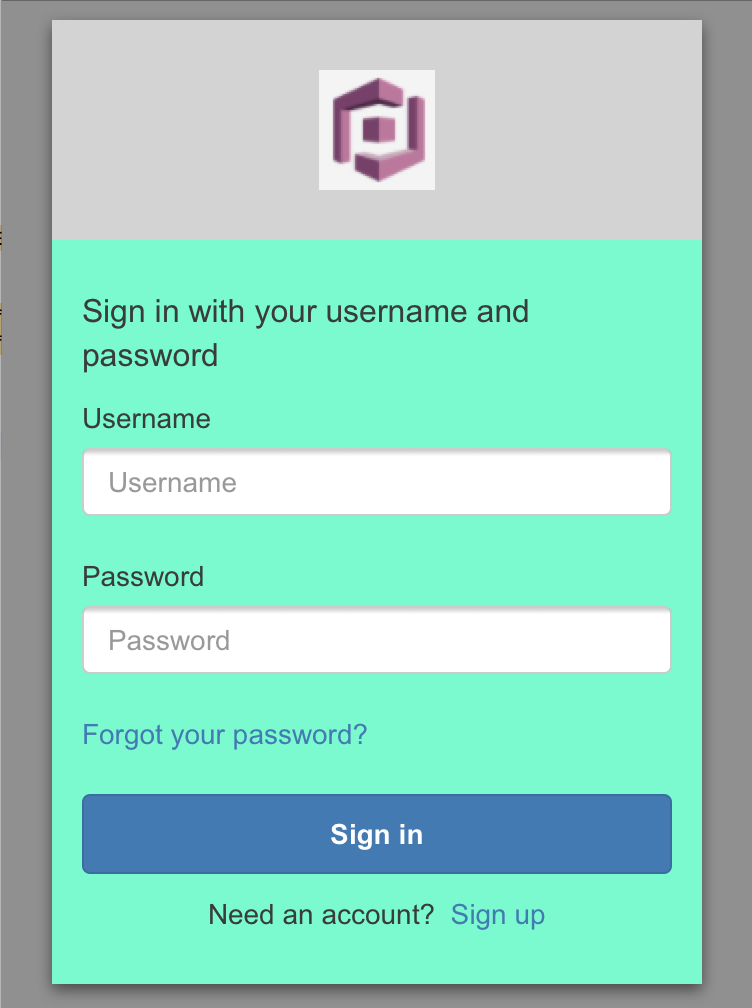
- サインイン画面(背景色変更・ロゴ表示)
雑感
今回の機能拡張で、Cognitoは一段と使いやすくなったと思います。