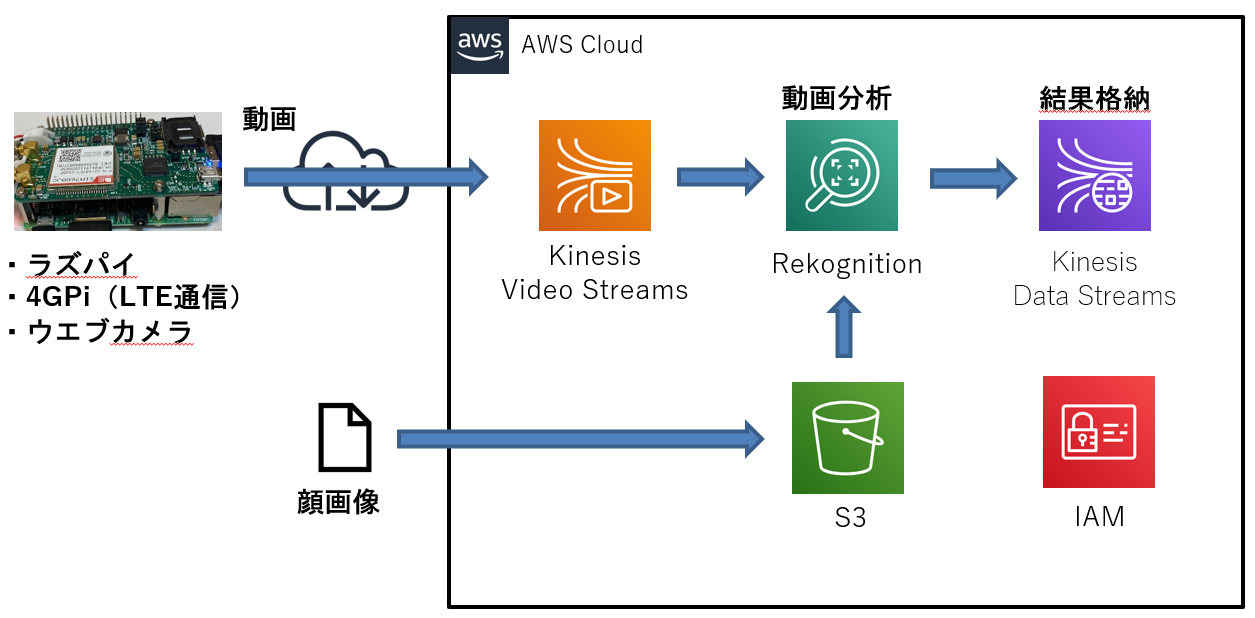
前回の記事ではラズパイに装着したウエブカメラの動画をLTE回線(4G通信モジュール「4GPi」)経由でKinesis Video Streamに送信しました。4G通信モジュールの詳細はこちら。
今回は画像分析サービスのAmazon Rekognitionを使用してKinesis Video Streamが受信した動画の中からAmazon S3にアップロードした顔画像を検知させてみました。下記の記事を参考にしています。
・ Amazon Kinesis Video Streamsの映像をAmazon Rekognition Videoで解析する #reinvent
概要
環境
前回の記事の環境をそのまま使用しました。
作業の流れ
- AWSマネジメントコンソールの設定
- コレクションに顔画像を蓄積
- Kinesis video streamの作成
- Kinesis data stream の作成
- ストリームプロセッサの開始
- ウエブカメラの動画をKinesis Video Streamに送信する
- 分析結果の確認
1. AWSマネジメントコンソールの設定
作業PCのブラウザからAWSマネジメントコンソールにログインして以下の作業を実施します。
ブラウザはGoogle Chrome推奨です。
1.1. IAMロールの作成
- マネジメントコンソールのサービスメニューからIAMのロール画面を開き、下表のロールを作成します。
| 項目 | 設定内容 |
|---|---|
| ロール名 | testRekognitionRole01 |
| サービス | Rekognition |
| ポリシー | AmazonRekognitionServiceRole |
- 作成したロールのロールARNの値をメモ帳にコピペします。
1.2. 顔画像のS3アップロード
Rekognitionで検知させる顔画像をAmazon S3のバケットにアップロードします。
- マネジメントコンソールのサービスメニューから「s3」を開き、新規バケットを作成します。リージョンは「アジアパシフィック(東京) ap-northeast-1」を選択。
- 作成したS3バケットをクリックしてRekognitionで検知させる顔画像のファイルをアップロードします。顔画像は”両目が開いている”や解像度等がAWSの推奨条件を満たしてないとRekognitionでの検知率が低くなります。

2. コレクションに顔画像を蓄積
S3にアップロードした顔画像をRekognitionのコレクションに蓄積します。
※以下の作業はラズパイのLXTerminalを使用します。
- Rekognitionに顔画像を蓄積するためのコレクションを作成します。
$ aws --profile awsconfigure01 rekognition create-collection --collection-id testcollection01

{
    "StatusCode": 200,
    "CollectionArn": "aws:rekognition:ap-northeast-1:xxxxxxxxxxxx:collection/testcollection01",
    "FaceModelVersion": "4.0"
}
- external-image-idに顔の識別名を指定してS3の顔画像ファイルをコレクションに蓄積します。蓄積に成功すると顔の情報が返されます。
※profileオプションで指定したawsconfigure01は前回の記事の中で設定しています。
$ aws --profile awsconfigure01 rekognition index-faces --image '{"S3Object":{"Bucket":"【S3バケット名】","Name":"【S3ファイル名】"}}' --collection-id "testcollection01" --detection-attributes "ALL" --external-image-id "【顔の識別名】"

{
    "FaceRecords": [
        {
            "Face": {
                "FaceId": "f10ea79b-0d7c-4856-b283-59f4cbf274b4",
                "BoundingBox": {
                    "Width": 0.4545164704322815,
                    "Height": 0.6655027866363525,
                    "Left": 0.29065603017807007,
                    "Top": 0.2575848400592804
                },
                "ImageId": "e4286175-7f03-3706-842d-d075cbfdec7e",
                "ExternalImageId": "xxxxxxxx",
                "Confidence": 99.99993896484375
            },
            "FaceDetail": {
                "BoundingBox": {
         ・
         ・
3. Kinesis video streamの作成
- Kinesis Video Streamに動画受信用のビデオストリームを作成し、表示されたStreamARNの値をメモ帳にコピペします。
$ aws --profile awsconfigure01 kinesisvideo create-stream --stream-name "testKinesisVideoStreams02" --data-retention-in-hours "24"

{
StreamARN": "arn:aws:kinesisvideo:ap-northeast-1:xxxxxxxxxxxx:stream/testKinesisVideoStreams02/1589094308184
}
4. Kinesis data stream の作成
- Kinesis data streamにRekognitionの分析結果を格納するためのオブジェクトを作成します。
$ aws kinesis create-stream --stream-name AmazonRekognitionDataStream01 --shard-count 1
- ストリームのStreamStatusが「ACTIVE」であること確認し、ShardIdとStreamARNの値をメモ帳にコピペします。
$ aws kinesis describe-stream --stream-name AmazonRekognitionDataStream01

{
    "StreamDescription": {
        "Shards": [
            {
                "ShardId": "shardId-000000000000",
                "HashKeyRange": {
                    "StartingHashKey": "0",
                    "EndingHashKey": "340282366920938463463374607431768211455"
                },
                "SequenceNumberRange": {
                    "StartingSequenceNumber": "49606866093651011850216802195303327451901325541455691778"
                }
            }
        ],
        "StreamARN": "arn:aws:kinesis:ap-northeast-1:xxxxxxxxxxxx:stream/AmazonRekognitionDataStream01",
        "StreamName": "AmazonRekognitionDataStream01",
        "StreamStatus": "ACTIVE",
        "RetentionPeriodHours": 24,
          ・
          ・
5. ストリームプロセッサの開始
ストリームプロセッサを起動して動画の分析を開始します。
- ストリームプロセッサを作成し、表示されるStreamProcessorArnの値をメモ帳にコピペします。
$ aws --profile awsconfigure01 rekognition create-stream-processor --name "testStreamProcessor01" --input '{"KinesisVideoStream": {"Arn": "【3節のStreamARN】"}}' --stream-processor-output '{"KinesisDataStream": {"Arn": "【4節のStreamARN】"}}' --role-arn "【1.1節のロールARN】" --settings '{"FaceSearch": {"CollectionId": "testcollection01","FaceMatchThreshold": 85.5}}'

{
    "StreamProcessorArn": "arn:aws:rekognition:ap-northeast-1:xxxxxxxxxxxx:streamprocessor/testStreamProcessor01"
}
- ストリームプロセッサを開始します。
$ aws rekognition start-stream-processor --name testStreamProcessor01 --region ap-northeast-1
- ストリームプロセッサのStatusが「RUNNING」であることを確認します。
$ aws rekognition describe-stream-processor --name testStreamProcessor01 --region ap-northeast-1

{
    "Name": "testStreamProcessor01",
    "StreamProcessorArn": "arn:aws:rekognition:ap-northeast-1:690626763451:streamprocessor/testStreamProcessor01",
    "Status": "RUNNING",
    "CreationTimestamp": 1589097878.314,
        ・
        ・
6. ウエブカメラの動画をKinesis Video Streamに送信する
前回の記事等を参考に、ラズパイに装着したウエブカメラの動画を4GPi経由でKinesis Video Streamに送信します。
ウエブカメラにコレクションに蓄積した顔が入るように撮影してください。
7. 分析結果の確認
- データの位置情報を示すシャードイテレーターの値を取得します。シャードイテレーターはストリームからレコードを抽出するために必要です。
$ aws kinesis get-shard-iterator --shard-id shardId-000000000000 --shard-iterator-type TRIM_HORIZON --stream-name AmazonRekognitionDataStream01

{
    "ShardIterator": "AAAAAAAAAAGAFu7MmT50YkF9N2pvMOhaeE9ymzGILJklzKUuj8M1SG9OKHGKxyfF6wGrN/vnuEyPFbw5AXreN73AVVkR2/fif6vyP77/K6WzXxIn3mG1HVE4GChWIjSOqKitLpeJ4S0U2KgqtVgVaDtQETlxALuoSYONedyQeEKAXlH2s7Vrs6hCulLmipXGb9jEQd2rtL28BSFMHfpEvko310weiZfAtBENUys6Vfs6/aCD+tyiog=="
}
- シャードイテレーターの値を指定してストリームからレコードを抽出します。
※シャードイテレーターの有効期間は300秒なので、300秒以内に下記コマンドを実行します。
$ aws kinesis get-records --shard-iterator AAAAAAAAAAGAFu7MmT50YkF9N2pvMOhaeE9ymzGILJklzKUuj8M1SG9OKHGKxyfF6wGrN/vnuEyPFbw5AXreN73AVVkR2/fif6vyP77/K6WzXxIn3mG1HVE4GChWIjSOqKitLpeJ4S0U2KgqtVgVaDtQETlxALuoSYONedyQeEKAXlH2s7Vrs6hCulLmipXGb9jEQd2rtL28BSFMHfpEvko310weiZfAtBENUys6Vfs6/aCD+tyiog==

        },
        {
            "SequenceNumber": "49606866093651011850216802195524560876891002654104223746",
            "ApproximateArrivalTimestamp": 1589099992.482,
            "Data": "eyJJbnB1dEluZm9ybWF0aW9uIjp7IktpbmVzaX  ・・(省略)・・mU3NGY4MjU2ZjIifX1dfV19",
            "PartitionKey": "7b459149-bcf0-47d4-a5a9-71ca55a9d65b"
        },
        {
         ・
         ・
上の実行結果は顔に検出に成功している例です。
逆に下の実行結果はDataの文字数が少なく顔の検出に失敗しています。この時はストリームプロセッサの起動に失敗する事象が発生していたのですが、Data Streamとストリームプロセッサの再作成で事象が改善しました。
        {
            "SequenceNumber": "49604526190993957371583841525857201473854060749047988226",
            "ApproximateArrivalTimestamp": 1582539544.113,
            "Data": "dGVzdDE=",
            "PartitionKey": "1"
        }
-
Base64デコーダを使用してDataの値をデコードします。
デコード結果に目や鼻の位置が返されており、ストリーミングデータからコレクションに蓄積した顔が検出されていること分かります。

補足
下記のコマンドで設定を削除できます。
- ストリームプロセッサの削除
$ aws --profile awsconfigure01 rekognition delete-stream-processor --name testStreamProcessor01
- Data Streamの削除
$ aws kinesis delete-stream --stream-name AmazonRekognitionDataStream01
- Video Streamの削除
$ aws --profile awsconfigure01 kinesisvideo delete-stream --stream-arn "arn:aws:kinesisvideo:ap-northeast-1:xxxxxxxxxxxx:stream/testKinesisVideoStreams02/1589094308184"
最後に
今回はラズパイ側で撮影した動画をRekognitionで分析させてみました。
カメラやセンサーの情報をAWS側で処理させる際は、特に検証用途として安価なラズパイはおすすめです。
また、4G通信モジュールを使用すればネットワーク環境が整っていない場所でもAWSと通信できるので
検証用途や単発の現地調査等でかなり活用できそうです。
