こんにちは。Japan Digital Designでインフラチームに所属している猪熊です。JDDでは、有志で AdventCalendar をやっています。本記事は JDD Advent Calendar 22日目です。よろしくお願いいたします。
とあるきっかけでスマホアプリ開発を手伝うことになりました。これまでサーバサイド、インフラメインで業務してきたのでフロントエンドやネイティブアプリ開発経験はほとんどありません(5年前くらいに Socket.io と Node.js で簡単なチャットアプリ作ってみた程度)。
今回はプロジェクトの雛形を作るまでにやったことを共有します。
私のようなフロントエンド・ネイティブアプリ開発経験のないエンジニアの方の参考になれば幸いです。
React Nativeにした理由
ゆくゆくはiOSだけでなくAndroidもリリースしたいものの、2つ開発する余力がなく、クロスプラットフォームを選んでいます。上に書いたように JavaScript の経験は多少あったのでReact Nativeでやってみようということになりました。
※社内で投稿を確認してもらっていて知ったのですが、特にモバイル開発者未経験者には、Expo CLIを使った開発を推奨しているそうです。今回の記事には含まれませんが、そちらも検討してみても良いかも知れません。
React Native + TypeScript で iOS アプリのひな形を作る
さて、ここからが本編です。
開発環境構築編
まずは開発環境を構築します。前提条件は以下です。
- 使用端末: MacBook Pro / macOS Catalina 10.15.7
- 使用エディタ: Visual Studio Code
環境構築に関する情報は検索すると沢山出てきます。
今回は詳細は割愛して、インストールしたものの列挙に留めます。
VSCode Extensions
- ESLint
- Prettier
- EditorConfig for VSCode
- Jest
実行環境・開発ツール系
- Node.js(私は anyenv 経由でインストールしました)
- yarn
- watchman
- Xcode
- CocoaPods
雛形プロジェクト作成編
まずは、React Native のプロジェクトを作成します。
npx react-native init RNSampleApp --template react-native-template-typescript
作成が終わったらアプリが起動することを確認します。
cd RNSampleApp
npx react-native run-ios
package.json を編集する
次に package.json を編集します。
name を変更する
RNSampleApp のままだと、警告が表示されるので適当に変更してきます。
ここでは、 rn-sample-app としておきます。
パッケージバージョンの^ (ハット)を削除する
例えば、以下のようにバージョン番号の前に ^ がついているものがあります。
  "devDependencies": {
    "@babel/core": "^7.8.4",
    "@babel/runtime": "^7.8.4",
    "@react-native-community/eslint-config": "^1.1.0",
    "@types/jest": "^25.2.3",
    "@types/react-native": "^0.63.2",
    "@types/react-test-renderer": "^16.9.2",
    "@typescript-eslint/eslint-plugin": "^2.27.0",
    "@typescript-eslint/parser": "^2.27.0",
    "babel-jest": "^25.1.0",
    "eslint": "^6.5.1",
    "jest": "^25.1.0",
    "metro-react-native-babel-preset": "^0.59.0",
    "react-test-renderer": "16.13.1",
    "typescript": "^3.8.3"
  }
先頭に ^ がついているパッケージは、メジャーバージョンしか固定されません。
yarn コマンド実行時に常に最新のマイナーバージョン、パッチバージョンのものがインストールされるため、記載されているバージョンとは異なるパッケージがインストールされる可能性があります。
(特にチーム開発をしている場合は)環境差異によるトラブルを避けるためにも削除しておいた方が良いと思います。
Prettierの設定を行う
Prettierを追加することで、常にコードフォーマットされるようになります。
yarn add --dev --exact prettier
.prettierrc.yaml をプロジェクトルートディレクトリ直下に作成します。
endOfLine: lf
tabWidth: 2
semi: true
singleQuote: true
trailingComma: all

overrides:
  - files: '*.json'
    options:
      parser: json
  - files:
    - '*.md'
    - '*.markdown'
    options:
      parser: markdown
  - files:
    - '*.ts'
    - '*.tsx'
    options:
      parser: typescript
  - files:
    - '*.yml'
    - '*.yaml'
    options:
      parser: yaml
ESLintの設定を行う
ESLintは静的解析ツールです。コード品質を一定水準に保つのに役立つので追加しましょう。
yarn add --dev --exact eslint
yarn add --dev --exact @typescript-eslint/parser
yarn add --dev --exact @typescript-eslint/eslint-plugin
yarn add --dev --exact eslint-config-prettier
yarn add --dev --exact eslint-plugin-prettier
yarn add --dev --exact eslint-plugin-react
yarn add --dev --exact eslint-plugin-jest
yarn add --dev --exact @react-native-community/eslint-config
.eslintrc.yaml をプロジェクトルートディレクトリ直下に作成します。
---
root: true
extends:
  - plugin:@typescript-eslint/recommended
  - prettier
  - prettier/@typescript-eslint
  - plugin:react/recommended
  - '@reactnativecommunity'
  - plugin:react-native/all
  - plugin:jest/recommended
parser: '@typescript-eslint/parser'
parserOptions:
  project: ./tsconfig.json
  ecmaFeatures:
    jsx: true
plugins:
  - '@typescript-eslint'
  - react
  - react-native
  - jest
settings:
  react:
    version: detect
rules:
  no-console: warn
EditorConfigの設定を行う
EditorConfigの設定を置いておくことで、インデントなどコード形式を統一することができます。
.editorconfig をプロジェクトルートディレクトリ直下に作成します。
root = true

[*]
indent_style = space
indent_size = 2
end_of_line = lf
charset = utf-8
trim_trailing_whitespace = true
insert_final_newline = true
実際に雛形アプリを作ってみる
それでは、実際に雛形を作っていきましょう。
ソースコードは全て srcディレクトリ内に含めることとします。
プロジェクトルートディレクトリ直下に App.jsx が配置されていますが、こちらをsrcディレクトリ直下に移動してください。
最終的なディレクトリ構成は以下のようになります。
RNSampleApp/src
├── App.tsx
├── components
│   └── pages
│       ├── Detail
│       │   └── index.tsx
│       ├── Home
│       │   └── index.tsx
│       ├── MyPage
│       │   └── index.tsx
│       ├── Search
│       │   └── index.tsx
│       └── index.ts
├── constants
│   ├── screen.ts
│   └── theme.ts
└── routes
    ├── Main
    │   ├── Home.tsx
    │   └── index.tsx
    └── index.tsx
アプリ必要なパッケージをインストールする
アプリに必要なパッケージを追加でインストールします。
インストール完了後、 package.json を開き、先ほどと同様に ^ のついたパッケージバージョンについては、 ^ を削除しておきましょう。
yarn add @react-navigation/native
yarn add @react-navigation/stack react-native-safe-area-context react-native-gesture-handler react-native-screens @react-native-community/masked-view
yarn add @react-navigation/material-bottom-tabs react-native-paper
yarn add react-native-vector-icons
yarn add @types/react-native-vector-icons
アイコン用のフォントをビルド成果物に含める必要があるので、 ios/RNSampleApp/info.plist に以下の定義を追加してください。
    <key>UIAppFonts</key>
    <array>
      <string>AntDesign.ttf</string>
      <string>Entypo.ttf</string>
      <string>EvilIcons.ttf</string>
      <string>Feather.ttf</string>
      <string>FontAwesome.ttf</string>
      <string>FontAwesome5_Brands.ttf</string>
      <string>FontAwesome5_Regular.ttf</string>
      <string>FontAwesome5_Solid.ttf</string>
      <string>Foundation.ttf</string>
      <string>Ionicons.ttf</string>
      <string>MaterialIcons.ttf</string>
      <string>MaterialCommunityIcons.ttf</string>
      <string>SimpleLineIcons.ttf</string>
      <string>Octicons.ttf</string>
      <string>Zocial.ttf</string>
    </array>
CocoaPodsのリポジトリを更新します。
rm -rf ios/build
cd ios
pod install --repo-update
cd ..
index.jsを修正する
/**
 * @format
 */

import { AppRegistry } from 'react-native';
import App from './src/App'; // './App' から './src/App' に変更する
import { name as appName } from './app.json';

AppRegistry.registerComponent(appName, () => App);
src/constants/screen.tsを作成する
画面名を示す定数を作成します。
今回は、ホーム画面、詳細画面(ホーム画面から遷移)、検索画面、マイページの4画面とします。
export const HOME = 'HOME';
export const MY_PAGE = 'MY_PAGE';
export const DETAIL = 'DETAIL';
export const SEARCH = 'SEARCH';
src/constants/theme.tsを作成する
コンポーネントで使用する色を示す定数を作成します。
今回は、画面下部のタブに使用する2つの色を定義しています。
export const COLOR = {
  BOTTOM_TAB: '#87cefa',
  TAB_ACTIVE: '#000000',
};
各画面を作成する
ここからは4つの画面をそれぞれ作成します。
src/components/pages/Home/index.tsx
ホーム画面を作成します。
import React from 'react';
import { View, Text, StyleSheet, TouchableOpacity } from 'react-native';
import { useNavigation } from '@react-navigation/native';
import { DETAIL } from '../../../constants/screen';

const styles = StyleSheet.create({
  container: {
    flex: 1,
    justifyContent: 'center',
    alignItems: 'center',
  },
});

export default function Home() {
  const { navigate } = useNavigation();
  return (
    <View style={styles.container}>
      <Text>ホーム</Text>
      <TouchableOpacity onPress={() => navigate(DETAIL)}>
        <Text>詳細画面へ遷移する</Text>
      </TouchableOpacity>
    </View>
  );
}
src/components/pages/Detail/index.tsx
詳細画面を作成します。
import React from 'react';
import { View, Text, StyleSheet } from 'react-native';

const styles = StyleSheet.create({
  container: {
    flex: 1,
    justifyContent: 'center',
    alignItems: 'center',
  },
});

export default function Detail() {
  return (
    <View style={styles.container}>
      <Text>詳細画面</Text>
    </View>
  );
}
src/components/pages/Search/index.tsx
検索画面を作成します。
import React from 'react';
import { View, StyleSheet, Text } from 'react-native';

const styles = StyleSheet.create({
  container: {
    flex: 1,
    justifyContent: 'center',
    alignItems: 'center',
  },
});

export default function Search() {
  return (
    <View style={styles.container}>
      <Text>検索画面</Text>
    </View>
  );
}
src/components/pages/Mypage/index.tsx
マイページ画面を作成します。
import React from 'react';
import { StyleSheet, Text, View } from 'react-native';

const styles = StyleSheet.create({
  container: {
    flex: 1,
    justifyContent: 'center',
    alignItems: 'center',
  },
});

export default function MyPage() {
  return (
    <View style={styles.container}>
      <Text>マイページ</Text>
    </View>
  );
}
src/components/pages/index.ts
pages ディレクトリから一括でインポートするためのtsファイルを作成します。
export { default as Detail } from './Detail';
export { default as Home } from './Home';
export { default as MyPage } from './MyPage';
export { default as Search } from './Search';
画面遷移を定義する
各画面を作成した後は、画面遷移を定義します。
src/routes/Main/Home.tsx
ホーム画面と詳細画面の画面遷移を定義します。
import React from 'react';
import { createStackNavigator } from '@react-navigation/stack';
import { DETAIL, HOME } from '../../constants/screen';
import { Detail, Home } from '../../components/pages';

const Stack = createStackNavigator();

function HomeNavigator() {
  return (
    <Stack.Navigator initialRouteName={HOME}>
      <Stack.Screen
        name={HOME}
        component={Home}
        options={{
          title: 'ホーム',
        }}
      />
      <Stack.Screen
        name={DETAIL}
        component={Detail}
        options={{
          title: '詳細画面',
        }}
      />
    </Stack.Navigator>
  );
}

export default HomeNavigator;
src/routes/Main/index.tsx
メイン画面の画面遷移を定義します。
import React from 'react';
import { createMaterialBottomTabNavigator } from '@react-navigation/material-bottom-tabs';
import MaterialCommunityIcons from 'react-native-vector-icons/MaterialCommunityIcons';
import { HOME, MY_PAGE, SEARCH } from '../../constants/screen';
import { Search, MyPage } from '../../components/pages';
import { COLOR } from '../../constants/theme';
import Home from './Home';

const Tab = createMaterialBottomTabNavigator();

export default function MainNavigator() {
  return (
    <Tab.Navigator
      initialRouteName={HOME}
      activeColor={COLOR.TAB_ACTIVE}
      shifting={true}
    >
      <Tab.Screen
        name={HOME}
        component={Home}
        options={{
          tabBarColor: COLOR.BOTTOM_TAB,
          tabBarLabel: 'ホーム',
          tabBarIcon: ({ color }) => (
            <MaterialCommunityIcons name="home" color={color} size={25} />
          ),
        }}
      />
      <Tab.Screen
        name={SEARCH}
        component={Search}
        options={{
          tabBarColor: COLOR.BOTTOM_TAB,
          tabBarLabel: '検索',
          tabBarIcon: ({ color }) => (
            <MaterialCommunityIcons
              name="map-search-outline"
              color={color}
              size={25}
            />
          ),
        }}
      />
      <Tab.Screen
        name={MY_PAGE}
        component={MyPage}
        options={{
          tabBarColor: COLOR.BOTTOM_TAB,
          tabBarLabel: 'マイページ',
          tabBarIcon: ({ color }) => (
            <MaterialCommunityIcons name="account" color={color} size={25} />
          ),
        }}
      />
    </Tab.Navigator>
  );
}
src/routes/index.tsx
メイン画面の画面遷移定義を NavigationContainer でラップします。
import React from 'react';
import { NavigationContainer } from '@react-navigation/native';
import MainNavigator from './Main';

export default function MainRouter() {
  return (
    <NavigationContainer>
      <MainNavigator />
    </NavigationContainer>
  );
}
アプリの起動ポイントとつなぐ
最後に、 src/App.jsx を修正して、作成したアプリが表示されるようにしましょう。
import React from 'react';
import MainRouter from './routes';

export default function App() {
  return <MainRouter />;
}
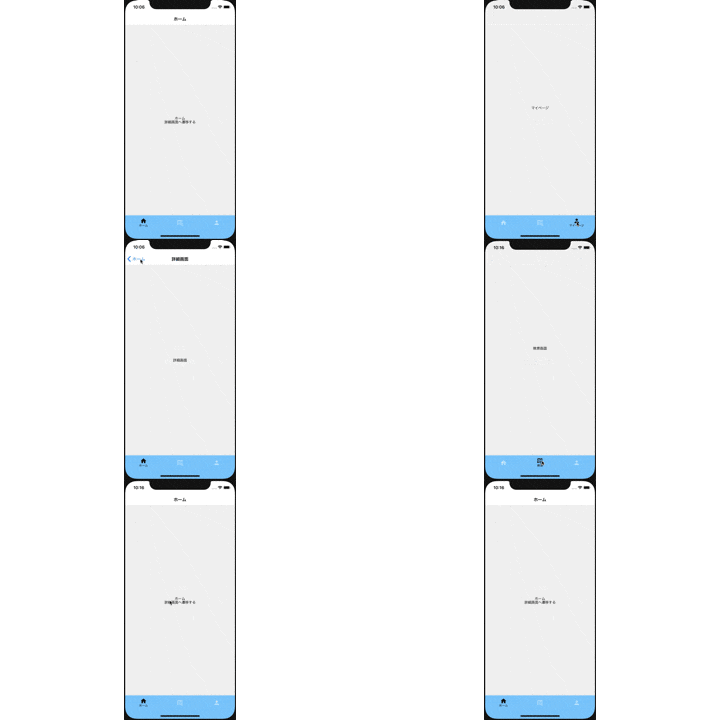
このようなアプリが表示されれば完成です。
おわりに
かなり簡素なひな形ですが、一応 Github に公開しておきました。
やってみた感想
今回は記載を省略しましたが、開発環境構築するだけでも大変だと感じました。
様々なツールの様々な設定をおさえるだけでも結構な時間がかかりそうです。
各コンポーネントやAPIの設定はさらに時間がかかりそうです...。
現在、業務で TeleportというOSSを扱っています。TeleportのUIは、ReactとTypeScriptで構築されています。今までは、UIの実装を見ても何となくしか内容を理解できなかったのですが、今後はもう少しちゃんと理解することができそうです。せっかくの経験なので業務にも活かしていきたいと思います。
今後に向けて
基本的なパッケージしか使用していないので、お手伝いを通してもっと多くの React 、React Native のパッケージに触れたいと思います。推奨されている Expo CLI を使ったひな形も公開したいですね。
また、サーバサイドは AWS Amplify または Firebase を利用する予定です。開発が進んで、さらにノウハウが溜まったらまた何らかの形で整理して共有したいと思います。
