最近 Slack のイベントにも参加したりした時に色々と聞いたので、自分でもやってみたものです。
ほとんど公式ドキュメントをなぞったものなので、難しい内容とかは特にないかと思います。
シンプルに 「Heroku で開発するならどうやるのか」 を試した感じです。
前提条件
これからやる作業の前提条件として、次のことはすでに済ませてある前提で進めていきます。
- Heroku のアカウントを作成済み
- Heroku CLI をインストール・設定済み(ログインとか)
- Node.js をインストール済み
- Git をインストール・設定済み
エディタはお好みのものをご利用ください。
これからやること
- Slack の Bolt フレームワークにあるアプリを作成
- 作成したアプリを Heroku 上にアップする
- 余力があればカスタマイズ
手順
アップロード先の Heroku アプリの準備
Slack の App を作る前に、次のコマンドであらかじめアップロード先の Heroku アプリを作成しておきます。
$ heroku apps:create <アプリの名前を半角英数字で>
Creating ⬢ <アプリ名>... done
https://<アプリ名>.herokuapp.com/ | https://git.heroku.com/<アプリ名>.git
heroku apps:create の後に何も入力せずに実行すると、Heroku が自動でランダムな名前を生成して設定しますが、分かりやすいように名前を指定しておくことをお勧めします。
アプリの作成が終わると、Web の URL と Git の URL の2つが表示されますので、どちらも控えておきます。
URL はこんな感じです。
Web の URL
https://<アプリ名>.herokuapp.com/
Git の URL
https://git.heroku.com/<アプリ名>.git
控え損ねた場合は、heroku apps:info <アプリ名> で確認もできます。(ブラウザからダッシュボードでもいけるはず)
Slack App の作成
今度は Slack 側のアプリの作成、設定をしていきます。
-
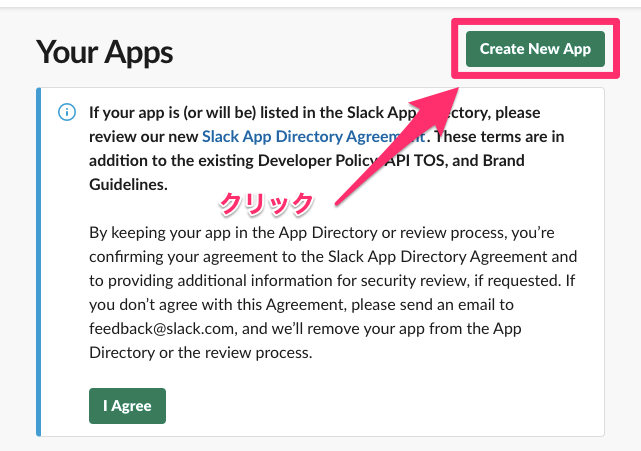
Slack API のサイトの Your Appsの画面から Create New App ボタンをクリックします。
-
ポップアップでアプリ名とインストール先のワークスペースを聞かれるので、必要事項を入力して Create App ボタンをクリックします。
-
アプリが作成されると Basic Information の 画面に遷移します。このページの App Credential の欄には、後ほど使用する認証情報が記載されています。
-
左側のメニューから Bot Users をクリックします
-
Add A Bot User をクリックして、表示名とユーザ名を設定し、Add Bot User をクリックします
-
左側のメニューから Install App をクリックします
-
Install App to Workspace をクリックしてワークスペースにインストールします
-
OAuth トークンが2種類生成されます
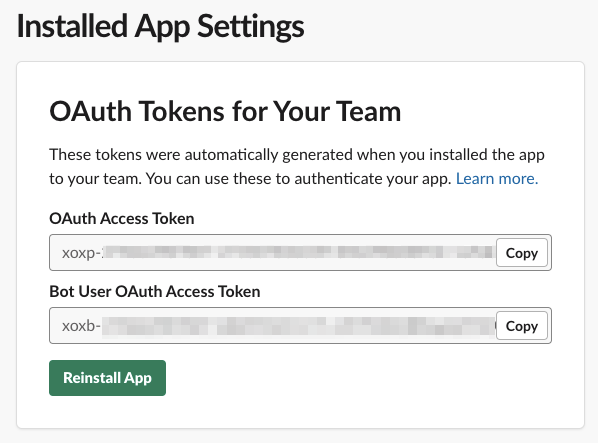
この後で Bot User OAuth Access Token の方を使っていきます。
Slack App の開発
ここからは実際にサンプルの Slack App を作っていきます。
なお、Heroku アプリへのデプロイには Git を使用するため、途中で Git コマンドも使用します。
-
プロジェクトディレクトリを作成し、中に移動します(ディレクトリの名前は任意)
$ mkdir <プロジェクトディレクトリ名> $ cd <プロジェクトディレクトリ名> -
git initコマンドで Git の管理対象に設定します$ git init -
.gitignoreファイルを作成します(中身は Heroku の公式サンプルを参考にしました。)$ vi .gitignore.gitignore# Node build artifacts node_modules npm-debug.log # Local development *.env *.dev .DS_Store # Docker Dockerfile docker-compose.yml -
Procfile を作成します。Procfile は起動時にアプリが実行するコマンドを記載するファイルです。ここでは
node app.jsコマンドを記載します。$ vi ProcfileProcfileweb: node app.js -
npm initコマンドでプロジェクトの設定を行います(私はこんな感じで実行しました)$ npm init This utility will walk you through creating a package.json file. It only covers the most common items, and tries to guess sensible defaults. See `npm help json` for definitive documentation on these fields and exactly what they do. Use `npm install <pkg>` afterwards to install a package and save it as a dependency in the package.json file. Press ^C at any time to quit. package name: (<プロジェクトディレクトリ名>) version: (1.0.0) description: entry point: (index.js) app.js test command: git repository: keywords: author: license: (ISC) About to write to <プロジェクトディレクトリの親のパス>/bolttest/package.json: { "name": "bolttest", "version": "1.0.0", "description": "", "main": "app.js", "scripts": { "test": "echo \"Error: no test specified\" && exit 1" }, "author": "", "license": "ISC" } Is this OK? (yes)出来上がった
package.jsonファイルpackage.json{ "name": "bolttest", "version": "1.0.0", "description": "", "main": "app.js", "scripts": { "test": "echo \"Error: no test specified\" && exit 1" }, "author": "", "license": "ISC" } -
Bolt パッケージをインストールします
$ npm install @slack/bolt -
app.js 内に次のコードを記述します。Heroku の場合、ポート番号は動的に割り振られるため、process.env.PORT の書き方で良いようです。
$ vi app.jsapp.jsconst { App } = require('@slack/bolt'); const app = new App({ token: process.env.SLACK_BOT_TOKEN, signingSecret: process.env.SLACK_SIGNING_SECRET }); (async () => { // Start your app await app.start(process.env.PORT || 3000); console.log('⚡️ Bolt app is running!'); })(); -
git でローカルにコミットします
$ git add . $ git commit -m "First Commit" -
ローカルリポジトリのリモートの設定を追加します。Heroku アプリへのデプロイは、ローカルのリポジトリを Heroku のリポジトリにそのままプッシュすることなので、あらかじめ登録しておきます。URL は アップロード先の Heroku アプリの準備 の手順ででた Git の URL です。
$ git remote add heroku <Git の URL> -
heroku リポジトリにプッシュします
$ git push heroku master -
トークンを設定します。Heroku では config vars という仕組みがあるので、それを使用します
$ heroku config:set SLACK_SIGNING_SECRET=<サインインシークレット> $ heroku config:set SLACK_BOT_TOKEN=xoxb-<Bot トークン> -
インスタンスを heroku コマンドで立ち上げます
$ heroku ps:scale web=1 -
ログを確認します。ログの確認には
heroku logsコマンドを使用します$ heroku logs -t次のログが出ているかと思います。
⚡️ Bolt app is running! -
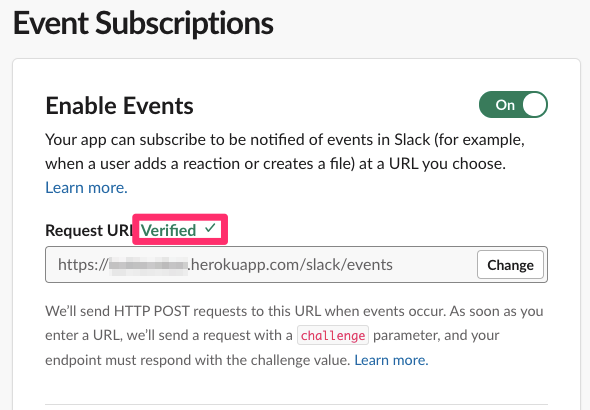
Slack api の左側のメニューから Event Subscription をクリックして、イベント URL を登録し Save Change をクリックします。設定する URL は Heroku の Web の URL の末尾に
/slack/eventsをつけたものとなります。https://bolttestbot.herokuapp.com/slack/eventsこんな感じになれば OK です。
-
現状だと何も反応しないため、
app.messageの処理を追加します。$ vi app.jsapp.jsconst { App } = require('@slack/bolt'); const app = new App({ token: process.env.SLACK_BOT_TOKEN, signingSecret: process.env.SLACK_SIGNING_SECRET }); // Listens to incoming messages that contain "hello" app.message('hello', ({ message, say }) => { // say() sends a message to the channel where the event was triggered say(`Hey there <@${message.user}>!`); }); (async () => { // Start your app await app.start(process.env.PORT || 3000); console.log('⚡️ Bolt app is running!'); })(); -
ローカルにコミットします
$ git add app.js $ git commit -m "Add hello message" -
Heroku にプッシュします
$ git push heroku master
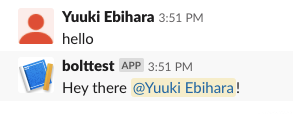
これで チャンネルに Bot ユーザを招待して、hello を含むメッセージを投稿すると反応してくれます。
メッセージのカスタマイズ
メッセージがテキストのみなので、ボタンを追加するチュートリアルにしたがってやっていきます。
-
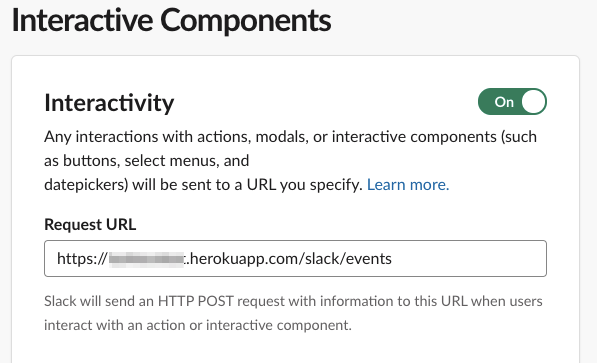
Slack api の画面左側の Interactive Components をクリックして、Request URL を登録し、Save Change をクリックします。登録する URL は Event Subscription のところで登録したものと同じものを登録します。
-
ボタン付きメッセージを返すようにコードを修正します
$ vi app.jsapp.jsconst { App } = require('@slack/bolt'); const app = new App({ token: process.env.SLACK_BOT_TOKEN, signingSecret: process.env.SLACK_SIGNING_SECRET }); // Listens to incoming messages that contain "hello" app.message('hello', ({ message, say }) => { // say() sends a message to the channel where the event was triggered say({ blocks: [ { "type": "section", "text": { "type": "mrkdwn", "text": `Hey there <@${message.user}>!` }, "accessory": { "type": "button", "text": { "type": "plain_text", "text": "Click Me" }, "action_id": "button_click" } } ] }); }); (async () => { // Start your app await app.start(process.env.PORT || 3000); console.log('⚡️ Bolt app is running!'); })(); -
ローカルにコミットします
$ git add app.js $ git commit -m "change message to block" -
Heroku にプッシュします
$ git push heroku master
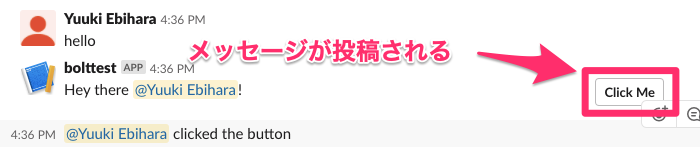
これで hello を含むメッセージを投稿した時にボタン付きのメッセージがボットから返されますが、ボタンをクリックした時の処理がないので何も起こりません。(正確には、ボタンを押すと右側にビックリマークが出ます)
-
ボタンクリック時のアクションを
app.actionで追加します$ vi app.jsapp.jsconst { App } = require('@slack/bolt'); const app = new App({ token: process.env.SLACK_BOT_TOKEN, signingSecret: process.env.SLACK_SIGNING_SECRET }); // Listens to incoming messages that contain "hello" app.message('hello', ({ message, say }) => { // say() sends a message to the channel where the event was triggered say({ blocks: [ { "type": "section", "text": { "type": "mrkdwn", "text": `Hey there <@${message.user}>!` }, "accessory": { "type": "button", "text": { "type": "plain_text", "text": "Click Me" }, "action_id": "button_click" } } ] }); }); app.action('button_click', ({ body, ack, say }) => { // Acknowledge the action ack(); say(`<@${body.user.id}> clicked the button`); }); (async () => { // Start your app await app.start(process.env.PORT || 3000); console.log('⚡️ Bolt app is running!'); })(); -
ローカルにコミットします
$ git add app.js $ git commit -m "Add button click action" -
Heroku にプッシュします
$ git push heroku master
これでボタンをクリックした時にメッセージが投稿されるようになりました。
私が実施したソースコードは GitHub のリポジトリにあります。
silverskyvicto/bolttest
余談
Slack の瀬良さん @seratch がサンプルのものをすでに作成していて、それを Heroku Button として公開していることを後で知りました。