この先作る予定のWebサービスはRIAにしたいので、今後作る勉強用サンプルもどうせなら何かRIA向けのJSフレームワーク使いたい。
とゆうわけでAngular2を触ってみます。まずはhello world。
今回の記事は英語版Angular2のクイックスタートページ の内容とほぼ同じです。
そんな記事を載せる価値があるのか?とも思いましたが、世の中にはドキュメントが英語なだけでやる気を無くす人も居るに違いないと思い、ソースの99%を転載した記事を書いていました。
より最小化したコードにしてもよかったのですが、Angular2の知識がロクにない状態で間違った情報を発信してしまうリスクもあるため止めました。
今回やりたいこと
- Angular2で「hello world」を表示してみる。終わり。
環境
- Microsoft Surface Pro4 (i5 2.4GHz, Mem 4GB)
- OS:Windows 10 Pro
- node.js v7.1.9
- npm v3.10.9
事前準備
- Windows用のnode.jsをインストール https://nodejs.org/en/
構築開始
https://angular.io/docs/ts/latest/quickstart.html
こちらの手順の通りです。
今回のサンプル用のディレクトリを作成し、移動。
カレントはどこでもいいです。(筆者はC:\work\angular\)
mkdir hello_angular2
cd hello_angular2
プロジェクト用の設定ファイルを作成
package.json
package.jsonをhello_angular2の直下に作成します。
mavenのpomファイルみたいなもので、今回のプロジェクトの依存ライブラリ群とパッケージ情報が記載されており、npmコマンドで一括ダウンロードされます。(まさにmaven)
hello worldでこんなに依存ライブラリが必要なのか?とも思いましたが、まだそれぞれのライブラリの意味も分かっていないので クイックスタートのまま使っています。
package.jsonはnode.jsの標準的な仕様ですので、項目の詳細については
npm package.json 日本語版 取扱説明書 等をご参照ください。
今回のサンプルではlite-serverを利用したHTTPサーバーを立ち上げますので、scripts.startにその記述がされています。
{
  "name": "hello_angular2",
  "version": "1.0.0",
  "scripts": {
    "start": "tsc && concurrently \"tsc -w\" \"lite-server\" ",
    "lite": "lite-server",
    "tsc": "tsc",
    "tsc:w": "tsc -w"
  },
  "licenses": [
    {
      "type": "MIT",
      "url": "https://github.com/angular/angular.io/blob/master/LICENSE"
    }
  ],
  "dependencies": {
    "@angular/common": "~2.2.0",
    "@angular/compiler": "~2.2.0",
    "@angular/core": "~2.2.0",
    "@angular/forms": "~2.2.0",
    "@angular/http": "~2.2.0",
    "@angular/platform-browser": "~2.2.0",
    "@angular/platform-browser-dynamic": "~2.2.0",
    "@angular/router": "~3.2.0",
    "@angular/upgrade": "~2.2.0",
    "angular-in-memory-web-api": "~0.1.15",
    "core-js": "^2.4.1",
    "reflect-metadata": "^0.1.8",
    "rxjs": "5.0.0-beta.12",
    "systemjs": "0.19.39",
    "zone.js": "^0.6.25"
  },
  "devDependencies": {
    "@types/core-js": "^0.9.34",
    "@types/node": "^6.0.45",
    "concurrently": "^3.0.0",
    "lite-server": "^2.2.2",
    "typescript": "^2.0.3"
  }
}
tsconfig.json
tsconfig.jsonをhello_angular2の直下に作成します。
Angular2のソースはTypeScriptが推奨されており、筆者もTypeScriptの記述はかなり好みなためTypeScriptを利用する予定です。
ただ、TypeScriptは現状そのままで動作するブラウザがかなり限られています。
そのため、TypeScriptで書かれたコードをJavaScriptに変換するための設定ファイルがこれです。
「どの使用のJavascriptに変換するか」が"target"の指定であり、今回はEcmaScript5を指す"es5"を指定しています。
基本的にはプロジェクト内に含まれる.ts拡張子のファイルがすべて変換対象になります。
tsconfig.jsonについて詳しく知りたい方は tsconfig.json(TypeScript構成ファイル)- @IT をお勧めします。
{
  "compilerOptions": {
    "target": "es5",
    "module": "commonjs",
    "moduleResolution": "node",
    "sourceMap": true,
    "emitDecoratorMetadata": true,
    "experimentalDecorators": true,
    "removeComments": false,
    "noImplicitAny": false
  }
}
systemjs.config.js
続いて、systemjs.config.jsをhello_angular2の直下に作成します。
こちらはAmgular2が起動する際の基本的な設定情報となります。
この設定については英語のドキュメントが主ですが、「System.config javascript」でググればそこそこ情報が出てくるので興味がある方は調べてください。
/**
 * System configuration for Angular samples
 * Adjust as necessary for your application needs.
 */
(function (global) {
  System.config({
    paths: {
      // paths serve as alias
      'npm:': 'node_modules/'
    },
    // map tells the System loader where to look for things
    map: {
      // our app is within the app folder
      app: 'app',
      // angular bundles
      '@angular/core': 'npm:@angular/core/bundles/core.umd.js',
      '@angular/common': 'npm:@angular/common/bundles/common.umd.js',
      '@angular/compiler': 'npm:@angular/compiler/bundles/compiler.umd.js',
      '@angular/platform-browser': 'npm:@angular/platform-browser/bundles/platform-browser.umd.js',
      '@angular/platform-browser-dynamic': 'npm:@angular/platform-browser-dynamic/bundles/platform-browser-dynamic.umd.js',
      '@angular/http': 'npm:@angular/http/bundles/http.umd.js',
      '@angular/router': 'npm:@angular/router/bundles/router.umd.js',
      '@angular/forms': 'npm:@angular/forms/bundles/forms.umd.js',
      '@angular/upgrade': 'npm:@angular/upgrade/bundles/upgrade.umd.js',
      // other libraries
      'rxjs':                      'npm:rxjs',
      'angular-in-memory-web-api': 'npm:angular-in-memory-web-api/bundles/in-memory-web-api.umd.js'
    },
    // packages tells the System loader how to load when no filename and/or no extension
    packages: {
      app: {
        main: './main.js',
        defaultExtension: 'js'
      },
      rxjs: {
        defaultExtension: 'js'
      }
    }
  });
})(this);
インストール
■ 現時点での構成
hello_angular2/
├ package.json
├ systemjs.config.js
└ tsconfig.json
hello_angular2配下で以下のコマンドを実行します。
npm install
自作スクリプトを配置する用のアプリケーションディレクトリを作成します。
mkdir app
アプリケーションの設定
app.module.ts
app直下にapp.module.tsを作成します。
.tsなのでTypeScriptで記述するユーザスクリプトとなります。
このファイルはこのアプリで利用するモジュールのimportを行います。
NgModuleについてはこちらのサイト「NgModule導入について - Angular2 Info」が分かりやすいです。
import { NgModule }      from '@angular/core';
import { BrowserModule } from '@angular/platform-browser';
import { AppComponent }   from './app.component';
@NgModule({
  imports:      [ BrowserModule ],
  declarations: [ AppComponent ],
  bootstrap:    [ AppComponent ]
})
export class AppModule { }
app/app.component.ts
app直下にapp.component.tsを作成します。
こちらも.tsなのでTypeScriptで記述するユーザースクリプトとなります。
このコンポーネントの設定はAngular2にとって最も重要な部類なので、hello world後はいろいろなコンポーネントを指定して遊んでみるといいと思います。
Angular2のガイドに様々なサンプルがあります。
import { Component } from '@angular/core';
@Component({
  selector: 'my-app',
  template: '<h1>Hello World!</h1>'
})
export class AppComponent { }
app/main.ts
app直下にmain.tsを作成します。
アプリケーション起動時に読み込まれる最も基本となるスクリプトファイルです。
名称は固定ではなく、systemjs.config.jsに書かれている"map.appの名称"+"packages.app.main"のパスのファイルが読み込まれます。
今回はappと./main.jsが指定されていますが、この.tsファイルは変換後にES5のmain.jsファイルが作成されるためそちらが読み込まれます。
import { platformBrowserDynamic } from '@angular/platform-browser-dynamic';
import { AppModule } from './app.module';
const platform = platformBrowserDynamic();
platform.bootstrapModule(AppModule);
シングルページとなるhtmlの作成
hello_angular2直下にindex.htmlを作成します。
app配下ではないので注意してください。
に先ほどapp.component.tsに指定したコンポーネントがバインドされます。
<html>
  <head>
    <title>Angular QuickStart</title>
    <meta charset="UTF-8">
    <meta name="viewport" content="width=device-width, initial-scale=1">
    <link rel="stylesheet" href="styles.css">
    <!-- 1. Load libraries -->
     <!-- Polyfill for older browsers -->
    <script src="node_modules/core-js/client/shim.min.js"></script>
    <script src="node_modules/zone.js/dist/zone.js"></script>
    <script src="node_modules/reflect-metadata/Reflect.js"></script>
    <script src="node_modules/systemjs/dist/system.src.js"></script>
    <!-- 2. Configure SystemJS -->
    <script src="systemjs.config.js"></script>
    <script>
      System.import('app').catch(function(err){ console.error(err); });
    </script>
  </head>
  <!-- 3. Display the application -->
  <body>
    <my-app>Loading...</my-app>
  </body>
</html>
style.css
hello_angular2直下にstyle.cssを作成します。
こちらは何の変哲もないただのcssです。
/* Master Styles */
h1 {
  color: #369;
  font-family: Arial, Helvetica, sans-serif;
  font-size: 250%;
}
h2, h3 {
  color: #444;
  font-family: Arial, Helvetica, sans-serif;
  font-weight: lighter;
}
body {
  margin: 2em;
}
Angular2の起動
■ 現時点での構成
hello_angular2/
├ app/
│ ├ app.component.ts
│ ├ app.module.ts
│ └ main.ts
├ node_modules/
├ index.html
├ package.json
├ styles.css
├ systemjs.config.js
└ tsconfig.json
npm startを実行しますが、今回はpackage.jsonにlite-serverの記述がされているため、ビルド完了後にHTTPサーバーが立ち上がり自動でブラウザが開きます。
それでは実行。
npm start
ブラウザが立ち上がり、以下が表示されれば成功です。
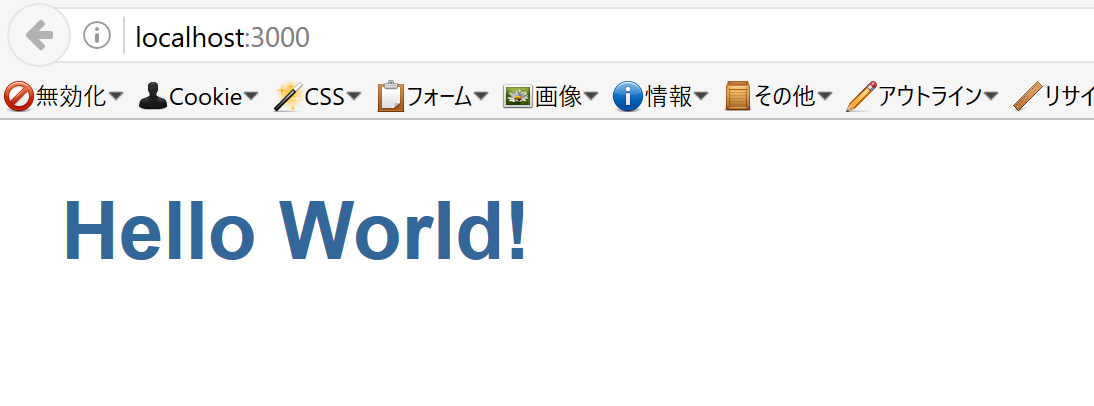
とゆうわけで、クイックスタート完了です。
再度書きますが、スクリプトの記載内容はこちらのサイト https://angular.io/docs/ts/latest/quickstart.html ほぼそのままです。
少しだけ追加編
…さすがにこれだけでは芸がなさすぎるため、少しだけ内容を追加してみます。
app/app.component.tsを編集
先ほど書いたapp.component.tsを編集して、Componentの指定を増やします。
import { Component } from '@angular/core';
@Component({
  selector: 'my-app',
  template: '<h1>Hello World!</h1>'
})
export class AppComponent { }

@Component({
  selector: 'key-up2',
  template: `
    <input #box (keyup)="onKey(box.value)">
    <p>{{values}}</p>
  `
})
export class KeyUpComponent_v2 {
  values = '';
  onKey(value: string) {
    this.values += value + ' | ';
  }
}
app.module.ts
こちらも同様に。
import { NgModule }      from '@angular/core';
import { BrowserModule } from '@angular/platform-browser';
import { AppComponent,KeyUpComponent_v2 }   from './app.component';
import { Ng2TableModule } from 'ng2-table/ng2-table';
@NgModule({
  imports:      [ BrowserModule ],
  declarations: [ AppComponent,KeyUpComponent_v2 ],
  bootstrap:    [ AppComponent,KeyUpComponent_v2 ]
})
export class AppModule { }
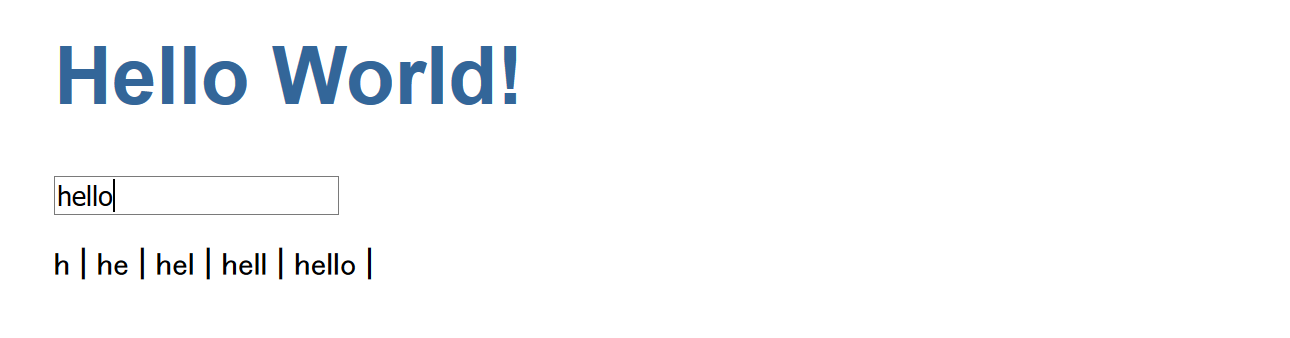
index.htmlの編集
先ほど書いたindex.htmlを編集して、key-up2タグを増やします。
<html>
  <head>
    <title>Angular QuickStart</title>
    <meta charset="UTF-8">
    <meta name="viewport" content="width=device-width, initial-scale=1">
    <link rel="stylesheet" href="styles.css">
    <!-- 1. Load libraries -->
     <!-- Polyfill for older browsers -->
    <script src="node_modules/core-js/client/shim.min.js"></script>
    <script src="node_modules/zone.js/dist/zone.js"></script>
    <script src="node_modules/reflect-metadata/Reflect.js"></script>
    <script src="node_modules/systemjs/dist/system.src.js"></script>
    <!-- 2. Configure SystemJS -->
    <script src="systemjs.config.js"></script>
    <script>
      System.import('app').catch(function(err){ console.error(err); });
    </script>
  </head>
  <!-- 3. Display the application -->
  <body>
    <my-app>Loading...</my-app>
    <key-up2></key-up2>
  </body>
</html>
ブラウザ表示
key-upに反応してタイプログが出力されるようになりました。
はい、今回は終了。
(しょぼくてすみません)
~次回はGo + TaskQueue + CloudDatastore + Angular2予定~