はじめに
Amplifyがどのようなものか、あまり理解できていないので、チュートリアルをやってみました。
色々な方がチュートリアルを紹介されていますが、内容が古くなっていたりしていたため、公式(?)のチュートリアルをなぞってやってみました。
(自分のメモがてら記録を残したものになります。)
AmplifyやVueは初心者のため、内容を理解できていない部分があります・・・。(写経です)
(もっと丁寧に解説されている方もいらっしゃるかと思いますが、極力コマンドの結果出力なども入れてみました。)
対象のチュートリアル
1. Prerequisites
環境
環境要件
Node.js v14.x or later
npm v6.14.4 or later
git v2.14.1 or later
ローカル環境
Windows10 + Windows Terminal利用。
❯ node -v
v16.13.1
❯ npm -v
8.1.2
❯ git --version
git version 2.39.0.windows.2
AWSアカウント
既存のものを利用。
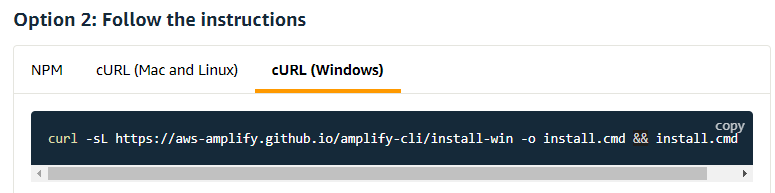
Amplify CLIのインストール
「Option 2: Follow the instructions」からWindowsのコマンドをコピー・実行。
Amplifyの設定
amplify configure
使用するリージョンとIAMユーザを指定。
Specify the AWS Region
? region:  us-east-1
Specify the username of the new IAM user:
? user name:  amplify-test
IAMユーザの追加
マネジメントコンソールにてIAMユーザの追加・権限設定。

ポリシーは「AdministratorAccess-Amplify」を設定。

作成したユーザのアクセスキーを作成し、「Access key ID」「Secret access key」を控えておく。
ターミナル上で入力、プロファイル名称を入力。(デフォルトにしたくなかったため、指定しました。)
Enter the access key of the newly created user:
? accessKeyId:  ********************
? secretAccessKey:  ****************************************
This would update/create the AWS Profile in your local machine
? Profile Name:  amplify-test
2. Set up fullstack project
Vue3アプリの作成
❯ npm init vue@3
Need to install the following packages:
  create-vue@3
Ok to proceed? (y) y

Vue.js - The Progressive JavaScript Framework

√ Project name: ... myamplifyproject
√ Add TypeScript? ... No
√ Add JSX Support? ... No
√ Add Vue Router for Single Page Application development? ... No
√ Add Pinia for state management? ... No
√ Add Vitest for Unit Testing? ... No
√ Add an End-to-End Testing Solution? » No
√ Add ESLint for code quality? ... No
必要なモジュールのインストール
cd myamplifyproject
npm install
アプリの実行
npm run dev
ターミナルに表示されたLocalのURLから表示。
  VITE v4.0.3  ready in 1166 ms

  ➜  Local:   http://127.0.0.1:5173/
  ➜  Network: use --host to expose
  ➜  press h to show help

新しいバックエンドの初期化
amplify init
❯ amplify init
Note: It is recommended to run this command from the root of your app directory
? Enter a name for the project todo <--- TODO と指定
The following configuration will be applied:

Project information
| Name: todo
| Environment: dev
| Default editor: Visual Studio Code
| App type: javascript
| Javascript framework: vue
| Source Directory Path: src
| Distribution Directory Path: dist
| Build Command: npm.cmd run-script build
| Start Command: npm.cmd run-script serve

? Initialize the project with the above configuration? Yes
Using default provider  awscloudformation
? Select the authentication method you want to use: AWS profile <---認証はprofile
? Please choose the profile you want to use amplify-test <--- 先ほど作成したものを指定
CloudFormationにて作成される。
Adding backend environment dev to AWS Amplify app: **********

Deployment completed.
Deployed root stack todo [ ======================================== ] 4/4
        AuthRole                       AWS::IAM::Role                 CREATE_COMPLETE
        DeploymentBucket               AWS::S3::Bucket                CREATE_COMPLETE
        UnauthRole                     AWS::IAM::Role                 CREATE_COMPLETE
        amplify-todo-dev-*****         AWS::CloudFormation::Stack     CREATE_COMPLETE

√ Help improve Amplify CLI by sharing non sensitive configurations on failures (y/N)  <--- Nを指定
Deployment bucket fetched.
√ Initialized provider successfully.
√ Initialized your environment successfully.

Your project has been successfully initialized and connected to the cloud!
Amplifyのライブラリをインストール
npm install aws-amplify @aws-amplify/ui-vue
フロントエンドのセットアップ
src/main.jsを修正
import { createApp } from 'vue'
import App from './App.vue'

import './assets/main.css'

import { Amplify } from 'aws-amplify'; //追加
import awsExports from './aws-exports'; //追加
Amplify.configure(awsExports); //追加

createApp(App).mount('#app')
Vue Vite Configの修正
index.htmlに追記
<!DOCTYPE html>
<html lang="en">
  <head>
    <meta charset="UTF-8">
    <link rel="icon" href="/favicon.ico">
    <meta name="viewport" content="width=device-width, initial-scale=1.0">
    <title>Vite App</title>
  </head>
  <body>
    <div id="app"></div>
    <script type="module" src="/src/main.js"></script>
    <!-- 追加 -->
    <script>
      window.global = window;
      var exports = {};
    </script>
    <!-- 追加 -->
  </body>
</html>
aliasの中を修正
import { fileURLToPath, URL } from 'node:url'

import { defineConfig } from 'vite'
import vue from '@vitejs/plugin-vue'

// https://vitejs.dev/config/
export default defineConfig({
  plugins: [vue()],
  resolve: {
    alias: [
      {
        find: './runtimeConfig',
        replacement: './runtimeConfig.browser',
      },
    ]
  }
})
TypeScriptは使用しないので、tsconfig.jsonは修正なし。
3. Connect API and database to the app
GraphQL APIとデータベースの作成
amplify add api
❯ amplify add api
? Select from one of the below mentioned services: (Use arrow keys)
> GraphQL
  REST
? Provide API name: todo
? Choose the default authorization type for the API (Use arrow keys)
> API key
  Amazon Cognito User Pool
  IAM
  OpenID Connect
  Lambda
? Enter a description for the API key: » 7
? Here is the GraphQL API that we will create. Select a setting to edit or continue (Use arrow keys)

  Name: todo
  Authorization modes: API key (default, expiration time: 7 days from now)
  Conflict detection (required for DataStore): Disabled
> Continue  <--- ここはContinueで次へ進む
? Choose a schema template: (Use arrow keys)
> Single object with fields (e.g., “Todo” with ID, name, description)
  One-to-many relationship (e.g., “Blogs” with “Posts” and “Comments”)
  Blank Schema
指定したエディタでスキーマのファイルが開かれる。
√ Do you want to edit the schema now? (Y/n) · yes
Edit the file in your editor: C:\Users\***\myamplifyproject\amplify\backend\api\todo\schema.graphql
modelの記載がAmplifyに認識させるために記載されているようです。
input AMPLIFY { globalAuthRule: AuthRule = { allow: public } } # FOR TESTING ONLY!

type Todo @model {
  id: ID!
  name: String!
  description: String
}
GraphQL APIのデプロイ
amplify push
√ GraphQL schema compiled successfully.
√ Successfully pulled backend environment dev from the cloud.
√  GraphQL schema compiled successfully.
(メッセージ一部割愛)

    Current Environment: dev

┌──────────┬───────────────┬───────────┬───────────────────┐
│ Category │ Resource name │ Operation │ Provider plugin   │
├──────────┼───────────────┼───────────┼───────────────────┤
│ Api      │ todo          │ Create    │ awscloudformation │
└──────────┴───────────────┴───────────┴───────────────────┘
? Are you sure you want to continue? Yes
√ GraphQL schema compiled successfully.
GraphQL APIのためのフロントエンドコードの生成
? Do you want to generate code for your newly created GraphQL API Yes
? Choose the code generation language target (Use arrow keys)
> javascript
  typescript
  flow
? Do you want to generate code for your newly created GraphQL API Yes
? Choose the code generation language target javascript
? Enter the file name pattern of graphql queries, mutations and subscriptions (src\graphql\**\*.js) <--- Enterで進む
? Do you want to generate/update all possible GraphQL operations - queries, mutations and subscripti
ons (Y/n) Y
? Enter maximum statement depth [increase from default if your schema is deeply nested] (2) <--- Enterで進む
CloudFormationにて環境が構築される。
Deployment completed.
Deployed root stack todo [ ======================================== ] 2/2
        amplify-todo-dev-****        AWS::CloudFormation::Stack     UPDATE_COMPLETE
        apitodo                        AWS::CloudFormation::Stack     CREATE_COMPLETE
Deployed api todo [ ======================================== ] 6/6
        GraphQLAPI                     AWS::AppSync::GraphQLApi       CREATE_COMPLETE
        GraphQLAPINONE**********       AWS::AppSync::DataSource       CREATE_COMPLETE
        GraphQLAPIDefaultApiKey****    AWS::AppSync::ApiKey           CREATE_COMPLETE
        GraphQLAPITransformerSchema3C… AWS::AppSync::GraphQLSchema    CREATE_COMPLETE
        Todo                           AWS::CloudFormation::Stack     CREATE_COMPLETE
        CustomResourcesjson            AWS::CloudFormation::Stack     CREATE_COMPLETE

√ Generated GraphQL operations successfully and saved at src\graphql
amplifyの状態を確認
amplify status
    Current Environment: dev

┌──────────┬───────────────┬───────────┬───────────────────┐
│ Category │ Resource name │ Operation │ Provider plugin   │
├──────────┼───────────────┼───────────┼───────────────────┤
│ Api      │ todo          │ No Change │ awscloudformation │
└──────────┴───────────────┴───────────┴───────────────────┘

GraphQL endpoint: https://********.appsync-api.us-east-1.amazonaws.com/graphql
GraphQL API KEY: ************

GraphQL transformer version: 2
APIのテスト
コンソールで確認。(Amplify Studioがおすすめされるが、ひとまずAWS Consoleで確認)
クエリを実行して確認できる模様。
amplify console


Connect frontend to API
GraphQL操作の記載
App.vueを書き換える。(チュートリアルでは3ステップになっているが、完成形が以下。)
<template>
  <div id="app">
    <h1>Todo App</h1>
    <input type="text" v-model="name" placeholder="Todo name" />
    <input type="text" v-model="description" placeholder="Todo description" />
    <button v-on:click="createTodo">Create Todo</button>
    <div v-for="item in todos" :key="item.id">
      <h3>{{ item.name }}</h3>
      <p>{{ item.description }}</p>
    </div>
  </div>
</template>

<script>
  import { API } from 'aws-amplify';
  import { createTodo } from './graphql/mutations';
  import { listTodos } from './graphql/queries';
  import { onCreateTodo } from './graphql/subscriptions';

  export default {
    name: 'App',
    async created() {
      this.getTodos();
    },
    data() {
      return {
        name: '',
        description: '',
        todos: []
      };
    },
    created() {
      this.getTodos();
      this.subscribe();
    },
    methods: {
      async createTodo() {
        const { name, description } = this;
        if (!name || !description) return;
        const todo = { name, description };
        this.todos = [...this.todos, todo];
        await API.graphql({
          query: createTodo,
          variables: { input: todo }
        });
        this.name = '';
        this.description = '';
      },
      async getTodos() {
        const todos = await API.graphql({
          query: listTodos
        });
        this.todos = todos.data.listTodos.items;
      },
      subscribe() {
        API.graphql({ query: onCreateTodo }).subscribe({
          next: (eventData) => {
            let todo = eventData.value.data.onCreateTodo;
            if (this.todos.some((item) => item.name === todo.name)) return; // remove duplications
            this.todos = [...this.todos, todo];
          }
        });
      }
    }
  };
</script>
4. Add authentication
Amplifyでの認証
amplify add auth
Using service: Cognito, provided by: awscloudformation

 The current configured provider is Amazon Cognito.

 Do you want to use the default authentication and security configuration? Default configuration
 Warning: you will not be able to edit these selections.
 How do you want users to be able to sign in? Username <--- Usernameを選択
 Do you want to configure advanced settings? No, I am done. <--- No, I am done.を選択
√ Successfully added auth resource todo****** locally
デプロイを実施。
amplify push
CloudFormationでCognitoが作成される。
┌──────────┬───────────────┬───────────┬───────────────────┐
│ Category │ Resource name │ Operation │ Provider plugin   │
├──────────┼───────────────┼───────────┼───────────────────┤
│ Auth     │ todo******    │ Create    │ awscloudformation │
├──────────┼───────────────┼───────────┼───────────────────┤
│ Api      │ todo          │ No Change │ awscloudformation │
└──────────┴───────────────┴───────────┴───────────────────┘
? Are you sure you want to continue? Yes
Deployment completed.
Deployed root stack todo [ ======================================== ] 3/3
        amplify-todo-dev-****          AWS::CloudFormation::Stack     UPDATE_COMPLETE
        authtodo*****                  AWS::CloudFormation::Stack     CREATE_COMPLETE
        apitodo                        AWS::CloudFormation::Stack     UPDATE_COMPLETE
Deployed auth todo*****  [ ======================================== ] 10/10
        UserPool                       AWS::Cognito::UserPool         CREATE_COMPLETE
        UserPoolClientWeb              AWS::Cognito::UserPoolClient   CREATE_COMPLETE
        UserPoolClient                 AWS::Cognito::UserPoolClient   CREATE_COMPLETE
        UserPoolClientRole             AWS::IAM::Role                 CREATE_COMPLETE
        UserPoolClientLambda           AWS::Lambda::Function          CREATE_COMPLETE
        UserPoolClientLambdaPolicy     AWS::IAM::Policy               CREATE_COMPLETE
        UserPoolClientLogPolicy        AWS::IAM::Policy               CREATE_COMPLETE
        UserPoolClientInputs           Custom::LambdaCallout          CREATE_COMPLETE
        IdentityPool                   AWS::Cognito::IdentityPool     CREATE_COMPLETE
        IdentityPoolRoleMap            AWS::Cognito::IdentityPoolRol… CREATE_COMPLETE
Amplify Consoleで確認。

Cognitoのユーザプールも作成されている。

login UIの作成
App.vueへ認証の記載を追加。(レイアウトが適当な点はご容赦ください・・・。)
<template>
  <div id="app">
      <authenticator>
        <template v-slot="{ user, signOut }">
          <h2>Hello {{ user.username }}!</h2>
          <button @click="signOut">Sign Out</button>
          <h2>Todo App</h2>
          <input type="text" v-model="name" placeholder="Todo name" />
          <input type="text" v-model="description" placeholder="Todo description" />
          <button v-on:click="createTodo">Create Todo</button>
          <div v-for="item in todos" :key="item.id">
            <h3>{{ item.name }}</h3>
            <p>{{ item.description }}</p>
          </div>
        </template>
      </authenticator>
  </div>
</template>

<script>
  import { API } from 'aws-amplify';
  import { createTodo } from './graphql/mutations';
  import { listTodos } from './graphql/queries';
  import { onCreateTodo } from './graphql/subscriptions';
  import { Authenticator } from '@aws-amplify/ui-vue'; // 追加
  import '@aws-amplify/ui-vue/styles.css'; // 追加

  export default {
    name: 'App',
    async created() {
      this.getTodos();
    },
    data() {
      return {
        name: '',
        description: '',
        todos: []
      };
    },
    components: { // 追加
      Authenticator
    },
    created() {
      this.getTodos();
      this.subscribe();
    },
    methods: {
      async createTodo() {
        const { name, description } = this;
        if (!name || !description) return;
        const todo = { name, description };
        this.todos = [...this.todos, todo];
        await API.graphql({
          query: createTodo,
          variables: { input: todo }
        });
        this.name = '';
        this.description = '';
      },
      async getTodos() {
        const todos = await API.graphql({
          query: listTodos
        });
        this.todos = todos.data.listTodos.items;
      },
      subscribe() {
        API.graphql({ query: onCreateTodo }).subscribe({
          next: (eventData) => {
            let todo = eventData.value.data.onCreateTodo;
            if (this.todos.some((item) => item.name === todo.name)) return; // remove duplications
            this.todos = [...this.todos, todo];
          }
        });
      }
    }
  };
</script>
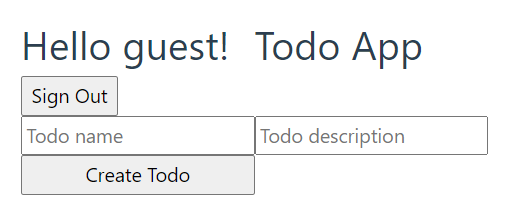
認証前

認証後
5. Deploy and host app
hostingの追加
amplify add hosting
? Select the plugin module to execute ...  (Use arrow keys or type to filter)
❯ Hosting with Amplify Console (Managed hosting with custom domains, Continuous deployment)
  Amazon CloudFront and S3
? Choose a type (Use arrow keys)
  Continuous deployment (Git-based deployments)
> Manual deployment
  Learn more
アプリのpublish
amplify publish
❯ amplify publish
(略)
    Current Environment: dev
┌──────────┬────────────────┬───────────┬───────────────────┐
│ Category │ Resource name  │ Operation │ Provider plugin   │
├──────────┼────────────────┼───────────┼───────────────────┤
│ Hosting  │ amplifyhosting │ Create    │ awscloudformation │
├──────────┼────────────────┼───────────┼───────────────────┤
│ Api      │ todo           │ No Change │ awscloudformation │
├──────────┼────────────────┼───────────┼───────────────────┤
│ Auth     │ todo06ef4fc2   │ No Change │ awscloudformation │
└──────────┴────────────────┴───────────┴───────────────────┘
? Are you sure you want to continue? Yes

Deployment completed.
Deployed root stack todo [ ======================================== ] 4/4
        amplify-todo-dev-******        AWS::CloudFormation::Stack     UPDATE_COMPLETE
        apitodo                        AWS::CloudFormation::Stack     UPDATE_COMPLETE
        hostingamplifyhosting          AWS::CloudFormation::Stack     CREATE_COMPLETE
        authtodo********               AWS::CloudFormation::Stack     UPDATE_COMPLETE
Deployed hosting amplifyhosting [ ======================================== ] 1/1
        AmplifyBranch                  AWS::Amplify::Branch           CREATE_COMPLETE
(略)
Publish started for amplifyhosting

> myamplifyproject@0.0.0 build
> vite build
(略)
√ Zipping artifacts completed.
√ Deployment complete!
https://dev.***********.amplifyapp.com
表示された 「dev.***********.amplifyapp.com」で確認。

更新方法
修正をした場合には再度、
amplify publish
6. 環境の削除
作成した環境を全て削除する場合には、以下を実行。
amplify delete
ハマったポイント
App.vueへの認証の記述を追加するところで、チュートリアルの記載では、

どこに書いてよいか分からない・・・。色々と調べて記載したコードにたどり着きました。