はじめに
この記事では WebVR のフレームワークの一つである A-Frame を使って、VR空間上でマニ車を回して遊ぶ方法について説明します。
WebVRでマニ車を作った
実物
PCよりもスマートフォンやヘッドマウントディスプレイで見た方が楽しめます。
きっかけ
YAPC:Tokyo 2019 に行った際に、hitode909 さんの WebVRで作品を作って展示しようという発表を聞きました。それで自分も何か作ってみようと思い、どうせなら徳が積めるものが良いのでマニ車を回すことにしました。しばらく作りかけたまま放置していたのですが、最近マニ車がバズっていたので記事を書くことにしました。
文献
A-Frame について解説した記事としては、Qiita に新しいWebVRフレームワークA-Frame入門がありますが、投稿が2015年12月とやや古いです。最近では LIG のVR表現をカンタンに実装できる?「A-Frame」であそんでみたよ!や、マグネッツの A-Frameを使ってWebVRを実装してみようといった記事がヒットします。デベロッパーの Mozilla も A-Frameを使った基本的なデモの作成
という記事を出しています。
チュートリアル
A-Frame のチュートリアルとしては、A-Frame Tutorial で扱い方を一とおり学ぶことができます。
リファレンス
実際に制作する際には、A-Frame のリファレンスを参照することになるでしょう。
実践
それでは A-Frame の準備からVRマニ車の公開までを説明します。
準備
まずは適当なディレクトリを作成します。今回は workspace 上 に mani を作りました。
~ silloi$ mkdir workspace/mani
~ silloi$ cd workspace/mani
以下、この mani ディレクトリで作業します。
A-Frameの読み込み
A-Frame を利用するのに、フレームワークのインストール等は特に必要ありません。
html ファイルの head タグ内に、script タグで A-Frame のスクリプトを読み込ませるだけです。
<script src="https://aframe.io/releases/0.9.0/aframe.min.js"></script>
具体的には、適当な名前の html ファイルを作成し、次のように記述します。
<!DOCTYPE html>
<html>
  <head>
    <meta charset="utf-8">
    <title>hello, WebVR!</title>
    <script src="https://aframe.io/releases/0.9.0/aframe.min.js"></script>
  </head>
  <body>
  </body>
</html>
オブジェクトを記述する
A-Frameでは空間内に置かれる物体のことをオブジェクトと呼びます。
オブジェクトは body タグ内に置かれた a-scene タグの内側に記述します。
  <body>
    <a-scene>
      <!-- ここにオブジェクトを記述 -->
    </a-scene>
  <body>
現時点では何も記述していないのでオブジェクトは何もありませんが、htmlファイルを開くと右下にVRのマークが表示されます。
天球を設置する
まずは背景代わりに天球を設置したいと思います。
天球は a-sky タグで記述します。色は color 要素で指定します。
  <body>
    <a-scene>
      <a-sky color="#ECECEC" radius="60"></a-sky>
    </a-scene>
  </body>

円柱を置く
次に円柱を置きます。
円柱は a-cylinder タグで記述します。座標はそのままだとカメラの位置と被ってしまうため、position 要素で少し奥に -5 だけずらします。高さは height 要素で、半径は radius 要素で指定します。
  <body>
    <a-scene>
      <a-cylinder color="#FFC65D" position="0 1 -5" height="1.5" radius="1.5"></a-cylinder>
      <a-sky color="#ECECEC" radius="60"></a-sky>
    </a-scene>
  <body>

床を置く
今度は床を置きます。床そのもののオブジェクトはないので、平板に当たる plane オブジェクトを転倒することで実現します。plane オブジェクトは height 、 width でそれぞれ高さと幅を指定します。 rotation 要素で -90 0 0 と指定することで、オブジェクトを奥に -90 度回転させることができます。
  <body>
    <a-scene>
      <a-plane color="#7BC8A4" height="100" width="100" rotation="-90 0 0"></a-plane>
      <a-cylinder color="#FFC65D" position="0 1 -5" height="1.5" radius="1.5"></a-cylinder>
      <a-sky color="#ECECEC" radius="60"></a-sky>
    </a-scene>
  <body>

画像を貼る
オブジェクトに画像を貼り付けるには、 color 要素の代わりに src 要素で画像のURLを指定します。
今回は天球、床それぞれ適当な画像を貼り付けます。
  <body>
    <a-scene>
      <a-cylinder color="#FFC65D" position="0 1 -5" height="1.5" radius="1.5"></a-cylinder>
      <a-sky src="https://farm2.staticflickr.com/1499/25634412711_f89ab2a240_k.jpg" radius="60"></a-sky>
      <a-plane src="https://cdn.shopify.com/s/files/1/0969/9128/products/TSPF42_956ec7f9-949a-4160-93df-416b3fe54f09.jpg" height="100" width="100" rotation="-90 0 0" ></a-plane>
    </a-scene>
  </body>

小さなマニ車を回す
それでは円柱をマニ車に変えていきます。マニ車には六字真言と呼ばれる六文字のチベット文字が刻まれているということなので、この画像を円柱の src 要素に指定します。
  <body>
    <a-scene>
      <a-cylinder src="https://svvpz4bkrdb1rpd6nhvckz10-wpengine.netdna-ssl.com/wp-content/uploads/OmManiPadmeHung.jpg" position="0 1 -5" height="1.5" radius="1.5"></a-cylinder>
      <a-sky src="https://farm2.staticflickr.com/1499/25634412711_f89ab2a240_k.jpg" radius="60"></a-sky>
      <a-plane src="https://cdn.shopify.com/s/files/1/0969/9128/products/TSPF42_956ec7f9-949a-4160-93df-416b3fe54f09.jpg" height="100" width="100" rotation="-90 0 0" ></a-plane>
    </a-scene>
  </body>
 今度はこのマニ車を回します。アニメーションにはいくつかの方法がありますが、今回は `animation` 要素を使う方法を採用します。
オブジェクトを回す上で重要なのは、`property: rotation; from: 0 0 0; to: 0 -360 0;` で360度の回転を指定すること、`loop: true` でそれをループさせることです。`dur: 2000` で一回転を 2000 ミリ秒に指定し、`easing: linear` で回転が一定速度(加速せず、減速しない)になるようにしています。
今度はこのマニ車を回します。アニメーションにはいくつかの方法がありますが、今回は `animation` 要素を使う方法を採用します。
オブジェクトを回す上で重要なのは、`property: rotation; from: 0 0 0; to: 0 -360 0;` で360度の回転を指定すること、`loop: true` でそれをループさせることです。`dur: 2000` で一回転を 2000 ミリ秒に指定し、`easing: linear` で回転が一定速度(加速せず、減速しない)になるようにしています。
<a-cylinder animation="property: rotation; from: 0 0 0; to: 0 -360 0; dur: 2000; easing: linear; loop: true" src="https://svvpz4bkrdb1rpd6nhvckz10-wpengine.netdna-ssl.com/wp-content/uploads/OmManiPadmeHung.jpg" position="0 1 -5" height="1.5" radius="1.5"></a-cylinder>
body タグ全体は次のようになります。
  <body>
    <a-scene>
      <a-cylinder animation="property: rotation; from: 0 0 0; to: 0 -360 0; dur: 2000; easing: linear; loop: true" src="https://svvpz4bkrdb1rpd6nhvckz10-wpengine.netdna-ssl.com/wp-content/uploads/OmManiPadmeHung.jpg" position="0 1 -5" height="1.5" radius="1.5"></a-cylinder>
      <a-sky src="https://farm2.staticflickr.com/1499/25634412711_f89ab2a240_k.jpg" radius="60"></a-sky>
      <a-plane src="https://cdn.shopify.com/s/files/1/0969/9128/products/TSPF42_956ec7f9-949a-4160-93df-416b3fe54f09.jpg" height="100" width="100" rotation="-90 0 0" ></a-plane>
    </a-scene>
  </body>

マニ車が回転しました。功徳がどんどん積み上がっていきます!
大きなマニ車を回す
今度は大きなマニ車を視界の外側で回転させます。つまり巨大なマニ車を内側から覗き上げることになります。
このままだと六字真言が見にくくなるので、先に天井と壁面を設置します。それぞれ a-plane と a-cylinder で記述します。
天井は床とは逆に手前に -90 度回転させます。
壁面については、a-cylinder などのオブジェクトはそのままだと内側から見ると表示されないため、material 要素で side: back と指定します。さらに、repeat: 16 2 で横に 16 回、縦に 2 回画像を繰り返します。後の照明のことも考えて、metalness: 0.5 も追加しましょう。
      <a-plane src="https://cdn.shopify.com/s/files/1/0969/9128/products/TSPF42_956ec7f9-949a-4160-93df-416b3fe54f09.jpg" height="100" width="100" rotation="90 0 0" position="0 30 0"></a-plane>
      <a-cylinder material="metalness: 0.5; repeat: 16 2; side: back" src="https://siliguritimes.com/wp-content/uploads/2017/02/buddha1.jpg" height="65" radius="42"></a-cylinder>
 この際、照明も追加しておきます。照明は `a-light` タグで記述します。`type="ambient"` で光源のない照明となり、`intensity` で強さを調整します。
<a-light type="ambient" color="#FFFFFF" intensity="2" position="0 100 0"></a-light>

最後に大きなマニ車として六字真言の画像を追加します。タグには透過画像が扱える a-curvedimage を使います。a-curvedimage の場合、theta-length 要素でカバーする角度を指定します。小さなマニ車同様にアニメーションを追加し、material="repeat: 32 24" で適当な数繰り返します。
<a-curvedimage material="repeat: 32 24" animation="property: rotation; from: 0 0 0; to: 0 360 0; dur: 20000; easing: linear; loop: true" src="https://upload.wikimedia.org/wikipedia/commons/thumb/0/07/OM_MANI_PADME_HUM_%28Lanydza_script%29.svg/2880px-OM_MANI_PADME_HUM_%28Lanydza_script%29.svg.png" height="60" radius="40" theta-length="360"></a-curvedimage>
body タグ全体の記述は以下のようになります。
  <body>
    <a-scene>
      <a-curvedimage material="repeat: 32 24" animation="property: rotation; from: 0 0 0; to: 0 360 0; dur: 20000; easing: linear; loop: true" src="https://upload.wikimedia.org/wikipedia/commons/thumb/0/07/OM_MANI_PADME_HUM_%28Lanydza_script%29.svg/2880px-OM_MANI_PADME_HUM_%28Lanydza_script%29.svg.png" height="60" radius="40" theta-length="360" position="0 0 0"></a-curvedimage>
      <a-light type="ambient" color="#FFFFFF" intensity="3" position="0 100 0"></a-light>
      <a-cylinder animation="property: rotation; from: 0 0 0; to: 0 -360 0; dur: 2000; easing: linear; loop: true" src="https://svvpz4bkrdb1rpd6nhvckz10-wpengine.netdna-ssl.com/wp-content/uploads/OmManiPadmeHung.jpg" position="0 1 -5" height="1.5" radius="1.5"></a-cylinder>
      <a-sky src="https://farm2.staticflickr.com/1499/25634412711_f89ab2a240_k.jpg" radius="60"></a-sky>
      <a-plane material="shader: flat" src="https://cdn.shopify.com/s/files/1/0969/9128/products/TSPF42_956ec7f9-949a-4160-93df-416b3fe54f09.jpg" height="100" width="100" rotation="-90 0 0" ></a-plane>
      <a-plane src="https://cdn.shopify.com/s/files/1/0969/9128/products/TSPF42_956ec7f9-949a-4160-93df-416b3fe54f09.jpg" height="100" width="100" rotation="90 0 0" position="0 30 0"></a-plane>
      <a-cylinder material="metalness: 0.5; repeat: 16 2; side: back" src="https://siliguritimes.com/wp-content/uploads/2017/02/buddha1.jpg" height="65" radius="42"></a-cylinder>
    </a-scene>
  </body>
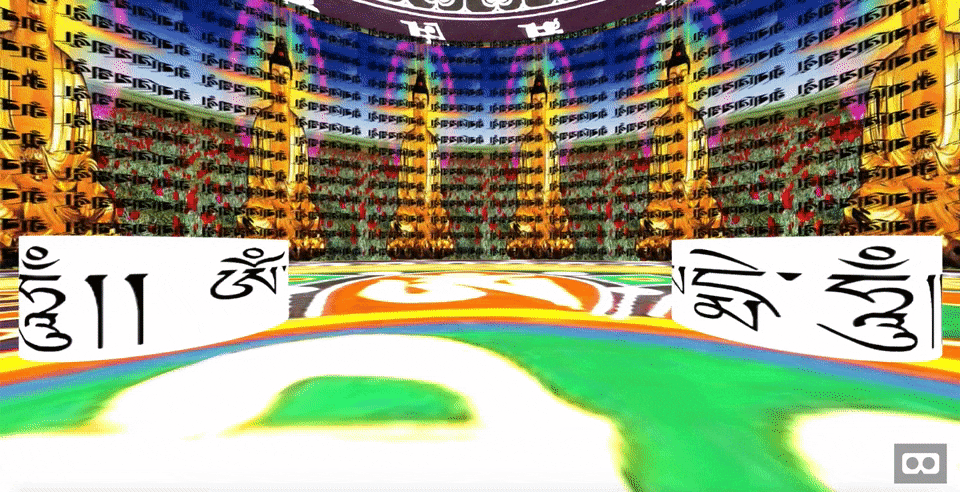
たくさんの六字真言を回すことができました!
試して確認する
スマートフォンやヘッドマウントディスプレイを持っていれば、ngrok でサーバを立てて実際に確認することもできます。
python -m SimpleHTTPServer 3100 & ngrok http 3100
公開
GitHub に push したものをそのまま GitHub Pages で公開することができます。
今回のデモからさらに手を加えたものを公開しているのでご覧ください。

備考
画像の相性
A-Frame は画像の扱いがうまくいかないことがあります。透過画像を重ねられないといった既知のものもありますが、一部の画像が正しく表示されないことがあり、その理由はよくわかりませんでした。
ローカルでの参照もうまくいかず、ネットから引っ張ってきた画像のままデプロイしています。直リンクごめんなさい。
Entity-Component
実際の開発では、a-cylinder といったオブジェクトのタグを使うよりも、 a-entity タグで geometry="primitive: cylinder といった具合に表現する方が、拡張などができて便利だそうです。しかし説明が一回りめんどうになるので、本記事では primitive な表現を用いました。
