はじめに
事前準備の次はWebサーバ側のセットアップをしていきます。
sshクライアントや作業用ユーザの設定はコチラのページを参照して下さい。
ローカルネットワークの設定
まずDBサーバと通信する為にローカルネットワークの設定を行います。
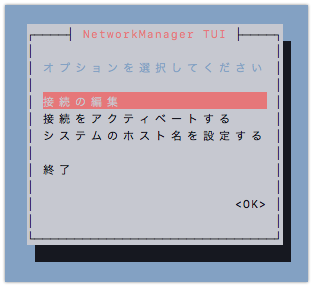
eth1のアクティベート
下記コマンドを実行します。
$ sudo nmtui
"接続をアクティベートする"を選択してEnterを押下します。
※ 任意で"システムのホスト名を設定する"からサーバのホスト名を設定してください。
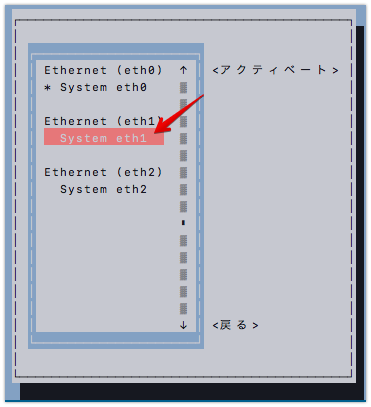
eth1を選択してEnterを押下します。eth0と同様にeth1の左横に「*」が付けばOKです。
戻るを押下します。
eth1のIPアドレスの設定
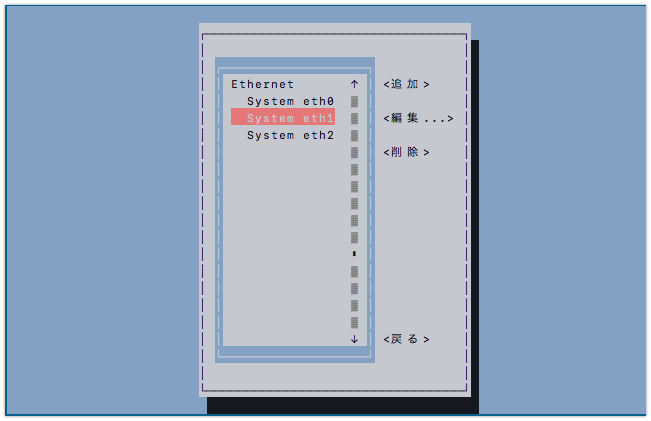
次に"接続の編集"を選択してEnterを押下します。
"system eth1"を選択してEnterを押下します。
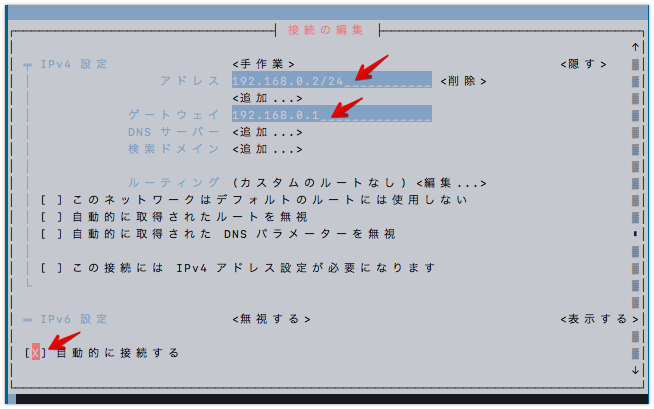
"IPv4設定"の項で"無効"となっているところを選択しEnterを押下し、"手作業"を選択します。
その後、その右側にある"表示"を選択しEnterを押下します。
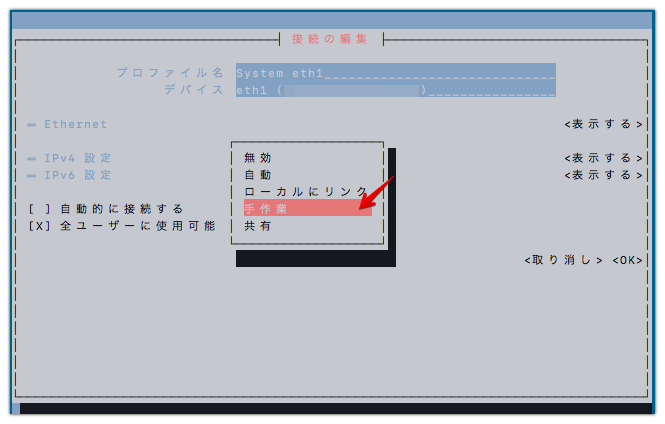
下記のような画面が表示されますので、"アドレス"と"ゲートウェイ"にローカルIPアドレスとなる任意の値を入力し控えておきます。(ローカルIPについてよくわからなければ画像の通りに入力して下さい。)
"自動的に接続する"に[x]を入れて画面下部にある<OK>を選択しEnterを押下します。
NetworkManagerの再起動
設定を反映させる為にNetworkManagerを再起動します。
$ systemctl restart NetworkManager
==== AUTHENTICATING FOR org.freedesktop.systemd1.manage-units ===
Authentication is required to manage system services or units.
Authenticating as: username
Password:  ⬅︎ユーザパスワードの入力
==== AUTHENTICATION COMPLETE ===
設定されたIPアドレスの確認
設定を確認してみます。
eth1のIPアドレスが指定した値になっていればOKです。
$ ip addr show
///

3: eth1: <BROADCAST,MULTICAST,UP,LOWER_UP> mtu 1500 qdisc pfifo_fast state UP group default qlen 1000
    link/ether aa:aa:aa:aa:aa:aa brd ff:ff:ff:ff:ff:ff
    inet 192.168.0.2/24 brd 192.168.0.255 scope global noprefixroute eth1
       valid_lft forever preferred_lft forever

///
以上でローカルネットワークの設定は完了です。
Apacheのインストールとセットアップ
Apacheのインストールとセットアップを行います。
以下の情報を用意して下さい。
- 取得した独自ドメイン
- さくらのVPS(webサーバ用)のIPアドレス
Apacheのインストール
$ sudo yum -y install httpd


 <<<略>>>

Complete!
Apacheの設定ファイルを開く
viで設定ファイルを開いて編集していきます。
$ sudo vi /etc/httpd/conf/httpd.conf

#
# This is the main Apache HTTP server configuration file.  It contains the
# configuration directives that give the server its instructions.
# See <URL:http://httpd.apache.org/docs/2.4/> for detailed information.
# In particular, see
# <URL:http://httpd.apache.org/docs/2.4/mod/directives.html>
# for a discussion of each configuration directive.
#

 <<<略>>>
ServerNameの編集
下記のようにコメントアウトを解除し独自ドメインを入力して下さい。
#
# ServerName gives the name and port that the server uses to identify itself.
# This can often be determined automatically, but we recommend you specify
# it explicitly to prevent problems during startup.
#
# If your host doesn't have a registered DNS name, enter its IP address here.
#
# ServerName www.example.com:80  ⬅︎ 先頭の[#]を消して独自ドメインを入力
# 例) ServerName hogehoge.com:80
DerectoryIndexについて
ここは基本編集する必要はないのですが、一応説明しておきます。
下記の部分はサイトのURLをブラウザに入力する際に、ディレクトリ名が省略された場合に表示されるページを設定する箇所です。
要するに[ http://www.mrchildren.jp/index.html/ ]を[ http://www.mrchildren.jp/ ]と入力しても表示されるようにする設定です。
#
# DirectoryIndex: sets the file that Apache will serve if a directory
# is requested.
#
<IfModule dir_module>
    DirectoryIndex index.html ← ココ
</IfModule>
Apacheの設定ファイルの編集は以上です。
最後に構文チェックの為のコマンドを実行して[ syntax OK ]と表示されるか確認しておいて下さい。
$ httpd -t
Syntax OK
よくわからないErrorが出た場合は大抵スペルミスや、必要以上にテキストを削除してしまっています。
Error Msgの中に[ line 100 ]のように何行目がおかしいか表示してくれているはずなので、それを頼りに確認してみてください。
Apacheの起動と自動起動の有効化
$ sudo systemctl start httpd
$ sudo systemctl enable httpd
Apacheのステータスの確認
ステータスを見るときは下記を実行して下さい。
色々表示されますがLoadedのところがenabled、Activeがactive (running)と表示されればOKです。
$ systemctl status httpd
● httpd.service - The Apache HTTP Server
   Loaded: loaded (/usr/lib/systemd/system/httpd.service; enabled; vendor preset: disabled)
   Active: active (running) since 火 2019-04-30 00:05:24 JST; 25s ago
///
Firewallへのアクセス許可設定
$ sudo firewall-cmd --permanent --add-service=http
success
& sudo firewall-cmd --reload
success
これで自分のVPSのIPアドレス、または独自ドメインでブラウザで叩けば下記のようなApacheのテストページが表示されるはずです。
ドキュメントルートが空の場合はテストページが表示される仕様になっています。
試しに /var/www/html/ の配下に簡単なhtmlファイルを置いてみるのもよいと思います。

PHPのインストール
PHPでMySQLとMariaDBを扱う為のパッケージ等もまとめてインストールします。
$ sudo yum -y install php php-mbstring php-gb php-mysql
Apacheの再起動
Apache側でPHPが扱えるようにする為、Apacheを再起動します。
$ sudo systemctl restart httpd
PHPのバージョン確認
$ php -v
PHP 5.4.16 (cli) (built: Oct 30 2018 19:30:51)
Copyright (c) 1997-2013 The PHP Group
Zend Engine v2.4.0, Copyright (c) 1998-2013 Zend Technologies
PHPのバージョンアップ
5.4系ではWordpressのインストール時に「サーバーの PHP バージョンは 5.4.16 ですが WordPress 5.2 は 5.6.20 以上のみでご利用になれます。」と表示され使用出来ません。
5.6系にバージョンアップします。
まずインストールされているPHPのパッケージ等を確認します。
$ rpm -qa | grep php
php-mysql-5.4.16-46.el7.x86_64
php-pdo-5.4.16-46.el7.x86_64
php-mbstring-5.4.16-46.el7.x86_64
php-cli-5.4.16-46.el7.x86_64
php-5.4.16-46.el7.x86_64
php-common-5.4.16-46.el7.x86_64
リポジトリの追加・更新
下記のコマンドを実行します。
「最新バージョンです」「何もしません」となった場合は対応不要です。
$ sudo yum -y install epel-release
$ sudo rpm -Uvh http://rpms.famillecollet.com/enterprise/remi-release-7.rpm
バージョンアップの実行
先ほど確認したインストール済みのパッケージ等を指定しyumでアップデートを実行します。
$ sudo yum -y update --enablerepo=remi,remi-php56 php php-pdo php-mbstring php-common php-cli php-mysql

///
完了しました!
バージョン確認
$ php -v
PHP 5.6.40 (cli) (built: Apr 30 2019 11:35:35)
Copyright (c) 1997-2016 The PHP Group
Zend Engine v2.6.0, Copyright (c) 1998-2016 Zend Technologies
サーバの再起動
$ sudo systemctl reboot
MariaDBのインストールとセットアップ
DBサーバにアクセスする為には、Webサーバ側にもMariaDBのインストールが必要です。
MariaDBのインストール
$ sudo yum -y install mariadb-server mariadb
$ sudo vi /etc/my.cnf

[mysqld]
datadir=/var/lib/mysql
socket=/var/lib/mysql/mysql.sock
character-set-server=utf8 ← ココを追加する
mariaDBの起動と自動起動の有効化
$ sudo systemctl start mariadb
$ sudo systemctl enable mariadb
設定ファイルの編集
ファイルの編集とは言っても MariaDB の場合は対話型の初期設定ツール secure_installation があります。
必要な設定を[y/n]で選択していくだけですので最高ですね。
$ sudo mysql_secure_installation

NOTE: RUNNING ALL PARTS OF THIS SCRIPT IS RECOMMENDED FOR ALL MariaDB
      SERVERS IN PRODUCTION USE!  PLEASE READ EACH STEP CAREFULLY!

In order to log into MariaDB to secure it, we'll need the current
password for the root user.  If you've just installed MariaDB, and
you haven't set the root password yet, the password will be blank,
so you should just press enter here.

Enter current password for root (enter for none):
OK, successfully used password, moving on...

Setting the root password ensures that nobody can log into the MariaDB
root user without the proper authorisation.

Set root password? [Y/n] Y
New password:  ← passwordを入力(MariaDB Administrator Password)
Re-enter new password: ← passwordを再入力
Password updated successfully!
Reloading privilege tables..
 ... Success!


By default, a MariaDB installation has an anonymous user, allowing anyone
to log into MariaDB without having to have a user account created for
them.  This is intended only for testing, and to make the installation
go a bit smoother.  You should remove them before moving into a
production environment.

Remove anonymous users? [Y/n] Y
 ... Success!

Normally, root should only be allowed to connect from 'localhost'.  This
ensures that someone cannot guess at the root password from the network.

Disallow root login remotely? [Y/n] Y
 ... Success!

By default, MariaDB comes with a database named 'test' that anyone can
access.  This is also intended only for testing, and should be removed
before moving into a production environment.

Remove test database and access to it? [Y/n] Y
 - Dropping test database...
 ... Success!
 - Removing privileges on test database...
 ... Success!

Reloading the privilege tables will ensure that all changes made so far
will take effect immediately.

Reload privilege tables now? [Y/n] Y
 ... Success!

Cleaning up...

All done!  If you've completed all of the above steps, your MariaDB
installation should now be secure.

Thanks for using MariaDB!
mariaDBにアクセス出来るか確認する
それと同時にMariaDBの設定状況を確認します。
$ mysql -u root -p
Enter password:  ⬅︎先ほど設定したMariaDBのrootパスワードを入力
Welcome to the MariaDB monitor.  Commands end with ; or \g.
Your MariaDB connection id is 10
Server version: 5.5.60-MariaDB MariaDB Server

Copyright (c) 2000, 2018, Oracle, MariaDB Corporation Ab and others.

Type 'help;' or '\h' for help. Type '\c' to clear the current input statement.

MariaDB [(none)]>
MariaDBの設定確認
インストール直後は以下のようにローカルからしかアクセスが出来ないように設定されています。
userはMariaDB側のアカウント名で、hostがアクセス可能なホストです。
MariaDB [(none)]> select user, host from mysql.user;
+------+-----------+
| user | host      |
+------+-----------+
| root | 127.0.0.1 |
| root | ::1       |
| root | localhost |
+------+-----------+
3 rows in set (0.00 sec)

MariaDB [(none)]>
現在の設定は下記です。
- 127.0.0.1(ローカルホスト)から「root」でアクセス可能
- localhost(ローカルホスト)から「root」でアクセス可能
- ::1 (IPv6のローカルホスト)「root」でアクセス可能
※ localhost(ローカルホスト)から「user」でアクセス可能の設定は「mysql_secure_installation」で設定時に削除済み
MariaDBを終了する
MariaDB [(none)]> FLUSH PRIVILEGES;
Query OK, 0 rows affected (0.00 sec)

MariaDB [(none)]> exit
Bye
Wordpressのインストール
ドキュメントルートに移動
$ cd /var/www/html/
Wordpressのインストールに必要な圧縮ファイルをダウンロード
$ sudo curl -LO http://ja.wordpress.org/latest-ja.tar.gz
ダウンロードしたファイルを解凍
wordpressというディレクトリが出来上がります。
$ sudo tar zxf latest-ja.tar.gz
$ ls
latest-ja.tar.gz wordpress
ファイルをドキュメントルートに移動する
このままではwebサイトにアクセスするURLが http://xxx.xxx.xxx.xxx/wordpress/domain/ となってしまう為、展開したファイルをドキュメントルート内に移動します。
$ sudo mv wordpress/* .
$ ls
index.php        wp-admin              wp-content         wp-load.php      wp-signup.php
license.txt      wp-blog-header.php    wp-cron.php        wp-login.php     wp-trackback.php
readme.html      wp-comments-post.php  wp-includes        wp-mail.php      xmlrpc.php
wp-activate.php  wp-config-sample.php  wp-links-opml.php  wp-settings.php

※ ココに latest-ja.tar.gz と wordpress も出てきます。
所有者情報の変更
Apachenのアクセスを許容する為、ドキュメントルートの所有者と所有グループを変更します。
$ sudo chown -R apache:apache /var/www/html/
wp-configのファイル名修正
wp-config-sample.php というファイルの名前を変更します。
$ sudo mv wp-config-sample.php wp-config.php
圧縮ファイルと空のファイルの削除
latest-ja.tar.gz と wordpress は消してしまってOKです。
$ sudo rm -rf latest-ja.tar.gz wordpress
wp-config.php を編集する
MariaDBに関する情報を編集します。
※ ファイルを開いて日本語の部分は文字化けしている場合はlocaleの設定を確認して下さい。
$ sudo vi wp-config.php

<?php
/**
 * WordPress の基本設定
 *
 * このファイルは、インストール時に wp-config.php 作成ウィザードが利用します。
 * ウィザードを介さずにこのファイルを "wp-config.php" という名前でコピーして
 * 直接編集して値を入力してもかまいません。
 *
 * このファイルは、以下の設定を含みます。
 *
 * * MySQL 設定
 * * 秘密鍵
 * * データベーステーブル接頭辞
 * * ABSPATH
 *
 * @link http://wpdocs.osdn.jp/wp-config.php_%E3%81%AE%E7%B7%A8%E9%9B%86
 *
 * @package WordPress
 */

// 注意:
// Windows の "メモ帳" でこのファイルを編集しないでください !
// 問題なく使えるテキストエディタ
// (http://wpdocs.osdn.jp/%E7%94%A8%E8%AA%9E%E9%9B%86#.E3.83.86.E3.82.AD.E3.82.B9.E3.83.88.E3.82.A8.E3.83.87.E3.82.A3.E3.82.BF 参照)
// を使用し、必ず UTF-8 の BOM なし (UTF-8N) で保存してください。

// ** MySQL 設定 - この情報はホスティング先から入手してください。 ** //
/** WordPress のためのデータベース名 */
define('DB_NAME', '任意のDB名');       ⬅︎ココを入力

/** MySQL データベースのユーザー名 */
define('DB_USER', '任意のユーザ名');     ⬅︎ココを入力

/** MySQL データベースのパスワード */
define('DB_PASSWORD', '任意のパスワード');  ⬅︎ココを入力

/** MySQL のホスト名 */
define('DB_HOST', '192.168.0.3');     ⬅︎DBサーバに設定するローカルIP

/** データベースのテーブルを作成する際のデータベースの文字セット */
define('DB_CHARSET', 'utf8');

/** データベースの照合順序 (ほとんどの場合変更する必要はありません) */
define('DB_COLLATE', '');

 <<<略>>>
設定完了後、このファイルのパーミッションを変更しておきます。
$ sudo chmod 400 wp-config.php
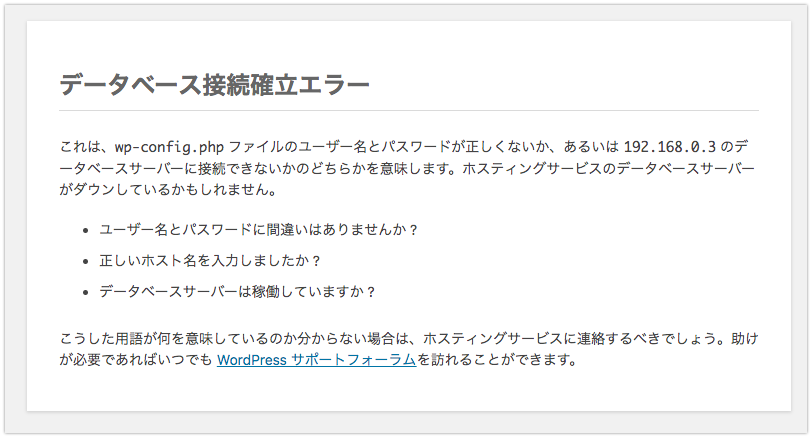
あとはブラウザで http://XXX.XXX.XXX.XXX/wp-admin/install.php/ にアクセスをすればWordpressのセットアップGUIが開きます。
しかし、まだDBの作成を行なっていない為に下記のよなエラー画面が出るのが正常動作です。
次の記事ではDBサーバのセットアップを行います。