はじめに
毎週、Slackで研究室の参加不参加の投票をSimple Pollでしていたのですが、無料枠の制限を突破してしまいました。(無料枠:100件の回答/月)
それ以上の投票をしたい場合は月額49ドルかかるので、Simple PollもどきのAppを自作することにしました。
Slack Appの作成
まずはslack apiからSlack Appを作成します。
- 「Create New App」>「From scratch」をクリックしアプリ名とワークスペースを選択し、作成します。
- 左のメニューの「OAuth & Permissions」をクリックしてパーミッションの設定をします。
- 「Scopes」>「Bot Token Scopes」>「Add an OAuth Scope」をクリックし、下記3つを追加します。
- chat:write
- chat:write.public
- commands
- 「Install to Workspace」をクリックしてインストールします。

そうすると、xoxb-*****から始まるBot User OAuth Tokenが発行されるのでコピーしてください。こちらのTokenは他の人に知られないように管理してください。
GASからpostする
GASでメッセージを送信できるようプログラムを書きます。
下記のソースコードをコピーして取得して適切なToken、チャンネルID、ユーザIDに書き換えて実行すればslackにメッセージを送信できます。
初めてプログラムの実行をすると承認が必要とポップアップされるので許可をしてください。
function postVote() {
  const url = "https://slack.com/api/chat.postMessage";
  const token = "Tokenを記述"
  const channelId = "チャンネルのIDを記述";
  const user = "User IDを記述";
  const blocks = [
    {
      "type": "section",
      "text": {
        "type": "mrkdwn",
        "text": "Title here"
      }
    },
    {
      "type": "section",
      "text": {
        "type": "mrkdwn",
        "text": "`0` 月"
      },
      "accessory": {
        "type": "button",
        "text": {
          "type": "plain_text",
          "text": "1",
          "emoji": true
        },
        "action_id": "1"
      }
    },
    {
      "type": "section",
      "text": {
        "type": "mrkdwn",
        "text": "`0` 火"
      },
      "accessory": {
        "type": "button",
        "text": {
          "type": "plain_text",
          "text": "2",
          "emoji": true
        },
        "action_id": "2"
      }
    },
    {
      "type": "section",
      "text": {
        "type": "mrkdwn",
        "text": "`0` 水"
      },
      "accessory": {
        "type": "button",
        "text": {
          "type": "plain_text",
          "text": "3",
          "emoji": true
        },
        "action_id": "3"
      }
    },
    {
      "type": "section",
      "text": {
        "type": "mrkdwn",
        "text": "`0` 木"
      },
      "accessory": {
        "type": "button",
        "text": {
          "type": "plain_text",
          "text": "4",
          "emoji": true
        },
        "action_id": "4"
      }
    },
    {
      "type": "section",
      "text": {
        "type": "mrkdwn",
        "text": "`0` 金"
      },
      "accessory": {
        "type": "button",
        "text": {
          "type": "plain_text",
          "text": "5",
          "emoji": true
        },
        "action_id": "5"
      }
    },
    {
      "type": "section",
      "text": {
        "type": "mrkdwn",
        "text": "`0` 欠席"
      },
      "accessory": {
        "type": "button",
        "text": {
          "type": "plain_text",
          "text": "6",
          "emoji": true
        },
        "action_id": "6"
      }
    },
    {
      "type": "context",
      "elements": [
        {
          "type": "mrkdwn",
          "text": "create by <@" + user + ">"
        }
      ]
    }
  ];

  const headers = {
    "Content-Type": "application/json; charset=utf-8",
    "Authorization": "Bearer " + token
  };
  const payload = {
    "channel": channelId,
    "blocks": blocks
  };
  const params = {
    "method": "POST",
    "headers": headers,
    "payload": JSON.stringify(payload)
  };

  UrlFetchApp.fetch(url, params);
}
ソースコードの説明をするとSlackにメッセージを送信するには chat.postMessage を使用します。
blocksではtextが実際に表示される内容でaction_idでユーザがどこに投票したか判別するためのものになります。blocksはBlock Kitで簡単に作成できます。
SlackにはJSON形式でPOSTしたいのでヘッダーにapplication/json を指定します。必須ではないですが文字コードの指定を付加します。認証はBearer方式で行います。
ペイロードはJOSNに変換しなければならないので JSON.stringfiy を使用します。
実行に成功すると下記の画像のような投票がSlackに送信されます。

このままでは送信された投票のボタンをクリックしても、何も変化が起きません。次の設定で投票したらユーザ名が表示されるようにします。
インタラクティブにする
まずはSlack App側で設定をします。
- 左のメニューから「Interactivity & Shortcuts」をクリックして「On」に変更します。
- 「Request URL」にはGASのURL※を記入します。
- 右下の「Save Changes」をクリックします。
※ GASのURLの取得は、GASを開いて右上の「デプロイ」>「新しいデプロイ」>歯車マーク>「ウェブアプリ」>「アクセスできるユーザー」を全員に変更してデプロイします。 https://script.google.com/macros/s/*******/exec
のようなURLが発行されるのでこちらを記入します。

次にGASで下記のソースコードを追加します。
function doPost(e) {
  const url = "https://slack.com/api/chat.update";
  const token = "Tokenを記述";
  const json = JSON.parse(e.parameter.payload);
  const user = json.user.id;
  const actionIdx = Number(json.actions[0].action_id);
  const channelId = json.channel.id;
  const ts = json.message.ts;
  let blocks = json.message.blocks;

  // 投票人数を取得
  const userNumber = blocks[actionIdx].text.text.match(/\d+/)[0];
  if (blocks[actionIdx].text.text.indexOf(user) != -1) {
    // 既に投票されている場合、ユーザを削除して投票人数を減らす
    const reg = ", <@" + user + ">";
    blocks[actionIdx].text.text = blocks[actionIdx].text.text.replace(new RegExp(reg, "g"), "");
    blocks[actionIdx].text.text = blocks[actionIdx].text.text.replace(/\d+/, Number(userNumber) - 1);
  } else {
    // まだ投票されていない場合、ユーザを追加し投票人数を増やす
    blocks[actionIdx].text.text += ", <@" + user + ">";
    blocks[actionIdx].text.text = blocks[actionIdx].text.text.replace(/\d+/, Number(userNumber) + 1);
  }

  const headers = {
    "Content-Type": "application/json; charset=utf-8",
    "Authorization": "Bearer " + token
  };
  const payload = {
    "channel": channelId,
    "ts": ts,
    "blocks": blocks
  };
  const params = {
    "method": "POST",
    "headers": headers,
    "payload": JSON.stringify(payload)
  };

  UrlFetchApp.fetch(url, params);
}
ソースコードの説明をすると、ボタンをクリックしたらユーザ名を表示したいので元のメッセージを更新する必要があります。Slack APIでは chat.update で実現できるのでこれを使用します。
SlackからJSONでPOSTされるのでパース後、ユーザID・どこのボタンをクリックしたか・チャンネルID・タイムスタンプ・元のメッセージ内容を取得しています。
そしてif文で既にユーザが投票しているか判別し replace や正規表現を使って適切に処理しています。
POSTする際のパラメータは postVote()とほとんど同じですが、chat.update ではペイロードに ts が必要なので記述します。
こちらのソースコードを追加したあと右上の「デプロイ」>「デプロイの管理」>右上の編集マークをクリック>バージョンを新バージョンに変更してデプロイする必要があります。
こちらの操作はソースコードを変更するたびにする必要があります。忘れやすいので気をつけてください。
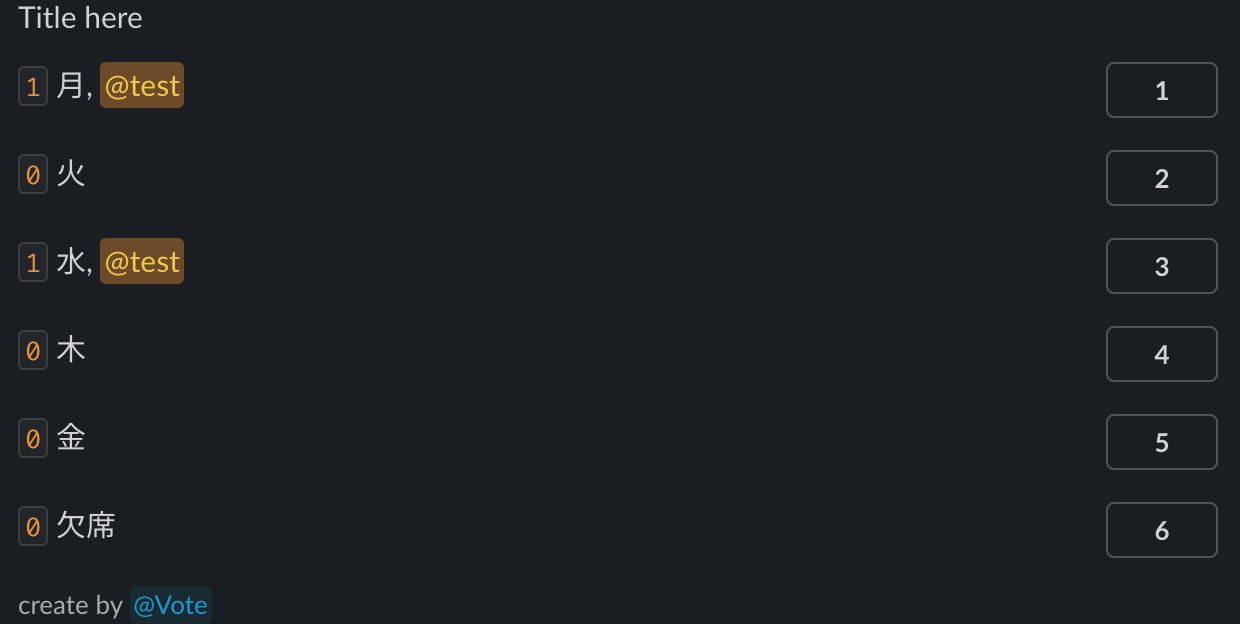
これらの設定が完了後GASから postVote() を実行して投票のリアクションをすると下記の画像のようにユーザが表示されます。
Slackから実行できるようにする
上記のままだとGASからしか投票が送信できないのでSlackからでも投票を作成し送信されるように設定します。
これを実現するには「Slash Commands」を使用します。
まずはSlack App側で設定をします。
- 左のメニューから「Slash Commands」>「Create New Command」をクリックします。
- 次の3点を記述してください
- Command:vote(各自お好みで)
- Requesy URL:Interactivity & Shortcutsで設定したURLを記述します。
- Short Description:create vote(各自お好みで)
- 右下の「Save」をクリックします。

Slackで /vote を入力して下の画像のように表示されればOKです。

次にGASで下記のソースコードを追加します。
const token = "Tokenを記述";  // *** 2つの関数で重複しているのでグローバルに移動 ***

// *** ▼▼▼ doPost(e)の処理を変更 ▼▼▼ ***
function doPost(e) {
  if (e.parameter.payload) {
    updateVote(JSON.parse(e.parameter.payload));
  } else {
    postVote(e.parameter);
  }
  return ContentService.createTextOutput("");
}
// *** ▲▲▲ doPost(e)の処理を変更 ▲▲▲ ***

function postVote(json) {
  const url = "https://slack.com/api/chat.postMessage";
  // *** const token = "Tokenを記述"; ***
  const channelId = json.channel_id;
  const user = json.user_id;

	// 同じコードなため省略

  UrlFetchApp.fetch(url, params);
}

function updateVote(json) {  // *** doPost(e)をupdateVote(json)に変更 ***
  const url = "https://slack.com/api/chat.update";
  // *** const token = "Tokenを記述"; ***
  // *** const json = JSON.parse(e.parameter.payload); ***
  const user = json.user.id;

  // 同じコードなため省略

  UrlFetchApp.fetch(url, params);
}
// *** *** のコメントがされているところが変更点です。省略しているコードがあるのでコピペする際は注意してください。
変数 token をグローバルにしています。そのため関数内で定義された token はコメントアウトしています。
以前の doPost(e) を updateVote(json) に関数名を変更しています。引数で json を受け取るので、もともと定義されたいた json をコメントアウトしています。
大きく変更されたのが doPost(e) です。まずスラッシュコマンドが実行されたら postVote() 、投票のリアクションは updateVote() を呼び出します。その判別方法は e.parameter.payload です。スラッシュコマンドの場合はこの payload がないのでif文で判断します。さらにスラッシュコマンドはJSON形式ではなく application/x-www-form-urlencoded でPOSTされるのでJSONのパースはせずに渡します。
return文ではThe script completed but did not return anything. の注意がSlackで表示されるので空文字を返しています。
これでSlackから投票を作成することができます。
投票をカスタマイズできるようにする
ひとまず完成はしましたが、より便利に使えるように投票の内容をカスタマイズできるようします。スラッシュコマンドは /vote option,option,... でタイトルや選択肢がカスタマイズできるのでそれを実装します。
Slack App側で設定はいらないので、GASで下記のソースコードを追加します。
function postVote(json) {
  const url = "https://slack.com/api/chat.postMessage";
  const channelId = json.channel_id;
  const user = json.user_id;

  // *** ▼▼▼ もとのblocksをコメントアウトしコードを追加 ▼▼▼ ***
  // *** const blocks = createDefaultBlocks()に記述する
  const text = json.text;
  let blocks = "";
  if (text == "") {
    blocks = createDefaultBlocks(user);
  } else {
    blocks = createCustomBlocks(user, text);
  }
  // *** ▲▲▲ blocksをコメントアウトしコードを追加 ▲▲▲ ***

	// 同じコードなため省略

  UrlFetchApp.fetch(url, params);
}

function createDefaultBlocks(user) {
  // *** ここにpostVote()のblocksを記述する

  return blocks;
}

function createCustomBlocks(user, text) {
  const textArray = text.split(",");

  let blocks = [
    {
      "type": "section",
      "text": {
        "type": "mrkdwn",
        "text": "Title here"
      }
    }
  ];
  const footer = {
    "type": "context",
    "elements": [
      {
        "type": "mrkdwn",
        "text": "create by <@" + user + ">"
      }
    ]
  };
  let option = {
    "type": "section",
    "text": {
      "type": "mrkdwn",
      "text": "`0` option"
    },
    "accessory": {
      "type": "button",
      "text": {
        "type": "plain_text",
        "text": "1",
        "emoji": true
      },
      "action_id": "1"
    }
  };

  textArray.forEach((value, i) => {
    if (i == 0) {
      blocks[i].text.text = value;
      return;
    }
    option.text.text = "`0` " + value;
    option.accessory.text.text = String(i);
    option.accessory.action_id = String(i);
    let deep = JSON.parse(JSON.stringify(option));
    blocks.push(deep);
  });

  blocks.push(footer);

  return blocks;
}
createDefaultBlocks() と createCustomBlocks() の追加、postVote() では// *** *** の部分が変更点です。
postVote() では json.text で /vote の後の文を取得できます。これがなければデフォルトの投票を作成、あればカスタム投票を作成します。
createDefaultBlocks() では月火水木金欠席のblocksを定義して返します。
createCustomBlocks() では渡された text を半角カンマで区切って配列に代入します。 blocks ではタイトル部分の雛形、 footer ではフッターの作成、 option では選択肢の雛形を定義しています。 forEach では最初だけはタイトル部分のカスタムをしています。それ以降は選択肢の部分をカスタムしています。ここで注意が必要なのが let deep = JSON.parse(JSON.stringify(option)); です。JavaScriptではオブジェクトのコピーは参照渡しのようなものになるのでディープコピーする必要があります。そしてディープコピーしたものを blocks に追加します。一番最後に footer も追加し、返します。
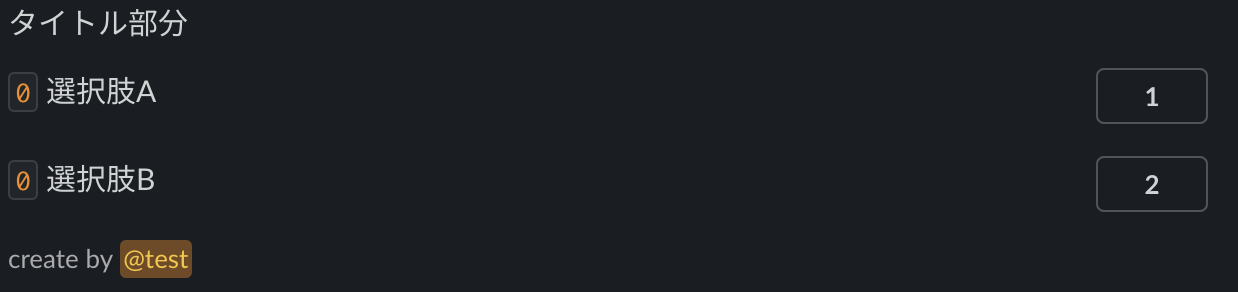
以下のスラッシュコマンドを実行すれば、画像のような投票が作成できます。
/vote タイトル部分,選択肢A,選択肢B
完成したソースコード
ソースコードを表示
token だけ適宜変更してください。
const token = "tokenを記述";

function doPost(e) {
  if (e.parameter.payload) {
    updateVote(JSON.parse(e.parameter.payload));
  } else {
    postVote(e.parameter);
  }
  return ContentService.createTextOutput("");
}

function postVote(json) {
  const url = "https://slack.com/api/chat.postMessage";
  const channelId = json.channel_id;
  const user = json.user_id;

  const text = json.text;
  let blocks = "";
  if (text == "") {
    blocks = createDefaultBlocks(user);
  } else {
    blocks = createCustomBlocks(user, text);
  }

  const headers = {
    "Content-Type": "application/json; charset=utf-8",
    "Authorization": "Bearer " + token
  };
  const payload = {
    "channel": channelId,
    "blocks": blocks
  };
  const params = {
    "method": "POST",
    "headers": headers,
    "payload": JSON.stringify(payload)
  };

  UrlFetchApp.fetch(url, params);
}

function updateVote(json) {
  const url = "https://slack.com/api/chat.update";
  const user = json.user.id;
  const actionIdx = Number(json.actions[0].action_id);
  const channelId = json.channel.id;
  const ts = json.message.ts;
  let blocks = json.message.blocks;

  // 投票人数を取得
  const userNumber = blocks[actionIdx].text.text.match(/\d+/)[0];
  if (blocks[actionIdx].text.text.indexOf(user) != -1) {
    // 既に投票されている場合、ユーザを削除して投票人数を減らす
    const reg = ", <@" + user + ">";
    blocks[actionIdx].text.text = blocks[actionIdx].text.text.replace(new RegExp(reg, "g"), "");
    blocks[actionIdx].text.text = blocks[actionIdx].text.text.replace(/\d+/, Number(userNumber) - 1);
  } else {
    // まだ投票されていない場合、ユーザを追加し投票人数を増やす
    blocks[actionIdx].text.text += ", <@" + user + ">";
    blocks[actionIdx].text.text = blocks[actionIdx].text.text.replace(/\d+/, Number(userNumber) + 1);
  }

  const headers = {
    "Content-Type": "application/json; charset=utf-8",
    "Authorization": "Bearer " + token
  };
  const payload = {
    "channel": channelId,
    "ts": ts,
    "blocks": blocks
  };
  const params = {
    "method": "POST",
    "headers": headers,
    "payload": JSON.stringify(payload)
  };

  UrlFetchApp.fetch(url, params);
}

function createDefaultBlocks(user) {
  const blocks = [
    {
      "type": "section",
      "text": {
        "type": "mrkdwn",
        "text": "Title here"
      }
    },
    {
      "type": "section",
      "text": {
        "type": "mrkdwn",
        "text": "`0` 月"
      },
      "accessory": {
        "type": "button",
        "text": {
          "type": "plain_text",
          "text": "1",
          "emoji": true
        },
        "action_id": "1"
      }
    },
    {
      "type": "section",
      "text": {
        "type": "mrkdwn",
        "text": "`0` 火"
      },
      "accessory": {
        "type": "button",
        "text": {
          "type": "plain_text",
          "text": "2",
          "emoji": true
        },
        "action_id": "2"
      }
    },
    {
      "type": "section",
      "text": {
        "type": "mrkdwn",
        "text": "`0` 水"
      },
      "accessory": {
        "type": "button",
        "text": {
          "type": "plain_text",
          "text": "3",
          "emoji": true
        },
        "action_id": "3"
      }
    },
    {
      "type": "section",
      "text": {
        "type": "mrkdwn",
        "text": "`0` 木"
      },
      "accessory": {
        "type": "button",
        "text": {
          "type": "plain_text",
          "text": "4",
          "emoji": true
        },
        "action_id": "4"
      }
    },
    {
      "type": "section",
      "text": {
        "type": "mrkdwn",
        "text": "`0` 金"
      },
      "accessory": {
        "type": "button",
        "text": {
          "type": "plain_text",
          "text": "5",
          "emoji": true
        },
        "action_id": "5"
      }
    },
    {
      "type": "section",
      "text": {
        "type": "mrkdwn",
        "text": "`0` 欠席"
      },
      "accessory": {
        "type": "button",
        "text": {
          "type": "plain_text",
          "text": "6",
          "emoji": true
        },
        "action_id": "6"
      }
    },
    {
      "type": "context",
      "elements": [
        {
          "type": "mrkdwn",
          "text": "create by <@" + user + ">"
        }
      ]
    }
  ];

  return blocks;
}

function createCustomBlocks(user, text) {
  const textArray = text.split(",");

  let blocks = [
    {
      "type": "section",
      "text": {
        "type": "mrkdwn",
        "text": "Title here"
      }
    }
  ];
  const footer = {
    "type": "context",
    "elements": [
      {
        "type": "mrkdwn",
        "text": "create by <@" + user + ">"
      }
    ]
  };
  let option = {
    "type": "section",
    "text": {
      "type": "mrkdwn",
      "text": "`0` option"
    },
    "accessory": {
      "type": "button",
      "text": {
        "type": "plain_text",
        "text": "1",
        "emoji": true
      },
      "action_id": "1"
    }
  };

  textArray.forEach((value, i) => {
    if (i == 0) {
      blocks[i].text.text = value;
      return;
    }
    option.text.text = "`0` " + value;
    option.accessory.text.text = String(i);
    option.accessory.action_id = String(i);
    let deep = JSON.parse(JSON.stringify(option));
    blocks.push(deep);
  });

  blocks.push(footer);

  return blocks;
}
おわりに
以上の設定で自作のPollを作成できると思います。余裕があればGUIでの投票作成や、投票の統計をとって分析できる機能を実装できたらと思っています。
このような開発は他の人は全く行っていなかったので、参考できるものが公式しかありませんでした。多くの公式のページを参照しながら開発をしていたので、少し完成させるのに時間がかかりました。
参考文献