はじめに
備忘を兼ねて、以下の環境を作った手順についての記事になります。もともと簡易な検証をする場合はVue or React + Nodejsを選ぶことが多かったのですが、最近ChatGPTなりを触る機会が多く、もっと違う環境で楽をできないかな?という観点で探しました。
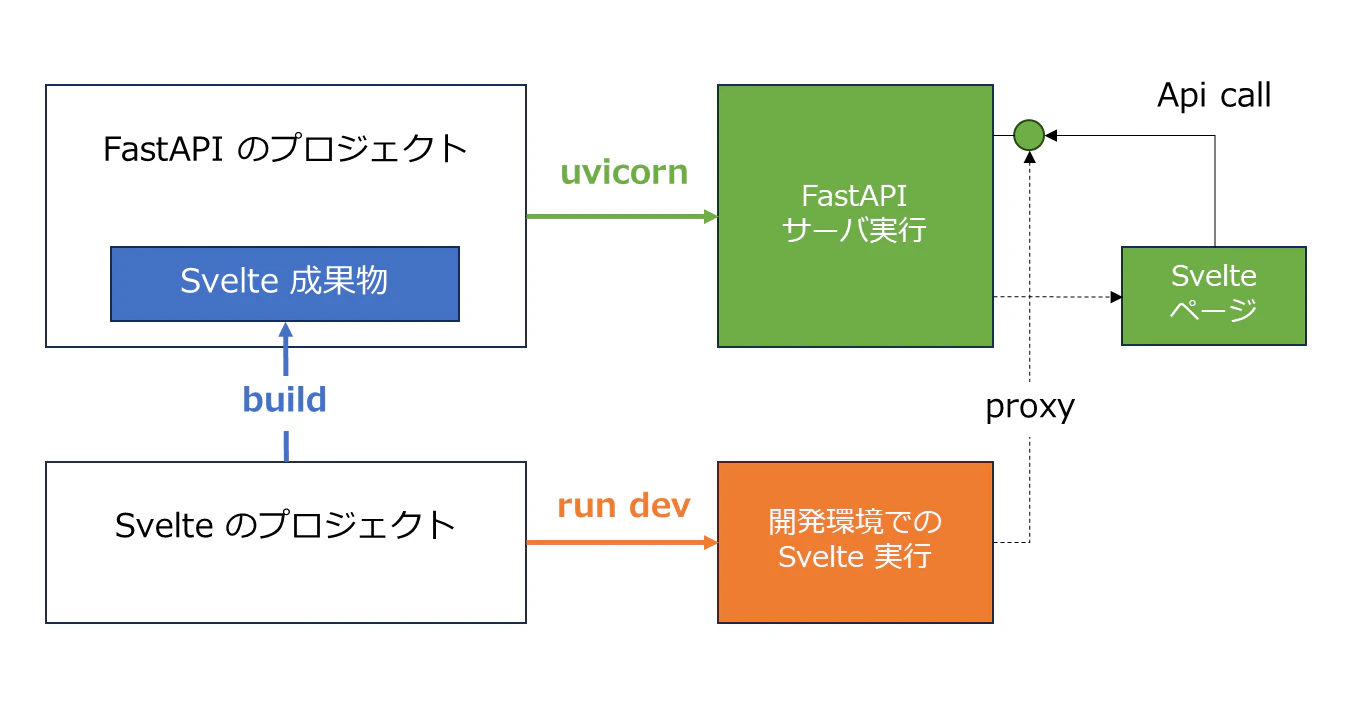
- サーバサイドはFastAPIにしました
- ChatGPTなどを使っていると事前事後の処理にPythonのライブラリがあるととても便利なシーンが多く、Pythonで探しました。
- Flaskなども検討しましたが、より簡易で新しい方という意味合いでFastAPIを選びました。
- クライアントサイドはSvelteにしました
- Vue(CDN)の方が楽といえば、楽かもしれませんが、最近の傾向と
- やはり圧倒的に軽くて速いという点でSvelteを選びました。
1. FastAPIの環境を準備する
実行環境はAnacondaなり素のpythonなりの準備をしたうえで、チュートリアルをベースに以下のコマンドを実行します。(とりあえず動く環境として。)
pip install "fastapi[all]"
FastAPI用にフォルダ(例えばserver)を作って、ルートにmain.pyを置きます。
from fastapi import FastAPI
from fastapi.responses import JSONResponse
from fastapi.staticfiles import StaticFiles

app = FastAPI()

@app.get("/api")
def api():
    data = {
        "message": "Hello, FastAPI",
        "status": 200
    }
    return JSONResponse(content=data)

# staticディレクトリにあるindex.htmlを使う (Svelte用)
app.mount("/", StaticFiles(directory="static", html=True), name="static")
とりあえずやっていることはGET(/api)リクエストをうけて適当なJSONを返すメソッドと、staticフォルダにあるhtmlを返すことです。
2. Svelteの環境を用意する
SvelteKitを使います。公式のガイドを元に以下のコマンドでフォルダから作成します(例ではclient)。 実行する場所は、FastAPIのフォルダがある場所で実行します。(中ではなくて、serverフォルダがおいてあるフォルダでの実行です)
npm create svelte@latest client
cd client
npm install
フォルダ構成はこんな形にします。
    ├─server
    │  └─...
    └─client
       └─...
Static site generationを参考にして、Svelteのフォルダ(client)に移動して、以下のコマンドを実行します。
npm i -D @sveltejs/adapter-static
その上で、client/svelte.config.jsを以下のように編集します。公式ガイドと違う点は、
- pages: '../server/static'
- assets: '../server/static'
- fallback: 'index.html'
です。pagesとassetsはビルド時に、FastAPIサーバ側のフォルダに成果物を配置するためで、fallbackはエントリーのhtmlを指定するためです。
import adapter from '@sveltejs/adapter-static';

export default {
    kit: {
        adapter: adapter({
            // default options are shown. On some platforms
            // these options are set automatically — see below
            pages: '../server/static',
            assets: '../server/static',
            fallback: 'index.html',
            precompress: false,
            strict: true
        })
    }
};
あと、開発中にsvelteとfastAPIをおしゃべりできるように、proxyを設定します。編集するのは、vite.config.jsです。FastAPIサーバが127.0.0.1:8000で起動するため、このようにしています。
import { sveltekit } from '@sveltejs/kit/vite';
import { defineConfig } from 'vite';

export default defineConfig({
	plugins: [sveltekit()],
	server: {
		proxy: {
			'/api': {
				'target': 'http://127.0.0.1:8000',
				changeOrigin: true,
			}
		}
	}
});
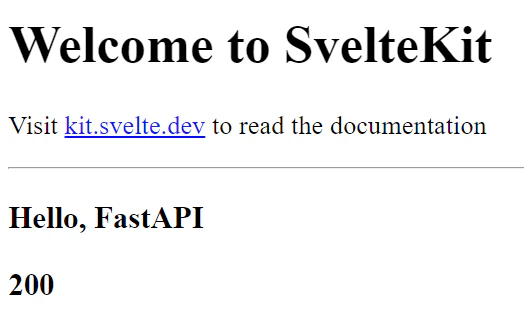
動作確認用に、Svelteのフォルダ(client)/src/routes/+page.svelteを以下のようにしておきます。内容としては、/apiにアクセスして、取ってきた値を表示しているだけです。
<script>
    const ans = (async()=>{
        const res = await fetch(`/api`);
        return await res.json();
    })()
</script>

<h1>Welcome to SvelteKit</h1>
<p>Visit <a href="https://kit.svelte.dev">kit.svelte.dev</a> to read the documentation</p>
<hr>
{#await ans}
    <p>...loading</p>
{:then data}
    <h3>{data.message}</h3>
    <h3>{data.status}</h3>
{:catch error}
    <p>An error occured!</p>
{/await}
3.動作確認(開発環境)
FastAPI サーバを起動します。serverフォルダで以下を実行します。
uvicorn main:app --reload
Svelte をdevで起動します。clientフォルダで以下を実行します。
npm run dev -- --open
こんな画面になれば成功です。
4.動作環境 (Svelteビルド成果物利用)
FastAPIサーバは起動のままにしておいて以下を実行してビルドします。
npm run build
これで成果物がFastAPIフォルダに展開されるので、次に127.0.0.1:8000にアクセスします。
同じ画面が出れば成功です。
まとめ
Svelteでフロントエンドを、FastAPIでバックエンドの環境を構築してみました。
いずれもとても新しいためそれでも古い情報が出てしまうこともあったりして情報を見つけるのだけが多少苦労しましたが、比較的スムーズにできたかなと。
これで、ChatGPT とかのシステムをつくれば、Pythonの利益を享受しつつ、フロントは最新のWebフレームワークで実行できる環境ができたので、あとは色々作るだけですね。
備忘を兼ねて。すぐに古くなっちゃうかもしれませんが。
追記
このままでも普通に動くんですが、svelte側で複数パスに対応した構成をとった場合、ビルドでエラーがでるようになります。(build成果物が、index.htmlだけでなくて、ページ名.htmlみたいのができる場合)
その場合は以下で対応できます。
svelte.configでfallbackをnullにする
import adapter from '@sveltejs/adapter-static';

export default {
    kit: {
        adapter: adapter({
            // default options are shown. On some platforms
            // these options are set automatically — see below
            pages: '../server/static',
            assets: '../server/static',
            fallback: null,
            precompress: false,
            strict: true
        })
    }
};
src/routesの直下に +layout.jsを作成する
export const prerender = true;
FastAPI側で、ページ名.htmlを返すパスを作成する
以下の例では、test.htmlを返すようにしてます。
@app.get("/test")
def bing():
    with open("static/test.html", encoding="utf-8") as f:
        html_content = f.read()
    return HTMLResponse(content=html_content, status_code=200)
このコードを見ると、FastAPIは静的なページを返すのに向いてないのでは?と思ったりもしましたが、そりゃそうだですね。本来的には静的なページはCDNとかつかって配布しつつ、FastAPIでAPIサーバをたてろ、っていうことでしょうし。
とはいえ、検証だと一つのサーバに固まってるのってとっても扱いやすい(コンテナ化もしやすい)ので、本番以外という前提をおけば、とっても楽な検証環境になってると思います。