はじめに
pug、postcssがどんなもんなのか知るために、vue.jsに取り入れて使ってみました。
この記事には導入する部分しか書いてません。
vue.js をはじめる
事前準備
npmでglobalに以下のpackageをインストールする。
今回はvue-cliを使ってやりたいと思います。
npm install -g vue-cli webpack
vue-cliをつかって始める
とりあえずvue.jsを使ってみたい人はvue-cli使わないで触ってみる方がいいかもしれません。
https://jp.vuejs.org/v2/guide/
vue-cliで作成できるtemplateが4つくらいありますが、今回は webpack-simple を使いたいと思います。
https://jp.vuejs.org/2015/12/28/vue-cli/
まずはtemplateを取ってきます
vue init webpack-simple vue-test-project
こんな感じのprojectが作成されてると思います
- vue-test-project
   |- .babelrc
   |- .gitignore
   |- README.md
   |- index.html
   |- package.json
   |- src
   |- webpack.config.js
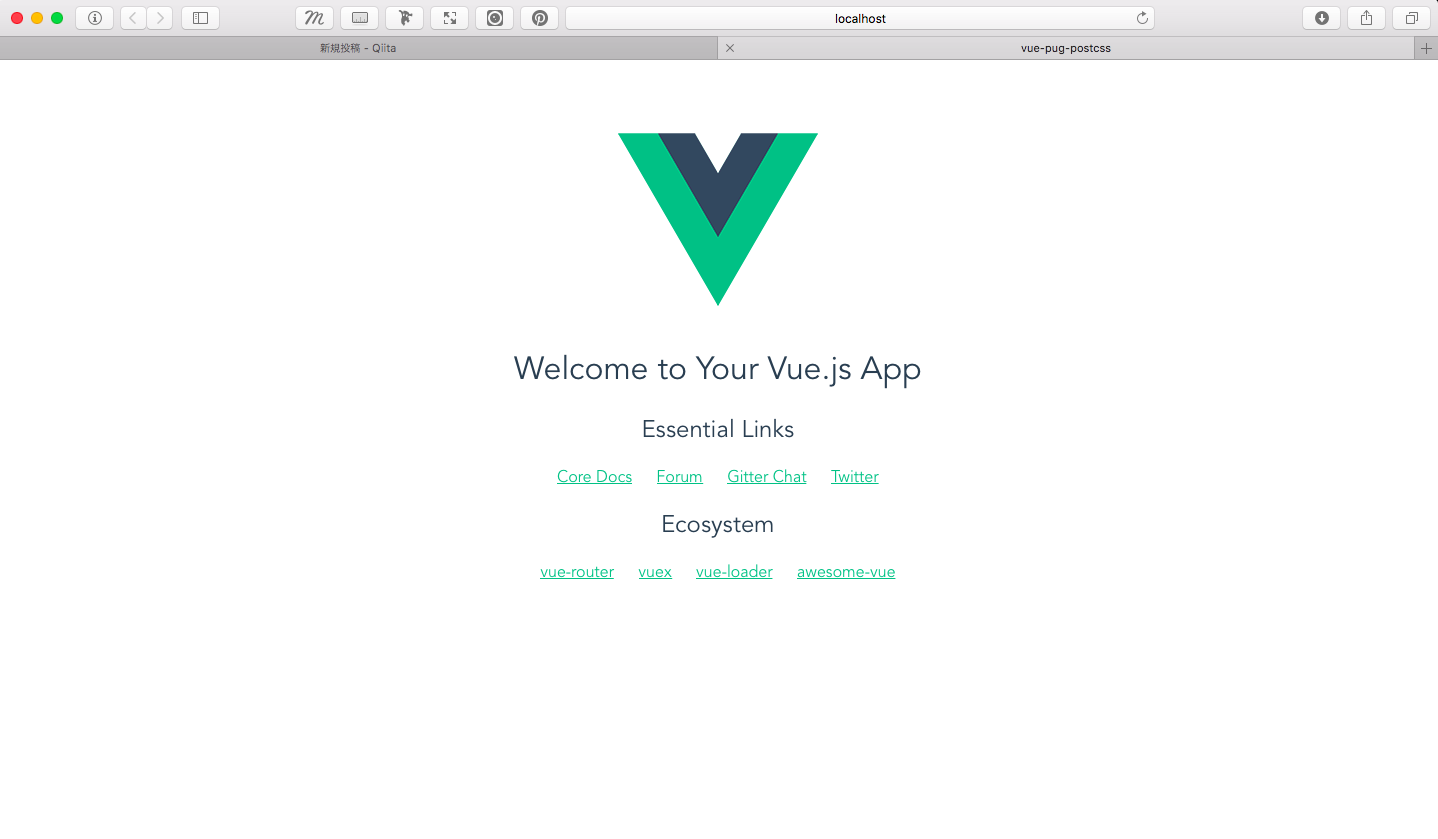
npm install してビルドしてみましょう
npm install
npm run dev
すると勝手にブラウザで以下のようなページが開かれるはずです
pugつかう
pugとは
pugとはhtmlを簡単に書けるようなやつです。
cssでいうsass的なやつだと思います。
例
<!-- html -->
<div class="hoge">
  <ul>
    <li>item 1</li>
    <li>item 2</li>
    <li>item 3</li>
    <li>item 4</li>
  </ul>
</div>
// pug
  div.hoge
    ul
      li item 1
      li item 2
      li item 3
      li item 4
変数やループもかけるらしいです。
vue.jsなどで使う場合に使うかどうかはわかりませんが。。
pugを追加する
先ほどのprojectに追加しましょう。
npm install --save-dev pug
webpackでpugをコンパイルできるようにpug-loaderも追加します
npm install --save-dev pug-loader
htmlをpugにしてみる
インストールできたら、実際にhtml部分をpugにしてみましょう。
ここでは、webpackの設定をいじる必要はないです。
vue-loaderがよしなにやってくれてるみたいです。
./src/App.vueを開きましょう。
以下のtemplate部分を書き換えてみます。
<!-- before -->

<template>
  <div id="app">
    <img src="./assets/logo.png">
    <h1>{{ msg }}</h1>
    <h2>Essential Links</h2>
    <ul>
      <li><a href="https://vuejs.org" target="_blank">Core Docs</a></li>
      <li><a href="https://forum.vuejs.org" target="_blank">Forum</a></li>
      <li><a href="https://gitter.im/vuejs/vue" target="_blank">Gitter Chat</a></li>
      <li><a href="https://twitter.com/vuejs" target="_blank">Twitter</a></li>
    </ul>
    <h2>Ecosystem</h2>
    <ul>
      <li><a href="http://router.vuejs.org/" target="_blank">vue-router</a></li>
      <li><a href="http://vuex.vuejs.org/" target="_blank">vuex</a></li>
      <li><a href="http://vue-loader.vuejs.org/" target="_blank">vue-loader</a></li>
      <li><a href="https://github.com/vuejs/awesome-vue" target="_blank">awesome-vue</a></li>
    </ul>
  </div></template>
<!--after -->

<template lang="pug">
  div#app
    img(src="./assets/logo.png")
    h1 {{ msg }}
    h2 Essential Links
    ul
      li: a(href="#" target="_blank") Core Docs
      li: a(href="#" target="_blank") Forum
      li: a(href="#" target="_blank") Gitter Chat
      li: a(href="#" target="_blank") Twitter
    h2 Ecosystem
    ul
      li: a(ref="#" target="_blank") vue-router
      li: a(ref="#" target="_blank") vuex
      li: a(ref="#" target="_blank") vue-loader
      li: a(ref="#" target="_blank") awesome-vue
</template>
ビルドすると同じ画面が開くはずです。(link先のurlは省略してます)
npm run dev
PostCSSつかう
PostCSSとは
cssのプリプロセッサです。
自分の好きなプラグインを組み合わせてコンパイルするので、カスタマイズ性が高いんだと思います。
以下の記事読めば具体的に知ることができると思います。
http://qiita.com/morishitter/items/4a04eb144abf49f41d7d
https://blog.mismithportfolio.com/web/20160911postcss
PostCSSを追加する
先ほどのprojectに追加しましょう。
npm install --save-dev postcss
webpackでpostcssをコンパイルできるようにpostcss-loaderも追加します
npm install --save-dev post-loader
とりあえず今回はpostcss-custom-propertiesを使って変数を利用できるようにしたいと思います。
https://www.npmjs.com/package/postcss-custom-properties
npm install --save-dev postcss-custom-properties
webpackの設定を変更する
以下の部分を書き換えましょう
// before

// ~~ 省略 ~~
  module: {
    rules: [
      {
        test: /\.vue$/,
        loader: 'vue-loader',
        options: {
          loaders: {
            // ↓↓↓↓ 修正箇所 ↓↓↓↓
            // Since sass-loader (weirdly) has SCSS as its default parse mode, we map
            // the "scss" and "sass" values for the lang attribute to the right configs here.
            // other preprocessors should work out of the box, no loader config like this nessessary.
            'scss': 'vue-style-loader!css-loader!sass-loader',
            'sass': 'vue-style-loader!css-loader!sass-loader?indentedSyntax'
          }
            // ↑↑↑↑ 修正箇所 ↑↑↑↑
          // other vue-loader options go here
        }
      },
// ~~ 省略 ~~
// after

// ~~ 省略 ~~
  module: {
    rules: [
      {
        test: /\.vue$/,
        loader: 'vue-loader',
        options: {
          // other vue-loader options go here
          postcss: [require('postcss-custom-properties')()]
        }
      },
// ~~ 省略 ~~
この時点でビルドしても何も変わってないはずです。
PostCSSのpostcss-custom-propertiesをつかってみる
実際に変数を使えるpostcss-custom-propertiesを利用してみましょう。
./src/App.vueを開いてstyle部分を変更してみます。
/* before */
<style>
# app {
  font-family: 'Avenir', Helvetica, Arial, sans-serif;
  -webkit-font-smoothing: antialiased;
  -moz-osx-font-smoothing: grayscale;
  text-align: center;
  color: #2c3e50;
  margin-top: 60px;
}

h1, h2 {
  font-weight: normal;
}

ul {
  list-style-type: none;
  padding: 0;
}

li {
  display: inline-block;
  margin: 0 10px;
}

a {
  color: #42b983;
}
</style>
/* after */

<style>
/* -- 追加 -- */
:root {
  --modify-color: red
}
/* --------- */

# app {
  font-family: 'Avenir', Helvetica, Arial, sans-serif;
  -webkit-font-smoothing: antialiased;
  -moz-osx-font-smoothing: grayscale;
  text-align: center;
  color: #2c3e50;
  margin-top: 60px;
}

h1, h2 {
  font-weight: normal;
}

ul {
  list-style-type: none;
  padding: 0;
}

li {
  display: inline-block;
  margin: 0 10px;
}

a {
  color: var(--modify-color);    /* 変更 */
}
</style>
--modify-colorとして赤色を設定し、aタグのcolorを--modify-colorをすることで、リンクの色が赤色になります。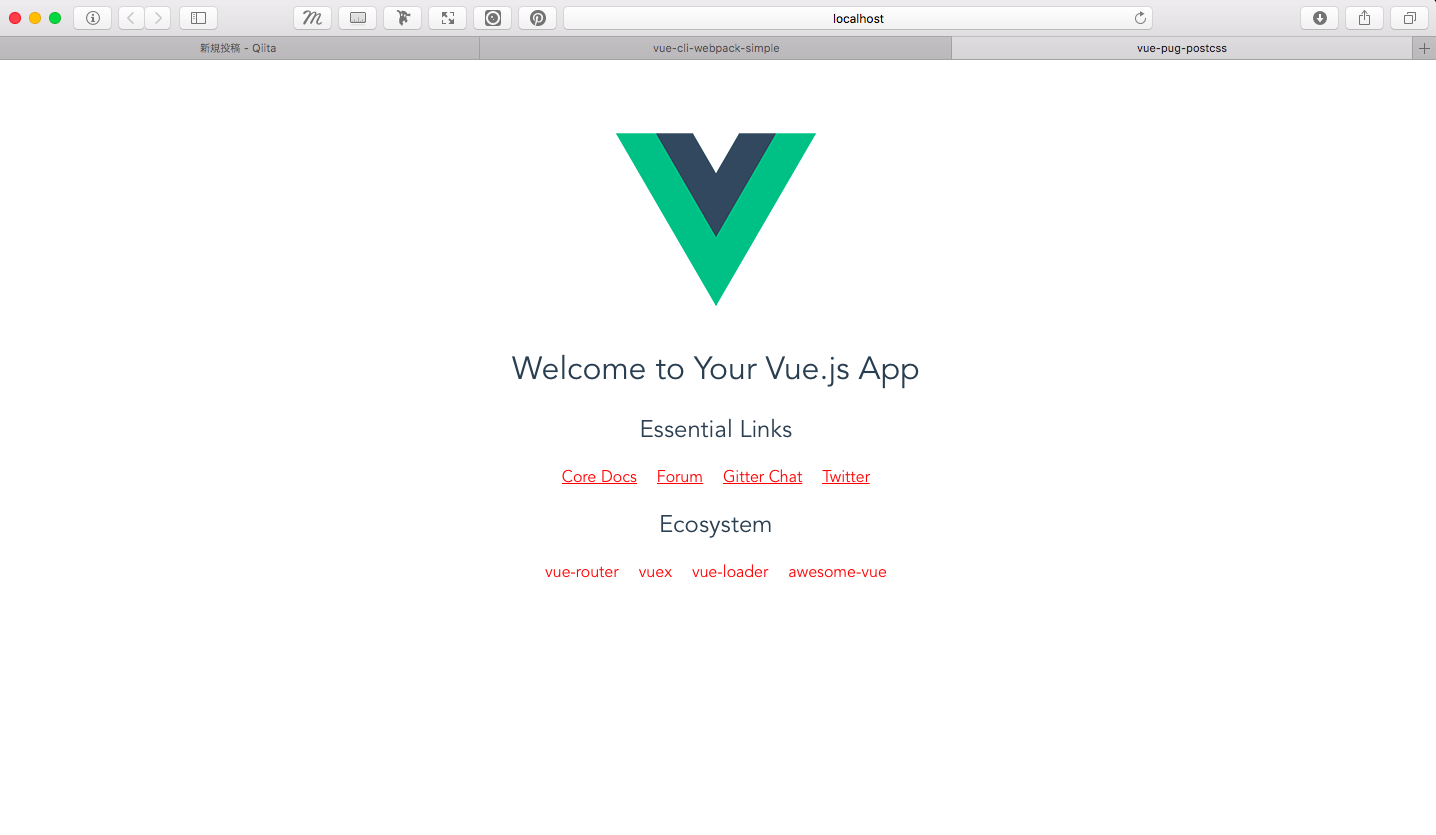
さいごに
これで導入ができたので、これから色々postcssのプラグインを利用しつつ、vue.jsを触っていきたいと思います。