はじめに
お店に電話をした時とかに自動音声メッセージが流れてくることがあるんですけど、あれどうやってるのか気になったので調べて実装してみました。
今回はtwilio-apiを使って実装してみます。twilioはfreeeやteamLabのような企業も導入しているみたいですね。
Twilioとは
Twilioはアメリカのサンフランシスコに本拠地を構えるクラウド通信企業で、ユーザーは自分で作ったAPIを使って、電話やSMSといった通信機能のプログラムを組むことが可能です。日本では、KDDIウェブコミュニケーションズが代理店となっています。
rubyとtwilio-apiを使った音声メッセージ機能
今回は触りということでブラウザから自分の携帯電話に電話を掛けて以下の音声メッセージを送ることを目標にしたいと思います。
□音声メッセージ
Hello! Happy MerryChristmas! GoodBye.
実装手順
1.Twilioのアカウント取得
2.topビューの作成
3.発信機能を作る
4.TwiMLを書く
5.外部からのアクセスを可能にする
1.Twilioのアカウント取得
でははじめていきます!
まずはTwilioのアカウントを取得しないといけません。もちろん無料なのでご心配なく。
アカウントはTwilioのwebサイトからサインアップしていただくと取得できます。
railsプロジェクトも作っておきましょう。
1.railsアプリケーションを作る
rails new twilio-app -d mysql
2.gem twilio-rubyをインストール
twilio-rubyはTwilioのapiをrubyで使うためのモジュールです。
3.auth_controllerとdial_controllerを作る
この時twilioのサイトからアカウントページにとんで、自身のAccountSIDとAuthTokenがあることを確認して下さい。
2.topビューの作成
auth_controllerのindexをルートパスに設定します。indexの中身は空で大丈夫です。
root 'auth#index'
   def index
   end
ビューには電話を掛けるためのボタンを設置します。
<div class="content">
  <%= link_to 'Call Up', '/auth', method: :post %>
</div>
.content {
  text-align: center;
  margin-top: 200px;
}

a {
  margin: auto;
  font-size: 50px;
}
3.発信機能を作る
twilioアプリケーションの電話番号を取得する
twilioのwebサイトにログインして、
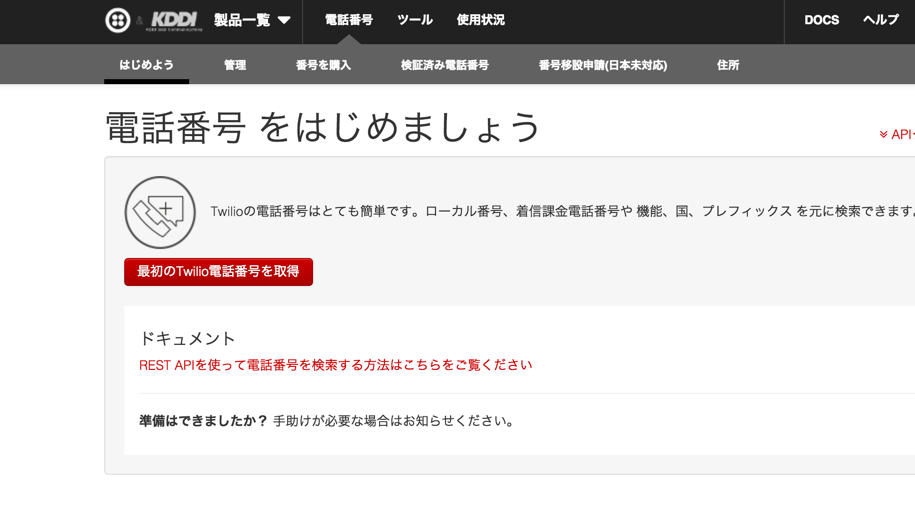
[電話番号] < [はじめよう] < [最初のTwilio電話番号を取得] から電話番号が1個無料で取得できるので取得します。
それも使って、dial_controllerに発信のためのメソッドを定義していきます。
def create
   begin
      account_id = "AC☓☓☓☓☓☓☓☓☓☓☓☓☓☓☓☓☓☓☓☓☓☓☓☓☓☓☓☓☓☓"
      auth_token = "ec☓☓☓☓☓☓☓☓☓☓☓☓☓☓☓☓☓☓☓☓☓☓☓☓☓☓☓☓"
      client = Twilio::REST::Client.new(account_id, auth_token)
      client.account.calls.create(
        from: "+81上記で取得した番号",
        to: " +81自分の携帯番号",
        url: "http://75d2c7ab.ngrok.com/dial", #ここは自分が取得したurl(後ほど解説)
        method: "GET", #デフォルトはpostなのでgetを指定
      )

   #error handling
   rescue Twilio::REST::RequestError => e
      puts e.message
   end

   redirect_to action: :index
end
4.TwiMLを書く
TwiMLとは
TwiMLはtwilioに特化したマークアップ言語で、通話やSMS、音声再生などの動作をTwilioに指示するための命令文書です。TwiMLはxml形式で書かれているので比較的とっつきやすいと思います。
今回は音声メッセージを作りたいのですが、最初から用意されているTwiML文書もいくつかあります。が、せっかくなのでサーバーサイドアプリで自作していきます🎅
  def index
    response = Twilio::TwiML::Response.new do |r| #TwiMLを作成するためのモジュール
      r.Say 'hello happy MerryChristmas', voice: 'alice'
    end
    render :xml => response.text
  end
ここで使っているSayはTwiML動詞と呼ばれるものです。
Say動詞は、発信者に対して、テキストの文字列を読み上げることができます。
TwiMLには他にもいろんなメソッドが準備されているので、試してみると面白いです!
参考サイト:TwiMLマークアップ
5.外部からのアクセスを可能にする
つまり、サーバーに上げるということですね。
TwiMLは外部アクセス可能なサーバーに置いてあげないといけないのです。
herokuにあげてもいいのですが、毎回変更を反映させるのが面倒なのでngrokを使います。ngrokはローカル環境を外部からアクセス可能にするもので、非常に簡単に使えるので便利です。
インストールはこれだけでokです!
brew install ngrok
localhost:3000でローカルサーバーを立てている場合は、
$ ngrok 3000
と打ち込んでください。
以下のような表示が現れると思います。Forwardingステータスの値がurlになります。
この画像でいうとurlはhttps://63babad0.ngrok.comということになりますね。
自分のurl/dialにアクセスしてみてください。
以下のような表示になっていれば成功です!
全体のソースコード
Rails.application.routes.draw do
  root "auth#index"
  resources :auth, only: [:create]
  resources :dial, only: [:index]
end
class AuthController < ApplicationController

  def index
  end

  def create
    begin
      account_id = "AC98852fd96add6286dec35cb565e5f2ce"
      auth_token = "eccfdde3cdb67a0986537b9137478053"
      client = Twilio::REST::Client.new(account_id, auth_token)
      client.account.calls.create(
        from: "+815031717494",
        to: " +819010045356",
        url: "http://75d2c7ab.ngrok.com/dial",
        method: "GET",
      )

    rescue Twilio::REST::RequestError => e
      puts e.message
    end

    redirect_to action: :index
  end
end
class DialController < ApplicationController

  def index
    response = Twilio::TwiML::Response.new do |r|
      r.Say 'hello happy MerryChristmas', voice: 'alice'
    end
    render xml: response.text
  end
end
<div class="content">
  <%= link_to 'Call Up', '/auth', method: :post %>
</div>
.content {
  text-align: center;
  margin-top: 200px;
}

a {
  margin: auto;
  font-size: 50px;
}
完成
ボタン押して自分の携帯に電話がかかってきたら成功です!
api使うとこんな簡単に実装できちゃうんですね。。
もちろんブラウザだけでなくiOSやAndroidからでも電話が可能です。(少し手間がかかりますが)
次回はswiftを使った通話機能の実装を書いていこうと思います。お楽しみに☆


