環境
ラズパイ3B+(SDカード含む)
RGB LEDmatrix(6mmピッチ 32×32) 6枚
LEDmatrix用コネクタ
MAXWELL スイッチング電源
LEDパネル用電源コード 3本
IDCフラットケーブル 6本
ジャンプワイヤー オスメスとオスオス 50本ずつ
ブレッドボード
ラズパイ以外は秋葉原のLEDピカリ館で購入しました。
LEDピカリ館
実現したいこと
ラズパイを使って、LEDmatrixの得点表示を自由に切り替えてみたい。
LEDmatrixをラズパイで扱うことができれば、ネット接続でスマホからの切り替えも可能になるので、応用の幅は広いはず!
LEDmatrixって何?
LEDmatrixとはLEDの集合体のことを言います(そのまま笑)
よく駅で見る電光掲示板と同じです。
いろいろな種類がありますが、基本的に違いはピッチ(LED同士の距離)と表現できる色、そして縦横のLEDの配置数です。今回は6mmピッチでRGB (全色表現可能)の32×32のLEDmatrixを6枚使用しました。
配線
まずは配線をしていきます。必要なものをそろえて行ってください。
電源周りとLEDmatrix同士の配線
電源はスイッチング電源を使っています。一枚あたりに必要な電流が2Aほどなので、複数枚使用する場合はそれに応じた電源を買いましょう。今回は6枚使用したので、12A以上は必要でした。GNDとV㏄さえ間違わなければ、大丈夫です。
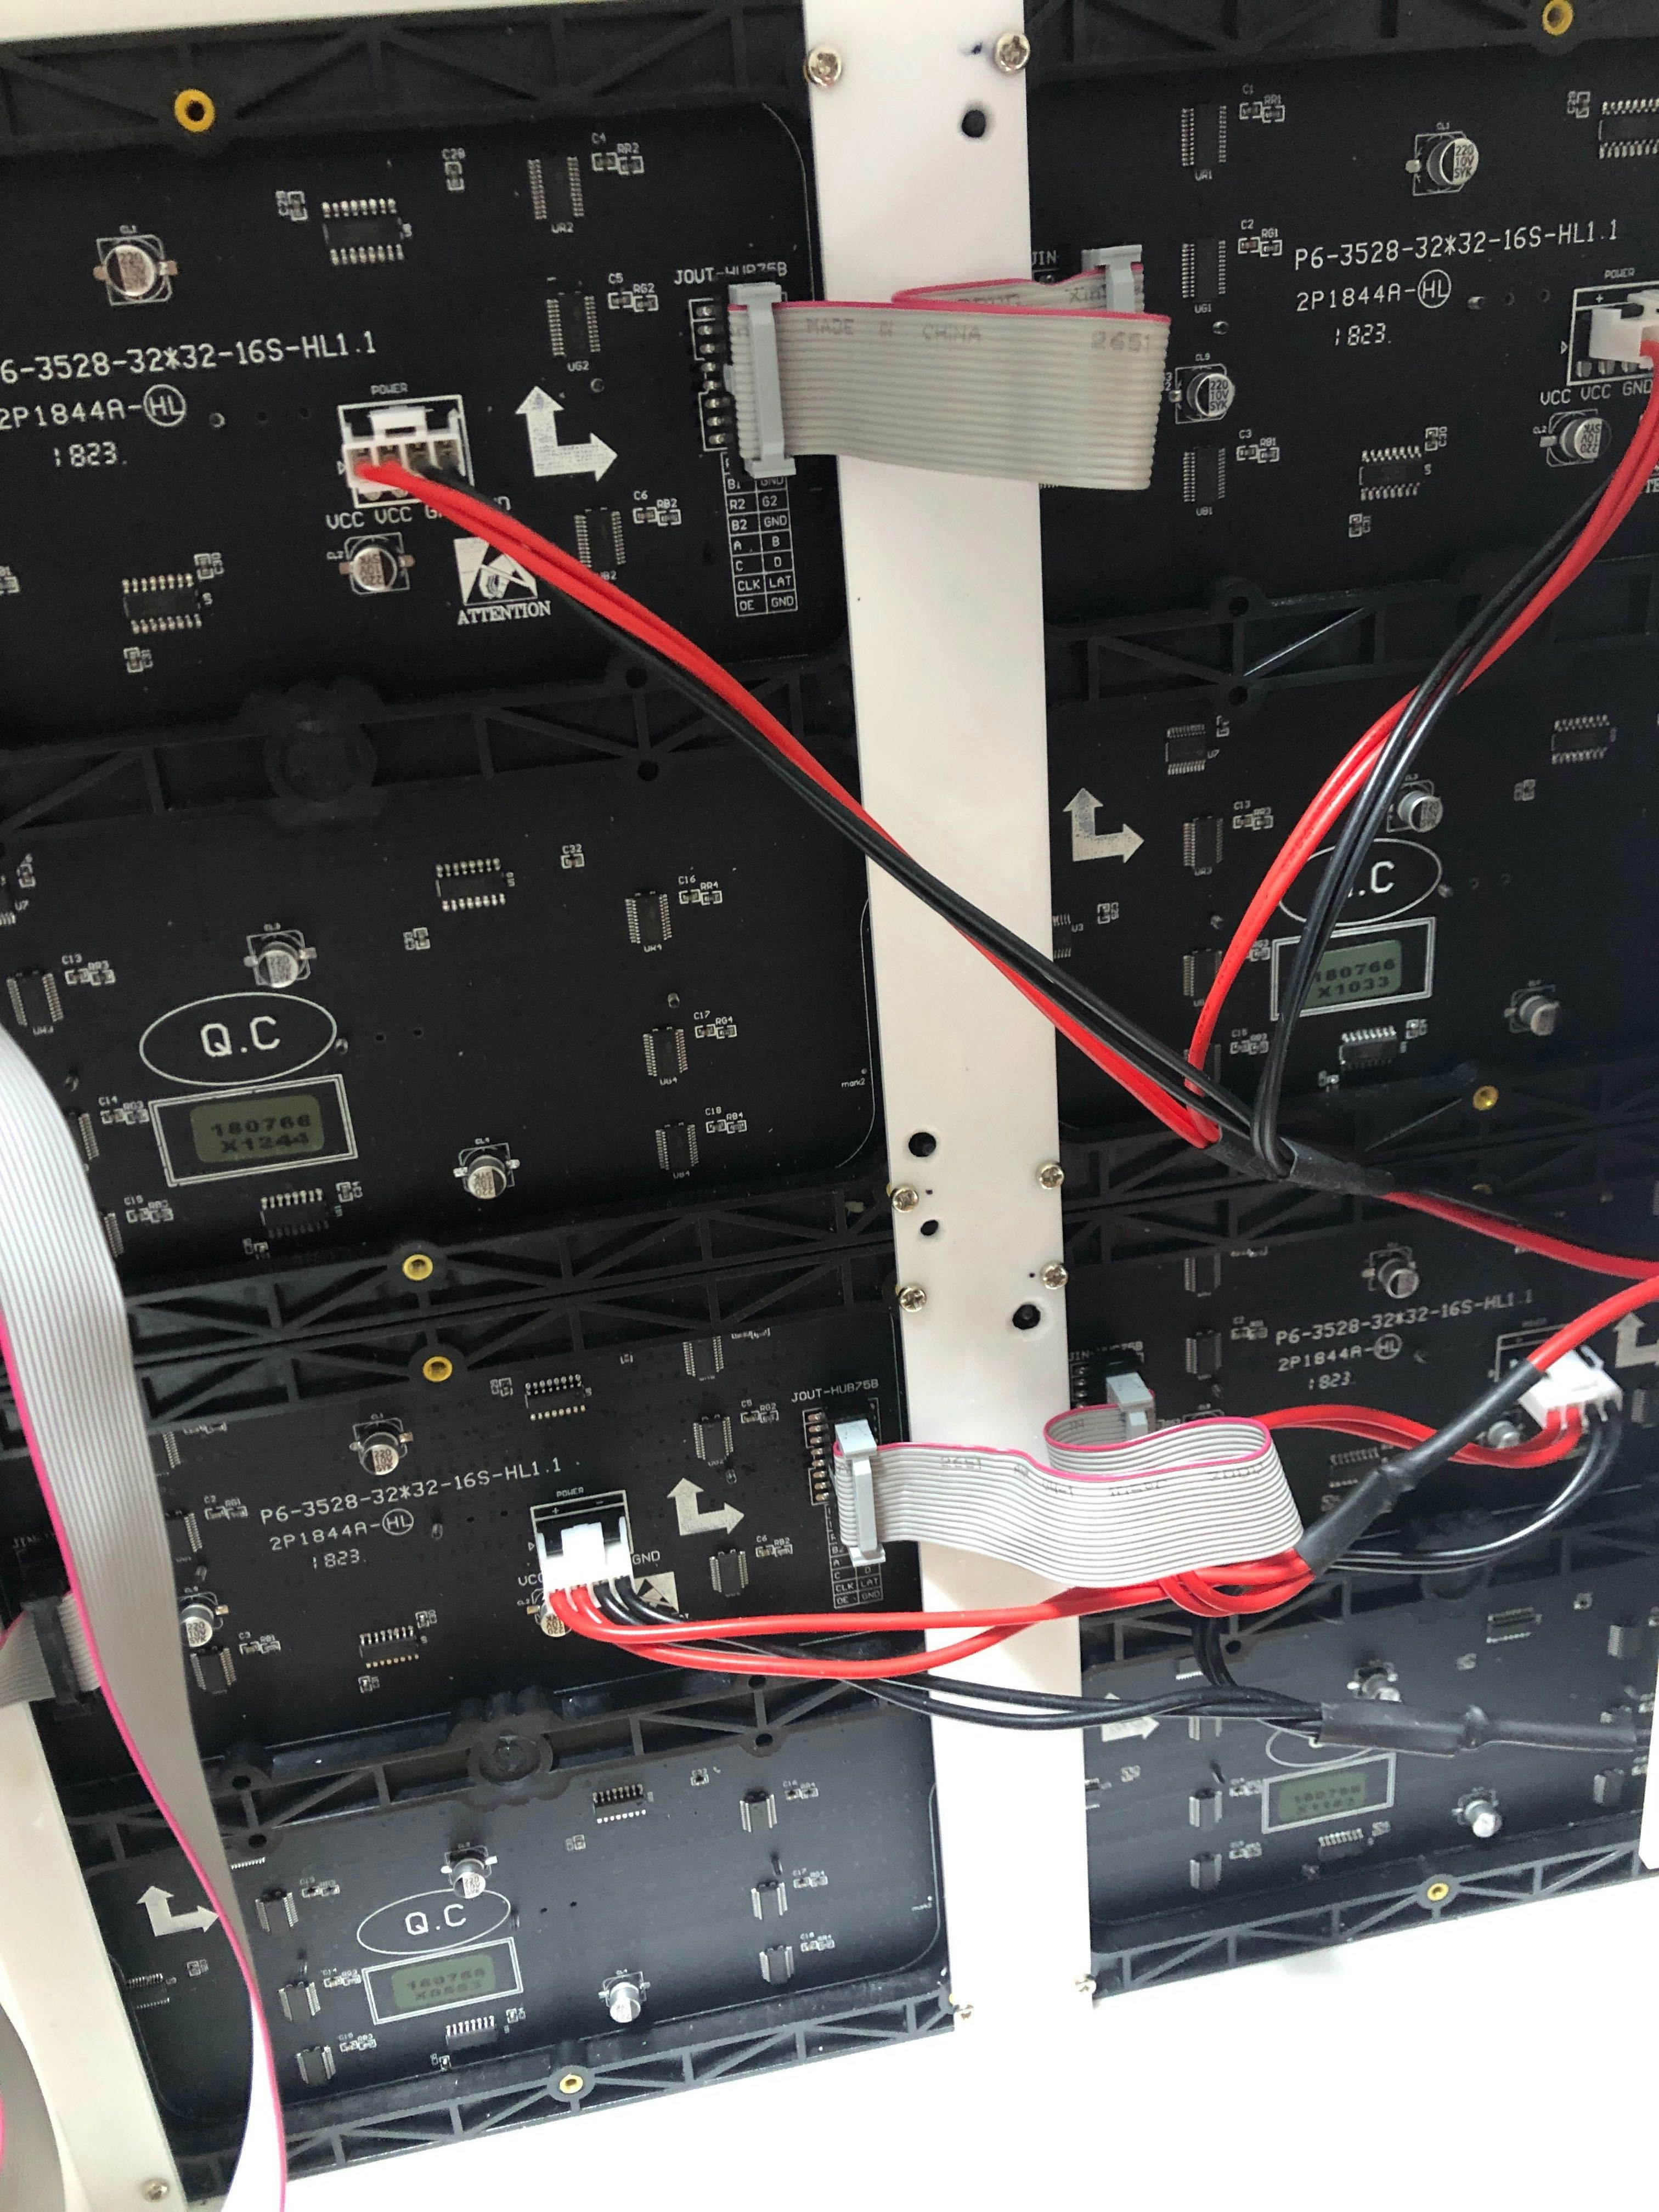
下の写真のように裏側の電源差込口にある表記に従ってください。matrix同士の接続は横だけ、フラットケーブルで配線します。
ラズパイとLEDmatrixの配線
この配線は以下のサイトに従って行いました。
hzeller github
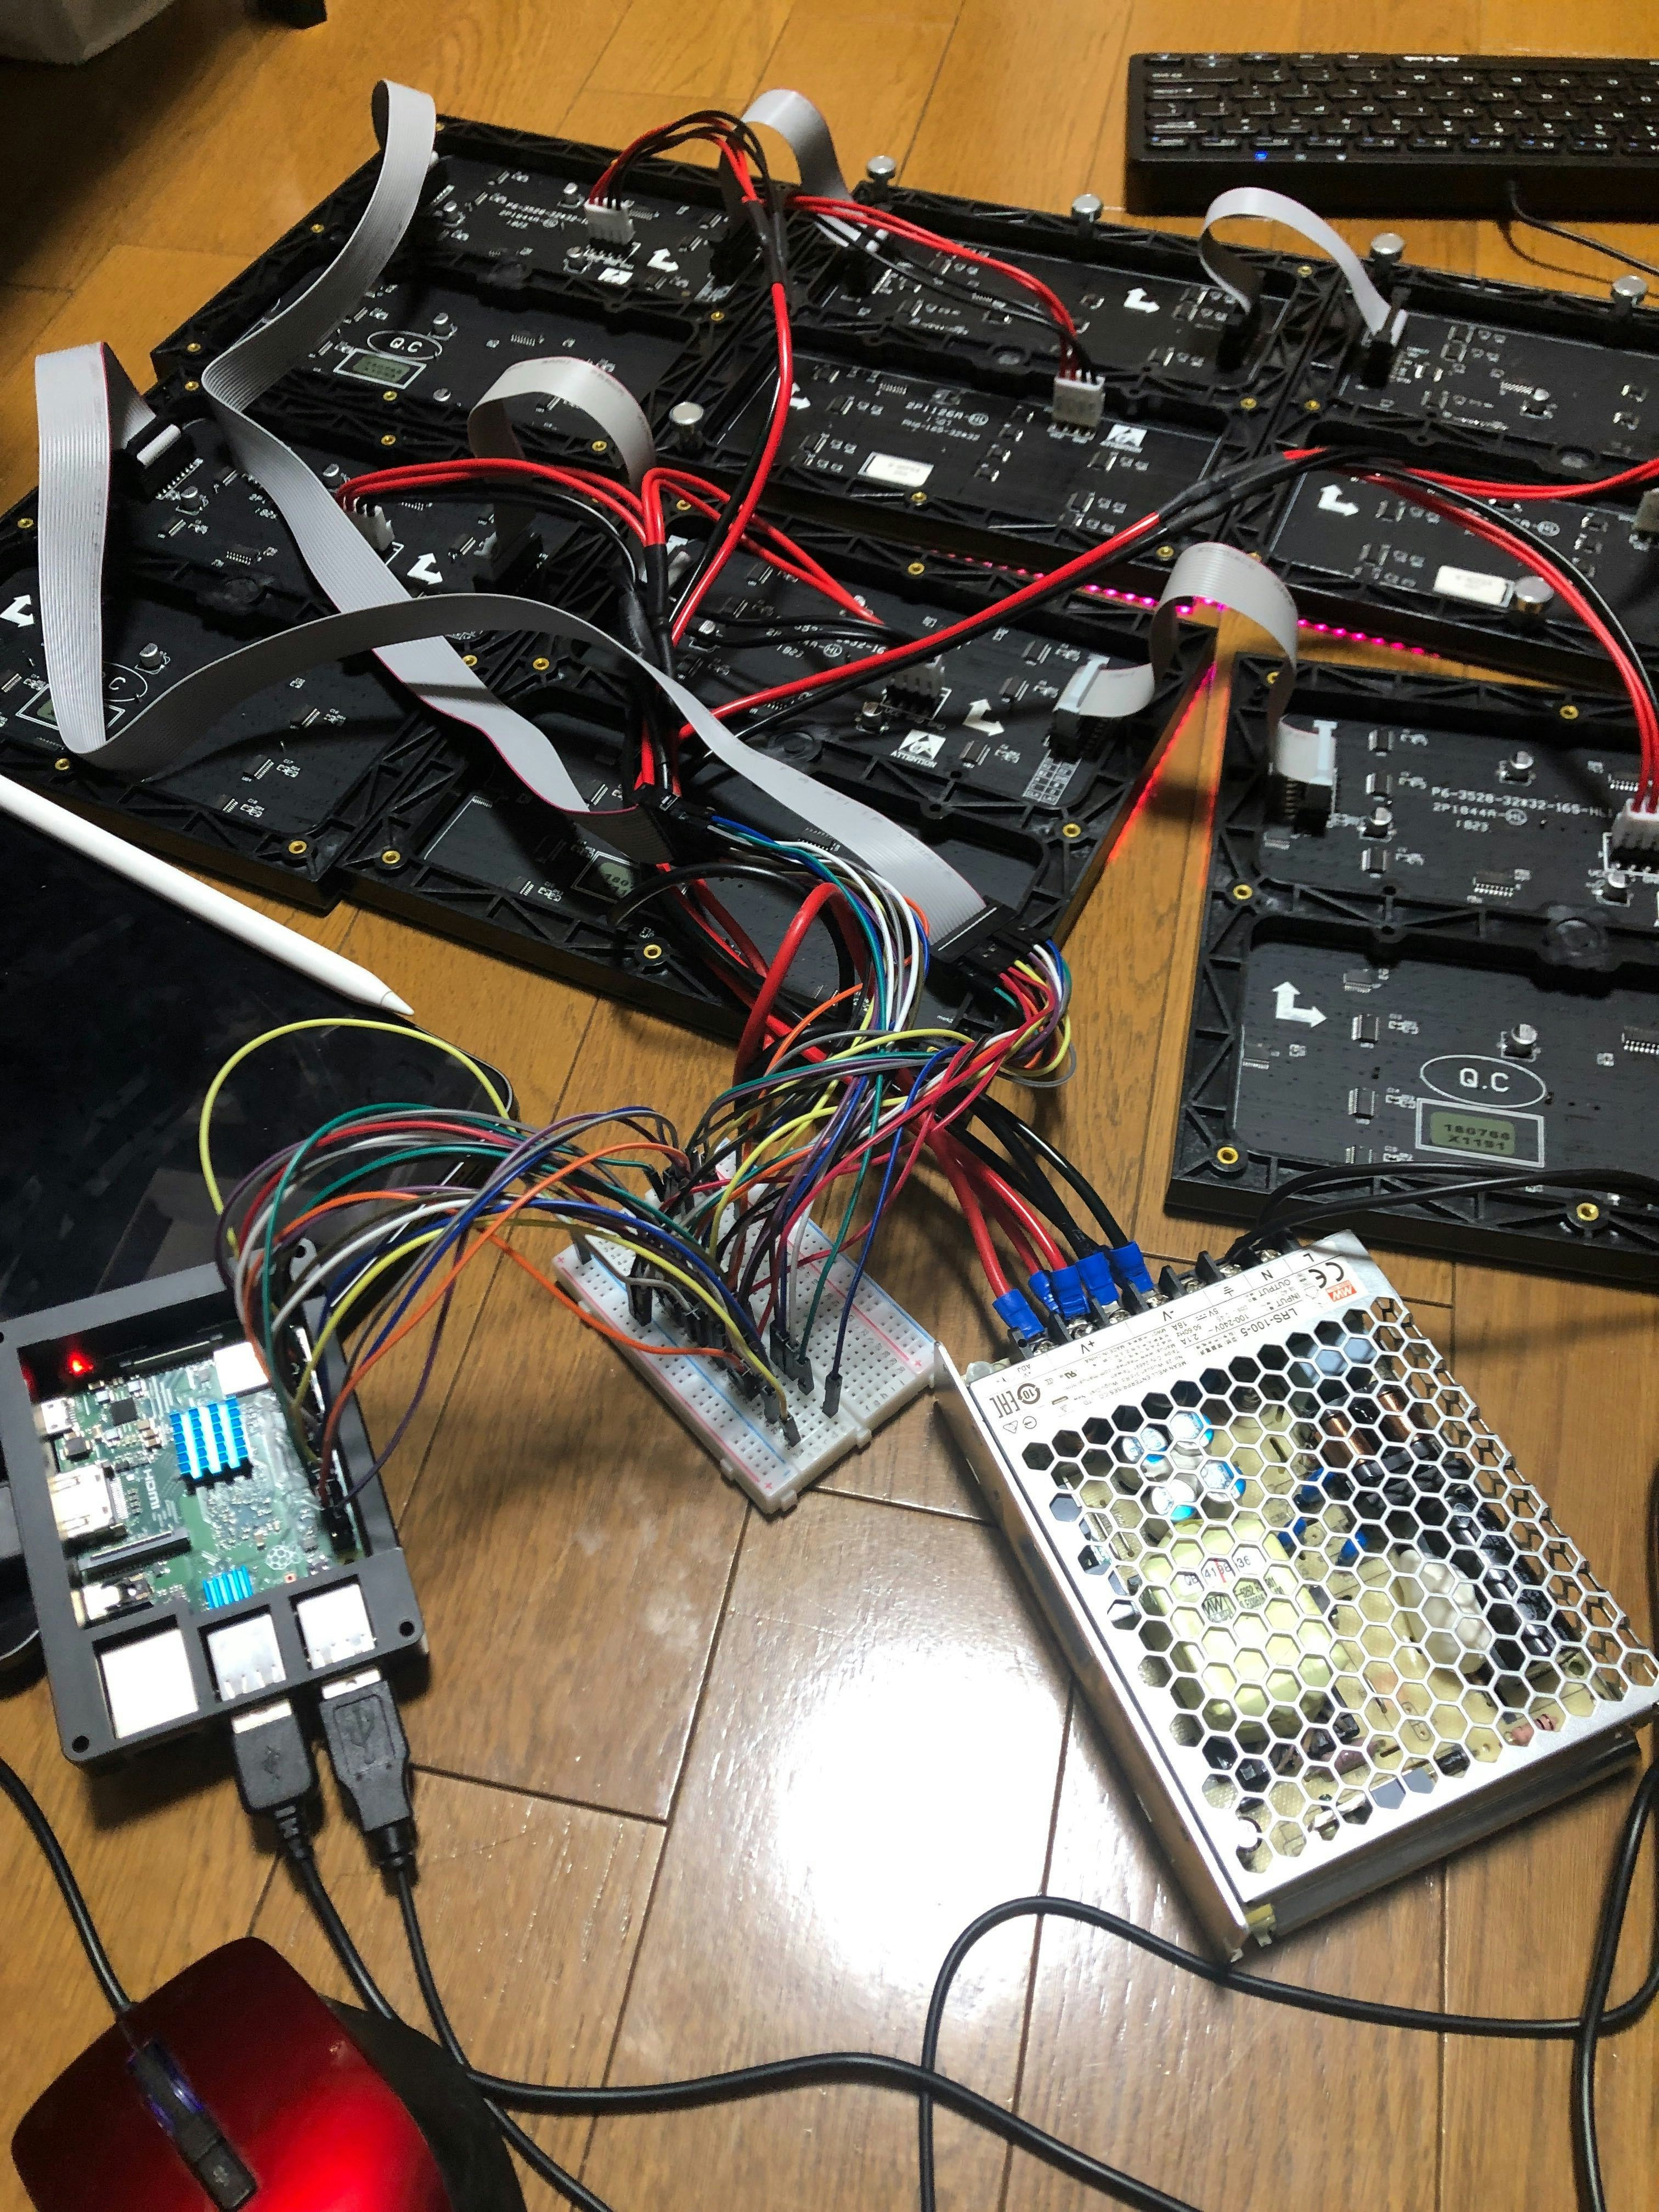
このサイトを引用して説明すると、コネクタ側は下の写真の16か所にそれぞれ配線しないといけません。
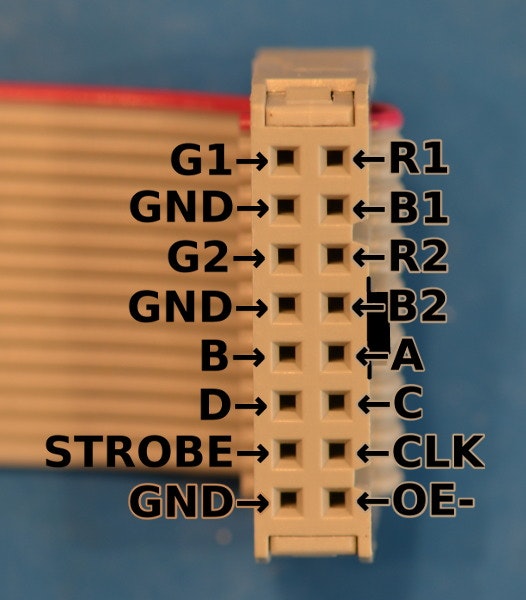
それぞれの接続先が下の手書きの表です。
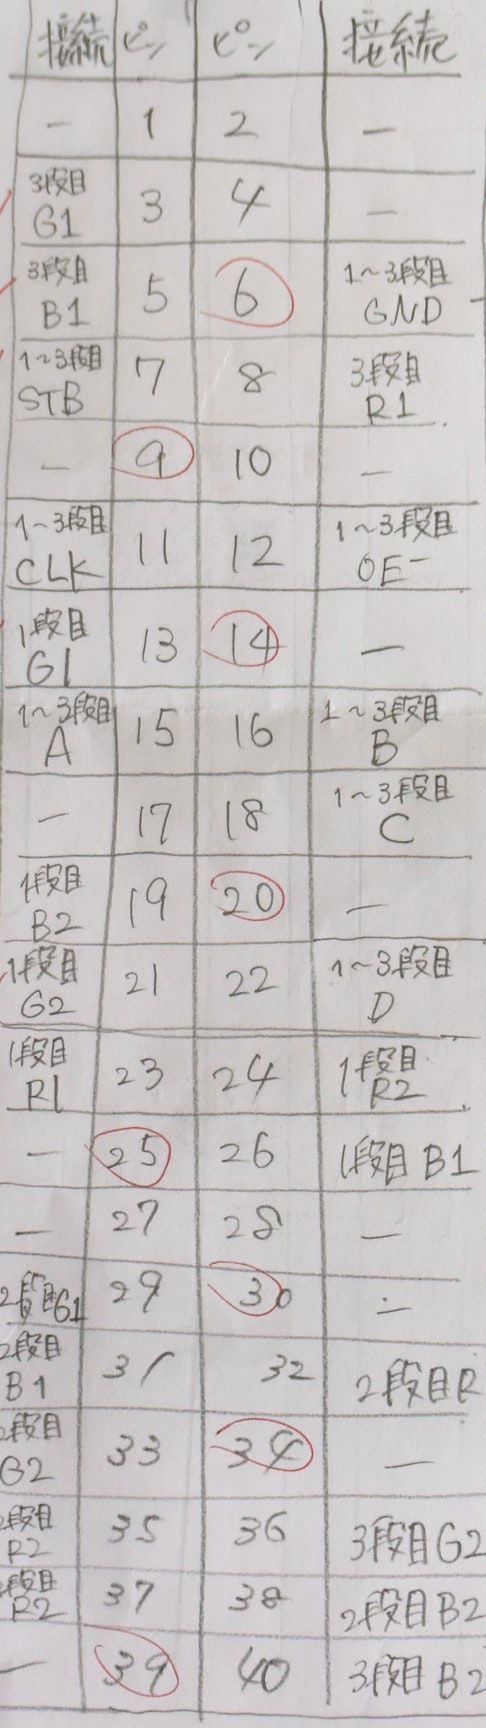
真ん中の二列がラズパイの40ピンを指します。それぞれの接続先が隣に書いてあります。このライブラリでは、LEDmatrixは三段まで表示が可能です。上から順に一段目から三段目までの接続先を記入しています。下の写真のように各行の右端のLEDmatrixをラズパイに配線してください。
1段だとコネクターにそのままジャンプワイヤーで接続することも可能ですが、二段以上になると、ブレッドボードが必要になります。配線を雑にすると、下の写真のようになってしまいます。
LEDmatrixをラズパイで制御
以下のライブラリを使いました。
LEDmatrix 制御ライブラリ
インストール
早速githubからライブラリをインストールします。インストールしたライブラリのディレクトリに移動してビルドをしてください。
git clone https://github.com/hzeller/rpi-rgb-led-matrix/
cd rpi-rgb-led-matrix
make -C examples-api-use
pythonを使えるようにするには以下のコマンドを実行してください。
sudo apt-get update && sudo apt-get install python3-dev python3-pillow -y
cd rpi-rgb-led-matrix/python
make build-python PYTHON=$(which python3)
sudo make install-python PYTHON=$(which python3)
デモプログラムの実行
rpi-rgb-led-matrixのディレクトリに移動すると、デモプログラムを実行することが可能です。以下を実行します。
cd rpi-rgb-led-matrix
sudo examples-api-use/demo
すると、以下のような操作のオプションが表示されるので、このオプションに従って、操作してください。
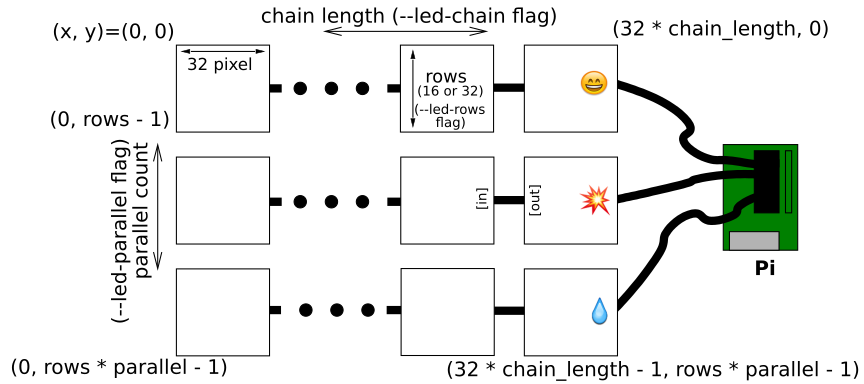
重要なものを説明しておきます。一枚当たりのLEDmatrixの行列の指定は--led-rows,--led-colsで行います。複数使う場合、段数は--led-parallel、横につなげた数は--led-chainで指定します。明るさは--led-brightness 表示時間は-t で指定します。
Expected required option -D <demo>
usage: examples-api-use/demo <options> -D <demo-nr> [optional parameter]
Options:
    -D <demo-nr>              : Always needs to be set
    -t <seconds>              : Run for these number of seconds, then exit.
    --led-gpio-mapping=<name> : Name of GPIO mapping used. Default "regular"
    --led-rows=<rows>         : Panel rows. Typically 8, 16, 32 or 64. (Default: 32).
    --led-cols=<cols>         : Panel columns. Typically 32 or 64. (Default: 32).
    --led-chain=<chained>     : Number of daisy-chained panels. (Default: 1).
    --led-parallel=<parallel> : Parallel chains. range=1..3 (Default: 1).
    --led-multiplexing=<0..9> : Mux type: 0=direct; 1=Stripe; 2=Checkered; 3=Spiral; 4=ZStripe; 5=ZnMirrorZStripe; 6=coreman; 7=Kaler2Scan; 8=ZStripeUneven; 9=P10-128x4-Z (Default: 0)
    --led-pixel-mapper        : Semicolon-separated list of pixel-mappers to arrange pixels.
                                Optional params after a colon e.g. "U-mapper;Rotate:90"
                                Available: "Rotate", "U-mapper". Default: ""
    --led-pwm-bits=<1..11>    : PWM bits (Default: 11).
    --led-brightness=<percent>: Brightness in percent (Default: 100).
    --led-scan-mode=<0..1>    : 0 = progressive; 1 = interlaced (Default: 0).
    --led-row-addr-type=<0..2>: 0 = default; 1 = AB-addressed panels; 2 = direct row select(Default: 0).
    --led-show-refresh        : Show refresh rate.
    --led-inverse             : Switch if your matrix has inverse colors on.
    --led-rgb-sequence        : Switch if your matrix has led colors swapped (Default: "RGB")
    --led-pwm-lsb-nanoseconds : PWM Nanoseconds for LSB (Default: 130)
    --led-pwm-dither-bits=<0..2> : Time dithering of lower bits (Default: 0)
    --led-no-hardware-pulse   : Don't use hardware pin-pulse generation.
    --led-slowdown-gpio=<0..2>: Slowdown GPIO. Needed for faster Pis/slower panels (Default: 1).
    --led-daemon              : Make the process run in the background as daemon.
    --led-no-drop-privs       : Don't drop privileges from 'root' after initializing the hardware.
Demos, choosen with -D
    0  - some rotating square
    1  - forward scrolling an image (-m <scroll-ms>)
    2  - backward scrolling an image (-m <scroll-ms>)
    3  - test image: a square
    4  - Pulsing color
    5  - Grayscale Block
    6  - Abelian sandpile model (-m <time-step-ms>)
    7  - Conway's game of life (-m <time-step-ms>)
    8  - Langton's ant (-m <time-step-ms>)
    9  - Volume bars (-m <time-step-ms>)
    10 - Evolution of color (-m <time-step-ms>)
    11 - Brightness pulse generator
Example:
    examples-api-use/demo -t 10 -D 1 runtext.ppm
Scrolls the runtext for 10 seconds
従って、デモを実行するには以下のようなコマンド(自分の枚数に応じて適宜変更)を打ち込めばよいです。仕様上、sudoで実行しないとエラーが発生します。また、最後の-Dの後ろの数字をいじれば、デモが変わります。
sudo examples-api-use/demo --led-no-hardware-pulse --led-rows=32 --led-cols=32 --led-chain=3 -t 10 --led-brightness=80 --led-parallel=2 -D 0
Pythonで日本語テキスト表示
このライブラリにはpythonのサンプルコードも載っているので、そちらを参考に日本語テキストの表示を可能にできるようにプログラムを作り変えます。海外の方のライブラリなので、テキスト表示のサンプルプログラムもありますが、アルファベットしか表示できません。いろいろ探した結果、この記事を参考に、日本語テキストを画像に変換して表示するという仕様にしました。日本語のフォントは何でもいいですが、ラズパイにダウンロードしてください。今回使用したフォントはこちらのサイトからダウンロードしました。
# !/usr/bin/env python
# -*- encoding:utf8 -*-
import time
import sys
import os
import numpy as np
from PIL import Image, ImageFont, ImageDraw
from rgbmatrix import RGBMatrix, RGBMatrixOptions
import subprocess, os, sys, re
def imaged_text(text, fontfile, fontsize, color, scale_bias=4):
font = ImageFont.truetype(fontfile, fontsize * scale_bias)
image = Image.new('RGBA', (1, 1))
draw = ImageDraw.Draw(image)
w,h = draw.textsize(text, font=font)
del draw
image = Image.new('RGBA', (w, h))
draw = ImageDraw.Draw(image)
draw.text((0, 0), text, font=font, fill=color)
del draw
return image.resize((w // scale_bias, h // scale_bias), Image.ANTIALIAS)
def draw_text_to(target, position, text, fontfile, fontsize, color):
image = imaged_text(text, fontfile, fontsize, color)
target.paste(image , position, image)
def select_color(threshold, color, destcolor = '#FFFFFF'):
mean = np.array(color).mean()
if mean > threshold:
#return (255, 255, 255)
return (int(destcolor[1:3],16),int(destcolor[3:5],16),int(destcolor[5:7],16))
else:
return (0, 0, 0)
# 文字画像二値化
def to_bin(img, w, h, color = '#FFFFFF'):
#各画素値のr,g,bの平均を求める
means = np.array([[img.getpixel((x,y)) for x in range(w)] for y in range(h)]).mean(axis=2).reshape(w * h,)
# ヒストグラムを作る
hist = np.array([np.sum(means == i) for i in range(256)])
max_v = 0
threshold = 0
# 0から255まで順に計算し、適切な閾値を求める
# 閾値より大きい画素値をクラス1、小さい画素値をクラス2とする
for th in range(256):
n1 = sum(hist[:th]) # クラス1の個数
m1 = np.dot(hist[:th], np.array(range(256))[:th]) # クラス1の値の平均
n2 = sum(hist[th:]) # クラス2の個数
m2 = np.dot(hist[th:], np.array(range(256))[th:]) # クラス2の値の平均
if n1 == 0 or n2 == 0:
v = 0
else:
# クラス間分散の分子を求める
v = n1 * n2 * (m1 / n1 - m2 / n2) ** 2
# クラス間分散の分子が最大となる閾値を更新していく
if max_v < v:
max_v = v
threshold = th
bin_img = Image.new('RGB', (w, h))
np.array([[bin_img.putpixel((x, y), select_color(threshold, img.getpixel((x,y)), color)) for x in range(w)] for y in range(h)])
return bin_img
# 横に画像をつなげる
def get_concat_h(im1, im2):
dst = Image.new('RGB', (im1.width + im2.width, im1.height))
dst.paste(im1, (0, 0))
dst.paste(im2, (im1.width, 0))
return dst
# 縦に画像をつなげる
def get_concat_w(im1, im2):
dst = Image.new('RGB', (im1.width,im1.height + im2.height,))
dst.paste(im1, (0, 0))
dst.paste(im2, (0, im1.height))
return dst
def get_text(str, width, separator = u"", col = '#B5E61D'):
image = Image.new("RGB", (width, 16))
draw_text_to(image, (0, 0), separator + str, 'KH-Dot-Kodenmachou-16.ttf', 16, col)
bin = to_bin(image, image.width, image.height, col)
return bin
def get_large_text(str, width, separator = u"", col = '#B5E61D'):
image = Image.new("RGB", (width,64))
draw_text_to(image, (0, 16), separator + str, 'KH-Dot-Kodenmachou-16.ttf', 32, col)
bin = to_bin(image, image.width, image.height, col)
return bin
def add_text(tex):
filename='clear.txt'
with open(filename,'a') as file_object:
file_object.write(tex+'\n')
def clearmatrix():
f=open('clear.txt')
line=f.readline()
while line:
ans=line
line=f.readline()
f.close()
ans=ans.strip()
if ans=='clear':
return True
else:
return False
# Configuration for the matrix
options = RGBMatrixOptions()
options.rows = 32
options.chain_length = 3
options.parallel = 2
options.hardware_mapping = 'regular'
options.brightness = 40
options.pwm_lsb_nanoseconds = 100
matrix = RGBMatrix(options = options)
def textscroll(text):
add_text("on")
width=full_width_decision(text)+32*6
text1=" "
left=0
right=96
result = Image.new("RGB", (96, 32))
text=text1+text
text_im = get_large_text(text, width, u"", '#FF7F27')
while clearmatrix()==False:
result=text_im.crop((left,0,right,64))
left+=1
right=left+96
if left>=width:
left=0
matrix.SetImage(result)
time.sleep(0.005)#この値を変えるとスクロール速度が変化します。
matrix.Clear()
add_text("off")
def ledprint(text):
add_text("on")
length=len(text)
row=int((length-1)/6)
text1=" "
text2=" "
text3=" "
text4=" "
if row==0:
text1=text
if row==1:
text1=text[0:6]
text2=text[6:]
if row==2:
text1=text[0:6]
text2=text[6:12]
text3=text[12:]
if row>=3:
text1=text[0:6]
text2=text[6:12]
text3=text[12:18]
text4=text[18:]
text1_im = Image.new("RGB", (96, 16))
text2_im = Image.new("RGB", (96, 16))
text3_im = Image.new("RGB", (96, 16))
text4_im = Image.new("RGB", (96, 16))
while clearmatrix()==False:
text1_im = get_text(text1, 96, u"", '#FF7F27')
text2_im = get_text(text2, 96, u"", '#FF7F27')
text3_im = get_text(text3, 96, u"", '#FF7F27')
text4_im = get_text(text4, 96, u"", '#FF7F27')
result = get_concat_w(text1_im,text2_im)
result = get_concat_w(result,text3_im)
result = get_concat_w(result,text4_im)
matrix.SetImage(result)
time.sleep(1)
matrix.Clear()
add_text("off")
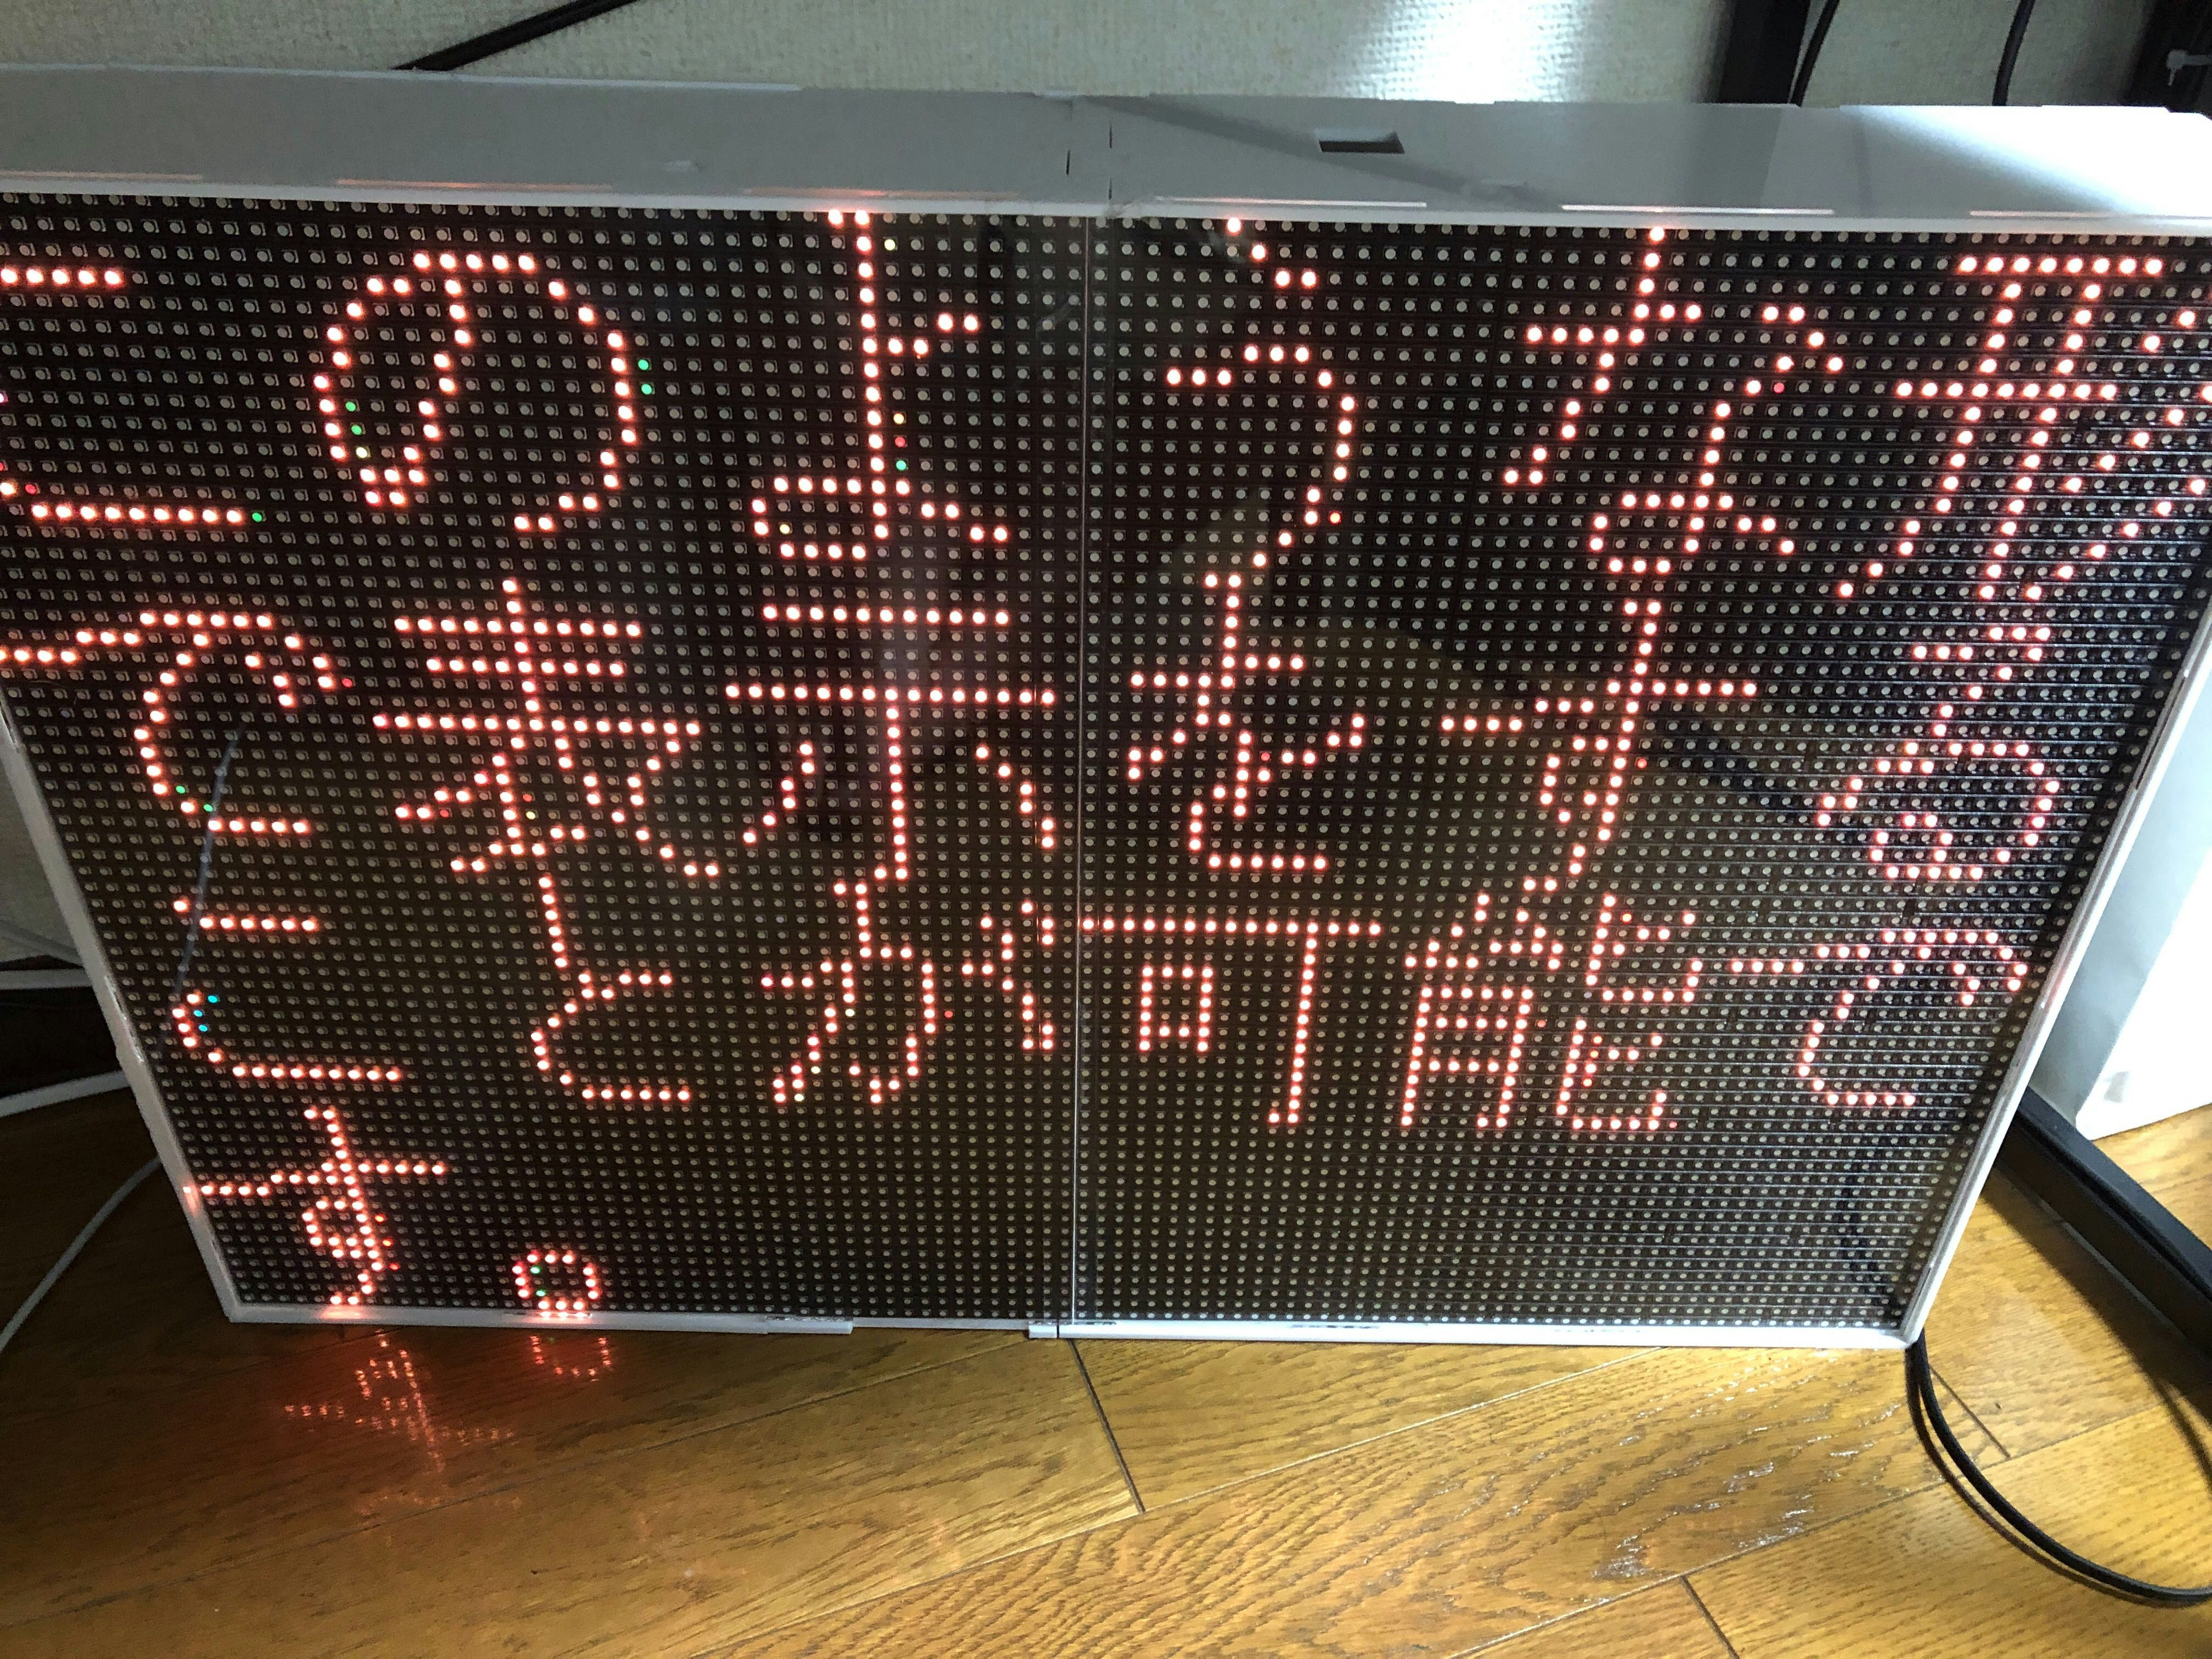
if __name__ == '__main__':
ledprint(u"このような形で表示をすることが可能です")
これで下に定義している二つの関数でテキストの表示とテキストのスクロールが可能です。自分のLEDmatrixの大きさに合わせて、数字部分は変えてください。また、今回は後半の記事で説明しますが、表示の切り替えをテキストファイルの読み書きで行うようにした(プログラム初心者)ので、'clear.txt'を読んで、消すか否かを判定しています。
参考にさせてもらったもの
今回LEDmatrixをラズパイで制御するにあたって、以下の記事を参考にしました。
素晴らしい記事ありがとうございました。
https://qiita.com/sousan/items/19425d5eac43786003a7/
https://qiita.com/t_slash_k/items/35ccf49ce85e5cbd045b/
https://qiita.com/eucalyhome/items/e871e297bfd527ccaf2c/
https://www.buildinsider.net/small/raspisinage/01/
https://yomon.hatenablog.com/entry/2018/09/p3rgbdisplay/
おわりに
今回でLEDmatrixの準備や配線、そして、日本語のテキスト表示が可能になりました。次回からはより扱いやすいものになるようにラズパイとSlackを連携させてみます。