0.はじめに
読んでから数ヶ月経つと『ゼロから作るDeep Learning 3』の内容も頭から綺麗サッパリ消え去りました。
というわけで復習を兼ねて、DeZeroでセマンティックセグメンテーションをしてみたいと思います。
windows10/gpuはgeforce gtx1060(6G)
使用しているのはこちら
python 3.7.13
DeZero 0.0.13
numpy 1.21.5
cupy 6.0.0
pillow 9.0.1
matplotlib 3.5.1
今回のnotebookは以下のリンク先で見られます。
https://github.com/takanashiyoruyoru/dezero_sample/blob/main/dezero_Semantic_Segmentation.ipynb
1. DeZeroの機能拡張
まずはDeZeroにないupsamplingとconcatの機能を作成します。
upsamplingは、「N * C * X * Y 」のデータを「N * C * 2X * 2Y 」にして、解像度を2倍にします。
forwardのときは、X軸, Y軸方向に2回、同じデータを繰り返します。
backwardのときは、4つの塊ごとに合計します。

class Up(Function):
    def __init__(self):
        super().__init__()

    def forward(self, x):
        return x.repeat(2, axis=2).repeat(2, axis=3)

    def backward(self, gy):
        return gy[:, :, ::2, ::2] + gy[:, :, 1::2, ::2]\
                + gy[:, :, ::2, 1::2] + gy[:, :, 1::2, 1::2]
forwardではcupy/numpyのrepeatを使用しています。
backwardではスライス機能で表現しています。
このUpのクラスでは解像度2倍にする機能しかありませんが、今回はこれで事足ります。
次にconcatでは, 「N * C1 * X * Y 」のデータと「N * C2 * X * Y 」のデータを組み合わせて「N * (C1 + C2) * X * Y 」にします。
class Concat(Function):
    def forward(self, x1, x2):
        xp = cuda.get_array_module(x1)
        #self.x1_len = xp.shape(x1)[1]
        self.x1_len = x1.shape[1]
        return xp.concatenate([x1, x2], axis=1)

    def backward(self, gy):
        gy_1 = gy[:, :self.x1_len, :, :]
        gy_2 = gy[:, self.x1_len:, :, :]
        return gy_1, gy_2


def concat(x1, x2):
    """
    Join two Variables along axis 1.
    The shapes of x1 and x2 must be the same, except in the axis 1 direction.

    Parameters
    ----------
    x1 : Variable
    x2 : Variable

    The axis along which the Variables will be joined.
    """
    return Concat()(x1, x2)
forwardのときに, C1の大きさ(x1.shape[1])を記憶しておくのがポイントです。
2. ネットワークの作成
ここではU-net風のネットワークを組んでみます。
U-netについては様々な文献で多くが語られていると思うので、あまり説明はしません。
今回は爪 or 爪でない を判断するネットワークを作成したいので、最後はsigmoid関数です。
class Net(Model):
    def __init__(self):
        super().__init__()
        self.conv_0 = L.Conv2d(32, kernel_size=3, stride=1, pad=1)
        self.conv_01 = L.Conv2d(32, kernel_size=3, stride=1, pad=1)
        self.conv_1 = L.Conv2d(64, kernel_size=5, stride=1, pad=2)
        self.conv_2 = L.Conv2d(128, kernel_size=5, stride=1, pad=2)
        self.conv_3 = L.Conv2d(128, kernel_size=5, stride=1, pad=2)
        self.conv_4 = L.Conv2d(128, kernel_size=3, stride=1, pad=1)
        self.conv_5 = L.Conv2d(64, kernel_size=3, stride=1, pad=1)
        self.conv_6 = L.Conv2d(32, kernel_size=3, stride=1, pad=1)
        self.conv_head0 = L.Conv2d(32, kernel_size=3, stride=1, pad=1)
        self.conv_head1 = L.Conv2d(1, kernel_size=3, stride=1, pad=1)

        self.up4 = Up()
        self.up5 = Up()
        self.up6 = Up()

        self.bn_0 = L.BatchNorm()
        self.bn_01 = L.BatchNorm()
        self.bn_1 = L.BatchNorm()
        self.bn_2 =  L.BatchNorm()
        self.bn_3 =  L.BatchNorm()
        self.bn_4 =  L.BatchNorm()
        self.bn_5 =  L.BatchNorm()
        self.bn_6 =  L.BatchNorm()
        self.bn_head =  L.BatchNorm()

    def forward(self, x0):
        x0 = F.relu(self.bn_0(self.conv_0(x0)))
        x0 = F.relu(self.bn_01(self.conv_01(x0)))
        x1 = F.relu(self.bn_1(self.conv_1(F.pooling(x0, 2, 2))))
        x2 = F.relu(self.bn_2(self.conv_2(F.pooling(x1, 2, 2))))
        x3 = F.relu(self.bn_3(self.conv_3(F.pooling(x2, 2, 2))))
        x4 = F.relu(self.bn_4(self.conv_4(self.up4(x3))))
        x4 = concat(x2, x4)
        x5 = F.relu(self.bn_5(self.conv_5(self.up5(x4))))
        x5 = concat(x1, x5)
        x6 = F.relu(self.bn_6(self.conv_6(self.up6(x5))))
        x6 = concat(x0, x6)
        x = F.relu(self.bn_head(self.conv_head0(x6)))
        x = F.sigmoid(self.conv_head1(x))
        return x
3.学習
データセットとデータローダーを作成します。
trainがtrueのときには、自作の関数でデータオーギュメンテーションするようにします。
class MyDataset:
    def __init__(self, img_path, mask_path, train=False, size=192):
        self.img_path = img_path
        self.mask_path = mask_path
        self.train = train
        self.size = size

    def __getitem__(self, index):
        #open two images, PIL
        img = Image.open(self.img_path[index]).convert('RGB')
        mask_img = Image.open(self.mask_path[index]).convert(mode="L")

        if self.train:
            img = random_gaussian_blur(img, p=0.4)
            img = random_brightness(img, p=1.)
            img = random_enhance(img, p=0.8)
            img = random_contrast(img, p=0.8)

        img = img.resize((self.size, self.size))
        img = np.array(img)

        mask_img = mask_img.resize((self.size, self.size))
        mask_img = np.array(mask_img)

        if self.train:
            img, mask_img = random_horizontal_flip(img, mask_img, p=0.5)
            img, mask_img = random_vertical_flip(img, mask_img, p=0.5)

        #convert ndarray, channel first,  0 to 1
        img = img.transpose((2, 0, 1))
        img = img / 255.
        mask_img = np.where(mask_img > 0, 1.0, 0.0)
        mask_img = mask_img.reshape(1, self.size, self.size)
        return img, mask_img

    def __len__(self):
        return len(self.img_path)
np.random.seed(42)

img_path = np.array(glob.glob("nailseg/images/*"), dtype=object)

random_nums = np.random.rand(len(img_path))
img_train_path = img_path[random_nums < 0.9]
img_test_path = img_path[random_nums > 0.9]

mask_train_path = [p.replace("images", "labels") for p in img_train_path]
mask_test_path = [p.replace("images", "labels") for p in img_test_path]

train_set = MyDataset(img_train_path, mask_train_path, train=True, size=128)
train_loader = DataLoader(train_set, 4, shuffle=True)

test_set = MyDataset(img_test_path, mask_test_path, train=False, size=128)
test_loader = DataLoader(test_set, 3, shuffle=False)
画像はimg_train_pathに42枚, img_test_pathに6枚が配分されるようになっています。
train_losses = []
test_losses = []

net = Net()

net.to_gpu()
train_loader.to_gpu()
test_loader.to_gpu()

optimizer = dezero.optimizers.Adam(alpha=0.0002).setup(net)

max_epoch = 100
for epoch in range(max_epoch):
    #Initialize the tmp_loss
    tmp_loss = 0.0

    for x, y in train_loader:
        y_pred = net(x)
        loss = F.binary_cross_entropy(y_pred, y)

        net.cleargrads()
        loss.backward()
        optimizer.update()

        tmp_loss += float(loss.data) * len(y)
    train_losses.append(tmp_loss / (len(train_set)))

    tmp_loss = 0.0
    for x, y in test_loader:
        with dezero.test_mode():
            y_pred = net(x)
            loss = F.binary_cross_entropy(y_pred, y)
        tmp_loss += float(loss.data) * len(y)
    test_losses.append(tmp_loss / (len(test_set)))

    print(epoch, ": ", train_losses[epoch]," test:", test_losses[epoch])
4.結果
エポック毎のlossの結果はこちら

実際のtest画像の推論結果(100 epoch終了後)
左が元画像, 真ん中が推論結果, 右が正解
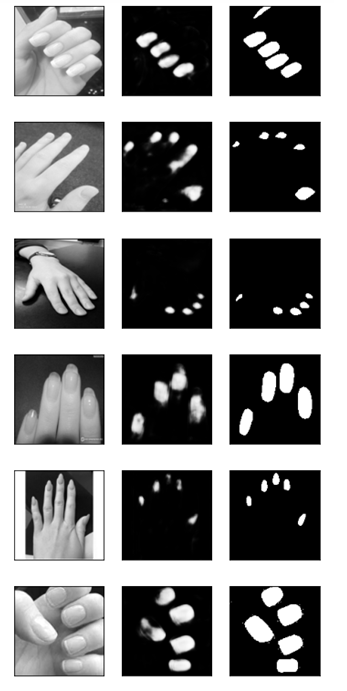
流石に学習画像42枚はキツいが、それなりに認識出来ている様子
終わりに
DeZeroを使うと結構簡単に追加で機能作れてすごくべん....
な訳はなく、実用的にはpytorch使った方がよい(確実に)。
それでも色々と作れると楽しい!!