最初に
ゼロから作るDeep Learning ❸――フレームワーク編の写経が大体終了~(理解したとは言っていない)。
せっかくなので、DeZeroを使ってみたいと思います。
テーマとしては, VGG16のファインチューニングをやってみます。
元ネタはpytorchチュートリアルなんで、そちらも参照ください。
画像はアリとハチ、それぞれ120枚程度で学習させていますが、ほかのデータでも同じようにできるはずです...
画像の準備
DeZeroはversion 0.0.13で,google colabを使って実行しました。
google colabでは最初に, "pip install dezero" でdezeroをインストールすることでdezeroを使えます。
import glob
from PIL import Image
import numpy as np
import matplotlib.pyplot as plt
import dezero
import dezero.functions as F
import dezero.layers as L
from dezero import DataLoader, optimizers, Parameter, test_mode
from dezero.models import VGG16
globを使って、画像のパスのlistとそれに対応するtargetデータを作成します。
# Change to the path where the image files are saved.
path = "./drive/MyDrive/ColabNotebooks/hymenoptera_data/"

train_path_ants = glob.glob(path + "train/ants/*")
train_path_bees = glob.glob(path + "train/bees/*")

test_path_ants = glob.glob(path + "val/ants/*")
test_path_bees = glob.glob(path + "val/bees/*")

train_path, test_path = [], []
train_path.extend(train_path_ants)
train_path.extend(train_path_bees)

test_path.extend(test_path_ants)
test_path.extend(test_path_bees)

# Create target labels. Ants are 0 and Bees are 1.
train_label = np.append(np.zeros(len(train_path_ants)),
                        np.ones(len(train_path_bees)))
test_label = np.append(np.zeros(len(test_path_ants)),
                        np.ones(len(test_path_bees)))
datasetとdataloaderを用意します。Pytorchのやり方とほとんど同じです。
class MyDataset:
  def __init__(self, path, label, transform):
    self.path = path
    self.label = label
    self.transform = transform

  def __getitem__(self, index):
    img = Image.open(self.path[index])
    img = self.transform(img)
    return img, int(self.label[index])

  def __len__(self):
    return len(self.label)

batchsize = 8
train_set = MyDataset(train_path, train_label, VGG16.preprocess)
train_loader = DataLoader(train_set, batchsize, shuffle=True)

test_set = MyDataset(test_path, test_label, VGG16.preprocess)
test_loader = DataLoader(test_set, batchsize, shuffle=False)

train_loader.to_gpu()
test_loader.to_gpu()
重みを更新しない層の指定
書籍では全く触れられていないですが、dezeroではoptimizersに勾配を0にするclass FreezeParamが存在しています。
ただ、これを使うとエラーが出て、ネットワークの更新がうまくできませんでした。(使い方が悪いのかな?)
ということで、今回は微変更したものを使用しました。
class FreezeParam:
    def __init__(self, *layers):
        self.freeze_params = []
        for l in layers:
            if isinstance(l, Parameter):
                self.freeze_params.append(l)
            else:
                for p in l.params():
                    self.freeze_params.append(p)

    def __call__(self, params):
        for p in self.freeze_params:
            p.grad.data = 0.
最終行の「p.grad = None」を「p.grad.data = 0.」に変更しただけです。
次にpretrainedのVGG16を呼び出してきます。pretrainedのVGG16は1000クラスで学習していますが、
今回欲しいのは2クラス分類なので、outputのfc8をL.Linear(2)に変更します。
そして、freeze_layersで重みを更新しない層を指定します。
今回は入力側のCNN層は重みを更新しない層、出力に近い全結合層は学習させる層になります。
net = VGG16(pretrained=True)
net.fc8 = L.Linear(2)  #replace the output layer.
freeze_layers = [net.conv1_1, net.conv1_2, net.conv2_1, net.conv2_2,
                 net.conv3_1, net.conv3_2, net.conv3_3,
                 net.conv4_1, net.conv4_2, net.conv4_3,
                 net.conv5_1, net.conv5_2, net.conv5_3]
freeze_fn = FreezeParam(*freeze_layers)

optimizer = optimizers.AdaGrad(lr=0.001).setup(net)
optimizer.add_hook(freeze_fn)

net.to_gpu()
学習と結果
後は学習させるだけです。pytorchとかと似たようなやり方で学習できます。
def test_score(net, test_loader, test_set):
  """
  return test_loss and accurcy, test_mode
  """
  #initialize tmp_loss and tmp accuracy for test_loader.
  tmp_loss, tmp_acc = 0.0, 0.0

  for x, y in test_loader:
    with test_mode():
      y_pred = net(x)
    loss = F.softmax_cross_entropy(y_pred, y)
    tmp_loss += float(loss.data) * len(y)
    tmp_acc += float(F.accuracy(y_pred, y).data) * len(y)

  return tmp_loss / (len(test_set)), tmp_acc / len(test_set)
def train_net(net, train_loader, test_loader, max_epoch=1):
  #lists to record the training progresses.
  train_losses, test_losses = [], []
  train_accuracies, test_accuracies = [], []

  for epoch in range(max_epoch):
    #Initialize the tmp_loss and the tmp_accuracy
    tmp_loss, tmp_acc = 0.0, 0.0
    for x, y in train_loader:
      y_pred = net(x)
      loss = F.softmax_cross_entropy(y_pred, y)

      net.cleargrads()
      loss.backward()
      optimizer.update()

      tmp_loss += float(loss.data) * len(y)
      tmp_acc += float(F.accuracy(y_pred, y).data) * len(y)

    #record train loss and train accuracies
    train_losses.append(tmp_loss / (len(train_set)))
    train_accuracies.append(tmp_acc / len(train_set))

    #calculate_test
    test_loss, test_acc = test_score(net, test_loader, test_set)
    test_losses.append(test_loss)
    test_accuracies.append(test_acc)

  return net, [train_losses, test_losses, train_accuracies, test_accuracies]
max_epoch = 10
net, progress = train_net(net, train_loader, test_loader, max_epoch)
progressにlossと正答率が記録されています。
matplotlibを使って可視化します。
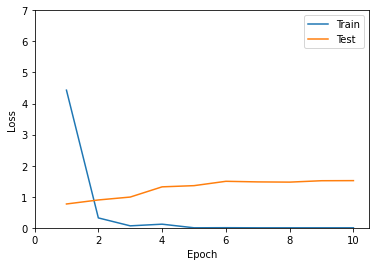
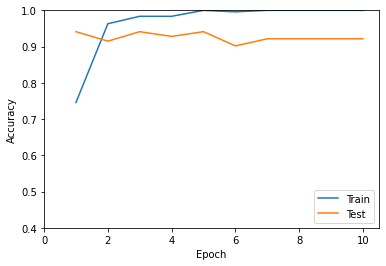
1 epoch学習させた時点でtestデータでは十分な性能を発揮しています。
2 epoch目以降は過学習状態ですね。
比較
すべての重みを更新する場合も試してみます。
# Initialize the network
net_no_freeze = VGG16(pretrained=True)
net_no_freeze.fc8 = L.Linear(2)  #replace output layer.
optimizer = optimizers.AdaGrad(lr=0.001).setup(net_no_freeze)
net_no_freeze.to_gpu()
net_no_freeze, progress_no_freeze = train_net(net_no_freeze,
                                              train_loader, test_loader,
                                              max_epoch)
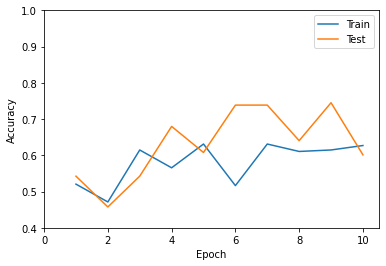
重みを更新しない場合と比較して、微妙な正答率になっています。
ファインチューニングの威力が発揮されています。