はじめに
この記事では、次のテキストエディタ利用時に画像を挿入をする方法を紹介しています。
- サクラエディタ
- 秀丸
- そのほかのエディタ
画像挿入方法
基本的な方針は、エディタのマクロ機能を利用して次の処理を実施します。
- クリップボードにコピーされている画像データをファイルに保存する
-
保存したファイルのパスをエディタに挿入する
(エディタの機能でファイルパスをダブルクリックすると画像ファイルが表示される)
なお、前提としてテキストファイルは事前に保存済み状態としておきます。紹介するマクロは、テキストファイルの保存先と同じパスに ss という名称のフォルダを作成して、そのフォルダ内に画像ファイルを保存するためです。
※紹介するマクロは、いずれも テキストファイルの保存パスに空白が入らない環境 で動作確認をしております。
サクラエディタ
次をマクロ管理フォルダに保存します。
Option Explicit

Dim file1 'folder path
Dim file2 'file name
Dim file  'file path
Dim cmd, shell, ret, isWait, isShow

isWait = true
isShow = 1 '0:hide, 1:show shell window

Dim fso
Set fso = CreateObject("Scripting.FileSystemObject")
file1 = fso.GetParentFolderName(GetFilename()) + "\ss"
file2 = "ss_" + Right("0" & Year(Now), 2) + Right("0" & Month(Now), 2) + Right("0" & Day(Now), 2) + "_" + Right("0" & Hour(Now), 2) + Right("0" & Minute(Now), 2) + Right("0" & Second(Now), 2) + "_.png"
file2 = InputBox("please input name of screenshot", "Input File Name", file2)
file = file1 + "\" + file2
If Not(file2 = "") Then
   cmd = "powershell mkdir " + file1 + "; $Image = Get-Clipboard -Format Image; if($Image){$Image.Save('" + file + "');exit $?}else{exit 0}"
   Set shell = CreateObject("WScript.Shell")
   ret = shell.Run("powershell -ExecutionPolicy RemoteSigned -Command " & cmd, isShow, isWait)
   If((isWait And ret) Or (Not(isWait))) Then
      Editor.insText("screenshot :: " + file)
   End If
End If
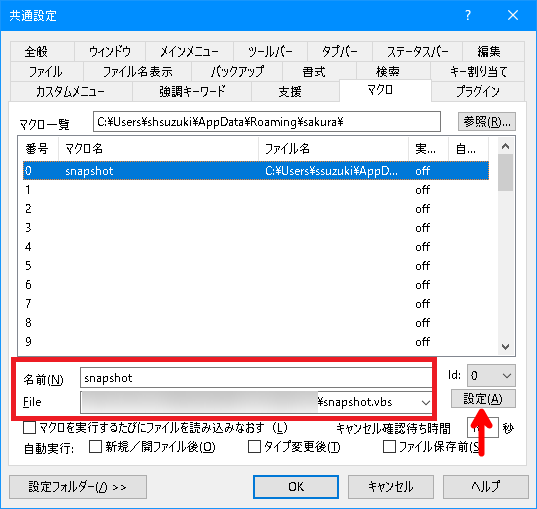
サクラエディタのメニューから[設定] > [共通設定] > [マクロ]タブを選択して タイトル を入力、 File に保存したsnapshot.vbsのフルパスを指定後、赤矢印のボタンから設定を保存します。

[マクロ]タブから[キー割り当て]タブに切り替えて、種別=外部マクロ(赤矢印) として、登録したマクロ(赤枠)を選択、割り当てるキー設定として(今回は)ALT+S(青枠)を指定後、青矢印のボタンで割り当てをして、OKボタンで設定を終えます。

実行すると、現在日時をもとに、作成する画像ファイルのデフォルト名を表示します。必要に応じてファイル名を変更してEnterキーを入力すると画像ファイルが保存されます。

秀丸
次をマクロ管理フォルダ(既定は %appdata%\Hidemaruo\Hidemaru\Macro)に保存します。
$dir = directory + "\\ss";
$file1 = "ss_" + year + month + day + "_" + hour + minute + second + "_.png";
$file2 = input("please input name of screenshot", $file1, 0x01);
$file = $dir + "\\" + $file2;
if(result){
   $cmd = "powershell mkdir " + $dir + "; $Image = Get-Clipboard -Format Image; if($Image){$Image.Save('" + $file + "');exit $?}else{exit 0}";
   runex $cmd
       , 1     //sync   0:async, 1:sync
       , 0, "" //stdin  0:none, 1:auto, 2:<file, 3:(reserved),
               //       4:current content, 5:selection
       , 0, "" //stdout 0:none, 1:auto, 2:>file 3:>>file, 4:new window,
               //       5:insert, 6:replace, 7:>output pane, 8:>>output pane
       , 0, "" //stderr 0:none, 1:auto or >>stdout, 2-8:same as stdout's param
       , 0, "" //folder 0:none, 1:current, 2:specify 3:(reserved), 4:exe's
       , 1     //show   0:auto, 1:show, 2:hide, 3-13:ShellExecute()'s SW_*
       , 1     //draw   0:draw, 1:no draw when stdout redirected
       , 0     //encode 0:ansi, 2:utf-16, 6:utf-8
       , 0     //extended flags
   ;
   if(getresultex(9)){
      insert "screenshot :: " + $file;
      insertreturn;
   }
}
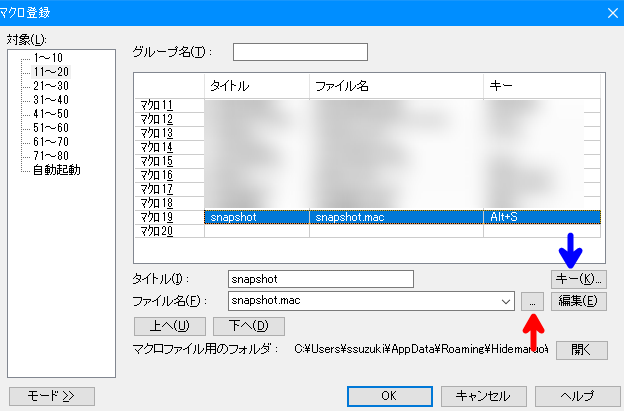
秀丸のメニューから[マクロ] > [マクロ登録]を選択して タイトル を入力して赤矢印のボタンからファイルを保存したマクロファイル(snapshot.mac)を選択、OKボタンをクリックします。

青矢印のボタンから、キー割り当て画面を表示してショートカットキーを指定します(スクリーンショットの例はAlt+S)。

実行すると、現在日時をもとに、作成する画像ファイルのデフォルト名を表示します。必要に応じてファイル名を変更してEnterキーを入力すると画像ファイルが保存されます。

画像ファイルの保存が完了するとscreenshot :: <ファイルパス名>という形式の文字列を編集中のテキストファイルに挿入してマクロは終了します。
そのほかのエディタ
サクラエディタ・秀丸の例では、いずれもエディタのマクロ機能を利用してpowershellコマンドpowershell mkdir " + <画像ファイルの保存先フォルダ> + "; $Image = Get-Clipboard -Format Image; if($Image){$Image.Save('" + <画像ファイルの保存先パス> + "');exit $?}else{exit 0}";を実行しています。お使いのエディタに合わせてこのコマンドを実行して、<画像ファイルの保存先パス>を編集中のテキストファイルに挿入できれば、どのエディタでも画像挿入が可能です。
おわりに
テクニカルな検証時のメモなど、基本的にテキストエディタを使って情報を整理しています。テキストエディタを利用すると、grepによる検索が容易なため、過去の検証メモを参照する際に効率的です。
以前はスクリーンショットを画像ファイルとして保存したり、Excelにまとめたりしていましたが、手間に感じることがあり、時にはスクリーンショットを取らないこともありました。しかし、この記事で紹介している方法を取り入れてからは、スムーズに検証時のスクリーンショットを管理できるようになり、生産性の向上を実感しています。
テキストエディタを活用してメモを取られている方には、ぜひ一度お試しいただきたい方法です。