概要
Nest.jsのアプリケーション内にPrismaを使用する際の初期設定の方法と簡単なAPIを使ってPrismaを使用する方法まで解説していきたいと思います
前提
- Nest.jsのアプリケーションを作成済み
- 今回はPostgresを使用します
- Postgres用のコンテナを作成済み
必要なパッケージのインストール
- prisma
- prisma/client
の2つをインストールします
npm install prisma --save-dev
npm install @prisma/client
Prismaの初期化
以下のコマンドでPrismaの初期化を行います
npx prisma init

✔ Your Prisma schema was created at prisma/schema.prisma
  You can now open it in your favorite editor.

warn You already have a .gitignore file. Don't forget to add `.env` in it to not commit any private information.

Next steps:
1. Set the DATABASE_URL in the .env file to point to your existing database. If your database has no tables yet, read https://pris.ly/d/getting-started
2. Set the provider of the datasource block in schema.prisma to match your database: postgresql, mysql, sqlite, sqlserver, mongodb or cockroachdb.
3. Run prisma db pull to turn your database schema into a Prisma schema.
4. Run prisma generate to generate the Prisma Client. You can then start querying your database.

More information in our documentation:
https://pris.ly/d/getting-started
初期化が完了したらprismaフォルダとschema.prismaファイルが作成されます
tree
・
├── prisma
│   └── schema.prisma
└── src
schemaの作成
schema.prismaにModelの設定を行います
今回はUserのModelを作成します
// This is your Prisma schema file,
// learn more about it in the docs: https://pris.ly/d/prisma-schema

// Looking for ways to speed up your queries, or scale easily with your serverless or edge functions?
// Try Prisma Accelerate: https://pris.ly/cli/accelerate-init

generator client {
  provider = "prisma-client-js"
}

datasource db {
  provider = "postgresql"
  url      = env("DATABASE_URL")
}

model User {
  id              Int      @id @default(autoincrement())
  name            String   @db.VarChar(255)
  employee_number String   @db.VarChar(8)
  email           String   @unique
  password        String   @db.VarChar(255)
  is_active       Boolean  @default(true)
  createdAt       DateTime @default(now())
  updatedAt       DateTime @updatedAt
}
DATABASE_URLの設定を行います
DATABASE_URL=postgresql://{ユーザ名}:{パスワード}@localhost:5432/{DB名}?schema=public
という風に必要な項目は適宜置き換えていただければと思います
今回は
- DB名:postgres
- ユーザ名:postgres
- パスワード:postgres
のため、以下のようにDATABASE_URLを設定します
DATABASE_URL=postgresql://postgres:postgres@localhost:5432/postgres?schema=public
マイグレーションの実行
設定後、Postgresへマイグレーションを実行します
以下のようにログが表示されたら成功です
npx prisma migrate dev
Environment variables loaded from .env
Prisma schema loaded from prisma/schema.prisma
Datasource "db": PostgreSQL database "postgres", schema "public" at "localhost:5432"

✔ Enter a name for the new migration: … init
Applying migration `20240329235621_init`

The following migration(s) have been created and applied from new schema changes:

migrations/
  └─ 20240329235621_init/
    └─ migration.sql

Your database is now in sync with your schema.

✔ Generated Prisma Client (v5.11.0) to ./node_modules/@prisma/client in 137ms
ディレクトリ構成
今回はユーザを一覧表示する簡単なAPIを作成します
tree
・
├── prisma
│   ├── migrations
│   │   ├── 20240329235621_init
│   │   │   └── migration.sql
│   │   └── migration_lock.toml
│   ├── schema.prisma
│   └── seed.ts
├── src
│   ├── app.controller.spec.ts
│   ├── app.controller.ts
│   ├── app.module.ts
│   ├── app.service.ts
│   ├── main.ts
│   ├── prisma
│   │   ├── prisma.module.ts
│   │   └── prisma.service.ts
│   └── user
│       ├── user.controller.ts
│       ├── user.module.ts
│       └── user.service.ts
├── package-lock.json
├── package.json
└── prisma
    └── schema.prisma
テストデータの作成
詳しい説明は以下の記事を参考にしてください
import { PrismaClient } from '@prisma/client';
const prisma = new PrismaClient();
async function main() {
  await prisma.user.upsert({
    where: { email: 'test_user_01@example.com' },
    update: {},
    create: {
      name: 'テストユーザゼロイチ',
      employee_number: '00000001',
      email: 'test_user_01@example.com',
      password: '$2b$12$tg885CjGIz1qs1nN2KFmlu6XdEPc.ucVzx4dwe9thxqL/rpaqWY9C',
      is_active: true,
    },
  });
}

main()
  .then(async () => {
    await prisma.$disconnect();
  })
  .catch(async (e) => {
    console.error(e);
    await prisma.$disconnect();
    process.exit(1);
  });
以下のコマンドを実行してテストデータが入ったら成功です
npx prisma db seed
Environment variables loaded from .env
Running seed command `ts-node prisma/seed.ts` ...

🌱  The seed command has been executed.
prisma.service.ts
PrismaClientを継承するPrismaSerivceを作成します
onModuleInitメソッド内にPrismaClientとデータベースを接続する記述を追加します
When setting up your NestJS application, you'll want to abstract away the Prisma Client API for database queries within a service. To get started, you can create a new PrismaService that takes care of instantiating PrismaClient and connecting to your database.
import { Injectable, OnModuleInit } from '@nestjs/common';
import { PrismaClient } from '@prisma/client';

@Injectable()
export class PrismaService extends PrismaClient implements OnModuleInit {
  async onModuleInit() {
    await this.$connect();
  }
}
prisma.module.ts
Prisma用のModuleを作成します
import { Module } from '@nestjs/common';
import { PrismaService } from './prisma.service';

@Module({
  providers: [PrismaService],
  exports: [PrismaService],
})
export class PrismaModule {}
一覧表示APIの作成
- app.module.ts
- user.service.ts
- user.controller.ts
内に必要な設定を記載します
app.module.ts
作成した
- PrismaModule
- PrismaService
をapp.module.ts内にimportします
import { Module } from '@nestjs/common';
import { AppController } from './app.controller';
import { AppService } from './app.service';
import { ConfigModule } from '@nestjs/config';
import { UserService } from './user/user.service';
import { UserController } from './user/user.controller';
import { UserModule } from './user/user.module';
import { PrismaService } from './prisma/prisma.service';
import { PrismaModule } from './prisma/prisma.module';

@Module({
  imports: [
    ConfigModule.forRoot({ envFilePath: '../.env' }),
    UserModule,
    PrismaModule,
  ],
  controllers: [AppController, UserController],
  providers: [AppService, UserService, PrismaService],
})
export class AppModule implements NestModule {}
user.service.ts
PrismaのfindManyメソッドを使ってusersの配列を取得し、map関数を使ってパスワード以外の項目を割り当てて一覧に表示させるよう設定します
import { Injectable } from '@nestjs/common';
import { PrismaService } from 'src/prisma/prisma.service';

@Injectable()
export class UserService {
  constructor(private readonly prismaService: PrismaService) {}

  async findAll() {
    const users = await this.prismaService.user.findMany({});
    return users.map((user) => ({
      id: user.id,
      name: user.name,
      employee_number: user.employee_number,
      email: user.email,
      is_active: user.is_active,
      createdAt: user.createdAt,
      updatedAt: user.updatedAt,
    }));
  }
}
user.controller.ts
controllerを作成してservice内のfindAll()メソッドを実行するようにします
import { Controller } from '@nestjs/common';
import { ApiTags, ApiResponse } from '@nestjs/swagger';
import { Get } from '@nestjs/common';
import { UserService } from './user.service';

@ApiTags('users')
@Controller('users')
export class UserController {
  constructor(private readonly userService: UserService) {}

  @Get()
  @ApiResponse({
    status: 200,
    description: 'ユーザを一覧表示',
    content: {
      'application/json': {
        example: [
          {
            id: 1,
            name: 'テストユーザゼロイチ',
            employee_number: '00000001',
            email: 'test_user_01@example.com',
            is_active: true,
            createdAt: '2024-03-08T00:33:27.790Z',
            updatedAt: '2024-03-08T00:33:27.790Z',
          },
        ],
      },
    },
  })
  findAll() {
    return this.userService.findAll();
  }
}
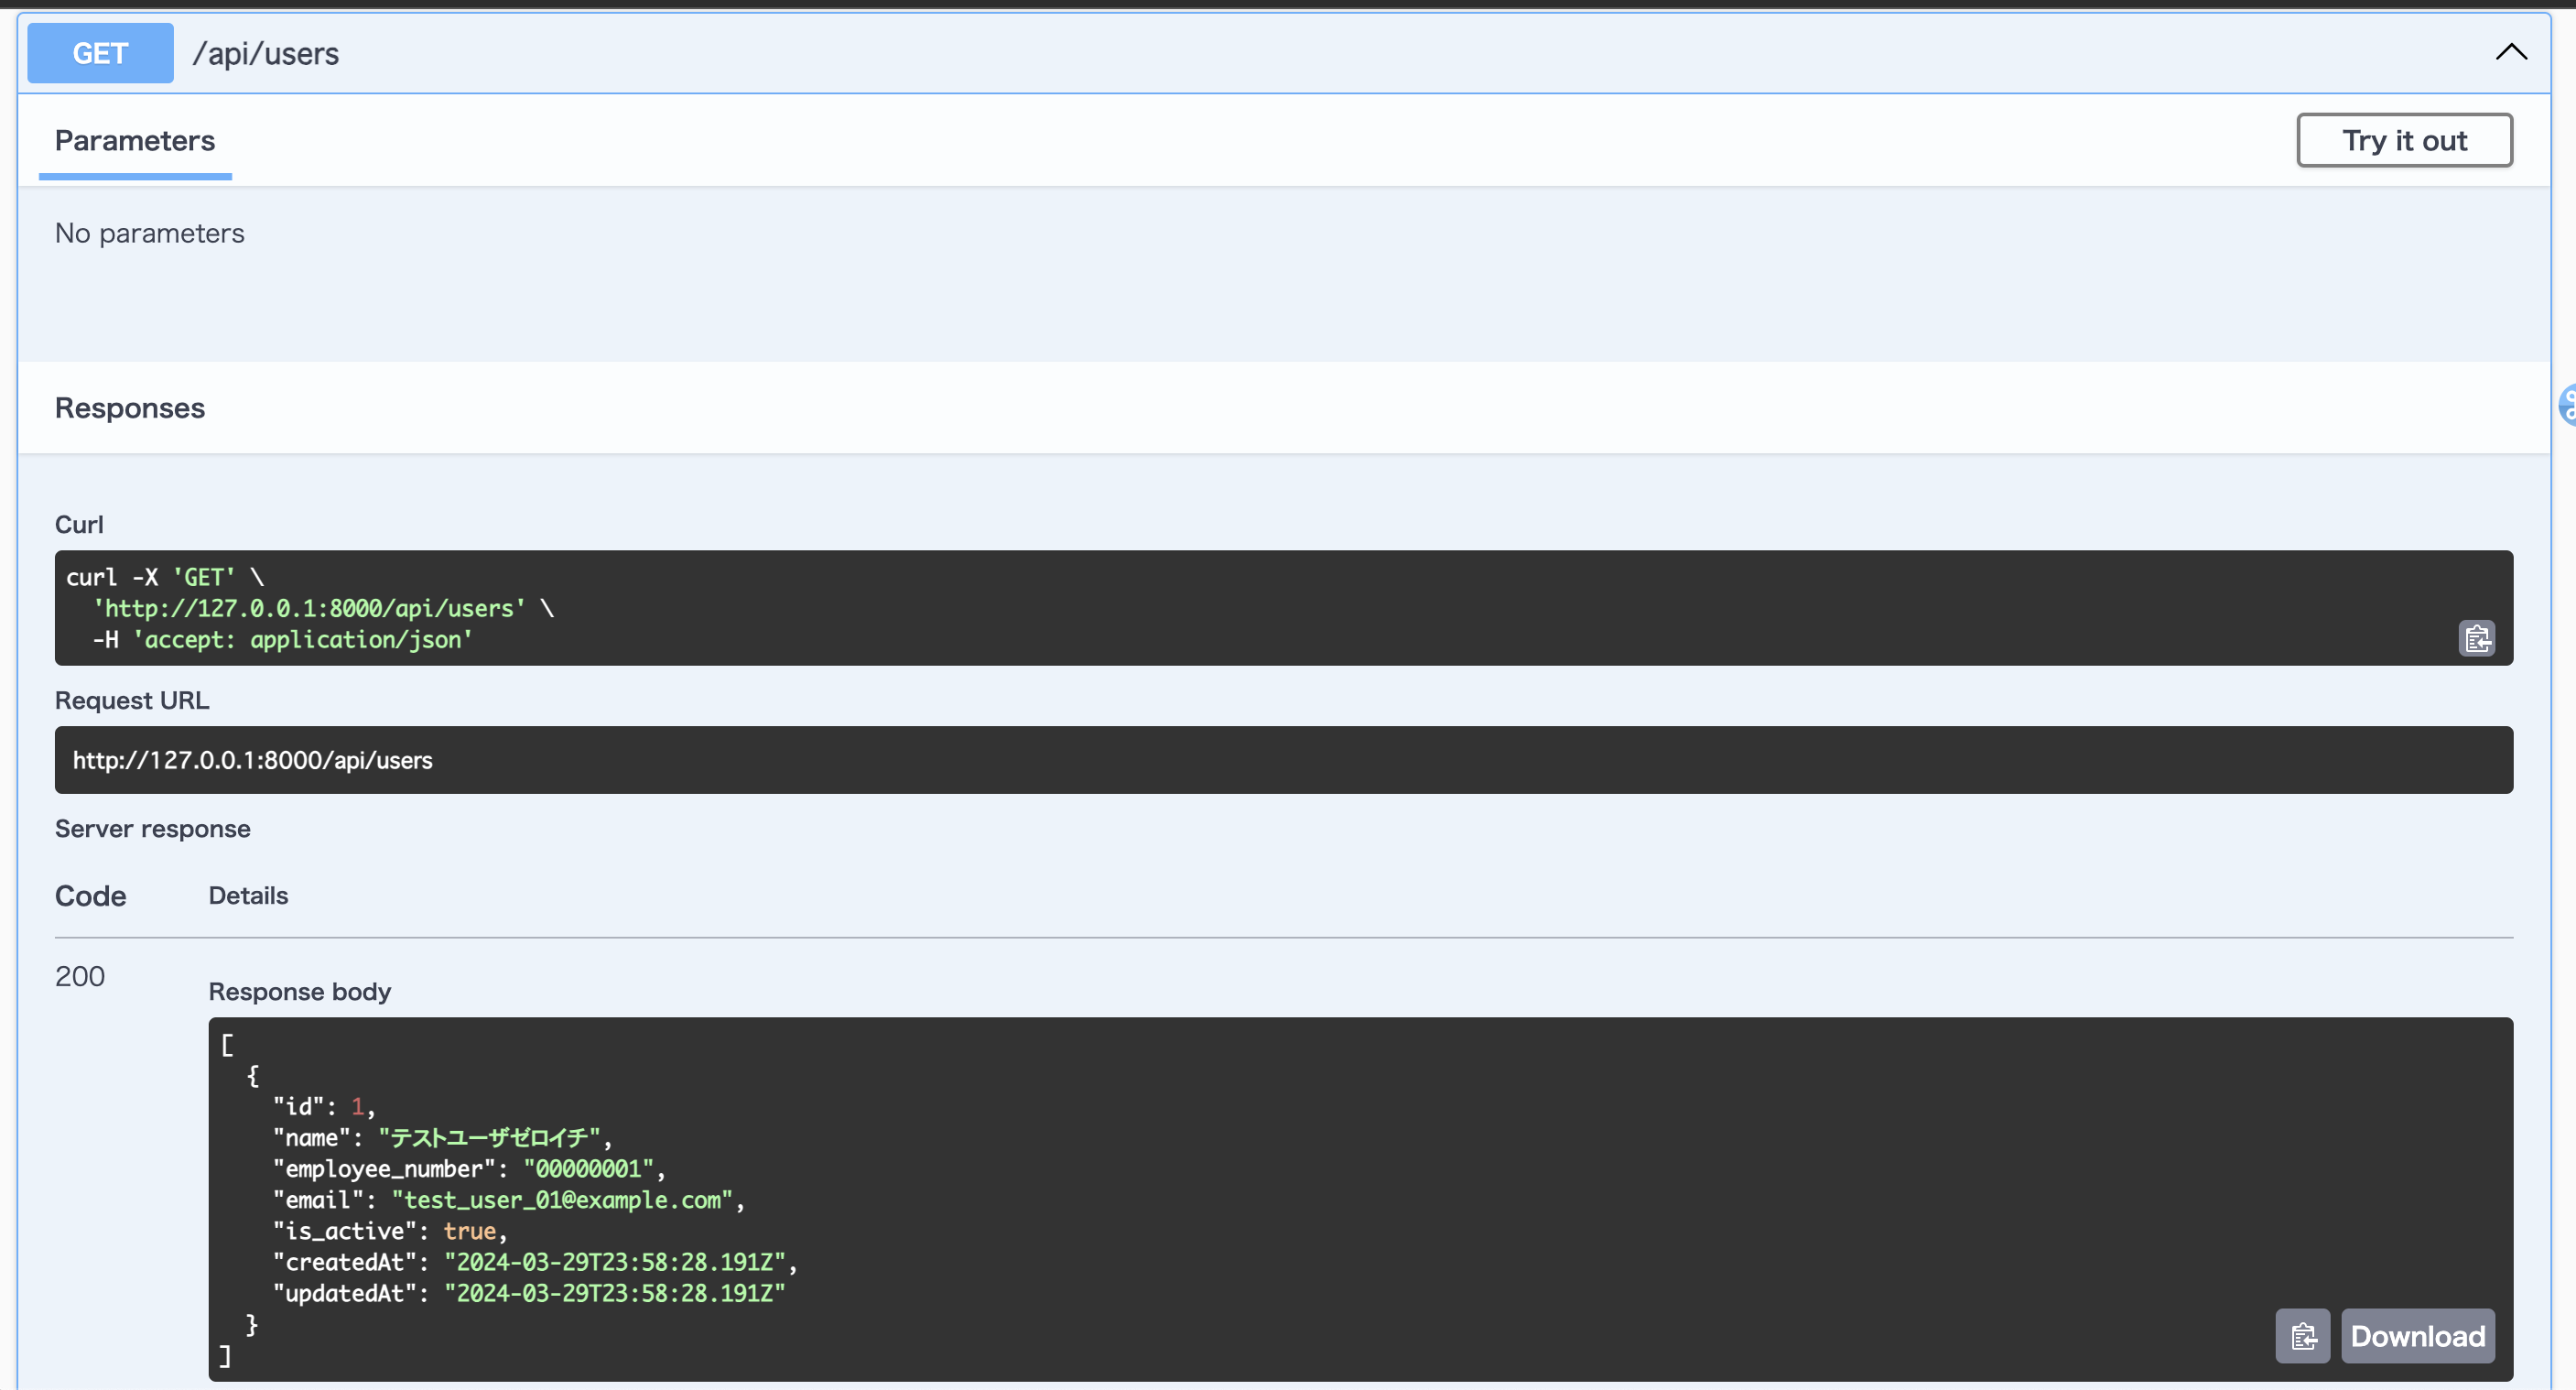
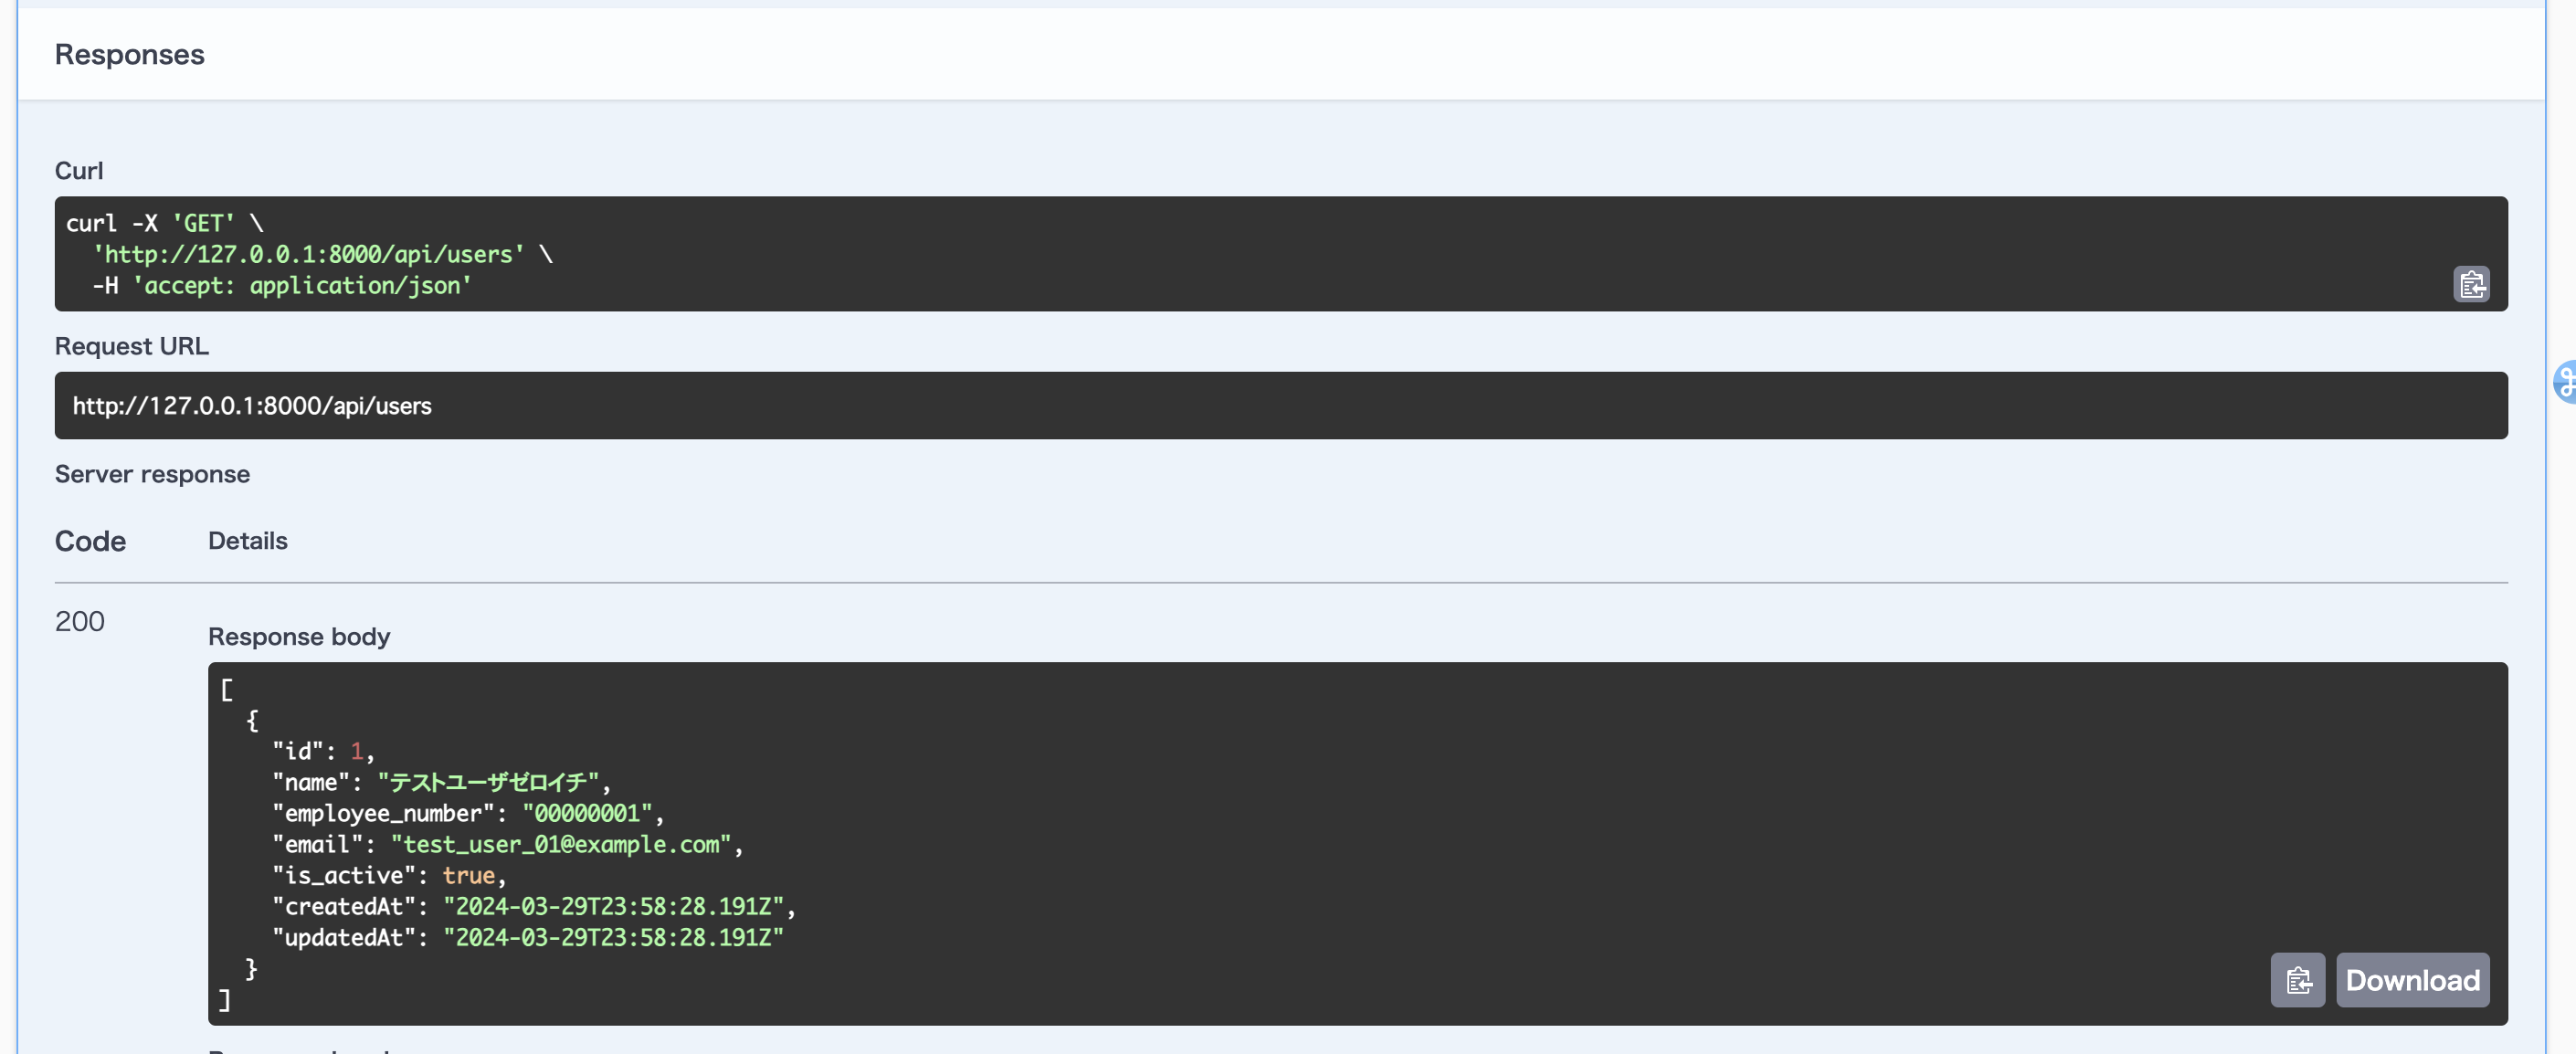
実際にAPIを実行してみよう!
ユーザの一覧表示APIを実行し、一覧がレスポンスとして表示されたら成功です
参考