概要
今回はDjango Rest Frameworkを使って
- ユーザへ招待メールを送信する
- トークンが有効であるか確認する
- 受信した招待メールのトークンを使ってユーザの認証を行う
APIの作成を行います
前提
- Djangoのプロジェクトを作成済み
ディレクトリ構成
tree
・
├── application
│   ├── __init__.py
│   ├── admin.py
│   ├── apps.py
│   ├── emails.py
│   ├── fixtures
│   │   └── fixture.json
│   ├── migrations
│   │   ├── 0001_initial.py
│   │   └── __init__.py
│   ├── models.py
│   ├── templates
│   │   ├── invite_user_email.html
│   │   └── invite_user_email.txt
│   ├── urls.py
│   └── views.py
└── project
    └── settings.py
メールの設定
MailCatcherの設定
MailCatcherという仮想のSMTPサーバの設定を行います
詳細は以下の記事を参考にしてください
version: '3.9'

services:
  db:
    container_name: db
    build:
      context: .
      dockerfile: containers/postgres/Dockerfile
    volumes:
      - db_data:/var/lib/postgresql/data
    healthcheck:
      test: pg_isready -U "${POSTGRES_USER:-postgres}" || exit 1
      interval: 10s
      timeout: 5s
      retries: 5
    environment:
      - POSTGRES_NAME
      - POSTGRES_USER
      - POSTGRES_PASSWORD
    ports:
      - '5432:5432' # デバッグ用

  app:
    container_name: app
    build:
      context: .
      dockerfile: containers/django/Dockerfile
    volumes:
      - ./backend:/code
      - ./static:/static
    ports:
      - '8000:8000'
      # デバッグ用ポート
      - '8080:8080'
    command: sh -c "/usr/local/bin/entrypoint.sh"
    stdin_open: true
    tty: true
    env_file:
      - .env
    depends_on:
      db:
        condition: service_healthy

  mail:
    container_name: mail
    image: schickling/mailcatcher
    ports:
      - '1080:1080'
      - '1025:1025'

volumes:
  db_data:
  static:
Djangoの設定
settings.pyにMailCatcherとSESの設定を行います
if DEBUG:
    # メールの設定
    EMAIL_HOST = "mail"
    EMAIL_HOST_USER = ""
    EMAIL_HOST_PASSWORD = ""
    EMAIL_PORT = 1025
    EMAIL_USE_TLS = False
else:
    # SESの設定
    EMAIL_BACKEND = "django_ses.SESBackend"
    AWS_DEFAULT_REGION_NAME = os.environ.get("AWS_DEFAULT_REGION_NAME")
    AWS_SES_REGION_ENDPOINT = os.environ.get("AWS_SES_REGION_ENDPOINT")
    DEFAULT_FROM_EMAIL = os.environ.get("DEFAULT_FROM_EMAIL")
.envファイルに必要な環境変数の設定を行います
AWS_DEFAULT_REGION_NAME=ap-northeast-1
AWS_SES_REGION_ENDPOINT=email.ap-northeast-1.amazonaws.com
DEFAULT_FROM_EMAIL=example.co.jp
BASE_URL=http://localhost
ユーザの招待機能
Model
- システムユーザ
- システムユーザの招待用トークンを管理する
用のModelを作成します
システムユーザのModelの詳細は以下の記事を参考にしてください
import uuid

from django.contrib.auth.models import AbstractUser
from django.contrib.auth.validators import UnicodeUsernameValidator
from django.core.validators import RegexValidator
from django.db import models


class User(AbstractUser):
    """システムユーザ"""

    username_validator = UnicodeUsernameValidator()

    class Role(models.IntegerChoices):
        """システムユーザのロール

        Args:
            MANAGEMENT(0): 管理者
            GENERAL(1):    一般
            PART_TIME(2):  アルバイト
        """

        MANAGEMENT = 0
        GENERAL = 1
        PART_TIME = 2

    # 不要なフィールドはNoneにすることができる
    first_name = None
    last_name = None
    date_joined = None
    groups = None
    id = models.UUIDField(
        primary_key=True,
        default=uuid.uuid4,
        editable=False,
        db_comment="システムユーザID",
    )
    employee_number = models.CharField(
        unique=True,
        validators=[RegexValidator(r"^[0-9]{8}$")],
        max_length=8,
        db_comment="社員番号",
    )
    username = models.CharField(
        max_length=150,
        unique=True,
        validators=[username_validator],
        db_comment="ユーザ名",
    )
    email = models.EmailField(
        max_length=254,
        unique=True,
        db_comment="メールアドレス",
    )
    role = models.PositiveIntegerField(
        choices=Role.choices,
        default=Role.PART_TIME,
        db_comment="システムユーザのロール",
    )
    created_at = models.DateTimeField(
        auto_now_add=True,
        db_comment="作成日",
    )
    updated_at = models.DateTimeField(
        auto_now=True,
        db_comment="更新日",
    )
    is_verified = models.BooleanField(
        default=False,
        db_comment="有効化有無",
    )

    USERNAME_FIELD = "employee_number"
    REQUIRED_FIELDS = ["email", "username"]

    class Meta:
        ordering = ["employee_number"]
        db_table = "User"
        db_table_comment = "システムユーザ"

    def __str__(self):
        return self.username


class UserInvitation(models.Model):
    """ユーザ招待用テーブルに対応するモデルクラス"""

    id = models.UUIDField(
        primary_key=True,
        default=uuid.uuid4,
        editable=False,
        db_comment="システムユーザID",
    )
    token = models.CharField(
        max_length=255,
        db_comment="ユーザ招待用メールURL用トークン",
    )
    expiry = models.DateTimeField(
        null=True,
        default=None,
        db_comment="有効期限",
    )
    created_at = models.DateTimeField(
        auto_now_add=True,
        db_comment="作成日時",
    )
    user = models.ForeignKey(
        User,
        on_delete=models.PROTECT,
        related_name="user_invitation",
        db_comment="社員テーブル外部キー",
    )
    is_used = models.BooleanField(
        default=False,
        db_comment="使用有無",
    )

    class Meta:
        db_table = "Invitation"
        db_table_comment = "ユーザ招待用"
Serializer
- 招待用
- トークン認証とパスワード設定用
- トークンの有効期限の確認用
のSerializerを作成します
InviteUserSerializer内にUserの作成処理を作成します
VerifyUserSerializer内にvalidateメソッドを作成し、新規パスワードと確認用パスワードが一致するか確認します
もし一致してなかったらValidationErrorをraiseします
また、Djangoのvalidate_passwordメソッドを使って新規パスワードのバリデーションを行います
独自でValidationを設定していなかったら
get_default_password_validators()
メソッドからDjangoのデフォルトのパスワードのバリデーションを使用します
from application.models import User
from django.contrib.auth.password_validation import validate_password
from rest_framework import serializers


class UserSerializer(serializers.ModelSerializer):
    """ユーザ用シリアライザ"""

    class Meta:
        model = User
        fields = ["id", "employee_number", "username", "email", "role"]
        read_only_fields = ["id", "created_at", "updated_at"]


class InviteUserSerializer(serializers.ModelSerializer):
    """ユーザ招待用シリアライザ"""

    def create(self, validated_data, created_by, updated_by):
        return User.objects.create_user(**validated_data)

    class Meta:
        model = User
        fields = [
            "employee_number",
            "username",
            "group",
            "email",
        ]


class VerifyUserSerializer(serializers.Serializer):
    """システムユーザ認証用シリアライザ"""

    token = serializers.CharField(max_length=255)
    """パスワード登録用メールURL用トークン"""
    new_password = serializers.CharField(max_length=255)
    """新規パスワード"""
    confirm_password = serializers.CharField(max_length=255)
    """新規パスワード再確認"""

    def validate(self, data):
        if data["new_password"] != data["confirm_password"]:
            raise serializers.ValidationError("新規パスワードと確認パスワードが違います")
        validate_password(data["new_password"])
        return data


class CheckTokenSerializer(serializers.Serializer):
    """トークンが有効であるか確認するSerializer"""

    token = serializers.CharField(max_length=255)
    """トークン"""
def validate_password(password, user=None, password_validators=None):
    """
    Validate that the password meets all validator requirements.

    If the password is valid, return ``None``.
    If the password is invalid, raise ValidationError with all error messages.
    """
    errors = []
    if password_validators is None:
        password_validators = get_default_password_validators()
    for validator in password_validators:
        try:
            validator.validate(password, user)
        except ValidationError as error:
            errors.append(error)
    if errors:
        raise ValidationError(errors)
Views
- invite_user(ユーザの招待)
- check_invitation_token(招待用トークンの有効期限確認)
- verify_user(ユーザの認証)
用のAPIを作成します
import os, secrets, logging
from datetime import timedelta

from django.contrib.auth.hashers import make_password
from django.db import DatabaseError, transaction
from django.http import HttpResponse, JsonResponse
from django.utils import timezone
from django.utils.crypto import get_random_string
from rest_framework import status
from rest_framework.decorators import action
from rest_framework.permissions import AllowAny
from rest_framework.viewsets import ModelViewSet

from application.emails import send_invitation_email
from application.models import User, UserInvitation
from application.serializers import (
    VerifyUserSerializer,
    InviteUserSerializer,
    UserSerializer,
)


class UserViewSet(ModelViewSet):
    queryset = User.objects.all()
    permission_classes = [AllowAny]
    logger = logging.getLogger(__name__)

    def get_serializer_class(self):
        match self.action:
            case "invite_user":
                return InviteUserSerializer
            case "verify_user":
                return VerifyUserSerializer
            case _:
                return UserSerializer

    @action(detail=False, methods=["POST"])
    def invite_user(self, request):
        """指定したメールアドレス宛へユーザの招待メールを送る

        Args:
            request: リクエスト

        Returns:
            HttpResponse
        """
        # Userの新規登録と招待用トークンを作成する
        serializer = self.get_serializer(data=request.data)
        serializer.is_valid(raise_exception=True)
        user = serializer.create(
            serializer.validated_data,
        )
        token = secrets.token_urlsafe(64)
        expiry = timezone.now() + timedelta(days=1)
        UserInvitation.objects.create(
            token=token, user=user, expiry=expiry
        )
        base_url = django_settings.BASE_URL
        # 初回登録用のURLへ遷移
        url = base_url + "/verify-user/" + token
        send_invitation_email(
            email=user.email,
            url=url,
        )
        return JsonResponse(
            data={"msg": "招待メールを送信しました"},
            status=status.HTTP_200_OK,
        )


    @action(detail=False, methods=["post"])
    def verify_user(self, request):
        """新規ユーザを認証する

        Args:
            request (HttpRequest): HttpRequestオブジェクト

        Returns:
            Union[
                HttpResponse,
                JsonResponse
            ]
        """
        serializer = self.get_serializer(data=request.data)
        serializer.is_valid(raise_exception=True)
        user_invitation = self._check_invitation(serializer.data["token"])
        if user_invitation is None:
            return JsonResponse(
                data={"msg": "こちらのURLは有効期限切れです"},
                status=status.HTTP_400_BAD_REQUEST,
            )
        user_invitation.is_used = True
        user_invitation.save()
        user = user_invitation.user
        user.is_verified = True
        user.set_password(serializer.validated_data["new_password"])
        user.save()
        return JsonResponse(
            data={"msg": "新規ユーザの認証に成功しました"},
            status=status.HTTP_200_OK,
        )

    @action(detail=False, methods=["post"])
    def check_invitation_token(self, request):
        serializer = self.get_serializer(data=request.data)
        if not serializer.is_valid():
            return JsonResponse(data={"check": False})

        check = self._check_invitation(serializer.data["token"]) != None
        return JsonResponse(data={"check": check})

    def _check_invitation(self, token):
        """ユーザ招待用トークンを確認する

        Args:
            token : ユーザ認証用トークン

        Returns:
            Union[
                Invitationオブジェクト,
                None
            ]
        """
        try:
            invitation = UserInvitation.objects.select_related("user").get(
                token=token,
                is_used=False,
            )
        except:
            return None

        if invitation.expiry < timezone.localtime() or invitation.is_used:
            return None
        return invitation
1つずつ解説していきます
ユーザの招待
Serializerを使ったバリデーションに成功した後、
ユーザを招待する際に
- User
- UserInvitation
を作成します
UserInvitation用のModelを作成する際にトークンの有効期限を24hとします
        # Userの新規登録と招待用トークンを作成する
        serializer = self.get_serializer(data=request.data)
        serializer.is_valid(raise_exception=True)
        user = serializer.create(
            serializer.validated_data,
        )
        token = secrets.token_urlsafe(64)
        expiry = timezone.now() + timedelta(days=1)
        UserInvitation.objects.create(
            token=token, user=user, expiry=expiry
        )
- User
- UserInvitation
のデータの作成に成功したらメールを送信します
BASE_URLに今回はlocalhostを指定していますが本番環境ではドメインを指定します
メール内に招待用のurlを記載し、今回はMailCatcherへ送信します
下記のurlのパスはフロントエンドと相談して決める必要があります
                base_url = os.environ.get("BASE_URL")
                # 初回登録用のURLへ遷移
                url = base_url + "/verify-user/" + token
                send_invitation_email(
                    email=user.email,
                    url=url,
                )
                return JsonResponse(
                    data={"msg": "招待メールを送信しました"},
                    status=status.HTTP_200_OK,
                )
トークンの有効期限の確認
メール内の招待用URLへアクセスする前にトークンが有効かどうか確認するAPIを作成します
トークンの有効期限、すでに使用されているかを確認し、
有効であれば
{"check": True}
無効であれば
{"check": False}
を返します
    @action(detail=False, methods=["post"])
    def check_invitation_token(self, request):
        serializer = self.get_serializer(data=request.data)
        if not serializer.is_valid():
            return JsonResponse(data={"check": False})

        check = self._check_invitation(serializer.data["token"]) != None
        return JsonResponse(data={"check": check})

    def _check_invitation(self, token):
        """ユーザ招待用トークンを確認する

        Args:
            token : ユーザ認証用トークン

        Returns:
            Union[
                Invitationオブジェクト,
                None
            ]
        """
        try:
            invitation = UserInvitation.objects.select_related("user").get(
                token=token,
                is_used=False,
            )
        except:
            return None

        if invitation.expiry < timezone.localtime() or invitation.is_used:
            return None
        return invitation
ユーザの認証
メールに添付されたurlへアクセスする際にフロント側からトークンの値を受け取ります
Serializerを使ったバリデーションに成功した後、
ユーザを認証する際にトークンが存在するか確認し、なければ404を返します
トークンの有効期限用のAPIを作成したので不要かと思われますが
例えば有効期限ギリギリにアクセスし、有効期限が過ぎてから認証しようとしてしまうことなど、
有効期限を確認するAPIでは検知できない不備を防ぐために記載しております
        try:
            user_invitation_password = UserInvitation.objects.get(
                token=serializer.validated_data["token"]
            )
        except UserInvitation.DoesNotExist:
            return JsonResponse(
                data={"msg": "無効なURLです"},
                status=status.HTTP_404_NOT_FOUND,
            )

        if (
            user_invitation_password.expiry is not None
            and user_invitation_password.expiry < timezone.now()
        ):
            return JsonResponse(
                data={"msg": "こちらのURLは有効期限切れです"},
                status=status.HTTP_404_NOT_FOUND,
            )
トークンが有効であることを確認した後、Userテーブル内に新しいパスワードを設定し、
- Userの有効化
- 招待用トークンの使用有無
のフラグをTrueにします
    @action(detail=False, methods=["post"])
    def verify_user(self, request):
        """新規ユーザを認証する

        Args:
            request (HttpRequest): HttpRequestオブジェクト

        Returns:
            Union[
                HttpResponse,
                JsonResponse
            ]
        """
        serializer = self.get_serializer(data=request.data)
        serializer.is_valid(raise_exception=True)
        user_invitation = self._check_invitation(serializer.data["token"])
        if user_invitation is None:
            return JsonResponse(
                data={"msg": "こちらのURLは有効期限切れです"},
                status=status.HTTP_400_BAD_REQUEST,
            )
        user_invitation.is_used = True
        user_invitation.save()
        user = user_invitation.user
        user.is_verified = True
        user.set_password(serializer.validated_data["new_password"])
        user.save()
        return JsonResponse(
            data={"msg": "新規ユーザの認証に成功しました"},
            status=status.HTTP_200_OK,
        )
メール送信機能
メール送信機能を実装します
メール送信の際はEmailMultiAlternativesクラスを使ってhtmlとtxtの両方のバージョンのメールを送信できるように設定できます
from django.core.mail import EmailMultiAlternatives
from django.template.loader import render_to_string


def send_invitation_email(email, url):
    plaintext = render_to_string(
        "invite_user_email.txt",
        {
            "email": email,
            "url": url,
        },
    )
    html_text = render_to_string(
        "invite_user_email.html",
        {
            "email": email,
            "url": url,
        },
    )

    msg = EmailMultiAlternatives(
        subject="アカウント登録のお知らせ",
        body=plaintext,
        from_email=None,
        to=[email],
        alternatives=[(html_text, "text/html")],
    )

    # 送信
    msg.send()
メールの本文は以下の通りurlを入れます
下記URLへ24時間以内にアクセスしてアカウントの本登録をお願いします。
▼アカウント認証URL
{{ url }}
<pre>

下記URLへ24時間以内にアクセスしてアカウントの本登録をお願いします。
▼アカウント認証URL
<a href={{url}}>{{ url }}</a>

</pre>
urls.py
APIのパスを作成します
from django.urls import include, path
from rest_framework_nested import routers

from application.views import UserViewSet

router = routers.DefaultRouter()
router.register(r"users", UserViewSet, basename="user")

urlpatterns = [
    path(r"", include(router.urls)),
]
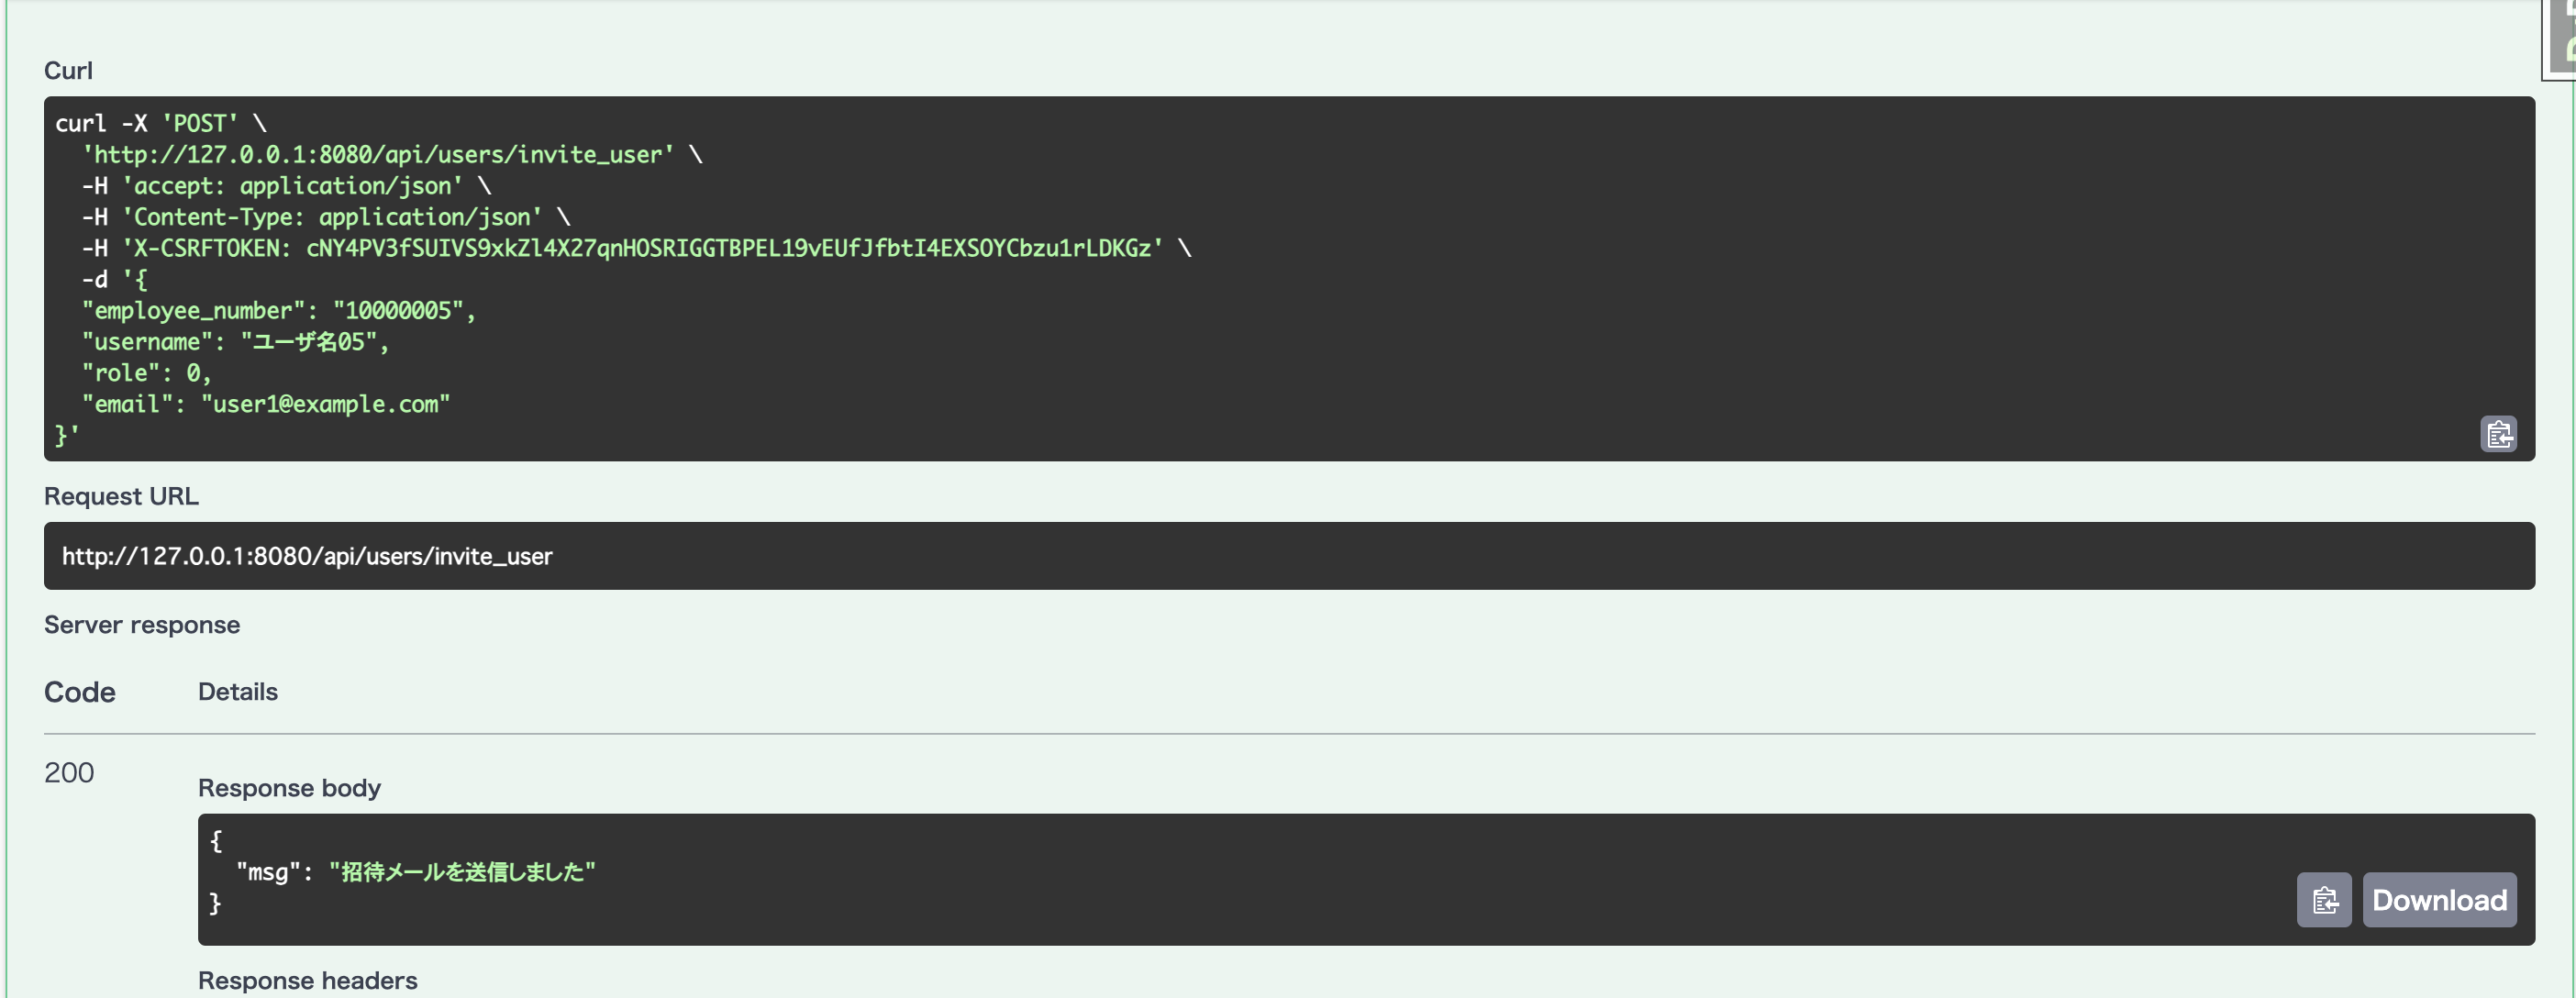
実際にユーザを招待してみよう!
- 社員番号
- ユーザ名
- メールアドレス
を入力して/api/users/invite_user へrequestを送ります

以下のようなresponseが返ってきたら成功です
MailCatcher(127.0.0.1:1080)へアクセスすると以下のようにメールを受信できたことを確認したら成功です

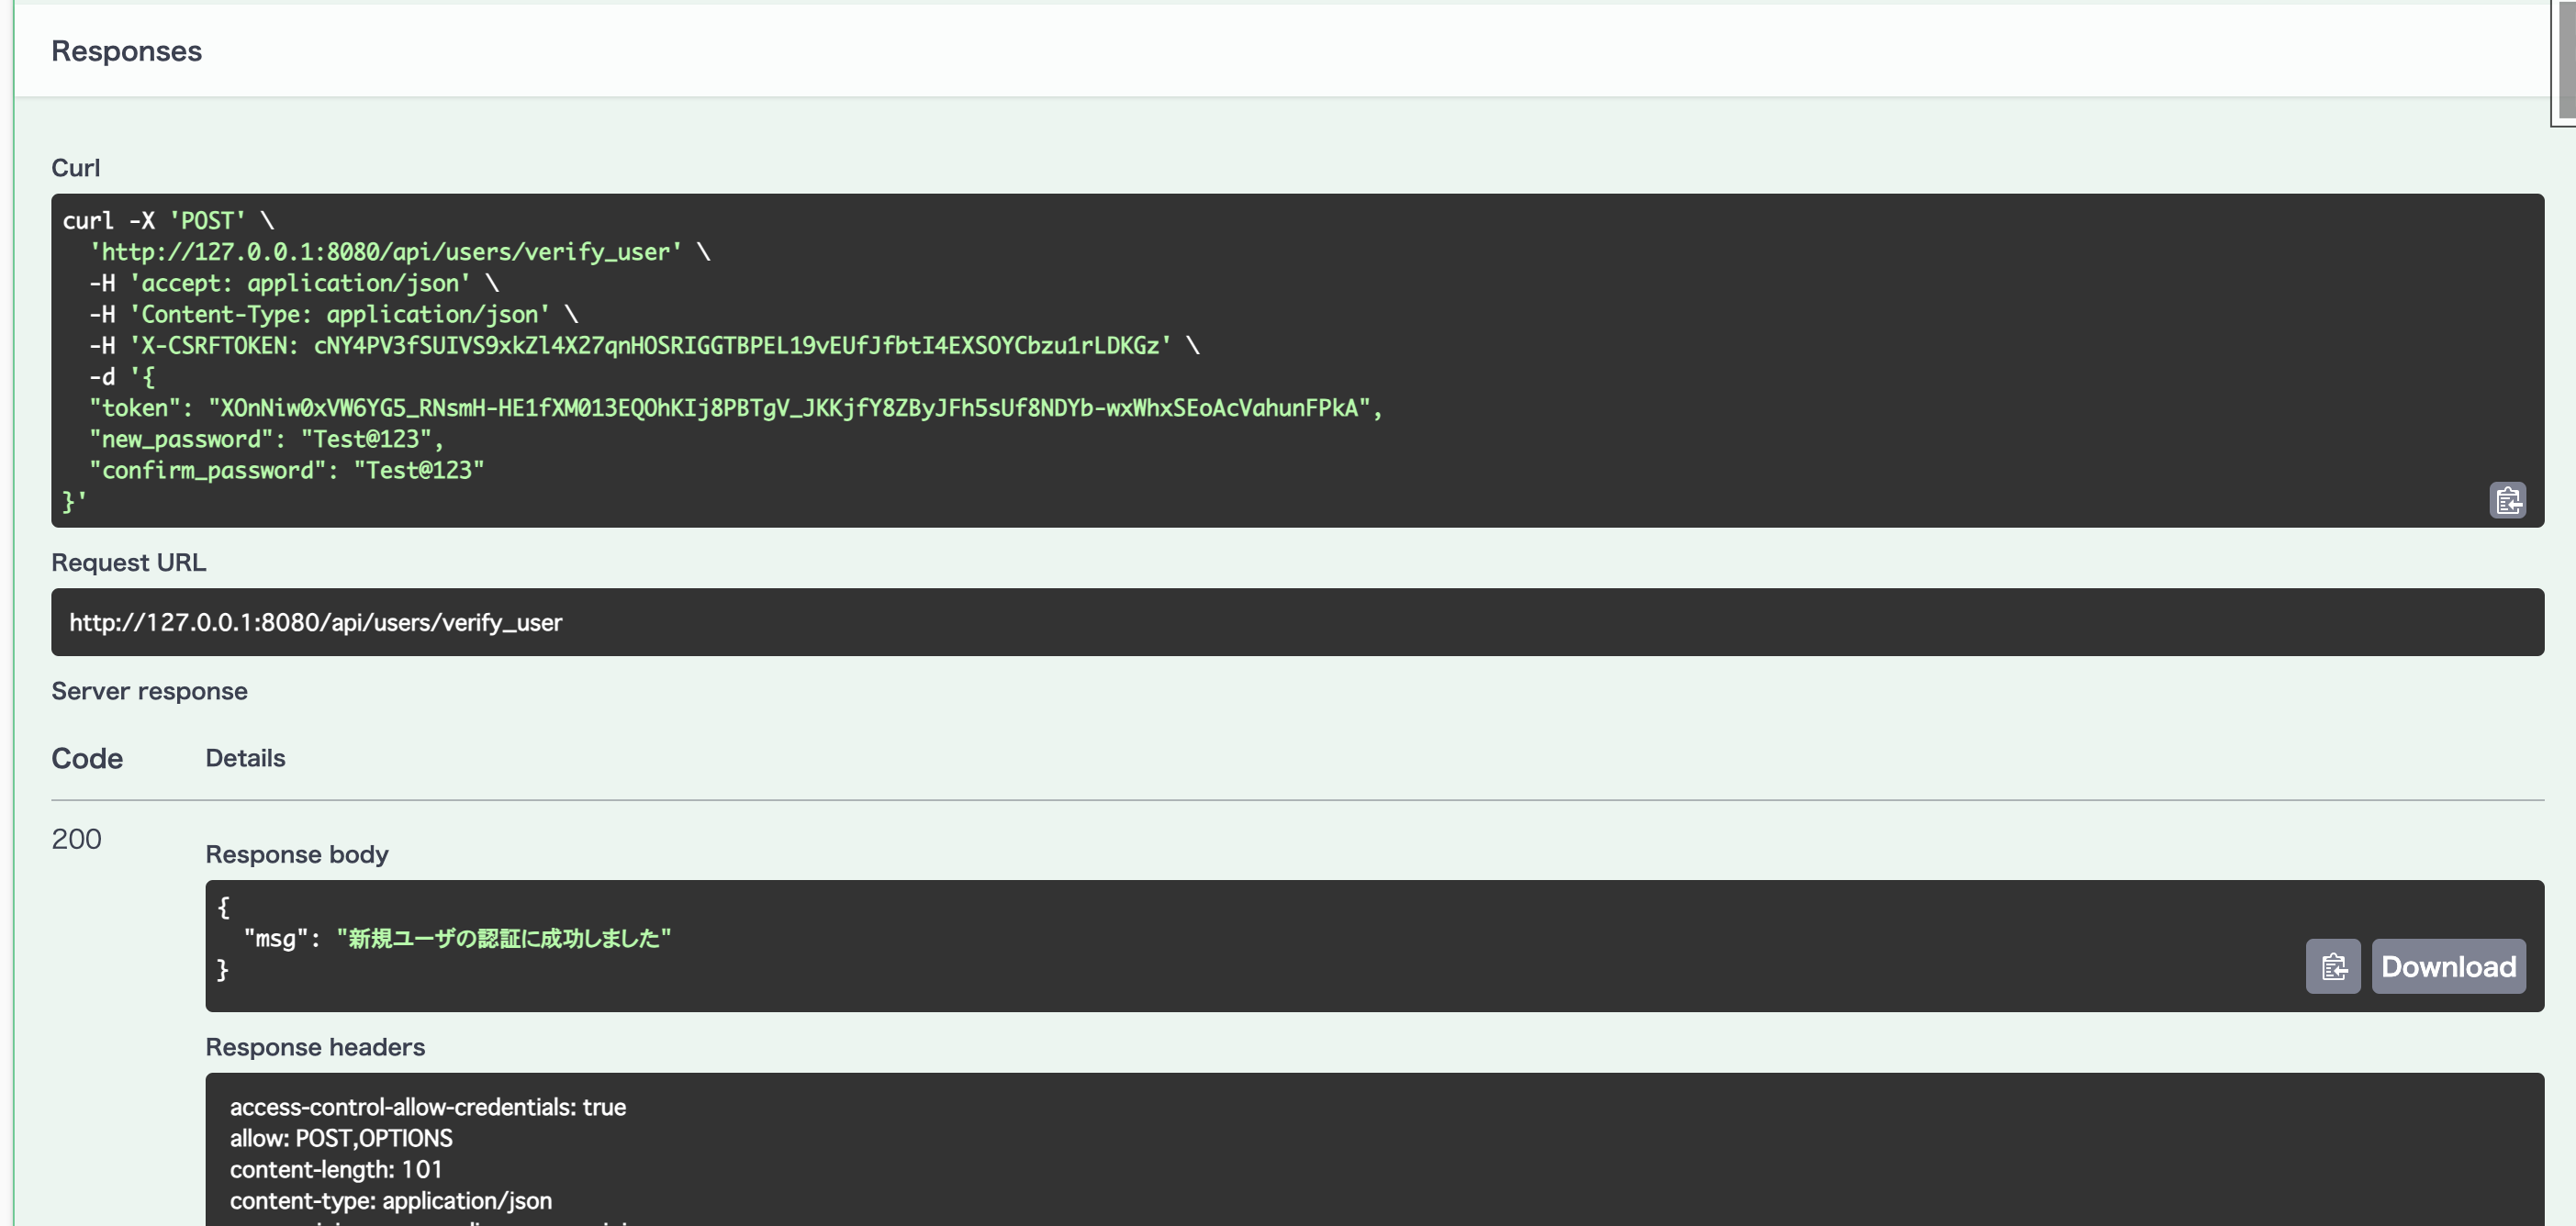
- 先ほど受信したメールのトークン
- 新規パスワード
- 確認用パスワード
を入力して/api/users/verify_userへrequestを送ります

以下のようなresponseが返ってきたら成功です
招待メールを再送したい時
再送したい時は以下のように招待用APIと分けて作成するのが一般的です
今回はSerializerを使わずに行います
    @action(detail=True, methods=["post"])
    def reinvite_user(self, request, pk):
        """ユーザを再招待する

        Args:
            request (HttpRequest): HttpRequestオブジェクト

        Returns:
            Union[
                HttpResponse,
                JsonResponse
            ]
        """
        try:
            user_invitation = UserInvitation.objects.select_related("user").get(
                user_id=pk
            )
        except UserInvitation.DoesNotExist:
            return JsonResponse(
                data={"msg": "指定されたユーザは見つかりませんでした"},
                status=status.HTTP_404_NOT_FOUND,
            )
        if user_invitation.user.is_verified:
            return JsonResponse(
                data={"msg": "指定されたユーザは認証済です"},
                status=status.HTTP_400_BAD_REQUEST,
            )
        user_invitation.token = secrets.token_urlsafe()
        user_invitation.expiry = timezone.now() + timedelta(days=1)
        user_invitation.save()
        base_url = django_settings.BASE_URL
        user = user_invitation.user
        url = base_url + "/verify-user/" + user_invitation.token
        send_invitation_email(
            email=user.email,
            url=url,
        )
        return JsonResponse(
            data={"msg": "招待メールを再送信しました"},
            status=status.HTTP_200_OK,
        )
以上です