概要
ReactとDjangoを使ってログイン画面を作成し、自作のログインAPIを使ってログインに成功したら別の画面へ遷移する処理まで作成します
前提
- Djangoのプロジェクトを作成済み
- Reactのアプリケーションを作成済み
- Formの作成はReact Hook Formを使用
- RestAPIを作成するためDjango Rest Frameworkを使用
- 今回はReactメインで説明するのでDjangoについてはCSRFとCORS以外詳しく説明しません
ファイル構成
tree
・
├── .gitignore
├── README.md
├── backend
│   ├── application
│   │   ├── __init__.py
│   │   ├── admin.py
│   │   ├── apps.py
│   │   ├── fixtures
│   │   │   └── fixture.json
│   │   ├── migrations
│   │   │   ├── __init__.py
│   │   │   └── 0001_initial.py
│   │   ├── models
│   │   │   ├── __init__.py
│   │   │   └── user.py
│   │   ├── permissions.py
│   │   ├── serializers
│   │   │   ├── __init__.py
│   │   │   └── user.py
│   │   ├── urls.py
│   │   └── views
│   │       ├── __init__.py
│   │       ├── login.py
│   │       └── user.py
│   ├── manage.py
│   ├── poetry.lock
│   ├── project
│   │   ├── __init__.py
│   │   ├── asgi.py
│   │   ├── settings.py
│   │   ├── urls.py
│   │   └── wsgi.py
│   └── pyproject.toml
├── containers
│   ├── django
│   │   ├── Dockerfile
│   │   ├── Dockerfile.prd
│   │   ├── entrypoint.prd.sh
│   │   └── entrypoint.sh
│   ├── front
│   │   └── Dockerfile
│   ├── nginx
│   │   ├── Dockerfile
│   │   └── nginx.conf
│   └── postgres
│       ├── Dockerfile
│       └── init.sql
├── docker-compose.yml
├── frontend
│   ├── README.md
│   ├── package-lock.json
│   ├── package.json
│   ├── pages
│   │   ├── 404
│   │   │   └── index.js
│   │   ├── index.js
│   │   ├── login_success
│   │   │   └── index.js
└── static
今回解説するのは以下のファイルです
- docker-compose.yml
- nginx.conf
- settings/base.py
- settings/local.py
- pages/index.js
- pages/login_success/index.js
一つずつ解説します
Dockerの設定
フロントエンドとバックエンドの疎通ができるよう
- docker-compose.yml
- nginx.conf
の作成を行います
今回はログイン機能の作成方法についての説明のため、上記について詳しく説明しません
詳細は以下の記事を参考にしてください
version: '3.9'

services:
  db:
    container_name: db
    build:
      context: .
      dockerfile: containers/postgres/Dockerfile
    volumes:
      - db_data:/var/lib/postgresql/data
    healthcheck:
      test: pg_isready -U "${POSTGRES_USER:-postgres}" || exit 1
      interval: 10s
      timeout: 5s
      retries: 5
    environment:
      - POSTGRES_NAME
      - POSTGRES_USER
      - POSTGRES_PASSWORD
    ports:
      - '5432:5432' # デバッグ用

  app:
    container_name: app
    build:
      context: .
      dockerfile: containers/django/Dockerfile
    volumes:
      - ./backend:/code
      - ./static:/static
    ports:
      - '8000:8000'
      # デバッグ用ポート
      - '8080:8080'
    command: sh -c "/usr/local/bin/entrypoint.sh"
    stdin_open: true
    tty: true
    env_file:
      - .env
    depends_on:
      db:
        condition: service_healthy

  mail:
    container_name: mail
    image: schickling/mailcatcher
    ports:
      - '1080:1080'
      - '1025:1025'

  nginx:
    container_name: web
    build:
      context: .
      dockerfile: containers/nginx/Dockerfile
    volumes:
      - ./static:/static
    ports:
      - 80:80
    depends_on:
      - app

  front:
    container_name: front
    build:
      context: .
      dockerfile: containers/front/Dockerfile
    volumes:
      - ./frontend:/code
      - node_modules_volume:/frontend/node_modules
    command: sh -c "npm run dev"
    ports:
      - '3000:3000'
    environment:
      - CHOKIDAR_USEPOLLING=true
      - NEXT_PUBLIC_RESTAPI_URL=http://localhost/back

volumes:
  db_data:
  static:
  node_modules_volume:

networks:
  default:
    name: testnet
upstream front {
    server host.docker.internal:3000;
}

upstream back {
    server host.docker.internal:8000;
}

server {
    listen       80;
    server_name  localhost;

    client_max_body_size 5M;

    location / {
        proxy_pass http://front/;
    }

    location /back/ {
        proxy_set_header X-Forwarded-Host $host:$server_port;
        proxy_set_header X-Forwarded-Server $host;
        proxy_set_header X-Forwarded-For $proxy_add_x_forwarded_for;
        proxy_pass http://back/;
    }

    location /upload/ {
        proxy_pass http://back/upload/;
    }

    location /_next/webpack-hmr {
        proxy_pass http://front/_next/webpack-hmr;
        proxy_http_version 1.1;
        proxy_set_header Upgrade $http_upgrade;
        proxy_set_header Connection "upgrade";
    }

}
Django
CORSとCSRFの設定
フロントエンドとバックエンドが連携するのに欠かせない
- CORS
- CSRF
CORSの詳細は以下の記事を参考にしてください
ALLOWED_HOSTS = ["http://localhost", "http://127.0.0.1"]

REST_FRAMEWORK = {
    "DEFAULT_AUTHENTICATION_CLASSES": [
        # 今回はログイン認証の方法としてSession認証を採用
        "rest_framework.authentication.SessionAuthentication",
    ]
}

INSTALLED_APPS = [
    "django.contrib.admin",
    "django.contrib.auth",
    "django.contrib.contenttypes",
    "django.contrib.sessions",
    "django.contrib.messages",
    "django.contrib.staticfiles",
    "rest_framework",
    "application.apps.ApplicationConfig",
    # CORS用のパッケージ
    "corsheaders",
]

MIDDLEWARE = [
    # CORS用のMiddleware
    "corsheaders.middleware.CorsMiddleware",
    "django.middleware.security.SecurityMiddleware",
    "django.contrib.sessions.middleware.SessionMiddleware",
    "django.middleware.common.CommonMiddleware",
    # CSRF用のMiddleware
    "django.middleware.csrf.CsrfViewMiddleware",
    "django.contrib.auth.middleware.AuthenticationMiddleware",
    "django.contrib.messages.middleware.MessageMiddleware",
    "django.middleware.clickjacking.XFrameOptionsMiddleware",
]

# 自身以外のオリジンのHTTPリクエスト内にクッキーを含めることを許可する
CORS_ALLOW_CREDENTIALS = True
# アクセスを許可したいURL(アクセス元)を追加
CORS_ALLOWED_ORIGINS = django_settings.TRUSTED_ORIGINS.split()
# プリフライト(事前リクエスト)の設定
# 30分だけ許可
CORS_PREFLIGHT_MAX_AGE = 60 * 30

# CSRFの設定
# これがないと403エラーを返してしまう
# https://docs.djangoproject.com/en/4.2/ref/settings/#csrf-trusted-origins
CSRF_TRUSTED_ORIGINS = ["http://localhost", "http://127.0.0.1"]
ログインAPIの作成
以下の記事を参考にログインAPIを作成します
APIのパスは/api/login/です
from django.contrib.auth import authenticate, login, logout
from django.http import HttpResponse, JsonResponse
from rest_framework import status
from rest_framework.decorators import action
from rest_framework.permissions import AllowAny
from rest_framework.viewsets import ViewSet

from application.models.user import User
from application.serializers.user import LoginSerializer


class LoginViewSet(ViewSet):
    serializer_class = LoginSerializer
    permission_classes = [AllowAny]

    @action(detail=False, methods=["POST"])
    def login(self, request):
        """ユーザのログイン"""
        serializer = LoginSerializer(data=request.data)
        serializer.is_valid(raise_exception=True)
        employee_number = serializer.validated_data.get("employee_number")
        password = serializer.validated_data.get("password")
        user = authenticate(employee_number=employee_number, password=password)
        if not user:
            return JsonResponse(
                data={"msg": "社員番号またはパスワードが間違っています"},
                status=status.HTTP_400_BAD_REQUEST,
            )
        else:
            login(request, user)
            return JsonResponse(data={"role": user.Role(user.role).name})

    @action(methods=["POST"], detail=False)
    def logout(self, request):
        """ユーザのログアウト"""
        logout(request)
        return HttpResponse()
React
ルートページ
ルートページにログイン用のコンポーネントを設定します
import React from 'react';
import Link from "next/link";
import Login from '../components/elements/Form/Login'

const Login = () => {

  return (
    <>
      <div>
        <Login/>
      </div>
    </>
  );
}

export default Login;
ログイン機能
ログイン用のフォームはReactHookFormを使って作成しました
詳細は下記の記事を参考にしてください
import { useForm } from 'react-hook-form';
import Cookies from 'js-cookie';
import router from 'next/router';

function Login() {

  type LoginDataType = {
    employee_number: string;
    password: string;
  };

  const {
    register,
    handleSubmit,
    formState: { errors },
  } = useForm<LoginDataType>({
    // ログインボタンを押した時のみバリデーションを行う
    reValidateMode: 'onSubmit',
  });

  const onSubmit = async (data) => {
    // Nginxとdocker-compose.ymlで設定したAPIのパス
    // http://localhost/back/api/login/
    const apiUrl = process.env.NEXT_PUBLIC_RESTAPI_URL + 'http://localhost/back/api/login/';
    const csrftoken = Cookies.get('csrftoken') || '';
    // ログイン情報をサーバーに送信
    const response = await fetch(apiUrl, {
      method: 'POST',
      headers: {
        'Content-Type': 'application/json',
        'X-CSRFToken': csrftoken,
      },
      // ユーザー名(社員番号)とパスワードをJSON形式で送信
      body: JSON.stringify(data),
    });

    if (response.ok) {
      // ログイン成功時に/login_successへ遷移
      console.log('ログイン成功');
      router.push('/login_success');
      // リダイレクトなど、ログイン後の処理を追加
    } else {
      // ログイン失敗時にバックエンドのエラーをアラートで表示("社員番号またはパスワードが間違っています")
      response.json()
      .then(data => {
        const msg = data.msg;
        alert(msg)
      })
    }
  };

  return (
    <div className="Login">
      <h1>ログイン</h1>
      <form onSubmit={handleSubmit(onSubmit)}>
        <div>
          <input
            id="employee_number"
            name="employee_number"
            placeholder="社員番号"
            {...register('employee_number', {
              required: {
                value: true,
                message: '社員番号を入力してください',
              },
              pattern: {
                value: /^[0-9]{8}$/,
                message: '8桁の数字のみ入力してください。',
              },
            })}
          />
            {errors.employee_number?.message && <div>{errors.employee_number.message}</div>}
        </div>
        <div>
          <input
            id="password"
            name="password"
            placeholder="パスワード"
            type="password"
            {...register('password', {
              required: {
                value: true,
                message: 'パスワードを入力してください'
              },
          />
            {errors.password?.message && <div>{errors.password.message}</div>}
        </div>
        <button type="submit">ログイン</button>
      </form>
    </div>
  );
}

export default Login;
一つずつ解説します
FetchAPI
FetchAPIを使って自作したログインAPIへPOSTします
今回はログインする前はSessionIDとCSRFトークンがないので
csrftokenの値は空になります
Content-Typeはapplication/jsonにします
リクエスト時のBODYはJSONにします
    // Nginxとdocker-compose.ymlで設定したAPIのパス
    // http://localhost/back/api/login/
    const apiUrl = process.env.NEXT_PUBLIC_RESTAPI_URL + '/api/login/';
    const csrftoken = Cookies.get('csrftoken') || '';
    // ログイン情報をサーバーに送信
    const response = await fetch(apiUrl, {
      method: 'POST',
      headers: {
        'Content-Type': 'application/json',
        'X-CSRFToken': csrftoken,
      },
      // ユーザー名(社員番号8桁)とパスワードをJSON形式で送信
      body: JSON.stringify(data),
    });
レスポンスのハンドリング
レスポンスが返ってきたときはステータスコードでハンドリングします
200系のレスポンスが来たらnext/routerで/login_successのPageへpushします
ログインに失敗したら(200系以外のレスポンスが来たら)エラーメッセージをアラートで表示させます
    if (response.ok) {
      // ログイン成功時に/login_successへ遷移
      console.log('ログイン成功');
      router.push('/login_success');
      // リダイレクトなど、ログイン後の処理を追加
    } else {
      // ログイン失敗時にバックエンドのエラーをアラートで表示("社員番号またはパスワードが間違っています")
      response.json()
      .then(data => {
        const msg = data.msg;
        alert(msg)
      })
    }
ログイン成功時の遷移先
遷移先は以下の単純なものです
import Link from "next/link";


const LoginSuccess = () => {

  return (
    <>
      <h1>ログイン成功!</h1>
      <div>
        <Link href="/"><h1>Homeへ</h1></Link>
      </div>
    </>
  );
};

export default LoginSuccess;
実際にログインしてみよう!
localhostにアクセスすると以下のようにログイン用のフォームが表示されます

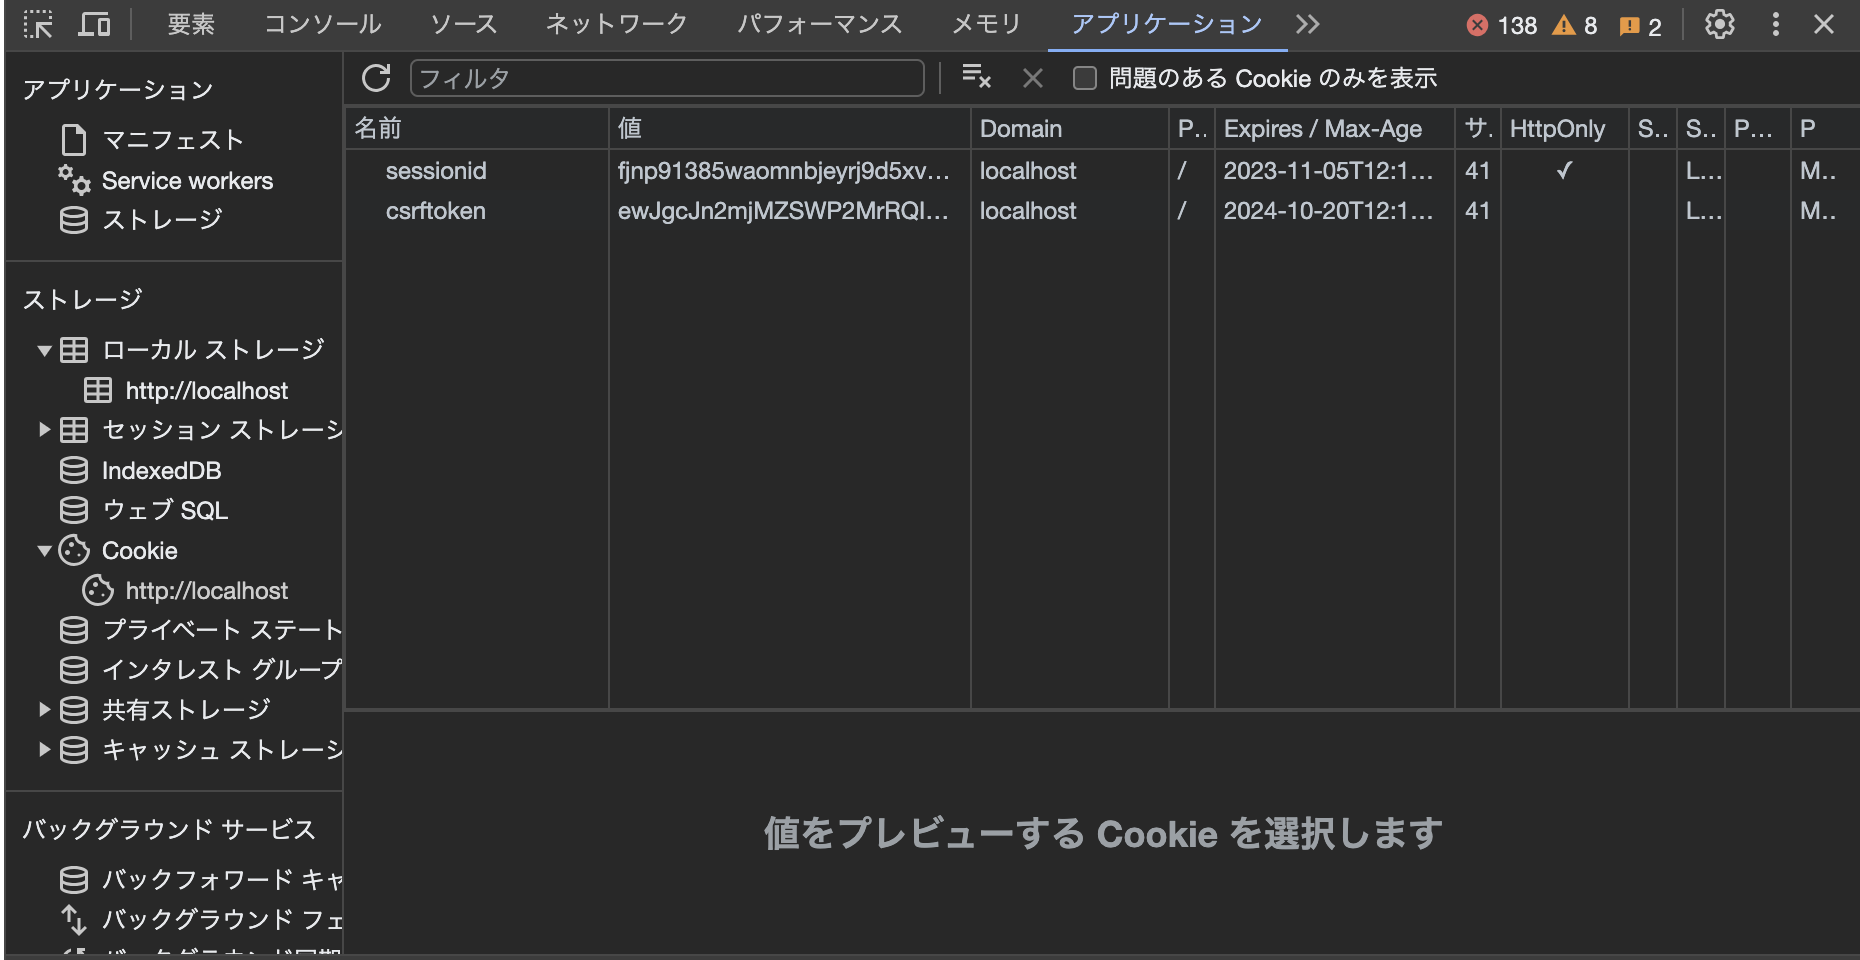
ログインに成功すると以下のようなページが表示され、SessionIDとCSRFトークンがCookieに保存されます
ログインに成功すると以下のようにSessionIDがCookieおよびDB上のdjango_sessionテーブルに保存されていることを確認できます

postgres=# \d django_session
 session_key  | character varying(40)    |           | not null |
 session_data | text                     |           | not null |
 expire_date  | timestamp with time zone |           | not null |
postgres=# select * from django_session;
 fjnp91385waomnbjeyrj9d5xv1yghwhu |.eJxtjEsOAiEQRO_CWgm_6UGX7j0DaWiQUQPJfFbGuzskLDSxFpVKql69mMNtzW5b4uwmYmcmuo5_rEuywzfmMTxiaSzdsdwqD7Ws8-R5m_DeLvxaKT4vfftzkHHJjSZAYEkDAqyQfuYRhIBtA0K9iohyFGBMkNKSRjac7RehkErTxI8e38AJ_E-gQ:1quXMh:m_UZbRXoULHFeFe6lyeb52dJw0Cpuq6VxCr8U8eOWCk | 2023-11-05 12:15:31.119386+00
ログインに失敗すると以下のようなアラートが表示されます
以上です
参考

