概要
【Django+Docker】の開発環境をVSCodeでリモートデバッグする方法について解説します
リモードデバッグする際は拡張機能のRemote Containersを使用します
VSCodeのブレークポイントやウォッチが使えるとかなり開発効率が上がるのでぜひ設定してみてください
記事の後半ではPoetryを使ってリモートデバッグする方法についても解説します
前提
- すでにDjangoのプロジェクトを
git cloneしている - VSCodeをインストール済み
- Dockerをインストール済み
- Remote Containersを使用します
- Dockerfileおよびdocker-compose.ymlはある程度読める方が望ましい
- ブレークポイント、ウォッチの解説はしません
コンテナイメージを作成しよう
Remote Containersを使うには該当コンテナのイメージをbuildする必要があります
Remote Containersのインストール
まずは拡張機能のRemote Containersをインストールします

該当するコンテナへリモート接続しよう
Remotes Containerのインストールができたら左下の緑色のマークをクリックします
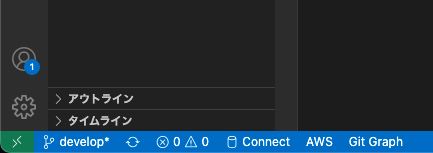
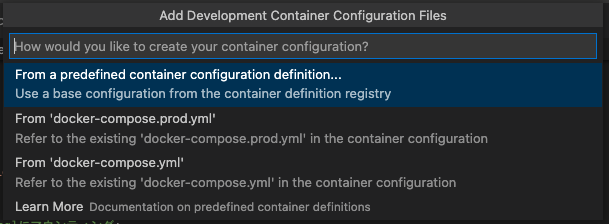
ボタンを押すとコマンドパレットが開くのでAdd Development Container Configuration Filesを選択します

リモート接続するコンテナイメージを作成するdocker-composeファイルを選択します
該当するコンテナ名を選択します

コンテナ名を選択すると.devcontainerフォルダが作成され、その中に
- devcontainer.json
- docker-compose.yml
が作成されます。devcontainer.jsonに必要な情報を入力していきます
{
    # 任意の名前を設定
    "name": "django container",

    # docker-compose.ymlのパスを指定
    # 今回は.devcontainersフォルダと同じディレクトリ階層に作成したので以下のように記載しています
    "dockerComposeFile": ["../docker-compose.yml"],

    # docker-compose.ymlに記載されているコンテナのサービス名を記入
    "service": "app",

    # docker-compose.ymlに記載されているWORKDIRを指定
    "workspaceFolder": "/workspace"

    // Use 'forwardPorts' to make a list of ports inside the container available locally.
    // "forwardPorts": [],

    // Uncomment the next line if you want start specific services in your Docker Compose config.
    // "runServices": [],

    // Uncomment the next line if you want to keep your containers running after VS Code shuts down.
    // "shutdownAction": "none",

    // Uncomment the next line to run commands after the container is created - for example installing curl.
    // "postCreateCommand": "apt-get update && apt-get install -y curl",

    // Uncomment to connect as a non-root user if you've added one. See https://aka.ms/vscode-remote/containers/non-root.
    // "remoteUser": "vscode"
}
Open Folder in Containerから該当するプロジェクトのディレクトリを開きます

2回目以降はAttach to Running Containerから開くこともできます

該当するプロジェクトのディレクトリを開くとコンテナにリモート接続できます

DjangoのデバッグをするにはPythonの拡張機能をインストールする必要があります

VSCodeのブレークポイントやウォッチが使えるよう設定します
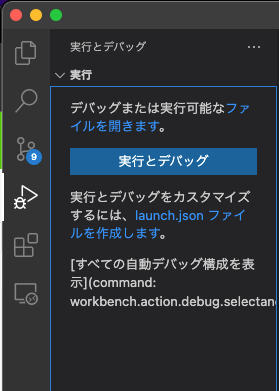
実行とデバッグを選択し、launch.jsonファイルを作成しますを押します
デバッガーはPythonを選択します

フレームワークはDjangoを選択します

launch.jsonに必要な情報を入力します
記事によってはtypeの箇所をpythonにしているものもありますが2024年1月から非推奨になっているのでdebugpyにしましょう
{
    "version": "0.2.0",
    "configurations": [
        {
            # 任意の名前でOK
            "name": "django container",
            "type": "debugpy",
            "request": "launch",
            # Djangoのmanage.pyを起動するよう設定します
            "program": "${workspaceFolder}/manage.py",
            # args(arguments)にrunserverコマンドを記載
            "args": [
                "runserver",
                "0.0.0.0:8080"
            ],
            "django": true,
            # falseにすることで自分が書いたコード以外の箇所をデバッグできます(後述)
            "justMyCode": false
        }
    ]
}
debugpyを使うことでVSCodeのPythonの拡張機能のバージョンを落とさずに古いバージョンを使っているPythonのバージョンでリモートデバッグできるとのことです
詳細は以下の通りです
The Python Debugger extension aims to separate the debugging functionality from the main Python extension to prevent compatibility issues. This ensures that even as the Python extension drops support for older Python versions (for example, Python 3.7), you can continue debugging projects with those versions without downgrading your Python extension. It also delivers platform-specific builds, ensuring you only receive the components relevant to your specific operating system, reducing download times and unnecessary overhead.
To ensure you are using the new Python Debugger extension, replace "type": "python" with "type": "debugpy" from your launch.json configuration file. In the future, the Python extension will no longer offer debugging support, and we will transition all debugging support to the Python Debugger extension for all debugging functionality.
緑の実行ボタンを押してデバッグを実行します

任意の箇所にブレークポイントを設定します
ブレークポイントが実行できれば成功です

justMyCode: false
justMyCode: false
にすることで下記の様に自分が書いたコード以外の箇所でデバッグできます

ブラウザからデバッグするとき
ブラウザからアクセスしてブレークポイントで止める際は下記のように
"--noreload"オブションを付与すると止めることができます
@campbel2525さん、ありがとうございます
            "args": [
                "runserver",
                "--noreload",
                "0.0.0.0:8080"
            ],
Poetryを使ってデバッグする時
Poetryを使用している場合はインタプリンタのパスをPoetryのVirtualenvのPythonのパスを指定する必要があります
poetry env info
を実行するとVirtualenvとSystemの情報が表示されます
Python:         3.10.7
Implementation: CPython
Path:           /root/.cache/pypoetry/virtualenvs/rest-framework-tutorial-MATOk_fk-py3.10
Executable:     /root/.cache/pypoetry/virtualenvs/rest-framework-tutorial-MATOk_fk-py3.10/bin/python
Valid:          True

System
Platform:   linux
OS:         posix
Python:     3.10.7
Path:       /usr/local
Executable: /usr/local/bin/python3.10
VirualenvのExecutableのパスをコピーし、VSCodeのコマンドパレットからインタプリンタをVirtualenvのExecutableのパスを設定します

ImportError: Couldn't import Django. Are you sure it's installed and available on your PYTHONPATH environment variable? Did you forget to activate a virtual environment?
実行するインタプリンタが間違っていることで生じるエラーです
コンテナ内のPython のPathを確認します
root@e9e17e517c4c:/workspace# which python
/usr/local/bin/python
コマンドパレットからインタプリンタを設定します

PythonのPathと一致するインタプリンタを選択またはPathを入力した後にデバッグするとエラーが解消されます

uv/venvを使ってデバッグする時
下記のようにpythonにvenvのパスを記載すればデバッグできます
{
    "version": "0.2.0",
    "configurations": [
        {
            "name": "django container",
            "type": "debugpy",
            "request": "launch",
            "program": "${workspaceFolder}/manage.py",
            "args": [
                "runserver",
                "0.0.0.0:8080"
            ],
            "python": "${workspaceFolder}/application/.venv/bin/python",
            "jinja": true,
            "justMyCode": false,
        }
    ]
}
Remote Containersを使用するたびに拡張機能を入れるのはめんどくさい
Remote Containersを使用するときは拡張機能がインストールされていないのでextensionsの中に任意の拡張機能を記述します
    "extensions": [
		"ms-python.python",
		"ms-python.vscode-pylance",
	]
}
記事の紹介
以下の記事も書いたので良かったら読んでいただけると幸いです
参考文献