概要
React/Next.jsを使って画面を作成し、Django Rest Frameworkを使ってAPIと疎通した上でスライダーのオン/オフの切り替えに応じて表示内容を変える方法について解説します
今回作成するスライダーのあるユーザ一覧画面は以下の通りです

前提
- Django、React(Next.js)のプロジェクトを作成済み
- Material UIとTailwind CSSを使用しますが今回は説明しません
- docker-compose.ymlとnginx.confを使用します。ソースコードは添付しますが詳細な説明は別記事のリンクを貼るのでそちらを参照してください
また、ログイン機能の続きとして記事を執筆しているのでまだ実装していない方は以下の記事を参考にしてください
ディレクトリ構成
tree
・
├── .gitignore
├── README.md
├── backend
│   ├── application
│   │   ├── __init__.py
│   │   ├── admin.py
│   │   ├── apps.py
│   │   ├── fixtures
│   │   │   └── fixture.json
│   │   ├── migrations
│   │   │   ├── __init__.py
│   │   │   └── 0001_initial.py
│   │   ├── models.py
│   │   ├── serializers.py
│   │   ├── urls.py
│   │   └── views.py
│   ├── manage.py
│   ├── poetry.lock
│   ├── project
│   │   ├── __init__.py
│   │   ├── asgi.py
│   │   ├── settings.py
│   │   ├── urls.py
│   │   └── wsgi.py
│   └── pyproject.toml
├── containers
│   ├── django
│   │   ├── Dockerfile
│   │   ├── Dockerfile.prd
│   │   ├── entrypoint.prd.sh
│   │   └── entrypoint.sh
│   ├── nginx
│   │   ├── Dockerfile
│   │   └── nginx.conf
│   └── postgres
│       ├── Dockerfile
│       └── init.sql
├── docker-compose.yml
├── frontend
│   ├── README.md
│   ├── package-lock.json
│   ├── package.json
│   └── pages
│       └── users
│           └── index.tsx
└── static
docker-composeとNginxの設定
今回はフロントエンド側でAPIを使用するときは
http://localhost/back/
へリクエストを送るようdocker-composeとNginxの設定を行います
詳細は以下の記事の通りです
version: '3.9'

services:
  db:
    container_name: db
    build:
      context: .
      dockerfile: containers/postgres/Dockerfile
    volumes:
      - db_data:/var/lib/postgresql/data
    healthcheck:
      test: pg_isready -U "${POSTGRES_USER:-postgres}" || exit 1
      interval: 10s
      timeout: 5s
      retries: 5
    environment:
      - POSTGRES_NAME
      - POSTGRES_USER
      - POSTGRES_PASSWORD
    ports:
      - '5432:5432' # デバッグ用

  app:
    container_name: app
    build:
      context: .
      dockerfile: containers/django/Dockerfile
    volumes:
      - ./backend:/code
      - ./static:/static
    ports:
      - '8000:8000'
      # デバッグ用ポート
      - '8080:8080'
    command: sh -c "/usr/local/bin/entrypoint.sh"
    stdin_open: true
    tty: true
    env_file:
      - .env
    depends_on:
      db:
        condition: service_healthy

  nginx:
    container_name: web
    build:
      context: .
      dockerfile: containers/nginx/Dockerfile
    volumes:
      - ./static:/static
    ports:
      - 80:80
    depends_on:
      - app

volumes:
  db_data:
  static:

networks:
  default:
    name: testnet
upstream front {
    server host.docker.internal:3000;
}

upstream back {
    server host.docker.internal:8000;
}

server {
    listen       80;
    server_name  localhost;

    client_max_body_size 5M;

    location / {
        proxy_pass http://front/;
    }

    location /back/ {
        proxy_set_header X-Forwarded-Host $host:$server_port;
        proxy_set_header X-Forwarded-Server $host;
        proxy_set_header X-Forwarded-For $proxy_add_x_forwarded_for;
        proxy_pass http://back/;
    }

    location /_next/webpack-hmr {
        proxy_pass http://front/_next/webpack-hmr;
        proxy_http_version 1.1;
        proxy_set_header Upgrade $http_upgrade;
        proxy_set_header Connection "upgrade";
    }

}
APIの実装
- model
- fixture
- serilaizer
- view
の順番に作成します
Modelの作成
import uuid

from django.contrib.auth.models import AbstractUser
from django.contrib.auth.validators import UnicodeUsernameValidator
from django.core.validators import RegexValidator
from django.db import models


class User(AbstractUser):
    """システムユーザ"""

    username_validator = UnicodeUsernameValidator()

    class Role(models.IntegerChoices):
        """システムユーザのロール

        Args:
            MANAGEMENT(0): 管理者
            GENERAL(1):    一般
            PART_TIME(2):  アルバイト
        """

        MANAGEMENT = 0, "管理者"
        GENERAL = 1, "一般"
        PART_TIME = 2, "アルバイト"

    # 不要なフィールドはNoneにすることができる
    first_name = None
    last_name = None
    date_joined = None
    groups = None
    id = models.UUIDField(
        primary_key=True,
        default=uuid.uuid4,
        editable=False,
        db_comment="システムユーザID",
    )
    employee_number = models.CharField(
        unique=True,
        validators=[RegexValidator(r"^[0-9]{8}$")],
        max_length=8,
        db_comment="社員番号",
    )
    username = models.CharField(
        max_length=150,
        unique=True,
        validators=[username_validator],
        db_comment="ユーザ名",
    )
    email = models.EmailField(
        max_length=254,
        unique=True,
        db_comment="メールアドレス",
    )
    role = models.PositiveIntegerField(
        choices=Role.choices,
        default=Role.PART_TIME,
        db_comment="システムユーザのロール",
    )
    created_at = models.DateTimeField(
        auto_now_add=True,
        db_comment="作成日",
    )
    updated_at = models.DateTimeField(
        auto_now=True,
        db_comment="更新日",
    )
    is_verified = models.BooleanField(
        default=False,
        db_comment="有効化有無",
    )

    USERNAME_FIELD = "employee_number"
    REQUIRED_FIELDS = ["email", "username"]

    class Meta:
        ordering = ["employee_number"]
        db_table = "User"
        db_table_comment = "システムユーザ"

    def __str__(self):
        return self.username
UserのModelについてはDjangoのAbstractUserを継承して作成します
詳細に知りたい方は以下の記事を参考にしてください
Fixtureの作成
システムユーザのテスト用データを作成します
[
    {
        "model": "application.User",
        "pk": 1,
        "fields": {
            "employee_number": "00000001",
            "username": "管理者ユーザユーザ01",
            "password": "pbkdf2_sha256$390000$KF4YHJxvWjSODaXdxLBg6S$U5XDh8mR77kMMUtlRcBZS/bkaxdpjNR/P4zyy25g3/I=",
            "email": "test01@example.com",
            "role": 0,
            "is_superuser": 0,
            "is_verified": true,
            "created_at": "2022-07-28T00:31:09.732Z",
            "updated_at": "2022-07-28T00:31:09.732Z",
            "created_by": 1,
            "updated_by": 1
        }
    },
    {
        "model": "application.User",
        "pk": 2,
        "fields": {
            "employee_number": "00000002",
            "username": "一般ユーザ01",
            "password": "pbkdf2_sha256$390000$KF4YHJxvWjSODaXdxLBg6S$U5XDh8mR77kMMUtlRcBZS/bkaxdpjNR/P4zyy25g3/I=",
            "email": "test02@example.com",
            "role": 1,
            "is_superuser": 0,
            "is_verified": true,
            "created_at": "2022-07-28T00:31:09.732Z",
            "updated_at": "2022-07-28T00:31:09.732Z",
            "created_by": 1,
            "updated_by": 1
        }
    },
    {
        "model": "application.User",
        "pk": 3,
        "fields": {
            "employee_number": "00000003",
            "username": "スーパーユーザ01",
            "password": "pbkdf2_sha256$390000$KF4YHJxvWjSODaXdxLBg6S$U5XDh8mR77kMMUtlRcBZS/bkaxdpjNR/P4zyy25g3/I=",
            "email": "test04@example.com",
            "role": 0,
            "is_superuser": 1,
            "is_verified": true,
            "created_at": "2022-07-28T00:31:09.732Z",
            "updated_at": "2022-07-28T00:31:09.732Z",
            "created_by": 1,
            "updated_by": 1
        }
    }
]
Serilaizerの作成
システムユーザの一覧表示用のserializerを使用します
from rest_framework import serializers

from application.models import User


class UserSerializer(serializers.ModelSerializer):
    """ユーザ用シリアライザ"""

    class Meta:
        model = User
        fields = [
            "id",
            "employee_number",
            "username",
            "email",
            "role",
            "is_active",
            "is_verified",
        ]
        read_only_fields = [
            "id",
            "created_at",
            "updated_at",
            "is_active",
            "is_verified",
        ]

    def to_representation(self, instance):
        rep = super(UserSerializer, self).to_representation(instance)
        rep["role"] = instance.get_role_display()
        return rep
Viewの作成
- システムユーザ一覧表示用API
- システムユーザの有効化・無効化用API
の2種類を作成します
from django.http import JsonResponse
from rest_framework import status
from rest_framework.decorators import action
from rest_framework.permissions import IsAuthenticated
from rest_framework.viewsets import ModelViewSet
from application.models import User
from application.serializers import UserSerializer
class UserViewSet(ModelViewSet):
queryset = User.objects.all()
serializer_class = UserSerializer
permission_classes = [IsAuthenticated]
@action(detail=True, methods=["post"])
def toggle_user_active(self, request, pk):
"""ユーザを有効化/無効化するAPI
Args:
request : リクエスト
pk : ユーザID
Returns:
JsonResponse
"""
user = self.get_object()
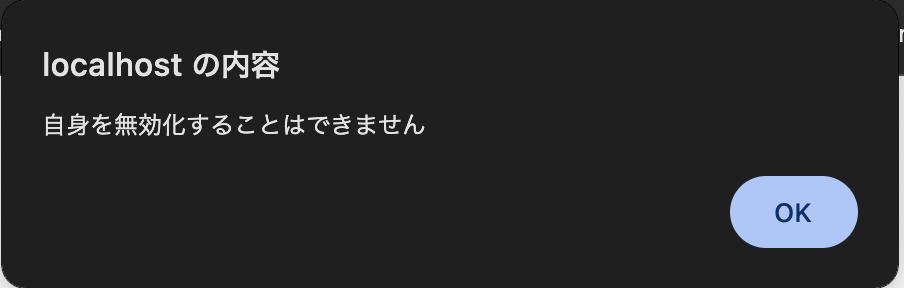
if request.user == user:
return JsonResponse(
data={"msg": "自身を無効化することはできません"},
status=status.HTTP_400_BAD_REQUEST,
)
if user.is_active:
user.is_active = False
else:
user.is_active = True
user.save()
return JsonResponse(data={"is_active": user.is_active})
ユーザを有効化/無効化するAPIを作成します
その際にユーザが自信を無効化しようとした場合、
{
    "msg": "自身を無効化することはできません"
}
というエラーメッセージをJSONで返します
システムユーザを有効・無効化するAPIの詳細は以下の記事を参考にしてください
お客様一覧画面
お客様一覧画面のコードは以下の通りです
import { useState, useEffect } from "react";
import Cookies from "js-cookie";
import router from "next/router";
import Table from "@mui/material/Table";
import TableHead from "@mui/material/TableHead";
import TableRow from "@mui/material/TableRow";
import TableBody from "@mui/material/TableBody";
import TableCell from "@mui/material/TableCell";
import { BasicMenu } from "@/components/buttons/MenuButton";
import { Switch, Button } from "@mui/material";
import SendIcon from "@mui/icons-material/Send";

type UserData = {
  id: number;
  employee_number: string;
  username: string;
  email: string;
  role: string;
  is_active: boolean;
  is_verified: boolean;
};

type UserArray = UserData[];

function UserList() {
  const [data, setData] = useState<UserArray>([]);
  const [loggedIn, setLoggedIn] = useState<Boolean>(true); // ログイン状態を管理

  const fetchActive = async (id: string) => {
    try {
      // fetchAPIの処理を記載する
      const apiUrl = `${process.env["NEXT_PUBLIC_API_URL"]}/api/users/${id}/toggle_user_active`;
      const csrftoken = Cookies.get("csrftoken") || "";
      const credentials = "include";

      const response = await fetch(apiUrl, {
        method: "POST",
        headers: {
          "Content-type": "application/json",
          "X-CSRFToken": csrftoken,
          "Cache-Control": "private",
        },
        credentials: credentials,
      });
      if (response.ok) {
        setLoggedIn(true);
        fetchUserData();
      } else if (response.status === 403) {
        setLoggedIn(false);
        router.push("/"); // ログインしていない場合にルートページにリダイレクト
      } else if (response.status === 404) {
        router.replace("/404"); // IDが存在しない場合は404ページへリダイレクト
      } else if (response.status === 400) {
        response.json().then((data) => {
          const msg = data.msg;
          alert(msg);
        });
      } else {
        alert("エラーが発生しました");
      }
    } catch (error) {
      if (error instanceof Error) {
        alert({ message: `${error.message}`, severity: "error" });
      }
    }
  };

  const switchHandler = (switchData: { id: String }) => {
    fetchActive(switchData.id);
  };

  const fetchUserData = async () => {
    try {
      // http://localhost/back/がNEXT_PUBLIC_API_URLに入る
      const apiUrl = `${process.env["NEXT_PUBLIC_API_URL"]}/api/users`;
      const csrftoken = Cookies.get("csrftoken") || "";
      const credentials = "include";

      const response = await fetch(apiUrl, {
        method: "GET",
        headers: {
          "X-CSRFToken": csrftoken,
        },
        credentials: credentials,
      });

      if (response.ok) {
        const responseData: UserArray = await response.json();
        setData(responseData);
        setLoggedIn(true);
      } else if (response.status === 403) {
        setLoggedIn(false);
      } else {
        alert("エラーが発生しました");
      }
    } catch (error) {
      console.error("データの取得に失敗しました:", error);
    }
  };

  useEffect(() => {
    fetchUserData();
  }, []);

  useEffect(() => {
    if (!loggedIn) {
      router.push("/");
    }
  }, [loggedIn]);

  if (!data || !data.results) return null;

  return (
    <div className="customer-list">
      <BasicMenu />
      <br />
      <div>
        <h1 className="flex flex-col items-center my-[10px] text-3xl text-gray-900">
          システムユーザ一覧
        </h1>
        <div className="flex flex-col items-end my-[10px]">
          <Button
            type="submit"
            size="medium"
            variant="contained"
            color="primary"
            className="grid justify-items-end w-[200px] my-[20px]"
          >
            ユーザ招待
          </Button>
        </div>
        <Table>
          <TableHead>
            <TableRow>
              <TableCell align="center" className="font-bold">
                社員番号
              </TableCell>
              <TableCell align="center" className="font-bold">
                システムユーザ名
              </TableCell>
              <TableCell align="center" className="font-bold">
                メールアドレス
              </TableCell>
              <TableCell align="center" className="font-bold">
                権限
              </TableCell>
              <TableCell align="center" className="font-bold">
                有効/無効
              </TableCell>
              <TableCell align="center" className="font-bold">
                再送信
              </TableCell>
              <TableCell align="center" className="font-bold"></TableCell>
            </TableRow>
          </TableHead>
          {data.results.map((item, index) => (
            <TableBody key={index}>
              <TableCell align="center">{item.employee_number}</TableCell>
              <TableCell align="center">{item.username}</TableCell>
              <TableCell align="center">{item.email}</TableCell>
              <TableCell align="center">{item.role}</TableCell>
              <TableCell align="center">
                <Switch
                  checked={item.is_active}
                  onChange={() => switchHandler({ id: item.id })}
                />
              </TableCell>
              <TableCell align="center">
                <Button
                  disabled={item.is_verified}
                  size="small"
                  variant="contained"
                  color="success"
                  className="w-[100px] my-[10px]"
                >
                  再送信
                  <SendIcon />
                </Button>
              </TableCell>
              <TableCell align="center">
                <Button
                  size="small"
                  variant="contained"
                  className="w-[100px] my-[10px]"
                >
                  編集
                </Button>
              </TableCell>
            </TableBody>
          ))}
        </Table>
      </div>
    </div>
  );
}

export default UserList;
一つずつ解説していきます
一覧表示のAPIからデータを取得
fetchUserDataという関数を使って関数内にAPIを実行し、response.okの場合はsetDataメソッドを実行し、dataのArrayに入れる処理を記載します
ログインしているか知りたいのでuseStateを使ってresponse.okだったらloggedInをTrueに、ステータスコードが403の場合はloggedInをFalseにします
useEffectを使って初回レンダリング時のみデータを取得する処理を実行するようにします
  const fetchUserData = async () => {
    try {
      // http://localhost/back/がNEXT_PUBLIC_API_URLに入る
      const apiUrl = `${process.env["NEXT_PUBLIC_API_URL"]}/api/users`;
      const csrftoken = Cookies.get("csrftoken") || "";
      const credentials = "include";

      const response = await fetch(apiUrl, {
        method: "GET",
        headers: {
          "X-CSRFToken": csrftoken,
        },
        credentials: credentials,
      });

      if (response.ok) {
        const responseData: UserArray = await response.json();
        setData(responseData);
        setLoggedIn(true);
      } else if (response.status === 403) {
        setLoggedIn(false);
      } else {
        alert("エラーが発生しました");
      }
    } catch (error) {
      console.error("データの取得に失敗しました:", error);
    }
  };
ログイン有無の確認
useEffectを使ってloggedInの変数が変わったタイミングで処理を実施します
loggedInがFalseの場合はルートページへリダイレクトさせます
ログイン機能について詳細に知りたい方は以下の記事を参考にしてください
  useEffect(() => {
    if (!loggedIn) {
      router.push("/");
    }
  }, [loggedIn]);
スライダーの実装
checked内にAPIから取得したis_activeが入リます
ボタンが押された時はswitchHandler関数が起動し、引数としてuserのidが入ります
<Switch
  checked={item.is_active}
  onChange={() => switchHandler({ id: item.id })}
/>
switchHandlerの実装
今回はスライダーを押したら確認画面を表示させるなど追加の処理を作成する予定がないのでswitchHandlerを実行するとfetchActiveが実行されるようにします
  const switchHandler = (switchData: { id: String }) => {
    fetchActive(switchData.id);
  };
一覧表示同様、APIを実行し、200の時はもう一度fetchUserData()を実行し、一覧画面を更新します
また、400の時はresponse内のエラーメッセージをalertでそのまま表示させます
  const fetchActive = async (id: string) => {
    try {
      // fetchAPIの処理を記載する
      const apiUrl = `${process.env["NEXT_PUBLIC_API_URL"]}/api/users/${id}/toggle_user_active`;
      const csrftoken = Cookies.get("csrftoken") || "";
      const credentials = "include";

      const response = await fetch(apiUrl, {
        method: "POST",
        headers: {
          "Content-type": "application/json",
          "X-CSRFToken": csrftoken,
          "Cache-Control": "private",
        },
        credentials: credentials,
      });
      if (response.ok) {
        setLoggedIn(true);
        fetchUserData();
      } else if (response.status === 403) {
        setLoggedIn(false);
        router.push("/"); // ログインしていない場合にルートページにリダイレクト
      } else if (response.status === 404) {
        router.replace("/404"); // IDが存在しない場合は404ページへリダイレクト
      } else if (response.status === 400) {
        response.json().then((data) => {
          const msg = data.msg;
          alert(msg);
        });
      } else {
        alert("エラーが発生しました");
      }
    } catch (error) {
      if (error instanceof Error) {
        alert({ message: `${error.message}`, severity: "error" });
      }
    }
  };
実際に触ってみよう
まず、以下のように一覧で表示できたら成功です
スライダーが切り替わったら成功です

自身を無効化しようとしてアラートが表示されたら成功です
参考