ポートフォリオもいよいよ終わりに近づいてきたときにCI/CDの自動化にCircle CIを導入を決め設定をしている際、たくさんのエラーにつまづいたため備忘録を兼ねて投稿します。
環境
- Amazon Linux2 (無料枠)
- RDS (MySQL8.0)
- capistrano 3.14.1
- Ruby 2.7.1
- Rails 6.0.3.4
- Unicorn 5.7.0
- Nginx 1.12.2
- Rspec-rails 4.0.1
- selenium_chrome_headless (chrome driver)
1. Master_key登録エラー
rakeが終了した前後のエラー文が下記になります。
DEPRECATION WARNING: #fog_provider is deprecated and has no effect (called from block in <main> at /home/circleci/live_share/config/initializers/carrierwave.rb:7)
rake aborted!
NoMethodError: undefined method `[]' for nil:NilClass
/home/circleci/live_share/config/initializers/carrierwave.rb:11:in `block in <main>'
解決法
エラー文を見るとNoMethodErrorが起きているのが分かり、その下でcarrierwave.rbの11行目でエラーが起きているようなので見に行ってみると、credentials.yml.encの中に書いた環境変数を使っていました。これが原因だったことが分かりました。
config.fog_credentials = {
    provider: 'AWS',
    aws_access_key_id: Rails.application.credentials.aws[:access_key_id], #11行目に該当
    aws_secret_access_key: Rails.application.credentials.aws[:secret_access_key],
    region: 'ap-northeast-1',
    path_style: true
  }
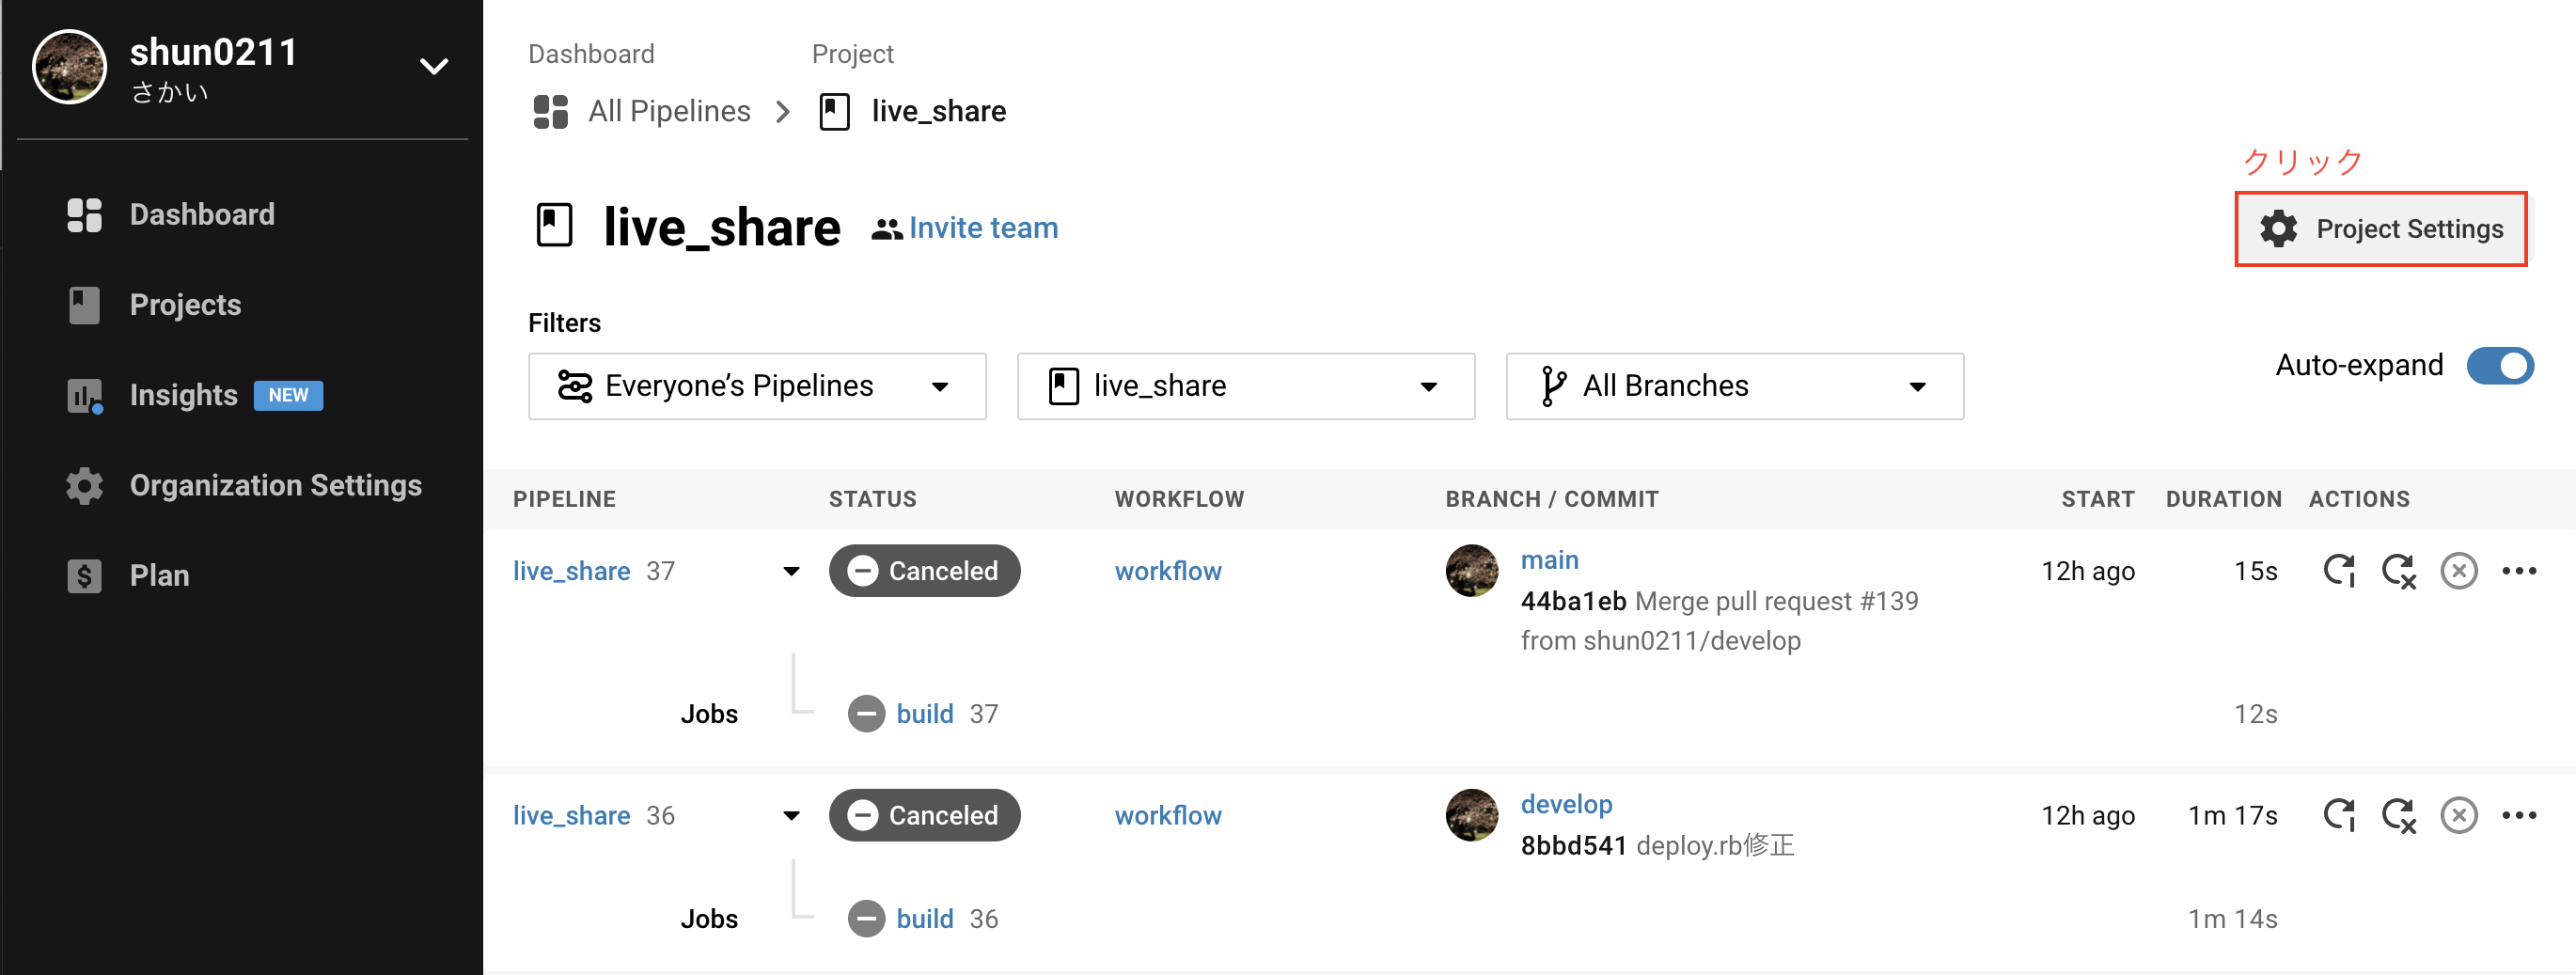
そこで、Circle CI側の環境変数を設定します。まずCircle CIのページからProjects → 自分のRepositoryへと移ります。そうすると、右の方にProject Settingとあるので、クリックします。
「Environment Variables」をクリックします。

「Add Environment Variable」をクリックします。
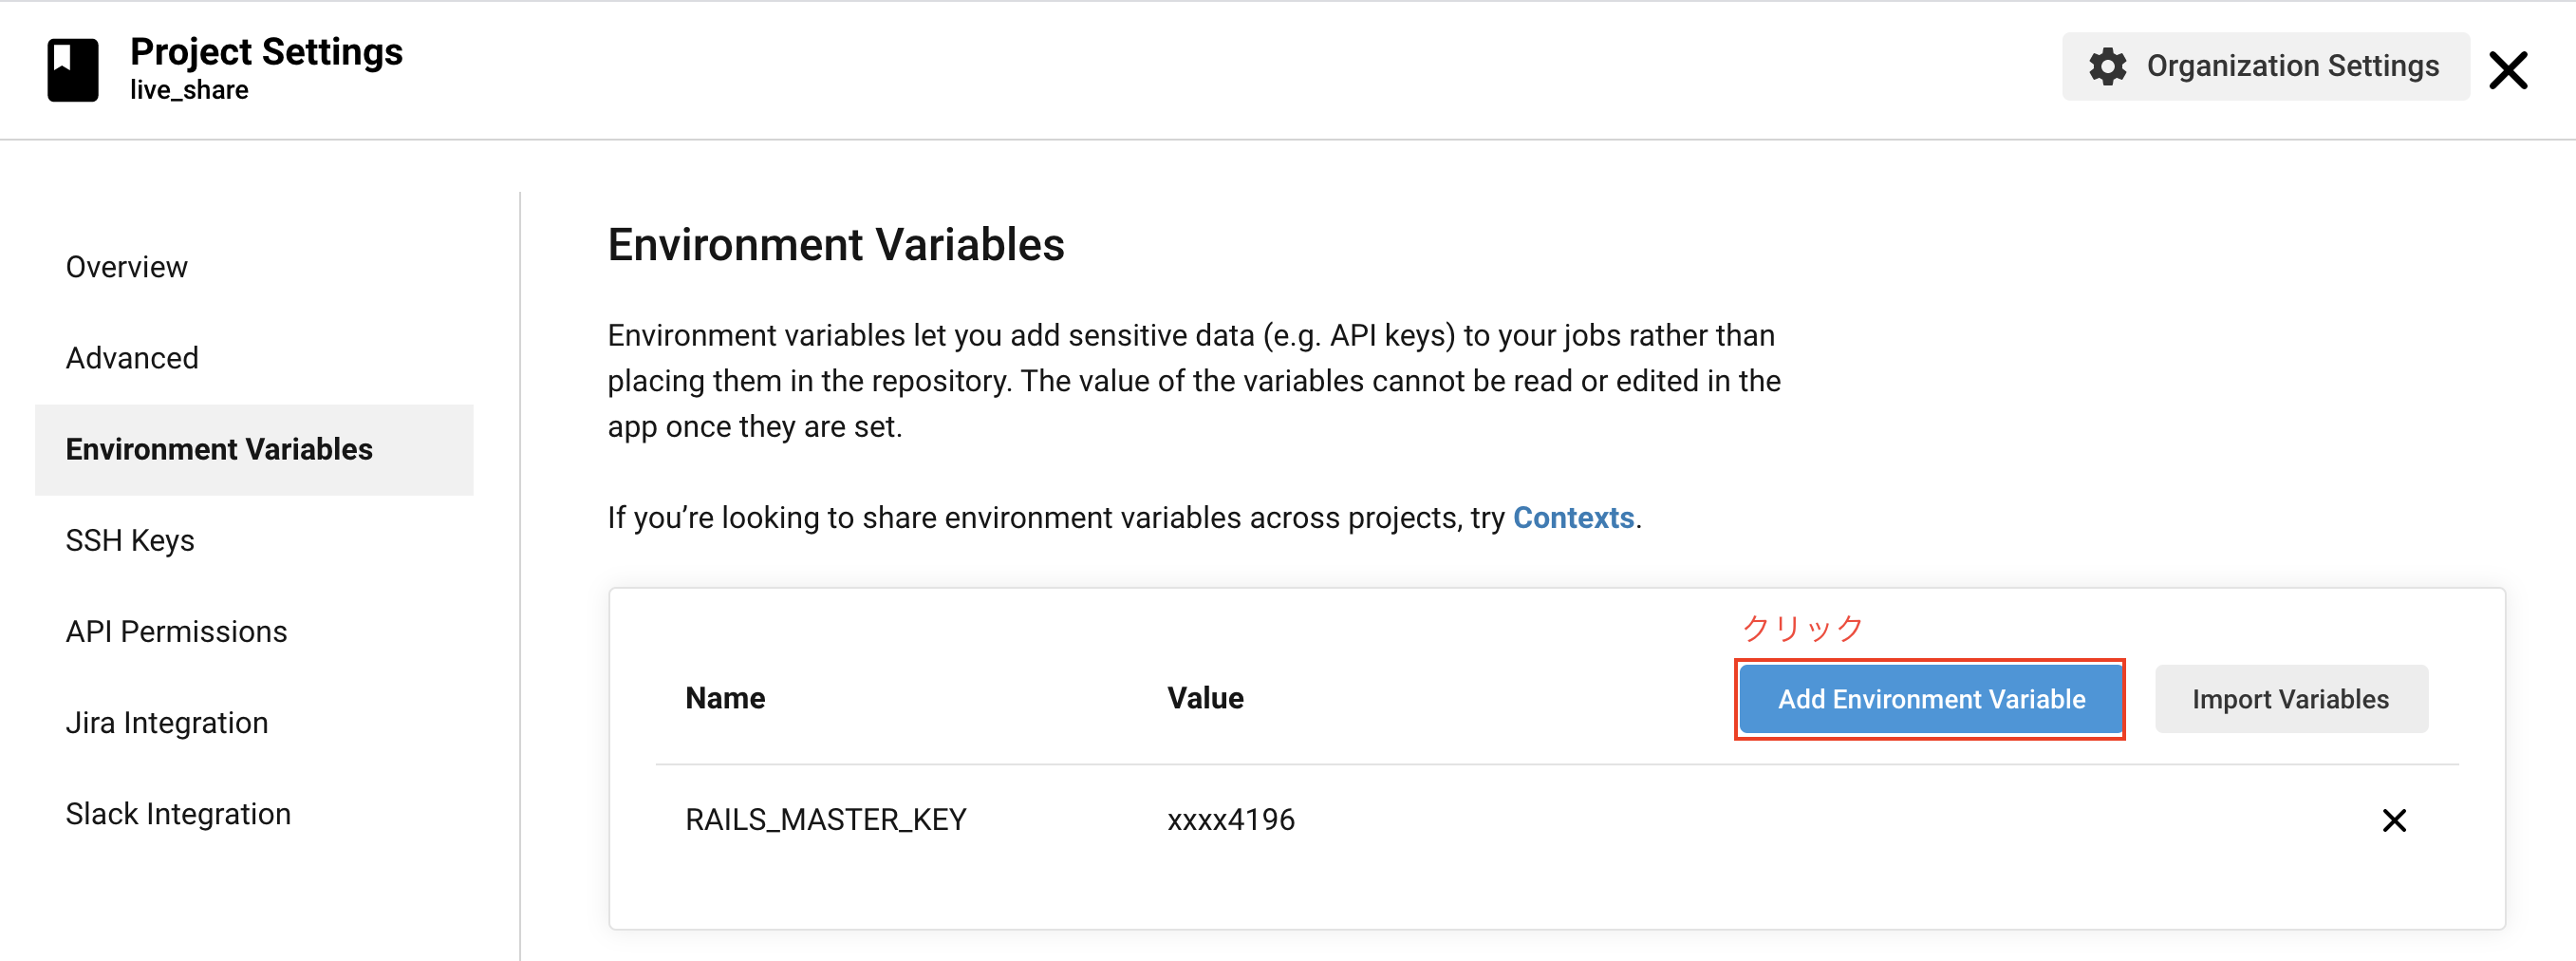
すると、新しくウインドウが開くので、NameにRAILS_MASTER_KEYとし、Valueに自分のmaster.keyをセットします。
RAILS_MASTER_KEYとすることでCircle CI側がmaster.keyだと認識します。
こうして、再度ビルドをすると先程のエラーは消えました。
2. bundle exec rake db:createで失敗する
DEPRECATION WARNING: #fog_provider is deprecated and has no effect (called from block in <main> at /home/circleci/live_share/config/initializers/carrierwave.rb:7)
/home/circleci/live_share/vendor/bundle/ruby/2.7.0/gems/activemodel-6.0.3.4/lib/active_model/validations/clusivity 4.rb:8: warning: already initialized constant ActiveModel::Validations::Clusivity::ERROR_MESSAGE
/home/circleci/live_share/vendor/bundle/ruby/2.7.0/gems/activemodel-6.0.3.4/lib/active_model/validations/clusivity.rb:8: warning: previous definition of ERROR_MESSAGE was here
rake aborted!
ActiveSupport::Concern::MultipleIncludedBlocks: Cannot define multiple 'included' blocks for a Concern
解決法
エラー文にヒントらしいヒントがなかったため、ほんとに悩まされました。ほとんど文献も落ちてなく、「ActiveModel::Validations::Clusivity::ERROR_MESSAGE」を頼りにやっと見つけたのが下記参考サイトでした。次のコマンドをbundle installの後に追加することでbundle exec rake db:createが通るようになりました。なぜ必要かは分かりません。
- run: bundle install --path vendor/cache
参考
Webpackがインストールされていない
Failure/Error: <%= javascript_pack_tag 'application', 'data-turbolinks-track': 'reload' %>

ActionView::Template::Error:
  Webpacker can't find application in /home/circleci/live_share/public/packs-test/manifest.json. Possible causes:
  1. You want to set webpacker.yml value of compile to true for your environment
     unless you are using the `webpack -w` or the webpack-dev-server.
  2. webpack has not yet re-run to reflect updates.
  3. You have misconfigured Webpacker's config/webpacker.yml file.
  4. Your webpack configuration is not creating a manifest.
  Your manifest contains:
  {
  }
解決法
こちらは非常に単純でwebpackをインストールしていないことによるエラーということがすぐに分かりました。webpackのインストールにはyarnが必要なので、これをインストール後、webpackをインストールしたところ通るようになりました。
- run:
   name: yarn Install
   command: yarn install
- run: bundle exec bin/webpack
参考
RSpecのテストが通らない
最後のエラーです。ローカル環境では成功しているテストがCircle CIでは約半分が失敗するというもの。
# 落ちていた代表的なエラーを2つ挙げておきます。
RSpec::Core::MultipleExceptionError
NoMethodError: undefined method `id' for nil:NilClass
これはローカル環境とCircle CIのDocker上の環境に差異があったためでした。具体的にはローカル環境にはchrome driverをインストールしていて、JavaScriptを扱うテストはこちらで行っていたのですが、Circle CI上ではこれをインストールしていなかったため落ちていました。当たり前といえば当たり前ですね。ということで、chrome driverをインストールする記載を設定に加えます。
- run:
    name: Chrome Driverのインストール
    command: |
      curl -sS https://dl.yarnpkg.com/debian/pubkey.gpg | sudo apt-key add -
      echo "deb https://dl.yarnpkg.com/debian/ stable main" | sudo tee /etc/apt/sources.list.d/yarn.list
      sudo apt-get update && sudo apt-get install -y unzip
      wget -N http://chromedriver.storage.googleapis.com/87.0.4280.88/chromedriver_linux64.zip -P ~/
      unzip ~/chromedriver_linux64.zip -d ~/
      rm ~/chromedriver_linux64.zip
      sudo chown root:root ~/chromedriver
      sudo chmod 755 ~/chromedriver
      sudo mv ~/chromedriver /usr/bin/chromedriver
      sh -c 'wget -q -O - https://dl-ssl.google.com/linux/linux_signing_key.pub | sudo apt-key add -'
      sudo sh -c 'echo "deb [arch=amd64] http://dl.google.com/linux/chrome/deb/ stable main" >> /etc/apt/sources.list.d/google-chrome.list'
      sudo apt-get update && sudo apt-get install -y google-chrome-stable
なぜなのかは分かりませんが、Dockerfile上ではsudo権限はいらないのに、こちらでは入れないとPermission deniedとなり落ちました。
ビルドが成功した設定ファイル
最後に筆者がうまくいった設定ファイルを載せておきます。RAILS_MASTER_KEYを書いているのはローカル環境でビルドしたかったためです。プッシュする際は消してください。
version: 2.1
jobs:
  build:
    docker:
      - image: circleci/ruby:2.7.1-node-browsers
        environment:
          - BUNDLER_VERSION: 2.1.4
          - RAILS_ENV: 'test'
          - RAILS_MASTER_KEY: '*******************************'

      - image: circleci/mysql:8.0
        command: mysqld --default-authentication-plugin=mysql_native_password
        environment:
          - MYSQL_ALLOW_EMPTY_PASSWORD: 'true'
          - MYSQL_ROOT_HOST: '%'

    working_directory: ~/live_share

    steps:
      # ソースコードをマシンにチェックアウト。通常stepsの最初に書かれる
      - checkout
      - run:
          name: Chrome Driverのインストール
          command: |
            curl -sS https://dl.yarnpkg.com/debian/pubkey.gpg | sudo apt-key add -
            echo "deb https://dl.yarnpkg.com/debian/ stable main" | sudo tee /etc/apt/sources.list.d/yarn.list
            sudo apt-get update && sudo apt-get install -y unzip
            wget -N http://chromedriver.storage.googleapis.com/87.0.4280.88/chromedriver_linux64.zip -P ~/
            unzip ~/chromedriver_linux64.zip -d ~/
            rm ~/chromedriver_linux64.zip
            sudo chown root:root ~/chromedriver
            sudo chmod 755 ~/chromedriver
            sudo mv ~/chromedriver /usr/bin/chromedriver
            sh -c 'wget -q -O - https://dl-ssl.google.com/linux/linux_signing_key.pub | sudo apt-key add -'
            sudo sh -c 'echo "deb [arch=amd64] http://dl.google.com/linux/chrome/deb/ stable main" >> /etc/apt/sources.list.d/google-chrome.list'
            sudo apt-get update && sudo apt-get install -y google-chrome-stable

      # Gemfile.lockが変更された場合、キャッシュを変更する設定
      - restore_cache:
          keys:
            - v1-dependencies-{{ checksum "Gemfile.lock" }}
            - v1-dependencies-

      - restore_cache:
          keys:
            - rails-yarn-{{ checksum "yarn.lock" }}
            - rails-yarn-

      - run:
          name: bundlerをインストール
          command: gem install bundler -v 2.1.4

      - run:
          name: プロジェクトローカルにGemをインストールするよう設定
          command: bundle config set --local path 'vendor/bundle'

      - run:
          name: bundle installを実行
          command: |
            bundle check --path vendor/bundle || bundle install --clean --force --jobs=4 --retry=3
            bundle install --path vendor/cache

      - run:
          name: yarn installを実行
          command: yarn install --cache-folder ~/.cache/yarn

      - run:
          name: webpack installを実行
          command: bundle exec bin/webpack

      # Gemfile.lockの中身が変わらない場合はcashを使う設定
      - save_cache:
          key: v1-dependencies-{{ checksum "Gemfile.lock" }}
          paths:
            - ./vendor/bundle

      - save_cache:
          key: rails-yarn-{{ checksum "yarn.lock" }}
          paths:
            - ~/.cache/yarn

      - run:
          name: Wait for DB
          command: dockerize -wait tcp://localhost:3306 -timeout 1m

      - run:
          name: Databasesetup
          command: |
            mv ./config/database.yml.ci ./config/database.yml
            bundle exec rake db:create
            bundle exec rake db:schema:load

      - run:
          name: Rubocop実行
          command: bundle exec rubocop

      - run:
          name: RSpec実行
          command: bundle exec rspec -b --format documentation

      # store_test_resultsを指定するとTESTSのタブでテスト結果を確認できるようになる
      - store_test_results:
          path: /tmp/test-results

      - add_ssh_keys:
          fingerprints:
            - "b9:b2:5d:69:d9:5b:59:03:52:35:78:af:00:9c:21:d1"

      - deploy:
          name: Capistrano deploy
          command: |
            if [ "${CIRCLE_BRANCH}" != "main" ]; then
              exit 0
            fi
            bundle exec cap production deploy
test:
  adapter: mysql2
  encoding: utf8mb4
  pool: 5
  username: 'root'
  port: 3306
  host: '127.0.0.1'
  database: live_share_test
FROM ruby:2.7.1

# Debianのインストール
RUN curl -sS https://dl.yarnpkg.com/debian/pubkey.gpg | apt-key add - \
    && echo "deb https://dl.yarnpkg.com/debian/ stable main" | tee /etc/apt/sources.list.d/yarn.list

# rails6.0からJavaScriptコンパイラがwebpackerに変更され、webpackerの導入に必要なパッケージマネージャであるyarnをインストールする
RUN apt-get update -qq && apt-get install -y nodejs yarn imagemagick mariadb-client vim

# chromeの追加
RUN apt-get update && apt-get install -y unzip && \
    CHROME_DRIVER_VERSION=`curl -sS chromedriver.storage.googleapis.com/LATEST_RELEASE` && \
    wget -N http://chromedriver.storage.googleapis.com/$CHROME_DRIVER_VERSION/chromedriver_linux64.zip -P ~/ && \
    unzip ~/chromedriver_linux64.zip -d ~/ && \
    rm ~/chromedriver_linux64.zip && \
    chown root:root ~/chromedriver && \
    chmod 755 ~/chromedriver && \
    mv ~/chromedriver /usr/bin/chromedriver && \
    sh -c 'wget -q -O - https://dl-ssl.google.com/linux/linux_signing_key.pub | apt-key add -' && \
    sh -c 'echo "deb [arch=amd64] http://dl.google.com/linux/chrome/deb/ stable main" >> /etc/apt/sources.list.d/google-chrome.list' && \
    apt-get update && apt-get install -y google-chrome-stable

RUN mkdir /myapp
WORKDIR /myapp
COPY Gemfile /myapp/Gemfile
COPY Gemfile.lock /myapp/Gemfile.lock
RUN bundle install
COPY . /myapp
COPY .ssh /root/.ssh

COPY entrypoint.sh /usr/bin/
RUN chmod +x /usr/bin/entrypoint.sh
ENTRYPOINT ["entrypoint.sh"]
EXPOSE 3000

CMD ["rails", "server", "-b", "0.0.0.0"]
補足
無駄なpushをなくすため、ローカル環境でcircle CIをビルドしたい時に使うコマンド
$ brew install circleci
$ circleci local execute --job build