はじめに
Micronautというマイクロサービス/サーバレスアプリケーションを構築するためのJVMベースのOSSフレームワークを用いて実装したアプリケーションをOracle Functionsにデプロイしてみたいと思います。
Micronaut on Oracle Functions
Oracle Functionsには、FDKと呼ばれるFunctionの入出力やライフサイクルの管理を行うためのヘルパーライブラリが存在しますが、かなりシンプルな作りとなっています。
例えば、HTTP Method/Pathに応じたハンドリング処理なんかは以下のように実装する必要があります。( HTTPGatewayContext にメソッドやパスの情報が含まれているのでそれを参照し、分岐処理を実装するイメージ)
public class PetstoreApplication {

    public Response handleRequest(HTTPGatewayContext ctx, InputEvent inputEvent) {
        if ("GET".equals(ctx.getMethod())) {
            return handleGetRequest(ctx);
        } else if ("POST".equals(ctx.getMethod())) {
            return handlePostRequest(ctx, inputEvent);
        } else {
            // ... omit
        }
    }

    private Response handleGetRequest(HTTPGatewayContext ctx) {
        // Request Path に応じた分岐処理
    }

    public Response handlePostRequest(HTTPGatewayContext ctx, InputEvent inputEvent) {
        // ... omit
    }

    // ... omit
}
Java EE, MicroProfileベースのフレームワーク, Spring Bootなどで今まで実装してきた方はきっとこんな感じに宣言的に実装したいのではないでしょうか?
@Path("/pet")
public class PetstoreResource {

    @GET
    @Produces(MediaType.APPLICATION_JSON)
    public List<Pet> getAllPets() {
        // ... omit
    }

    @GET
    @Path("/id/{id}")
    @Produces(MediaType.APPLICATION_JSON)
    public Pet getPet(@PathParam("id") String id) {
        // ... omit
    }

    @POST
    @Produces(MediaType.APPLICATION_JSON)
    @Consumes(MediaType.APPLICATION_JSON)
    public Pet createPet(Pet pet) {
        // ... omit
    }

}
1つのFunctionのサイズは大きくなるので起動時間は遅くなる傾向にありますが、このように実装するメリットはいくつかあると思っています。
- 今まで宣言的にアプリケーションを実装してきた人にとっては取っつきやすい
- .oO(Javaの開発者はこっちの人が大多数なのでは...?)
- リクエストのメソッド・パスが変更となった際に、API Gatewayの修正が不要なので保守が楽
起動時間に関してはGraalVMでNative Imageが生成できればかなり解決すると思います。これとは別に、アプリを実装するならDI(Dependency Injection)の仕組みやクラウドプロバイダーとの連携機能が欲しかったりしますよね...
...そんな要望を実現してくれるのがMicronautです!
Micronaut on Oracle Functions を実際に試してみる
今回は、非常にシンプルに単なる文字列を返却するFunctionを実装します。Autonomous DatabaseやOCI Vault等のすてきな連携機能もMicronautにあるのですが、それはまた別記事で取り上げようと思います。
アプリケーションのひな形を作成する
今回は、https://micronaut.io/launch/を使いますが、手元にMicronaut CLIがある方はそっちを使ってもいいです。
curl --location \
    --request GET \
    'https://launch.micronaut.io/create/default/com.example.hello-world?lang=JAVA&build=GRADLE&test=JUNIT&javaVersion=JDK_17&features=oracle-function' \
    --output hello-world.zip
解凍します。
unzip hello-world.zip
以下のファイル群が含まれています。(※説明のため、いくつかコメントを追記しています)
tree
.
├── README.md
├── build.gradle
├── func.yml # Oracle Functionsの設定ファイル
├── gradle
│   └── wrapper
│       ├── gradle-wrapper.jar
│       └── gradle-wrapper.properties
├── gradle.properties
├── gradlew
├── gradlew.bat
├── micronaut-cli.yml
├── settings.gradle
└── src
    ├── main
    │   ├── java
    │   │   └── com
    │   │       └── example
    │   │           ├── Application.java # アプリケーションの起動クラス
    │   │           └── HelloWorldController.java # HTTP Method/Pathに応じたハンドリング処理が実装されたクラス
    │   └── resources
    │       ├── application.yml # アプリケーションの設定ファイル
    │       └── simplelogger.properties
    └── test
        └── java
            └── com
                └── example
                    ├── HelloWorldControllerTest.java
                    └── HelloWorldTest.java
いくつか生成されたファイルの中身を確認してみます。
build.gradle には、Micronautアプリケーションが使用する依存ライブラリ等が定義してあります。
コンテナイメージ(Native Image含む)を生成するタスクが定義されているので、実際にデプロイする際は自分の使用しているコンテナレジストリに置き換えることを忘れずに!
plugins {

    id("com.github.johnrengelman.shadow") version "7.1.2"
    id("io.micronaut.application") version "3.6.3"

}

version = "0.1"
group = "com.example"

repositories {

    mavenCentral()

}

dependencies {

    implementation("io.micronaut:micronaut-jackson-databind")
    implementation("jakarta.annotation:jakarta.annotation-api")
    runtimeOnly("org.slf4j:slf4j-simple")
    implementation("io.micronaut:micronaut-validation")

    testImplementation("io.micronaut:micronaut-http-client")

}

application {

    mainClass.set("com.example.Application")

}
java {

    sourceCompatibility = JavaVersion.toVersion("17")
    targetCompatibility = JavaVersion.toVersion("17")

}

tasks {

    dockerfileNative {
      args("-XX:MaximumHeapSizePercent=80")
    }
    dockerBuild {
        images = ["[REGION].ocir.io/[TENANCY]/[REPO]/$project.name:$project.version"]
    }

    dockerBuildNative {
        images = ["[REGION].ocir.io/[TENANCY]/[REPO]/$project.name-native:$project.version"]
    }

}
graalvmNative.toolchainDetection = false
graalvmNative {

    binaries.configureEach {
        buildArgs.add("--initialize-at-build-time=com.example")
    }

}
micronaut {

    runtime("oracle_function")
    testRuntime("junit5")
    processing {
        incremental(true)
        annotations("com.example.*")
    }

}
func.ymlには、Oracle Functionsの各種設定が記載されています。
schema_version: 20180708
name: hello-world
version: 0.0.1
timeout: 120
Application.java は、アプリケーションの起動クラスになっています。作った直後は特別な設定は含まれていない。
package com.example;

import io.micronaut.runtime. Micronaut;

public class Application {

    public static void main(String[] args) {
        Micronaut.run(Application.class, args);
    }

}
HelloWorldController.javaには、HTTP Method/Pathに応じたハンドリング処理が実装されています。(一部、コメント追加しています)
package com.example;

import io.micronaut.http.annotation.*;
import io.micronaut.http.annotation.Produces;
import io.micronaut.http.MediaType;
import io.micronaut.core.annotation.Introspected;

@Controller("/helloWorld")
public class HelloWorldController {

    // HTTP GET /helloWorld のリクエストが来た場合の処理
    @Produces(MediaType.TEXT_PLAIN)
    @Get
    public String index() {
        return "Example Response";
    }

    // HTTP POST /helloWorld のリクエストが来た場合の処理
    @Post
    public SampleReturnMessage postMethod(@Body SampleInputMessage inputMessage){
      SampleReturnMessage retMessage = new SampleReturnMessage();
      retMessage.setReturnMessage("Hello " + inputMessage.getName() + ", thank you for sending the message");
      return retMessage;
    }
}

@Introspected
class SampleInputMessage{
    private String name;

    public SampleInputMessage() {
    }

    public SampleInputMessage(String name) {
        this.name = name;
    }

    public String getName() {
        return name;
    }
    public void setName(String name) {
        this.name = name;
    }
}

@Introspected
class SampleReturnMessage{
    private String returnMessage;
    public String getReturnMessage() {
        return returnMessage;
    }
    public void setReturnMessage(String returnMessage) {
        this.returnMessage = returnMessage;
    }
}
Micronautは、単体のJVMで動作する(アプリケーションサーバーへのデプロイが 不要で java -jar コマンドで起動できる)ので、開発中はこんな感じに手元で確認できます。
# ./hello-world
./gradlew run

> Task :run
 __  __ _                                  _
|  \/  (_) ___ _ __ ___  _ __   __ _ _   _| |_
| |\/| | |/ __| '__/ _ \| '_ \ / _` | | | | __|
| |  | | | (__| | | (_) | | | | (_| | |_| | |_
|_|  |_|_|\___|_|  \___/|_| |_|\__,_|\__,_|\__|
  Micronaut (v3.7.3)

[main] INFO io.micronaut.context.env.DefaultEnvironment - Established active environments: [oraclecloud, cloud]
[main] INFO org.eclipse.jetty.util.log - Logging initialized @907ms to org.eclipse.jetty.util.log.Slf4jLog
[main] INFO org.eclipse.jetty.server.Server - jetty-9.4.35.v20201120; built: 2020-11-20T21:17:03.964Z; git: bdc54f03a5e0a7e280fab27f55c3c75ee8da89fb; jvm 17.0.5+9-LTS-jvmci-22.3-b07
[main] INFO org.eclipse.jetty.server.AbstractConnector - Started ServerConnector@2254127a{HTTP/1.1, (http/1.1)}{0.0.0.0:8080}
[main] INFO org.eclipse.jetty.server.Server - Started @968ms
[main] INFO io.micronaut.runtime.Micronaut - Startup completed in 572ms. Server Running: http://localhost:8080
<=========----> 75% EXECUTING [14s]
> :run
実際にリクエストを送ってみると、
### GET /helloWorld
curl http://localhost:8080/helloWorld
Example Response

### POST /helloWorld
curl -X POST http://localhost:8080/helloWorld \
  --header 'content-type: application/json' \
  --data '{"name": "shukawam"}'
{"returnMessage":"Hello shukawam, thank you for sending the message"}
Oracle Functionsにデプロイする
作成したアプリケーションをOracle Functionsにデプロイし、API Gatewayで公開するために設定をいくつか追加します。
まず、 resources/application.yaml にコンテキスト・パスの設定を追加します。
micronaut:
  application:
    name: helloWorld
  server: # 追加
    context-path: /sandbox # 追加(API Gatewayのデプロイメントのパス接頭辞に設定するパスを指定)
この状態で手元で動かすとパスは以下のように変更されます。
### GET /helloWorld
curl http://localhost:8080/sandbox/helloWorld
Example Response

### POST /helloWorld
curl -X POST http://localhost:8080/sandbox/helloWorld \
  --header 'content-type: application/json' \
  --data '{"name": "shukawam"}'
{"returnMessage":"Hello shukawam, thank you for sending the message"}
Micronaut on Oracle FunctionsはGradleタスクにFunction生成タスクが含まれているので、これを活用するための設定を build.gradle に追加します。
- [Region]: OCIRのリージョンを指定(e.g.
nrt) - [TENENCY]: OCIRのネームスペースを指定(e.g.
hsucvysox) - [REPO]: レジストリ内でのパスを指定(e.g.
shukawam/fn)
tasks {

    dockerfileNative {
      args("-XX:MaximumHeapSizePercent=80")
    }
    dockerBuild {
        images = ["[REGION].ocir.io/[TENANCY]/[REPO]/$project.name:$project.version"]
    }

    dockerBuildNative {
        images = ["[REGION].ocir.io/[TENANCY]/[REPO]/$project.name-native:$project.version"]
    }

}
また、ビルド時に使用しているDockerfileを参照してみると、jre11-latestのタグが付いたベースイメージが使われているので、ひな形の生成時にjavaVersion=JDK_17を指定した方は、source/target Compatibilityを修正しておくといいでしょう。
java {
    sourceCompatibility = JavaVersion.toVersion("11") // 17 -> 11へ変更
    targetCompatibility = JavaVersion.toVersion("11") // 17 -> 11へ変更
}
作成したコンテナイメージを格納するためのレジストリを作成します(コンソールからGUI操作で作成してもOKです)
oci artifacts container repository create \
  --display-name shukawam/fn/hello-world \
  --compartment-id <your-compartment-id>
コンテナイメージを生成します。
# ./hello-world
./gradlew dockerBuild
作成されたコンテナイメージをプッシュします。
docker push <コンテナイメージ>
作成したコンテナイメージを使うOracle Functionsを作成します。
fn create function \
  <app-name> \
  hello-world \
  <コンテナイメージ> \
  --memory 512 \
  --timeout 120
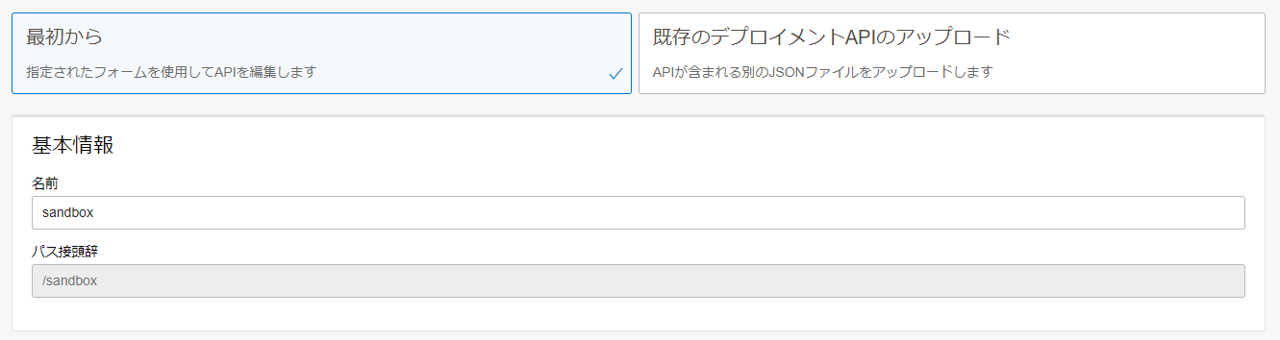
API Gatewayで公開する
作成したOracle FunctionsをいよいよAPI Gatewayで公開するわけですが、デプロイメントの作り方に一工夫必要です。
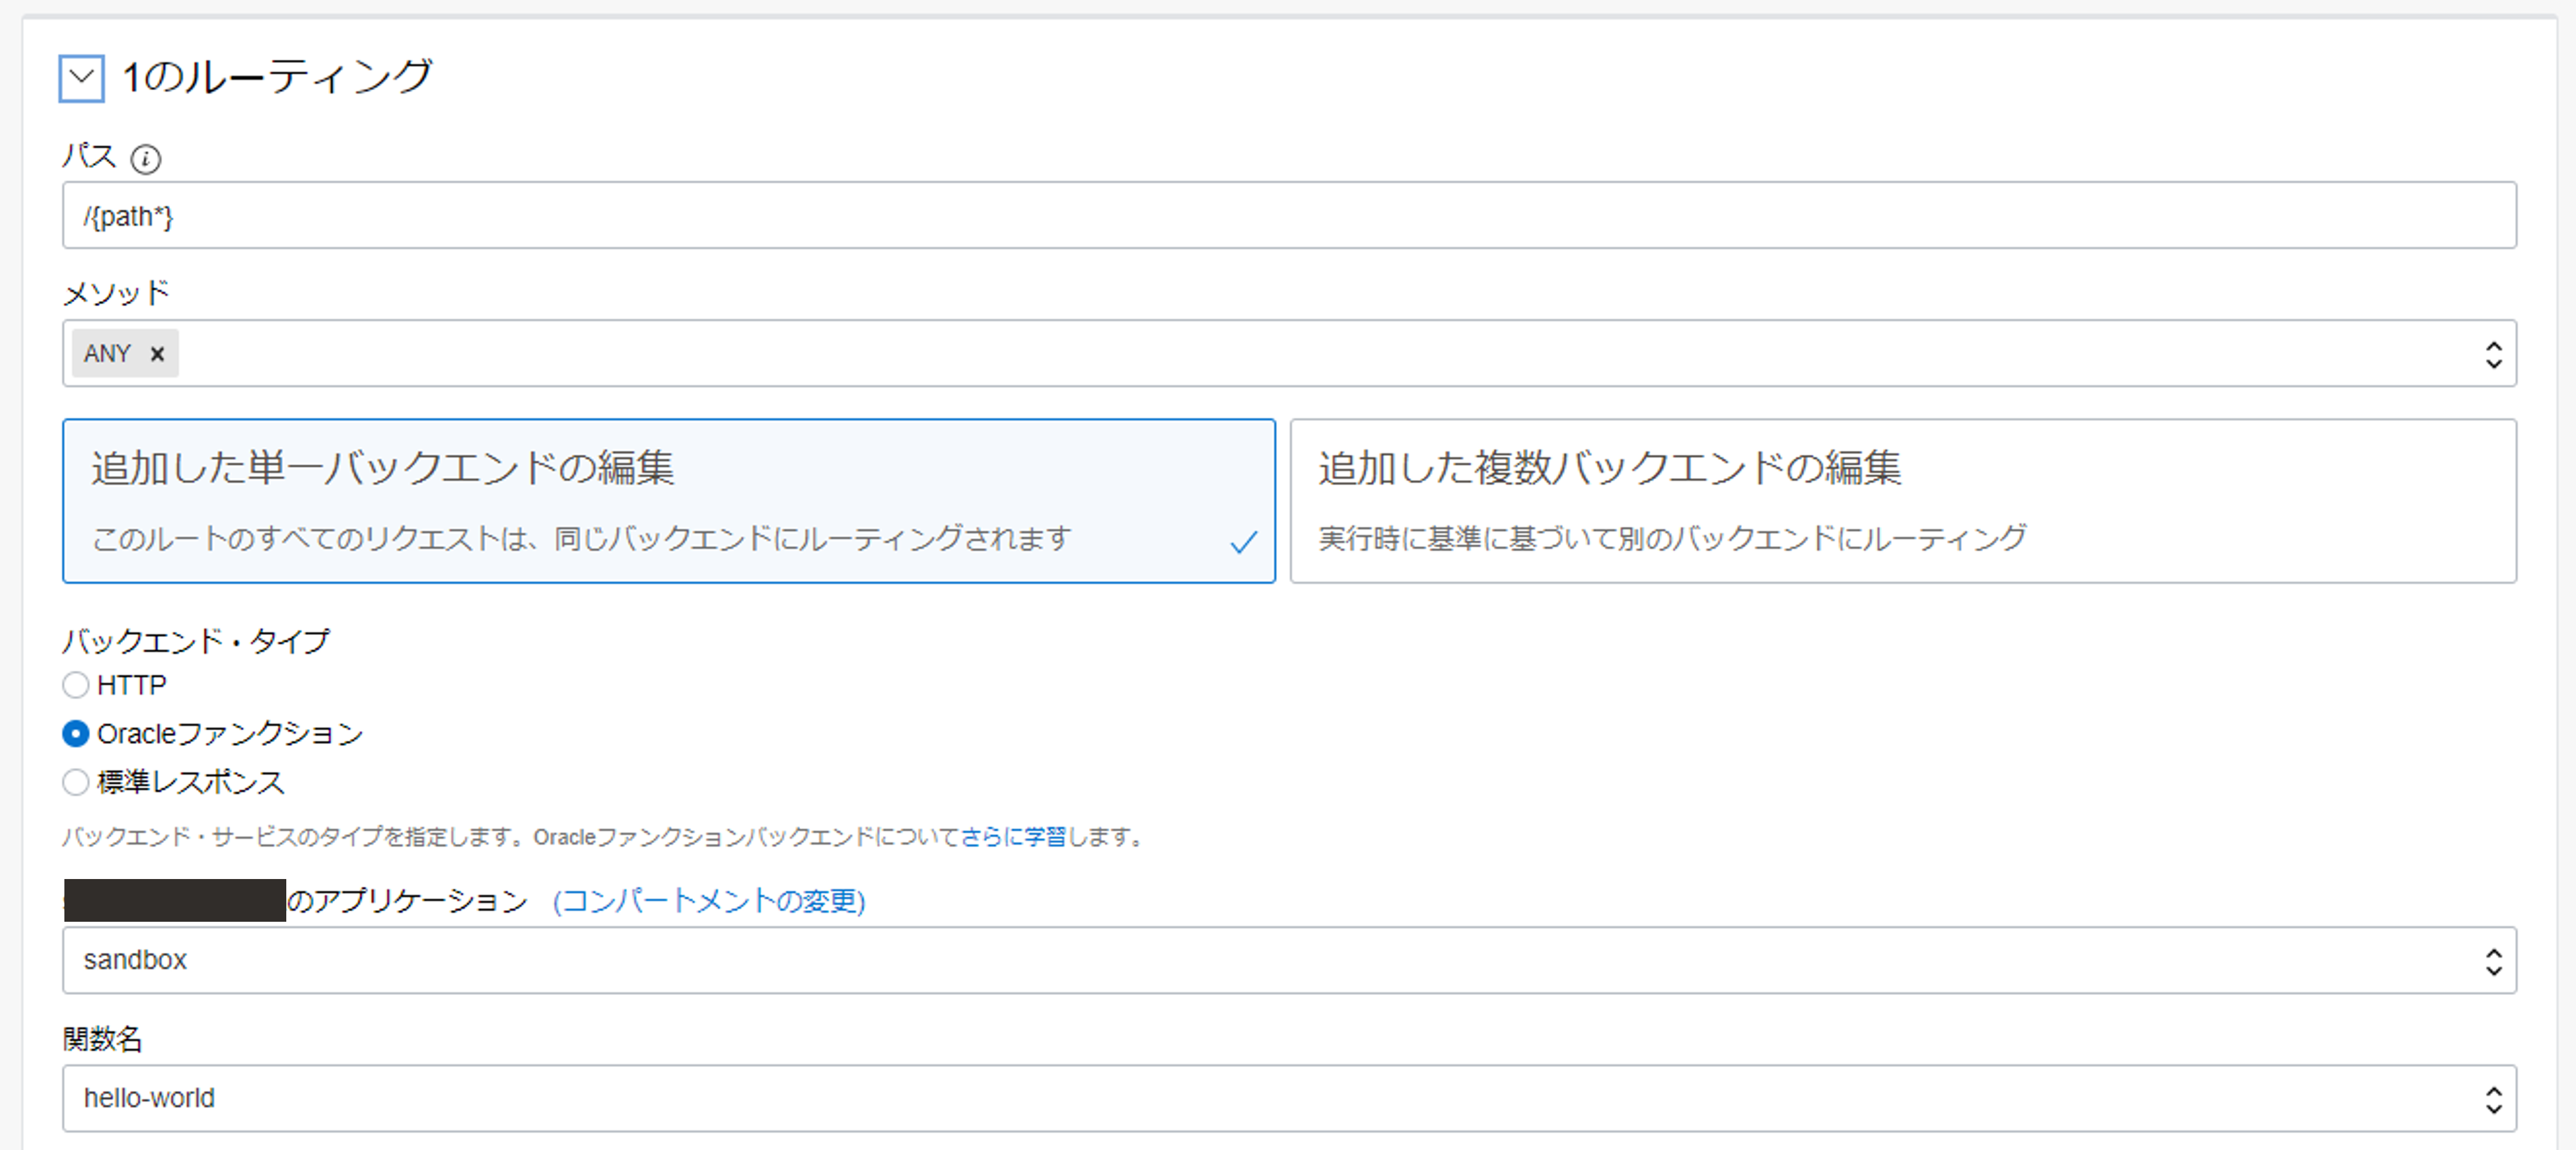
- デプロイメントのパス接頭辞をMicronautのコンテキスト・パスに一致させる
- HTTP Method/Pathによるハンドリングは、Micronaut側で実施するので、全てのパスと受け入れる可能性のある全てのメソッド(
ANYが楽だと思います)を指定する
ということで、これらを満たした作成例が以下になります。
確認
最後に作成したAPI Gatewayにリクエストを送ってみます。
### GET /helloWorld

curl https://glzyl...apigateway.ap-tokyo-1.oci.customer-oci.com/sandbox/helloWorld
Example Response

### POST /helloWorld

curl -X POST https://glzyl...apigateway.ap-tokyo-1.oci.customer-oci.com/sandbox/helloWorld \
  --header 'content-type: application/json' \
  --data '{"name": "shukawam"}'
{"returnMessage":"Hello shukawam, thank you for sending the message"}
OK!!
おわりに
今回は取り組みませんでしたが、GraalVMを用いたNative ImageをFunctionsにデプロイすることでさらに初回起動時の遅延が抑えられそうです。この辺りも別記事にて取り上げようと思っています。