はじめに
Webアプリを作りたくなりました.
せっかくなら初挑戦のGo言語でがんばります!!
今回は掲示板もどきを目標にしましょう.
具体的な説明は少なめです.すいません( 一一)
開発環境
ubuntu 16.04
docker version : 19.03.1
docker関連
はじめに,開発環境の構築を行います.
GoとWEBフレームワークであるBeegoとMySQLを導入していきます.
初期フォルダ構成は↓
chat/
  |- docker-compose.yml
  |- Go/
     |- Dockerfile
  |- MySQL/
     |- Dockerfile
docker-composeの設定ファイルは↓
version: '2'
services:
  db:
    build:
      context: ./MySQL
    environment:
      MYSQL_ROOT_PASSWORD: root
      MYSQL_DATABASE: test_db
      MYSQL_USER: test
      MYSQL_PASSWORD: password
    container_name: go_db
    ports:
      - "3306:3306"
    tty: true
    volumes:
      - ./MySQL/mysql_init:/docker-entrypoint-initdb.d
      - ./MySQL/mysql_data:/var/lib/mysql
    command: mysqld --character-set-server=utf8 --collation-server=utf8_unicode_ci --skip-character-set-client-handshake
  app:
    build:
      context: ./Go
    volumes:
      - "./Go:/go/src/app"
    container_name: go_app
    ports:
      - "8080:8080"
    tty: true
    depends_on:
      - db
私の環境では,version:"2"ですが,"3"の場合は変更すれば動くのかな?
FROM golang:1.12.6

ENV GOPATH $GOPATH:/go
ENV PATH $PATH:$GOPATH/bin
WORKDIR /go/src/app

RUN apt-get update
RUN go get "github.com/go-sql-driver/mysql"
RUN go get "github.com/beego/bee"
RUN go get "github.com/astaxie/beego"
FROM mysql:5.7
これで,初期ファイルは整いましたので,実際に環境を立ち上げていきます.
docker-compose up -d --build
docker psで確認してみましょう.
無事2つのコンテナ(go_app・go_db)が立ち上がったでしょうか?
アプリケーション作成
ファイル自動生成
まずは,go_appコンテナに移動し,ファイルを自動作成していきましょう.
docker exec -it go_app bash
/go/src/app#
Beegoは,scaffoldで一気にテンプレートファイルを作成することができます.
(ginにもあるのですが,つまづいて諦めました.)
これにより,ruby on railsのようなコード生成が可能で,便利です!
bee generate scaffold comment -fields="content:string" -driver=mysql -conn="test:password@tcp(db:3306)/test_db"
出てくる質問に,すべてyで答えます.
最終的に,Scaffold successfully generated!と出力されれば完了です.
ローカルでもフォルダの更新ができるように,chmod 777 -R .すると楽です.
ちなみに,bee helpやbee help generateでコマンドの確認ができます.
周辺ファイル作成
次に,周辺のファイルを作っていきます.
適宜フォルダも作成します.
( bee api sample -driver=mysql -conn=test:password@tcp"(db:3306)"/test_db)である程度サンプル作れます.)
appname = app
httpport = 8080
runmode = dev
autorender = true
copyrequestbody = true
EnableDocs = true
driver = mysql
sqlconn = test:password@tcp(db:3306)/test_db
package main

import (
    _ "app/routers"
    "time"
    "fmt"
    "github.com/astaxie/beego/orm"
    "github.com/astaxie/beego"
    _ "github.com/go-sql-driver/mysql"
)

func main() {
    if beego.BConfig.RunMode == "dev" {
        beego.BConfig.WebConfig.DirectoryIndex = true
        beego.BConfig.WebConfig.StaticDir["/swagger"] = "swagger"
    }
    beego.Run()
}

func init() {
    orm.RegisterDriver(beego.AppConfig.String("driver"), orm.DRMySQL)
    orm.RegisterDataBase("default", beego.AppConfig.String("driver"), beego.AppConfig.String("sqlconn")+"?charset=utf8")
    err := orm.RunSyncdb("default", false, false)
    if err != nil {
        fmt.Println(err)
    }
    // あとで使います
    beego.AddFuncMap("dateformatJst", func(in time.Time) string {
        in = in.Add(time.Duration(9) * time.Hour)
        return in.Format("2006-01-02 15:04:05")
    })
}
package routers

import (
    "app/controllers"

    "github.com/astaxie/beego"
)

func init() {
    // beego.Router("/", &controllers.MainController{}) // あとで使います
    ns := beego.NewNamespace("/test_db",
        beego.NSNamespace("/comment",
            beego.NSInclude(
                &controllers.CommentController{},
            ),
        ),
    )
    beego.AddNamespace(ns)
}
package models

import (
    "errors"
    "fmt"
    "reflect"
    "strings"
    "time"

    "github.com/astaxie/beego/orm"
)

type Comment struct {
    Id      int64  `orm:"auto"`
    Content string `orm:"size(128)"`
    Created time.Time `orm:"auto_now_add;type(datetime)"`   // 追加
    Updated time.Time `orm:"auto_now;type(datetime)"`       // 追加
}

// func init() { ・・・

// あとで使うので,末尾に追加
func GetAllComments() ([]Comment, error) {
    o := orm.NewOrm()
        var l []Comment
        _, err := o.QueryTable(new(Comment)).All(&l)
        return l, err
}
自動生成されるGetAllComment()をそのまま使いたかったのですが,引数がよく分からず諦めました...
コメント頂きたい!
サーバー起動
では,この状態でサーバーを起動してみます.
bee run -downdoc=true -gendoc=true
後半のオプションを付けることにより,swaggerがダウンロードされ,設定ファイルが更新されます(?).
ブラウザで,http://localhost:8080/swagger/にアクセスしてみます.

Go
|-- Dockerfile
|-- app
|-- conf
|   `-- app.conf
|-- controllers
|   `-- comment.go
|-- database
|   `-- migrations
|       `-- 20190810_063851_comment.go
|-- lastupdate.tmp
|-- main.go
|-- models
|   `-- comment.go
|-- routers
|   |-- commentsRouter_controllers.go
|   `-- router.go
|-- static                            //今回は利用しないが,この階層に設置しておくと便利
|   |-- css
|   |-- img
|   `-- js
|-- swagger
`-- views
    `-- comment
        |-- create.tpl
        |-- edit.tpl
        |-- index.tpl
        `-- show.tpl
一度目だと,テーブルが作成されないみたいなので,いったんctrl Cしてサーバーを再起動します.(オプションはなくてもOK,たぶん)
では,初期データを投入してみましょう.
swaggerのcomment内のPOSTを選択し,try it outからexecuteです.
localhost:8080/test_db/commentにアクセスして,データが保存されたことを確認してみましょう.
Chat Appの作成
最後に,アプリのメインファイルを書いていきます.
package controllers

import (
    "app/models"
    "encoding/json"
    "errors"
    "strconv"
    "strings"

    "github.com/astaxie/beego"
)

//  CommentController operations for Comment
type CommentController struct {
    beego.Controller
}

// URLMapping ...
func (c *CommentController) URLMapping() {
    c.Mapping("Post", c.Post)
    c.Mapping("GetOne", c.GetOne)
    c.Mapping("GetAll", c.GetAll)
    c.Mapping("Put", c.Put)
    c.Mapping("Delete", c.Delete)
}

// Post ...
// @Title Post
// @Description create Comment
// @Param   body        body    models.Comment  true        "body for Comment content"
// @Success 201 {int} models.Comment
// @Failure 403 body is empty
// @router / [post]
func (c *CommentController) Post() {
    var v models.Comment
    if c.GetString("content")==""{
        json.Unmarshal(c.Ctx.Input.RequestBody, &v)
    }else{
        v = models.Comment{
            Content: c.GetString("content"),
        }
    }
    if _, err := models.AddComment(&v); err == nil {
        c.Ctx.Output.SetStatus(201)
        c.Data["json"] = v
        if c.GetString("content")!=""{
            c.Redirect("/", 302)
        }
    } else {
        c.Data["json"] = err.Error()
    }
    c.ServeJSON()
}

// GetOne ...
// ・・・
追加の部分ですが,Swaggerからのリクエストってjsonらしく,また,formからのsubmitはまた別みたいです.
ajaxを使ってformからjsonを送れるらしいです.(今回はパスします)
というわけで,APIかformかで条件分岐を立てています.(これだと,フォームに何も入力しないで送信するとバグります.)
package routers

import (
    "app/controllers"

    "github.com/astaxie/beego"
)

func init() {
    beego.Router("/", &controllers.MainController{})           // 追加
    ns := beego.NewNamespace("/test_db",
        beego.NSNamespace("/comment",
            beego.NSInclude(
                &controllers.CommentController{},
            ),
        ),
    )
    beego.AddNamespace(ns)
}
package controllers

import (
    "github.com/astaxie/beego"
    "app/models"
)

type MainController struct {
    beego.Controller
}

func (c *MainController) Get() {
    c.Data["Website"] = "Chat App"
    c.Data["Email"] = "chat-app@gmail.com"
    data, _ := models.GetAllComments()
    c.Data["Comment"] = data
    c.TplName = "comment/index.tpl"
}
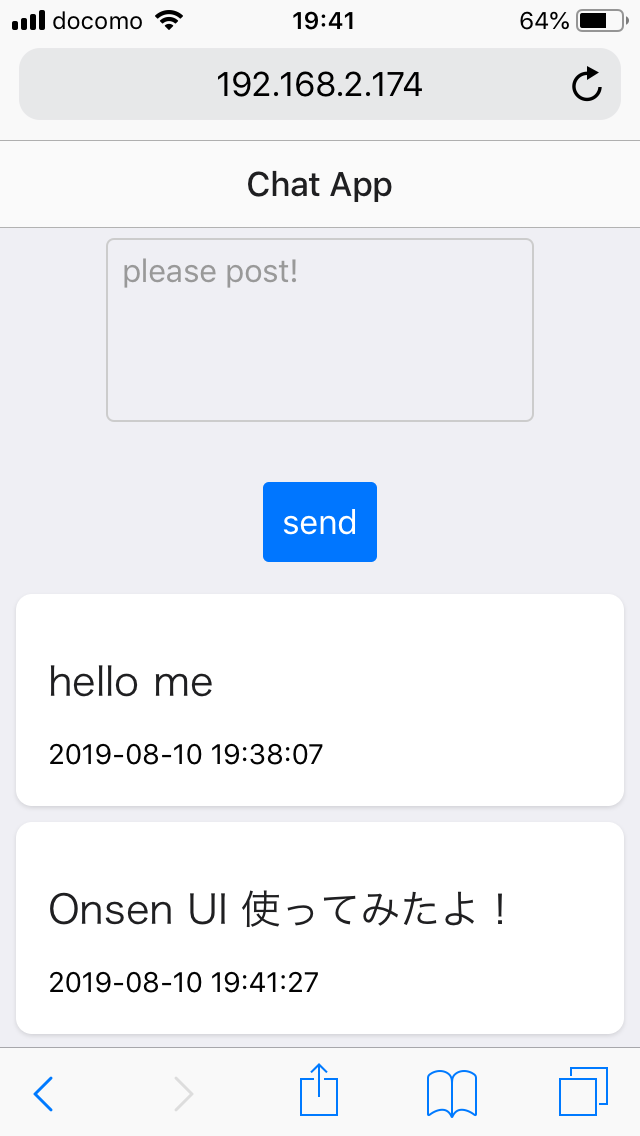
いつもBootstrapを使っているのですが,華麗なネイティブアプリを目指したく,Onsen UIを使ってみました.
が,全然使いこなせてませんね(笑)
<!DOCTYPE html>
<html lang="ja">
<head>
  <meta charset="utf-8">
  <meta name="viewport" content="width=device-width, initial-scale=1, shrink-to-fit=no">
  <title>chat app</title>

  <link rel="stylesheet" href="https://unpkg.com/onsenui/css/onsenui.css">
  <link rel="stylesheet" href="https://unpkg.com/onsenui/css/onsen-css-components.min.css">
  <script src="https://unpkg.com/onsenui/js/onsenui.min.js"></script>

</head>

<body>
  <ons-page>
    <ons-toolbar>
      <div class="center">
        {{.Website}}
      </div>
    </ons-toolbar>
    <form id="comment" action="/test_db/comment/" method="post">
      <div style="text-align: center; margin-top: 30px;">
        <textarea class="textarea" name="content" type="text" rows="4" placeholder="please post!"></textarea>
        <p style="margin-top: 30px;">
          <button type="submit" class="button">send</button>
        </p>
      </div>
    </form>
    {{range .Comment}}
    <div>
      <div class="card">
        <h3 class="card__title">{{.Content}}</h3>
        <div class="card__content">{{.Created|dateformatJst}}</div>
      </div>
    </div>
    {{end}}
  </ons-page>
</body>
</html>
完成!!
Go langやBeegoを理解するのにやっとで,10日くらいかかりました...
こんなでも,かなり嬉しいですね(^^♪
他に実装したいことは,ユーザーとのリレーション,編集・削除ですかね.
まあ,なんとか難所は乗り越えられたかなと思うので,今後も頑張っていきます!
参照サイト
Go製フレームワーク(BEEGO)の使い方
Beego入門(モデル定義・データベース接続・マイグレーション)
go言語での開発始めてみる〜beego で掲示板っぽいもの作ってみる編〜
ありがとうございました(_ _)